Air Campaigns
Want to start or join a group build? This is where to start.
FW 190 Campaign. It will really be cool!
AirLedge
_VISITCOMMUNITY
Cork, Ireland
Joined: July 26, 2007
KitMaker: 292 posts
AeroScale: 265 posts
Posted: Wednesday, March 04, 2009 - 10:41 PM UTC

Quoted Text

No progress from me this time, except reporting my frustration with Academy D9's clear parts. Unbelievable... Just great-looking parts, marred by idiotic placement of sprue connector on the windscreen and even more moronic prominent headrest mounts on the sides of the sliding canopy portions. On the freakin' clear side, man!

And the moronism doesn't end there. The honor of the rest belongs to me.
I ruined one windscreen when removing it from the sprue (well, not ruined, more like marred, but I couldn't have lived with that sprue connector scar). The other I got reasonably well removed. After sanding, polishing and two dippings in Future there's only a small mark left.
Removing the headrest mounts from the sliding part was very tedious and required utmost care to ensure I wouldn't cause unnecessary polishing work for myself. Anyway, I go the mounts removed quite well. But two Future dippings, it wasn't as good as I wanted, so I decided to strip the Future and polish it some more.
So, I went and grabbed some window cleaner and placed the part in a bath of it for a while. Big mistake. Cleaners containing denatured ethanol and clear parts do mix, with bad consequences for the parts. The canopy went whitish and developed some cracking.

I was briefly thinking about buying another Academy Dora to get another flat canopy, but I'd rather not spend another minute sanding off those horrible headrest mounts. Then it struck me: time to get some more aftermarket parts, and using the majority of them for another kit than it's designed for!

So I looked around a bit and CMK's cockpit set meant for Revell's 190 looked it might be just what's needed. The flat canopy goes to the Revell kits and the rest to the office of the Academy Dora.
Since the Academy canopy fits Revell's A8 like a glove, I suppose the bulged canopy in the CMK set will fit the Academy kit. The rest of the parts will do wonders for the cockpit of the Dora. If the cockpit tub will fit, that's just pleasant extra.


Hi Eetu,

I feel your pain. I'm also doing the Academy kit for this campaign and the Revell kit for the Nightfighter campaign. The canopy is definitely an issue, but I found this and I'm going to give it a go: Smash moulding a canopy

Good luck,

Mike.
Emeritus
_VISITCOMMUNITY
Uusimaa, Finland
Joined: March 30, 2004
KitMaker: 2,845 posts
AeroScale: 1,564 posts
Posted: Thursday, March 05, 2009 - 06:32 AM UTC
Interesting, the clear plastic sheet being pulled directly over the original canopy part. The great majority of articles I've seen about vacuum and crash moulding involve making a mould from the original, then casting a moulding pattern.
Good luck on your attempt. Don't forget to report back here on how it went.

I think I'll have to go for something commercial. First of all, I don't anymore have a flat type canopy to do crash moulding on (ruined in the bath of wrong type window cleaner). And secondly, the resulting copy would be a little bit larger than the pattern; I already have one such, the aeroclub vac-form.

Speaking of aftermarket purchases, I'll have to remember to order some decals for the Academy Dora. There's no way I'm using their older-style decals again, unless absolutely necessary. Good decals keep modelers merrier I think.
almonkey
_VISITCOMMUNITY
England - East Midlands, United Kingdom
Joined: March 23, 2003
KitMaker: 2,124 posts
AeroScale: 788 posts
Posted: Thursday, March 05, 2009 - 07:38 AM UTC
Hi Eetu,

I feel your pain. I'm also doing the Academy kit for this campaign and the Revell kit for the Nightfighter campaign. The canopy is definitely an issue, but I found this and I'm going to give it a go: Smash moulding a canopy

Good luck,

Mike.[/quote]

mike, i just tried this method, ended up with a bunch of useless shapeless blobs of plastic, a house full of burnt plastic smell, and the icing on the cake, i cracked the canopy i was trying to copy
i wish i'd made a mould of it first.
:[]--
with it being an out of production 1970's kit with no aftermarket whatsoever, does any know if theres a custom vacform service for this sort of stuff?
(it was an airfix magister kit, that i got from ebay, came with a cracked canopy so i bought another kit to try something like this)
CaptainA
_VISITCOMMUNITY
Indiana, United States
Joined: May 14, 2007
KitMaker: 3,117 posts
AeroScale: 2,270 posts
Posted: Thursday, March 05, 2009 - 01:55 PM UTC
Welcome Phil.

Do you all think one of the extra canopy from my Eduard kit will fit?
almonkey
_VISITCOMMUNITY
England - East Midlands, United Kingdom
Joined: March 23, 2003
KitMaker: 2,124 posts
AeroScale: 788 posts
Posted: Friday, March 06, 2009 - 04:53 AM UTC
probably not carl, i did an experiment with a different kit, an airfix fouga magister

top one is the "good" one i cracked trying to make a replacement for the bottom one, which as it was already damaged when i got the kit, has had quite a bit of experimenting carried out on it!
back to buisiness, i recently got some pro modeller wash at a show, and as i've done quite a bit of re-scribing decided to use it on this one. in my keenness to have a try i forgot i should really have put the decals on first! luckily as most of the decals are black anyway i got away with this little "ooopsie"

the wash going on, although you can blast it totally over your kit, it seemed to me to be easier just to paint it onto the lines only after i tried it, as you can see from the pic above


my favourite bit- the spiral!
Yeti123
_VISITCOMMUNITY
Michigan, United States
Joined: February 11, 2008
KitMaker: 311 posts
AeroScale: 278 posts
Posted: Saturday, March 07, 2009 - 08:57 PM UTC
Phil:
Making great progress on the 190. I love promodeler wash stuff and it looks like it worked well for you. Can't wait to see it finished

Taylor
TedMamere
_VISITCOMMUNITY
Moselle, France
Joined: May 15, 2005
KitMaker: 5,653 posts
AeroScale: 4,347 posts
Posted: Saturday, March 07, 2009 - 11:15 PM UTC
Hi Phil!

Very nice Dora!

It's good to see you here. It's been a long time we didn't dogfight...

Jean-Luc
cinzano
_VISITCOMMUNITY
Indiana, United States
Joined: January 13, 2009
KitMaker: 419 posts
AeroScale: 378 posts
Posted: Sunday, March 08, 2009 - 10:50 AM UTC
Finally got around to taking some advise and making some mods to the aerial of my A8. Hopefully its regained a little "scale effect". She's a finished and I can say I'm quite pleased with the final result.

Now then,

Anyone want to advise me on converting a Pro-Modeler Bf 110 G-2 into a night fighter?


Cheers,
Fred
AirLedge
_VISITCOMMUNITY
Cork, Ireland
Joined: July 26, 2007
KitMaker: 292 posts
AeroScale: 265 posts
Posted: Sunday, March 08, 2009 - 10:31 PM UTC
Hi all,

Great Dora Phil. Sorry to hear about your canopy catastrophe. I also tried the crash moulding of my Dora canopy, as described in the above link, and it didn't work until I tried a different approach which I've found much better and easier, maybe it could work with your cracked canopy. Here's what I did.

I made a mould with the canopy by packing it with blu-tac and sticking it on a chopstick and then putting it into a cd box as a base:


After that I tacked a rectangular sheet of plastic to two more chopsticks. Here comes the fun part. I slowly heated the plastic by holding it about 6 inches over a gas ring on a low heat. It only takes a few seconds to start sagging and then I pulled it over the canopy. It took me 3 ttempts to get a really nice shape, but it does work.


And now for my Dora. Finished the pre-shading and sprayed Gunze RLM 76 on the fuselage first. Sprayed the wheel wells Pactra RLM 02, gave them a dry brush and a dark wash. Then masked it and sprayred Pactra white in rough stripes so as not to hide the shading. Then masked it with Tamiya tape and lightly dusted on Pactra RLM 23 red to build up a nice even coat and avoid paint running underneath the tape. Finally unmasked and it's done ....


Next week, top surfaces,

All the best,

Mike
LongKnife
_VISITCOMMUNITY
Jönköping, Sweden
Joined: April 25, 2006
KitMaker: 831 posts
AeroScale: 688 posts
Posted: Wednesday, March 11, 2009 - 12:46 AM UTC
Wow. Lots of nice stuff happening here, but very little on my side. I have to comment Taylors and Fredericks pits. Beautiful, both of them. Mikes redbelly looks really realistic too. Nice shade you got there Mike.

I hope to put pics of the twins here tomorrow night, since we started to get some decals on yesterday (but i forgot my camera, again). The balkenkreutze from Tamiya were beasts to get down though. Took a bit of microsol and patience to get it working.

Tony
jaypee
_VISITCOMMUNITY
Scotland, United Kingdom
Joined: February 07, 2008
KitMaker: 1,699 posts
AeroScale: 1,384 posts
Posted: Wednesday, March 11, 2009 - 01:39 AM UTC
Cracking Mike, nice work with the crash moulding and esp with the markings.
love the improvisation with cd case and chop sticks
atoplu
_VISITCOMMUNITY
Ontario, Canada
Joined: August 17, 2003
KitMaker: 753 posts
AeroScale: 174 posts
Posted: Thursday, March 12, 2009 - 07:57 AM UTC
Some progress pictures.


almonkey
_VISITCOMMUNITY
England - East Midlands, United Kingdom
Joined: March 23, 2003
KitMaker: 2,124 posts
AeroScale: 788 posts
Posted: Thursday, March 12, 2009 - 08:09 AM UTC

Quoted Text

Hi Phil!

Very nice Dora!

It's good to see you here. It's been a long time we didn't dogfight...

Jean-Luc


that sounds like a challenge!
its fair to say that for the last 12 months my airmodelling has been somewhat thin on the ground. but its good to be back, and this dora is turning out to be really nice.

taylor- its my first use of the pro modeller wash, but it is pretty amazing stuff and i can't now imagine not using it, plus the panel lines on this kit were raised, so i re-scribed them and it makes the whole thing that much better.

mike- i did exactly what you did with the blu tac and chop stick, it seems i packed the blu tac in a little too much and when i put in a peice of wire to hold it it was too much- and...POP!

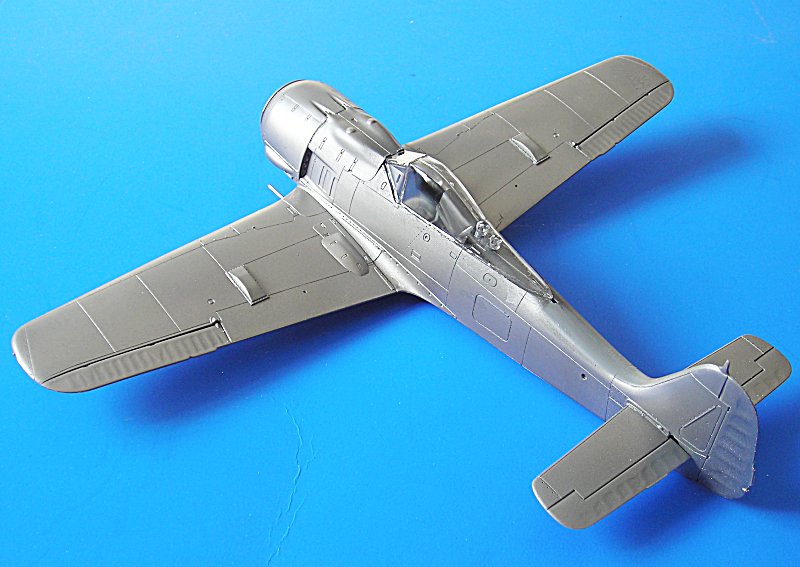
heres where i am with this build at the moment, more or less finished, just needs a matt coat to go on, an antennae wire to be fitted and i have some fine diameter brass tube to make the gun barrels with.
thegirl
_VISITCOMMUNITY
Alberta, Canada
Joined: January 19, 2008
KitMaker: 6,743 posts
AeroScale: 6,151 posts
Posted: Thursday, March 12, 2009 - 05:58 PM UTC
i must say everone is doing a fantastic job on their builds , but i will have to drop out , having problems with customs and immagration at the month and i'm to stressed to worry about doing any kind of building . bye for now
LongKnife
_VISITCOMMUNITY
Jönköping, Sweden
Joined: April 25, 2006
KitMaker: 831 posts
AeroScale: 688 posts
Posted: Thursday, March 12, 2009 - 08:38 PM UTC
Ayhan, that's really nice mottling. Do you just squiggle around more or less aimlessly, or is it result of careful aiming?

Terri, I hope you get through without too much trouble. We're sending three guys over next week to race motorcycles, and it's just as hard as to get into China. A brave new world...

Anyway, the twins got a bit further yesterday. Mottles and camo finished, decals on and a flat coat for the panel wash.


My Faber-mount got a light wash and some soft exhaust stains, but we both have had problems with paint chipping off. The RAF-wurger is now taking a rest, due to severe loss of paint on the fin and rudder, with accompanying drop in mood . I've decided to call further weathering off. It seems like we have chosen a bad (old?) can of primer, and maybe was too soft on the flat coats.


One more evening and I should be through though. I just hope Tomas gets his mood back up or else he's lost to the dark side (armor) forever

Tony
Yeti123
_VISITCOMMUNITY
Michigan, United States
Joined: February 11, 2008
KitMaker: 311 posts
AeroScale: 278 posts
Posted: Friday, March 13, 2009 - 02:20 PM UTC
Ayhan:
I have to say you do some of the finest mottling on your Luftwaffe subjects I have seen
Tony:
Great looking 190s. I love the way the white chevron bird is looking. Sorry to hear about the paint
Terri
Good luck with the customs thing. Maybe once that is behind you the rest of the move will be uneventful

Taylor
CMOT70
_VISITCOMMUNITY
Victoria, Australia
Joined: August 23, 2007
KitMaker: 629 posts
AeroScale: 539 posts
Posted: Friday, March 13, 2009 - 05:55 PM UTC
The builds for this campaign are looking outstanding!

I couldn't help myself and began work on Eduards A5 kit during breaks whilst waiting for the filler to dry on the Roden He111...which was very often actually.

I'll have some pics soon, most of the construction is done and it will be in Rolf Strohal markings...black and white striped cowl.

Andrew
Yeti123
_VISITCOMMUNITY
Michigan, United States
Joined: February 11, 2008
KitMaker: 311 posts
AeroScale: 278 posts
Posted: Sunday, March 15, 2009 - 01:40 PM UTC
Did get some bench time this weekend. Getting closer to actually painting. The MDC MG cowel did not fit at all and was not cast as well as the rest of the parts so I had to use the kit part. I used Mal Mayfield's technique for painting the radiator. It really gives a great result.


Taylor
AirLedge
_VISITCOMMUNITY
Cork, Ireland
Joined: July 26, 2007
KitMaker: 292 posts
AeroScale: 265 posts
Posted: Sunday, March 15, 2009 - 11:10 PM UTC
Hi,

Ayhan, Phil, Tony, Taylor: fantastic stuff, looking forward to seeing more.

Little progress for me this weekend, but did manage to do the little bits and pieces like canopy, etc. The crash moulded canopy has turned out really well, the masking wasn't easy but it was worth the effort. Next weekend I hope to have the top surfaces done.

Mike.


The crash moulded canopy next to the original kit part (which is really unusable due to the thick locating tabs)

Canopy and spinner masked for painting. Although most of the spiral on the spinner will be painted over in the yellow and black of JV44, as in some photos part of the spiral is still visible.


atoplu
_VISITCOMMUNITY
Ontario, Canada
Joined: August 17, 2003
KitMaker: 753 posts
AeroScale: 174 posts
Posted: Monday, March 16, 2009 - 08:56 AM UTC
Thanks all.

Decal phase done.


alpha_tango
_VISITCOMMUNITY
Germany
Joined: September 07, 2005
KitMaker: 5,609 posts
AeroScale: 5,231 posts
Posted: Monday, March 16, 2009 - 09:14 AM UTC
Very Nice, Ayhan!!!

I prefer glueing the tailplanes before painting, because I work so dirty, that I have to clean up gluing marks and so on ... I admire people who can actually work without such extra work!

Looking forward to the finished model!

One question though: the RV band is very broad, do you have a real aicraft as an example or is this just a fun model?

all the best

Steffen
alpha_tango
_VISITCOMMUNITY
Germany
Joined: September 07, 2005
KitMaker: 5,609 posts
AeroScale: 5,231 posts
Posted: Tuesday, March 17, 2009 - 05:04 AM UTC
Hi All

Here is a short update on my builds:

Eduard Fw 190 A-8: loooong ago started (there is a thread somewhere here). OOB, just reglued the instrument panel cover to get the front canopy to fit. It will get EagleCal decals for "Kornjark" (Konrad Bauer) .. of course this cannot be my entry because of the long term nature of the project.


Eduard Fw 190 A-5 Weekend edition with Eduard Zoom and Quickboost gun covers ... not sure I can finish it in time ... but I try. This will get oob decals for Emil Bully Lang.


Hasegawa Fw 190 A-4 "Graf" .. includes supercharger intakes .. which are wrong (as posted earlier) ... tried to rework them. I also used an Eduard Zoom here .. sadly this did not fit very well .. the wind shield does not sit right yet. This machine will get decals for Egon Mayer, which are in the box, but these will be partly replaced by decals from either Eduards A-5 or an AM sheet as some of them are misprinted


FinallyTamiya Fw 190 F-8 (new F-8/F-9 boxing). OOB with eduard seat belts. Will get HAD decals for Egon Thiem, SG 10.


quite a schedule for my slow working speed ....

all the best

Steffen
thegirl
_VISITCOMMUNITY
Alberta, Canada
Joined: January 19, 2008
KitMaker: 6,743 posts
AeroScale: 6,151 posts
Posted: Thursday, March 19, 2009 - 08:04 AM UTC
Awesome work is being done by all !! even though i can't doing any building it's a real joy watching the progress of others .

Tony , you do have talent after all !!!!
CMOT70
_VISITCOMMUNITY
Victoria, Australia
Joined: August 23, 2007
KitMaker: 629 posts
AeroScale: 539 posts
Posted: Thursday, March 19, 2009 - 05:55 PM UTC
Here's the state of my Eduard A5. It will sit until tomorrow now in wait for the laquer clear gloss before decals.

The cowl has already had the decals done a week ago and has been waiting for the airframe to catch up. I almost decided to paint the black stripes, but decided to try the decals. Glad i did! They fit perfect and settle into the surface detail like they're painted. Much quicker than masking would have been.

One of the Kagero books caption this aircraft as an A4, but i believe Eduard are correct in this case, study of the pic leads me to believe there is too big a gap between the engine cowl and leading edge of the wing for it to be an A4. And it definately has no outer wing guns fitted which makes it more likely an A5 rather than an A6- plus it has the early pattern wheels that early A5's were fitted with.


Andrew

LongKnife
_VISITCOMMUNITY
Jönköping, Sweden
Joined: April 25, 2006
KitMaker: 831 posts
AeroScale: 688 posts
Posted: Friday, March 20, 2009 - 12:57 AM UTC
Ayhan, if I pass by Turkey I'll put myself in your mottle-school.

Steffen, it's building up to a nice collection, but don't mix them. I once had one Airfix and one Tamiya P 51 on the bench. Parts were not quite interchangeable .

Andrew. Nice cowl. That will be one flamboyant one in the end.

And if somebody would help Terri into the States so she can get busy again, it would be much appreciated, even by me. (Keep the spirits up Terri!)

Tony