 Tony
TonyAir Campaigns
Want to start or join a group build? This is where to start.
Want to start or join a group build? This is where to start.
Hosted by Frederick Boucher, Michael Satin
Stripes in the Skies

LongKnife

Joined: April 25, 2006
KitMaker: 831 posts
AeroScale: 688 posts

Posted: Tuesday, May 05, 2009 - 11:05 PM UTC
Nice "filler". That guy's really got an attitude. I'd love to see him in the quiz. "What does this man say?"
 Tony
Tony
 Tony
Tonythegirl

Joined: January 19, 2008
KitMaker: 6,743 posts
AeroScale: 6,151 posts

Posted: Wednesday, May 06, 2009 - 05:43 AM UTC
Yes Taylor , there is going to be some really cool builds !
Luciano , The Sopwith triplane is a great call for this campaign . I have one in the stash as well . Does this one come with the resin tailplane and engine ? I'm surprised to see you build 1/48 scale . Figured you would have done 1/144 .
Keith , really looking forward to your build on this . Wood grain is looking might fine ! And yes the choice for the stripe on in the marking option will be just fine . So no worries just don't keep us waiting to long on it .
JP , the crew figure fills up the cockpit just fine . will you be trying out some of the aero club items on this build ? The contrail strut stock is great to have on hand . If you try it out on 48 scale it is a little on the flimmies side . You can get it in brass as well . I built one of the 48 scale blue max kits and wish I had the brass strut stock , which I will have to redo it again for it has started to wrap , could be that I also have the wrong tension on some of the rigging lines . Looking forward to your build on this .........................
guitarlute101

Joined: December 18, 2006
KitMaker: 1,121 posts
AeroScale: 1,063 posts

Posted: Wednesday, May 06, 2009 - 08:06 AM UTC
Hi Terri,
Whats the latest date I can jump on and do a build for this campaign?
Mark

Emeritus

Joined: March 30, 2004
KitMaker: 2,845 posts
AeroScale: 1,564 posts

Posted: Wednesday, May 06, 2009 - 08:40 AM UTC
Technically, September 15th, the last day of the campaign, but then you'd have to kind of hurry with your entry in order to qualify for the ribbon though. 
No pics from me yet, but I've made a start on my 1:48 Westland Wyvern: put some sub-assemblies together, filled pin-ejector marks, worked on the cockpit. The usual.

No pics from me yet, but I've made a start on my 1:48 Westland Wyvern: put some sub-assemblies together, filled pin-ejector marks, worked on the cockpit. The usual.
thegirl

Joined: January 19, 2008
KitMaker: 6,743 posts
AeroScale: 6,151 posts

Posted: Wednesday, May 06, 2009 - 06:01 PM UTC
Eetu has covered the closing date So any time up until them Mark . Would be great to have you join up for this one . Any idea on what type of aircraft ?
I should be able to start my this weekend , almost done with the decals on the fw 190 and the oil paint is still tacky on the Fokker D.VII , prefect time to start !
I should be able to start my this weekend , almost done with the decals on the fw 190 and the oil paint is still tacky on the Fokker D.VII , prefect time to start !

LongKnife

Joined: April 25, 2006
KitMaker: 831 posts
AeroScale: 688 posts

Posted: Thursday, May 07, 2009 - 09:06 AM UTC
Awrite! No stripes so far, but some more done to the cockpit of the Mule. By the way Terri, it says "HobbyCraft Made in south Korea", so I'm not sure if I should paint maple leafs in the wings. 
I love cockpits, maybe because they (the real ones) are out of reach, but still. Here is a 1:32'ish seat belt in a 1:48 seat. I won't redo, but take the lesson with me to the next pit.

I'm more pleased with the strap on the cannon cover. However, I don't know if the Israeli 199's flew with cannon, but I take some artistic licence.

Now, here's my first real scratch, ever. It seems like the side walls are mold from HobbyCrafts Bf B/C/D-series, so I made oxygen lines and regulator (?) from wire and excess mold. Maybe not great, but it's a narrow hole to look through .
.

Finally, the dash and gun sight. Small parts, but I borrowed my colleagues reading glasses. I'll get my own tomorrow. Let's throw the pride overboard

Now I only hope I remember to drill all holes needed, before I close the wing and fuselage assemblies.
 Tony
Tony

I love cockpits, maybe because they (the real ones) are out of reach, but still. Here is a 1:32'ish seat belt in a 1:48 seat. I won't redo, but take the lesson with me to the next pit.

I'm more pleased with the strap on the cannon cover. However, I don't know if the Israeli 199's flew with cannon, but I take some artistic licence.

Now, here's my first real scratch, ever. It seems like the side walls are mold from HobbyCrafts Bf B/C/D-series, so I made oxygen lines and regulator (?) from wire and excess mold. Maybe not great, but it's a narrow hole to look through
 .
.
Finally, the dash and gun sight. Small parts, but I borrowed my colleagues reading glasses. I'll get my own tomorrow. Let's throw the pride overboard


Now I only hope I remember to drill all holes needed, before I close the wing and fuselage assemblies.
 Tony
Tonythegirl

Joined: January 19, 2008
KitMaker: 6,743 posts
AeroScale: 6,151 posts

Posted: Thursday, May 07, 2009 - 05:22 PM UTC
Hey , looking really good there Tony . Nice job done in the cockpit !
Now whats this about your first time scratching something ?
Now whats this about your first time scratching something ?


LongKnife

Joined: April 25, 2006
KitMaker: 831 posts
AeroScale: 688 posts

Posted: Thursday, May 07, 2009 - 06:31 PM UTC
Scratch BUILDING something Terri. You and your mind, you... 
Anyway, more is to come in the weekend. Weather forecast looks grim, and with the pit done it's frankly not much more to do before wings and fuselage goes together.
 Tony
Tony

Anyway, more is to come in the weekend. Weather forecast looks grim, and with the pit done it's frankly not much more to do before wings and fuselage goes together.
 Tony
Tony
Emeritus

Joined: March 30, 2004
KitMaker: 2,845 posts
AeroScale: 1,564 posts

Posted: Friday, May 08, 2009 - 08:38 AM UTC
Nice progress going on everybody! 
I hope I could say the same for myself. I already got half-a-dozen kits in progress on my workbench (I don't even want to start on those stashed somewhere else...), and this Wyvern has the dubious honor of being the seventh.
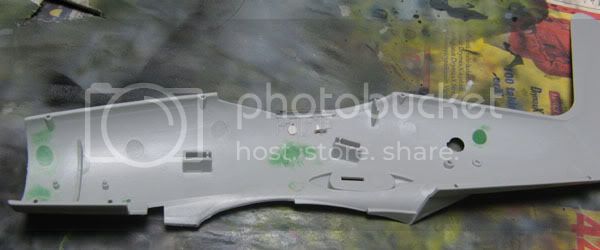
No need for posting a pic of the other fuselage half, as it's more or less the same. Non-prepainted PE bits glued in place and pin ejector marks puttied and sanded. Only afterwards I found out that filling the ejector marks is all but useless, since they won't be visible in the finished model (well, at least without fiber optic devices! ) Even the ones in the cockpit areas will be behind the side consoles.
It's got to be a matter of knowing they're taken care, what do you think?
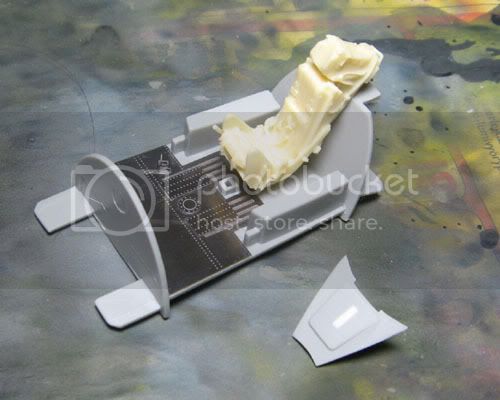
Cockpit under construction underway. The office will be enhanced with Eduard's interior PE set and a Pavla ejection seat. The gunsight mounting slot in the instrument panel coaming has been filled with styrene sheet as the kit-part will be replaced by a multi-part PE assembly. A PE floor plate and landing gear emergency release pedal has been glued to the floor part.
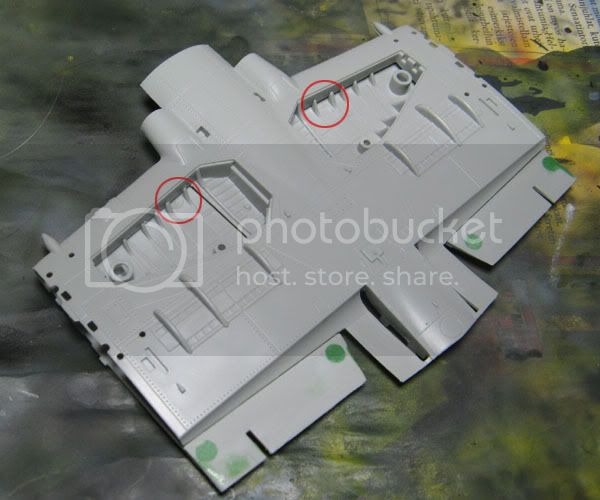
Inner wing halfs dryfitted here. Some more pin ejector marks to fill in the flap area, easy to fill. Unfortunately the same cannot be said about those two half-visible in the main wheel well area (circled with red). Any ideas how to deal with those?
I'm a little dissappointed how trumpeter retained the pre-opened ordnance mounting holes of the earlier 1:72 scale kit. They aren't difficult to fill if not needed, but a chore averted by holes opened half-way through by so many manufacturers.
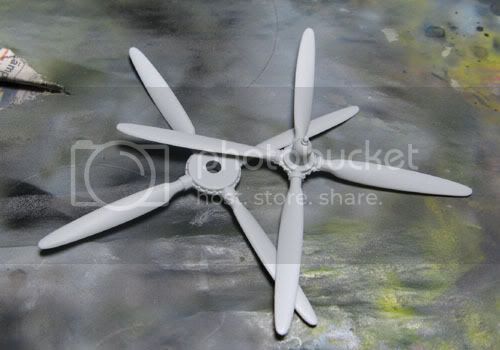
Ending this first build post are the propeller blades sanded to a more accurate shape. Trumpeter repeated the mistake in the 1:72 kit by having the paddle-bladed propellers of the prototype instead of the slimmer, more pointed props of the production aircraft.
That's it for this time.
Over and out.


I hope I could say the same for myself. I already got half-a-dozen kits in progress on my workbench (I don't even want to start on those stashed somewhere else...), and this Wyvern has the dubious honor of being the seventh.

No need for posting a pic of the other fuselage half, as it's more or less the same. Non-prepainted PE bits glued in place and pin ejector marks puttied and sanded. Only afterwards I found out that filling the ejector marks is all but useless, since they won't be visible in the finished model (well, at least without fiber optic devices!
 ) Even the ones in the cockpit areas will be behind the side consoles.
It's got to be a matter of knowing they're taken care, what do you think?

Cockpit under construction underway. The office will be enhanced with Eduard's interior PE set and a Pavla ejection seat. The gunsight mounting slot in the instrument panel coaming has been filled with styrene sheet as the kit-part will be replaced by a multi-part PE assembly. A PE floor plate and landing gear emergency release pedal has been glued to the floor part.

Inner wing halfs dryfitted here. Some more pin ejector marks to fill in the flap area, easy to fill. Unfortunately the same cannot be said about those two half-visible in the main wheel well area (circled with red). Any ideas how to deal with those?
I'm a little dissappointed how trumpeter retained the pre-opened ordnance mounting holes of the earlier 1:72 scale kit. They aren't difficult to fill if not needed, but a chore averted by holes opened half-way through by so many manufacturers.

Ending this first build post are the propeller blades sanded to a more accurate shape. Trumpeter repeated the mistake in the 1:72 kit by having the paddle-bladed propellers of the prototype instead of the slimmer, more pointed props of the production aircraft.
That's it for this time.
Over and out.


jaypee

Joined: February 07, 2008
KitMaker: 1,699 posts
AeroScale: 1,384 posts

Posted: Friday, May 08, 2009 - 11:12 AM UTC
Red4

Joined: April 01, 2002
KitMaker: 4,287 posts
AeroScale: 1,164 posts

Posted: Friday, May 08, 2009 - 11:16 AM UTC
I signed on for this one and while roaming the aisles of my favorite LHS found this little beauty and knew right away this was the one I would buiild for this campaign.

I crossed my fingers that the blue would be decals or at least some of it would be.
 I opened the box and was rewarded with no such luck so I will painting all of them instead.
  Talk about a masking nightmare. Add to the fact that it is an ICM kit and the headaches go into autoflow.. lol I'm actually looking forward to it though as it will be one eye catching paint scheme once complete.
Thanks, "Q"

I crossed my fingers that the blue would be decals or at least some of it would be.

 I opened the box and was rewarded with no such luck so I will painting all of them instead.
  Talk about a masking nightmare. Add to the fact that it is an ICM kit and the headaches go into autoflow.. lol I'm actually looking forward to it though as it will be one eye catching paint scheme once complete.
 Thanks, "Q"


Emeritus

Joined: March 30, 2004
KitMaker: 2,845 posts
AeroScale: 1,564 posts

Posted: Friday, May 08, 2009 - 11:55 AM UTC
Quoted Text
magic stuff Eetu. I'll be following this keenly as I have the 1/72 kit coming up soon.
Hey thanks!

I built the 1:72 a couple of years ago and it's a nice kit. Goes together quite well, has nice details, but has a few things to look out for:
- The wing tips didn't fold on production aircraft, so glue them extended whether you fold the wings or not
- kit has paddle-bladed prototype props (sand to shape), same issue as on the 1:48 kit
- horisontal stabilisers end up with no hidedral when built OOB. Fixed with some sanding
- glue the inner main gear doors shut, they only opened when the u/g cycled up and down.
I hope these are of help.
If anything else pops in my mind, I'll let you know.

guitarlute101

Joined: December 18, 2006
KitMaker: 1,121 posts
AeroScale: 1,063 posts

Posted: Saturday, May 09, 2009 - 12:36 AM UTC
Hi everyone,
I recently acquired several 1/72 Roden kits with Part photo etch sets. I'd like to build this kit, the 1/72 Pfalz D.III for the Stripes Campaign. Below the box it the aircraft I'd like to do. Would this be acceptable as enough stripes?

Please send out some comments and let me know.
Mark
I recently acquired several 1/72 Roden kits with Part photo etch sets. I'd like to build this kit, the 1/72 Pfalz D.III for the Stripes Campaign. Below the box it the aircraft I'd like to do. Would this be acceptable as enough stripes?

Please send out some comments and let me know.
Mark
thegirl

Joined: January 19, 2008
KitMaker: 6,743 posts
AeroScale: 6,151 posts

Posted: Saturday, May 09, 2009 - 03:44 AM UTC
Eetu , you are off to a great start on this build . I have done that as well , filled injector pin marks only to have them invisible once every thing is closed up . I have to say though "wow" the resin set is awesome with the level of detail ! Even with out the paint yet .
Awesome job on the stripes JP , nice effect with the white for the scale appearance . Will be a very colourful machine when done .
Thanks for joining the GB Matthew , I almost pick up the same kit a while back so I'm curious to see have the fit will be . Having the stripes as decals would have been a lot easier . Looking forward to your take on this one .
Cool Mark , another Pfalz has joined up ! It's a great kit . I have the D.IIIa in the stash which is the same you get the parts either to build the D.III or the D.IIIa . I'm just waiting to get the Part PE set for my . Was able to find 72 scale lozenge for it . And can up with a way to do the turn buckles using my hair for the rigging and q-tips .
I have started with my build now and will have some pic's up soon .
guitarlute101

Joined: December 18, 2006
KitMaker: 1,121 posts
AeroScale: 1,063 posts

Posted: Saturday, May 09, 2009 - 04:36 AM UTC
Great!! I've enlisted and am reporting for duty.
Mark

LongKnife

Joined: April 25, 2006
KitMaker: 831 posts
AeroScale: 688 posts

Posted: Sunday, May 10, 2009 - 05:05 AM UTC
@Eetu. Nice to see you have started the Wyvern. It will be exiting to see what you can do in the great scale of 1:48 
@JP. Nice stripes. Your dude will be spotted from even swedish miles, and those are long! Impessive lack of splotches under the masking tape, considering that the fuselage ain't exactly smooth and straight. Great job.
 Tony
Tony

@JP. Nice stripes. Your dude will be spotted from even swedish miles, and those are long! Impessive lack of splotches under the masking tape, considering that the fuselage ain't exactly smooth and straight. Great job.
 Tony
Tony
Kornbeef

Joined: November 06, 2005
KitMaker: 1,667 posts
AeroScale: 1,551 posts

Posted: Sunday, May 10, 2009 - 06:18 AM UTC
SE5a and LVG coming along well........only real new mishap was that the stripe decal wasnt the right size,,,,It had to be cut and repositioned and patched......hopefully pics tomorrow to show ho far they both are.
Keith
Keith

LongKnife

Joined: April 25, 2006
KitMaker: 831 posts
AeroScale: 688 posts

Posted: Sunday, May 10, 2009 - 06:56 PM UTC
I got myself some time at the workbench yesterday evening, and decided to try a different path than usual. This time I will try preshading wings and fuselage separately. That way I think it's easier to get the side of the fuselage preshaded without the wings coming in the way for the airbrush.
I taped the fuselage together to see if I could fit the cockpit late, and if I left the front end unglued, that would work. That way I could sand and repaint the joint behind the seat, without messing up the pit.

Next thing was the wings, and of course I made all locating holes first, and realized that the ones for the top wing gear well covers ended up in the gear well itself.

Luckily I just got myself some better filler than universal from the carpenters shop, so it will probably turn out well. But next time, skip locating pins instead.

 Tony
Tony
I taped the fuselage together to see if I could fit the cockpit late, and if I left the front end unglued, that would work. That way I could sand and repaint the joint behind the seat, without messing up the pit.

Next thing was the wings, and of course I made all locating holes first, and realized that the ones for the top wing gear well covers ended up in the gear well itself.


Luckily I just got myself some better filler than universal from the carpenters shop, so it will probably turn out well. But next time, skip locating pins instead.

 Tony
Tony thegirl

Joined: January 19, 2008
KitMaker: 6,743 posts
AeroScale: 6,151 posts

Posted: Monday, May 11, 2009 - 04:13 AM UTC
Making good progress Tony ! 


LongKnife

Joined: April 25, 2006
KitMaker: 831 posts
AeroScale: 688 posts

Posted: Monday, May 11, 2009 - 07:22 AM UTC
No Terri, I'm afraid not. This is like playing the Canadian national hockeyteam. If you lose, you're good, if you win you're great. Today I lost. Or maybe even worse....
I had a plan to glue the rear fuselage, leave the forward section flopping about, and fit the pit afterwards. This way I'd be able to paint the section behind the cockpit without messing the pit up. Idea was good, but execution left a bit to wish for. My idea was; pit first - dash later. Bad bad idea!

This is blind flying. Something's missing here. Now, where's that thing.

Ah, there you are, you.....stupid thing, you. Where'd you hide?
Ok. Time to fabricate a reach-thingy from sprue. It is said that a proper J 35 Draken-mechanic has 17 joint between the shoulder and the wrist. (I know one of those guys, so I have it first hand). Then we just have to drop some glue from behind and fabricate a reinforcement from ahead. What to take as reinforcement....I know, the gunsight! (I didn't see that one coming myself at first.)

So, I had some use for the "gun hatch". Unfortunately that's the only use. It doesn't seem to match any panel lines at all, so I will have to do some serious puttying to get rid of the seam. Why oh why did they make it like this.
But, why not qoute Forrest Gump in these situations. Sh-t happens! Tony.
Tony.
I had a plan to glue the rear fuselage, leave the forward section flopping about, and fit the pit afterwards. This way I'd be able to paint the section behind the cockpit without messing the pit up. Idea was good, but execution left a bit to wish for. My idea was; pit first - dash later. Bad bad idea!

This is blind flying. Something's missing here. Now, where's that thing.

Ah, there you are, you.....stupid thing, you. Where'd you hide?
Ok. Time to fabricate a reach-thingy from sprue. It is said that a proper J 35 Draken-mechanic has 17 joint between the shoulder and the wrist. (I know one of those guys, so I have it first hand). Then we just have to drop some glue from behind and fabricate a reinforcement from ahead. What to take as reinforcement....I know, the gunsight! (I didn't see that one coming myself at first.)

So, I had some use for the "gun hatch". Unfortunately that's the only use. It doesn't seem to match any panel lines at all, so I will have to do some serious puttying to get rid of the seam. Why oh why did they make it like this.
But, why not qoute Forrest Gump in these situations. Sh-t happens!
 Tony.
Tony.
cinzano

Joined: January 13, 2009
KitMaker: 419 posts
AeroScale: 378 posts

Posted: Monday, May 11, 2009 - 04:09 PM UTC
Tony,
You're really getting after it! I gotta shake off the cobwebs and pick up the tempo on the Bloch. I'm looking forward to seeing how your Avia turns out. I'd like to add one to my 109 collection but have seen so few completed.
Cheers,
Fred
You're really getting after it! I gotta shake off the cobwebs and pick up the tempo on the Bloch. I'm looking forward to seeing how your Avia turns out. I'd like to add one to my 109 collection but have seen so few completed.
Cheers,
Fred
Posted: Monday, May 11, 2009 - 11:30 PM UTC
Nice to see your progress although limited, Tony. I will learn what to do and not to do with this kit.
I have this kit in my stash and had actually planned to go with it for this campaign, but has now changed my mind and I am going for a FW 190A8 instead.
More to follow.
I have this kit in my stash and had actually planned to go with it for this campaign, but has now changed my mind and I am going for a FW 190A8 instead.
More to follow.


Kornbeef

Joined: November 06, 2005
KitMaker: 1,667 posts
AeroScale: 1,551 posts

Posted: Tuesday, May 12, 2009 - 01:57 AM UTC
A couple of pics to sho I am still doing stuff.... I have more comrehensive pics of the SE in the early aviation forum. me's bad...lol


And the LVG which isnt posted elsewhere yet.


I tried to do the LVG pretty OOB but you just have to add some dtls somewhere.
On both these kit I have had decal size issues...I cant imagine for 1 minute its all me...LOL..
The SE5a's decaos seem altogether a tad too big, the LVG the fuselage stripe....hence in this campain was way to small, to wrap it around the fuselage it was almost on the tail..... other than that the only real issues so far were and are self inflicted.
Keith


And the LVG which isnt posted elsewhere yet.


I tried to do the LVG pretty OOB but you just have to add some dtls somewhere.
On both these kit I have had decal size issues...I cant imagine for 1 minute its all me...LOL..
The SE5a's decaos seem altogether a tad too big, the LVG the fuselage stripe....hence in this campain was way to small, to wrap it around the fuselage it was almost on the tail..... other than that the only real issues so far were and are self inflicted.
Keith

LongKnife

Joined: April 25, 2006
KitMaker: 831 posts
AeroScale: 688 posts

Posted: Tuesday, May 12, 2009 - 02:59 AM UTC
Thank for the comments guys. I'll keep ypu updated on the booby traps.
One I didn't mention is the width of the dasboard. It's far too narrow, so if I had done it the right way I would have put a rod across the bottom of the dash, in order to be able to secure it to both sides of the fuselage. Looking back I guess the extra dash I had from a Bf 109 K of Fujimi would have fit better, and maybe even had been a better match to the timeframe.
Biplanes are looking good Keith. You got the plywood nicely done. Some horizontal and some vertical. I won't even try...
 Tony
Tony
One I didn't mention is the width of the dasboard. It's far too narrow, so if I had done it the right way I would have put a rod across the bottom of the dash, in order to be able to secure it to both sides of the fuselage. Looking back I guess the extra dash I had from a Bf 109 K of Fujimi would have fit better, and maybe even had been a better match to the timeframe.
Biplanes are looking good Keith. You got the plywood nicely done. Some horizontal and some vertical. I won't even try...
 Tony
Tony
LongKnife

Joined: April 25, 2006
KitMaker: 831 posts
AeroScale: 688 posts

Posted: Wednesday, May 13, 2009 - 08:14 AM UTC
The 199 rolls on, but no giant leaps. This on this one I decided to preshade wing- and fuselage-assemblies separately. It feels like a hit even though I needed a little putty in front and rear joint, and had to sand the preshading a bit. But the main pro is that I didn't bang the airbrush into anything at all 

The nose, and especially the gun cover, could do with some putty too, but not as much as I expected. I will have to talk to the chargerintake some more, but nothing fancy.

Now, next step will involve paint mixing. The cockpit got a bit dirty, so pure green will not be right on this one. Hmmm. What to choose? Grayish green? Greenish gray? Pure gray? Naah, greenish gray! Or maybe....tan?....hmmmm..... Choose to hard, this one is, as Yoda would have said!
Decision to follow... Tony
Tony


The nose, and especially the gun cover, could do with some putty too, but not as much as I expected. I will have to talk to the chargerintake some more, but nothing fancy.

Now, next step will involve paint mixing. The cockpit got a bit dirty, so pure green will not be right on this one. Hmmm. What to choose? Grayish green? Greenish gray? Pure gray?
 Naah, greenish gray! Or maybe....tan?....hmmmm..... Choose to hard, this one is, as Yoda would have said!
Decision to follow...
 Tony
Tony |


