Air Campaigns
Want to start or join a group build? This is where to start.
Want to start or join a group build? This is where to start.
Hosted by Frederick Boucher, Michael Satin
Stripes in the Skies
thegirl

Joined: January 19, 2008
KitMaker: 6,743 posts
AeroScale: 6,151 posts

Posted: Monday, May 18, 2009 - 01:14 PM UTC
You are welcome Tony ! However , I don't recommend you use any make-up at all just won't look right and won't go with your eye's !

LongKnife

Joined: April 25, 2006
KitMaker: 831 posts
AeroScale: 688 posts

Posted: Monday, May 18, 2009 - 06:40 PM UTC
True, brown would make my eyes look like Hptm Hannahs.
 Tony
Tony
 Tony
Tony
Kornbeef

Joined: November 06, 2005
KitMaker: 1,667 posts
AeroScale: 1,551 posts

Posted: Tuesday, May 19, 2009 - 09:01 PM UTC
Kornbeef is MIA a couple of days and we are all talking about makeup!...Blinks, coughs and then faints.


thegirl

Joined: January 19, 2008
KitMaker: 6,743 posts
AeroScale: 6,151 posts

Posted: Wednesday, May 20, 2009 - 06:53 PM UTC
Well Keith , hopefully Tony will apply it to the model and not himself .
cinzano

Joined: January 13, 2009
KitMaker: 419 posts
AeroScale: 378 posts

Posted: Friday, May 22, 2009 - 01:53 AM UTC
OK, Its Friday and I'm finally ready to get down to some serious painting. (I just hope I can find a little time this weekend. 
Cheers,
Fred
Cheers,
Fred
thegirl

Joined: January 19, 2008
KitMaker: 6,743 posts
AeroScale: 6,151 posts

Posted: Friday, May 22, 2009 - 11:02 AM UTC
Cool Fred will be looking forward to seeing her with some paint .
Tony in the next few weeks I will be doing an article on weathering with pastels more in detail on how I do it .
Tony in the next few weeks I will be doing an article on weathering with pastels more in detail on how I do it .

Posted: Friday, May 22, 2009 - 10:41 PM UTC
Its been a while since I posted here, but in that time, my entry is complete!
Here you go, it is the Revell Light and Sound Tornado in 1/72, unfortuantely i slipped up and forgot to apply the Set and Sol so there is a bit of silvering on the smaller decals.


Cheers
Loobes
Here you go, it is the Revell Light and Sound Tornado in 1/72, unfortuantely i slipped up and forgot to apply the Set and Sol so there is a bit of silvering on the smaller decals.
Cheers
Loobes
thegirl

Joined: January 19, 2008
KitMaker: 6,743 posts
AeroScale: 6,151 posts

Posted: Saturday, May 23, 2009 - 04:28 AM UTC
Super build Lewis ! The tiger stripes on the tail are cool !
Thanks for joinning the Campaign and sharing your build . Was there any fit issues with the kit ?
Thanks for joinning the Campaign and sharing your build . Was there any fit issues with the kit ?

cinzano

Joined: January 13, 2009
KitMaker: 419 posts
AeroScale: 378 posts

Posted: Saturday, May 23, 2009 - 08:35 AM UTC
Stripes, stripes, stripes! Man, this doesn't get easier (just more difficult). There was nothing for it today. It was time to get stuck in. Managed some initial painting on the fuse and finished the cowl today.
Undercoated the yellow areas with a warm brown to make it a little more rich. I also took an idea I learned here on the forum for preventing 'lift off' when doing significant masking jobs with acrylic.
Step one: let your primer coats cure a day or two.
Once base color is down, apply a coat of Future (and let dry thoroughly) before beginning the masking process.


Cheers,
Fred
Undercoated the yellow areas with a warm brown to make it a little more rich. I also took an idea I learned here on the forum for preventing 'lift off' when doing significant masking jobs with acrylic.
Step one: let your primer coats cure a day or two.
Once base color is down, apply a coat of Future (and let dry thoroughly) before beginning the masking process.

Cheers,
Fred
Posted: Saturday, May 23, 2009 - 09:12 AM UTC
Quoted Text
Super build Lewis ! The tiger stripes on the tail are cool !
Thanks for joinning the Campaign and sharing your build . Was there any fit issues with the kit ?
Thanks Terri, there were not any fit issues and it was a great kit!
Cheers
Loobes
thegirl

Joined: January 19, 2008
KitMaker: 6,743 posts
AeroScale: 6,151 posts

Posted: Saturday, May 23, 2009 - 11:56 AM UTC
Fred , super job on the stripes ! Not the easiest to mask keeping them in unifrom . You have nailed it . No bleeding anywhere ......... 

Rattler

Joined: November 23, 2002
KitMaker: 512 posts
AeroScale: 104 posts

Posted: Saturday, May 23, 2009 - 03:54 PM UTC
ok so I'm a late start but I'm in
Tamiya's P-47 D razor back.. with AM decals an very little PE..
back later with some photos...
Tamiya's P-47 D razor back.. with AM decals an very little PE..
back later with some photos...

cinzano

Joined: January 13, 2009
KitMaker: 419 posts
AeroScale: 378 posts

Posted: Sunday, May 24, 2009 - 05:26 AM UTC
Welcome aboard Chris!
You're hardly late. We just kicked this campaign off a few weeks ago. There is still plenty of campaign time ahead.
Yes, please do send picks of the progress on your "jug".

More stripes. Next : a little light buffing on the rudder then time to mask and paint the tri color. I'm painting the tail section _before_ the airframe camo so I can mask and bag off the tail feathers. This will give me something tangible to grasp while painting. (usually I drill the firewall and run a pencil into the front of the plane for a painting handle but this bird really wasn't very suitable for that treatment.)
Cheers,
Fred
You're hardly late. We just kicked this campaign off a few weeks ago. There is still plenty of campaign time ahead.
Yes, please do send picks of the progress on your "jug".
More stripes. Next : a little light buffing on the rudder then time to mask and paint the tri color. I'm painting the tail section _before_ the airframe camo so I can mask and bag off the tail feathers. This will give me something tangible to grasp while painting. (usually I drill the firewall and run a pencil into the front of the plane for a painting handle but this bird really wasn't very suitable for that treatment.)
Cheers,
Fred

thegirl

Joined: January 19, 2008
KitMaker: 6,743 posts
AeroScale: 6,151 posts

Posted: Sunday, May 24, 2009 - 05:59 AM UTC
Welcome and glad to have you sign up Chris ! Nice to have a Jug build with the GP Looking forward to the pic's . Fred is right , still lots of time , we are only a month into the build so far so there is still Lot's of time left . Don't be shy now .......................
most excellent Fred . Tail stripes turned out very well ! Nice approach on using the tail as a handle . It's going to look really sweet with the camo !!!
most excellent Fred . Tail stripes turned out very well ! Nice approach on using the tail as a handle . It's going to look really sweet with the camo !!!
thegirl

Joined: January 19, 2008
KitMaker: 6,743 posts
AeroScale: 6,151 posts

Posted: Sunday, May 24, 2009 - 06:48 AM UTC
JP , have you tried the home made decals yet ?

cinzano

Joined: January 13, 2009
KitMaker: 419 posts
AeroScale: 378 posts

Posted: Sunday, May 24, 2009 - 07:22 AM UTC
You mean making decals on a color printer with decal media, Terri? That sounds interesting to try.
Thanks for the encouragement, its crazy painstaking work not to blow the whole project at every turn. I had some near misses so far but time and again with modeling, I found that the best approach is to 'stay with it' and it usually turns out for the better (of course I won't mention the box of half built aircraft languishing in my closet waiting for me to come up with a solution to some significant flub up I 've managed)

Can't say they're perfect by any means, but I can't say I'm not satisfied at this stage of the process. Decals and esp. final weathering should create the relief in the rudder/ tail panel lines I want.
Whew, now its time to go for a bike ride!
Cheers,
Fred
Thanks for the encouragement, its crazy painstaking work not to blow the whole project at every turn. I had some near misses so far but time and again with modeling, I found that the best approach is to 'stay with it' and it usually turns out for the better (of course I won't mention the box of half built aircraft languishing in my closet waiting for me to come up with a solution to some significant flub up I 've managed)

Can't say they're perfect by any means, but I can't say I'm not satisfied at this stage of the process. Decals and esp. final weathering should create the relief in the rudder/ tail panel lines I want.
Whew, now its time to go for a bike ride!
Cheers,
Fred


Yeti123

Joined: February 11, 2008
KitMaker: 311 posts
AeroScale: 278 posts

Posted: Sunday, May 24, 2009 - 04:16 PM UTC
Gone a few days and Tony is writing an article on wearing pastels or did I miss read something? 
Lewis: Congratulations on finishing your build. Something I seem to have a hard time doing. I have never seen that kind of kit before. Is it 1/72nd scale? Great job
Fred: The paint work looks awesome. Great job on masking
Taylor

Lewis: Congratulations on finishing your build. Something I seem to have a hard time doing. I have never seen that kind of kit before. Is it 1/72nd scale? Great job
Fred: The paint work looks awesome. Great job on masking
Taylor

LongKnife

Joined: April 25, 2006
KitMaker: 831 posts
AeroScale: 688 posts

Posted: Sunday, May 24, 2009 - 07:13 PM UTC
Wow Fred. That last pic explains the whole campaign. Great finish both there and in the other end.
Lewis, you've got a nice little diorama ther too. Stripes comes in many shades and types. I like the ones on the tarmac too!
As for myself I managed to mess up the rear edge of the rudders stripe decals, so I will have to consider masking and painting. Good thing I haven't fitted the stabilizer yet.
 Tony
Tony
Lewis, you've got a nice little diorama ther too. Stripes comes in many shades and types. I like the ones on the tarmac too!

As for myself I managed to mess up the rear edge of the rudders stripe decals, so I will have to consider masking and painting. Good thing I haven't fitted the stabilizer yet.
 Tony
Tony
jaypee

Joined: February 07, 2008
KitMaker: 1,699 posts
AeroScale: 1,384 posts

Posted: Sunday, May 24, 2009 - 09:06 PM UTC
Yep terri, they were a little on the small side but will do. They were also really thick,
but was able to smooth it out with a few coats of future. Why does no-one but ww1
usaac cockades in 1/72? weird.
Glued the lower wing on. Won't have a chance for any modelling this week but will
get back to painting the pilot and doing the rigging then. Fit of this old revell kit has been
excellent. The proof of the pudding will be how well the trench style struts fit
if they are no good it'll filling and using the contrail stock
CaptainA

Joined: May 14, 2007
KitMaker: 3,117 posts
AeroScale: 2,270 posts

Posted: Monday, May 25, 2009 - 08:35 AM UTC
Quoted Text
I think I will do something with orange stripes...
One orange stripe down each side of the fuselage, one orange stripe down the spine, and three orange stripes on each side of the top and bottom of the tail, with red, blue and some more orange thrown in. And just to make sure I have enough stripes, I think I will add around 90 blue wing stripes.
And it was flown by an ace with 11 victories.
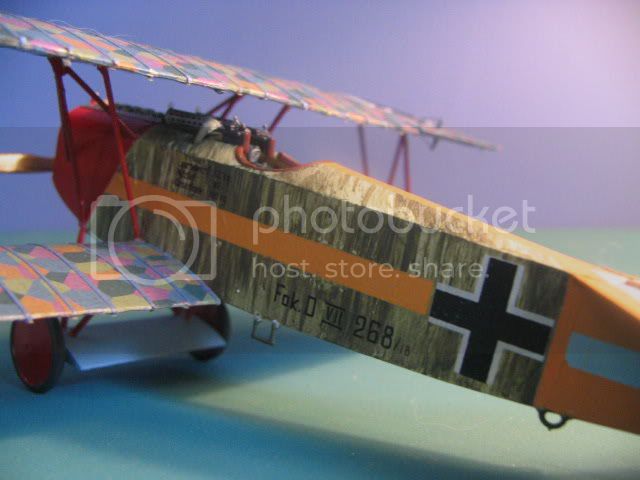
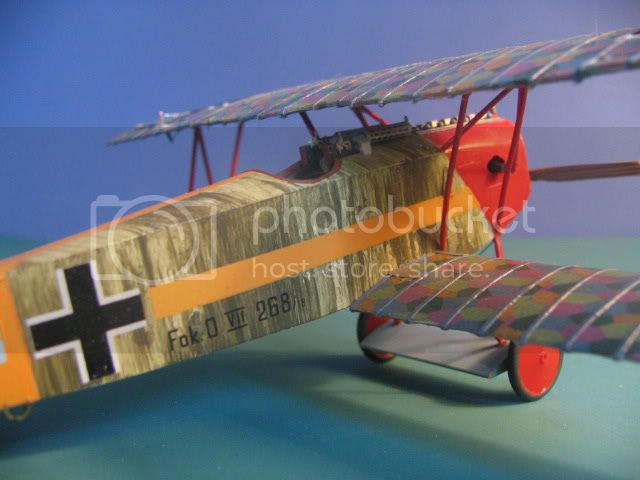
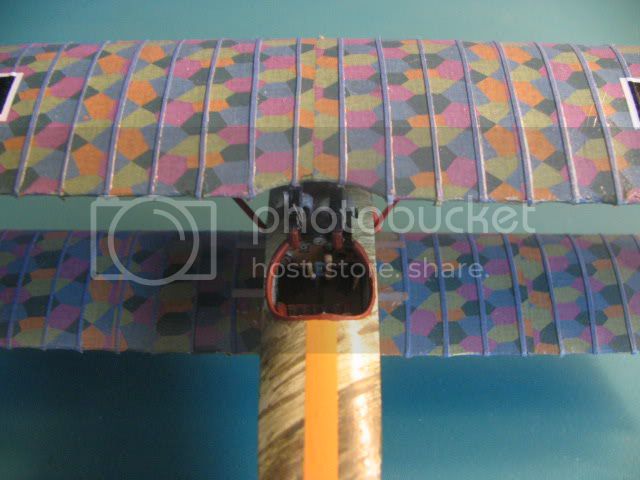

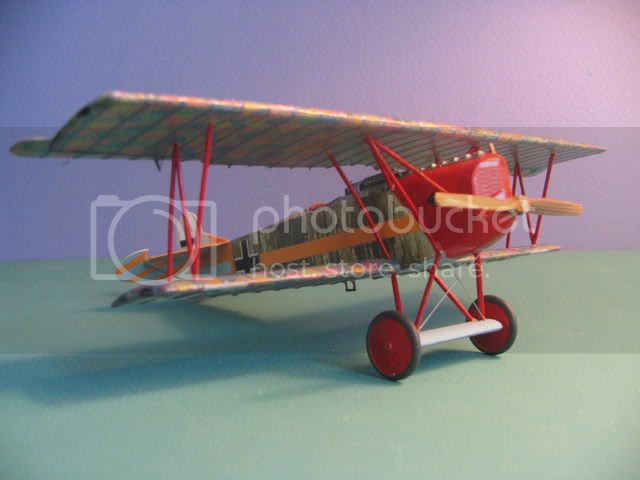
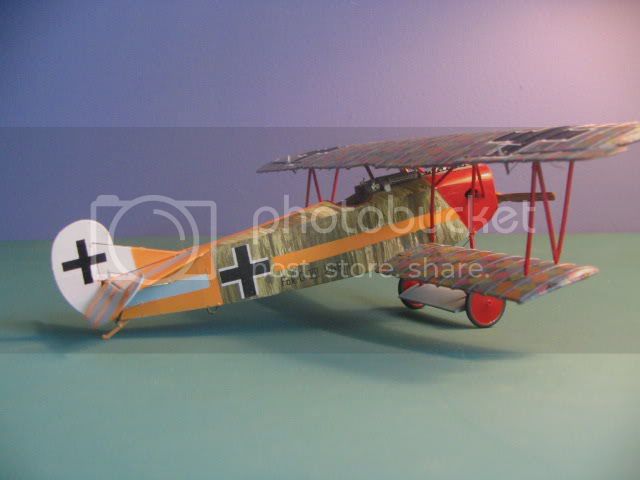


How's that for some stripes?

cinzano

Joined: January 13, 2009
KitMaker: 419 posts
AeroScale: 378 posts

Posted: Monday, May 25, 2009 - 09:23 AM UTC
Carl,
That one is really really nice. Is that 1/72 or 1/48?
Cheers,
Fred
That one is really really nice. Is that 1/72 or 1/48?
Cheers,
Fred
CaptainA

Joined: May 14, 2007
KitMaker: 3,117 posts
AeroScale: 2,270 posts

Posted: Monday, May 25, 2009 - 10:57 AM UTC
1/48th.

cinzano

Joined: January 13, 2009
KitMaker: 419 posts
AeroScale: 378 posts

Posted: Monday, May 25, 2009 - 11:40 AM UTC
@ Carl: Great build. (you slipped that one under the radar and got it built pretty quickly.)
Finally getting to the "meat" of this build. Camo went on today. Probably one of the most compelling reasons to build WW2 french planes is that they have arguably the coolest camo pattern of any air force of the period. (though admittedly a bit of a pain to execute). Learned a few things doing this that I''ll apply to the Hawk75, d520, and the VG39 when I get to them.
The post-it notes work like a champ, however I may add Future between colors (or more properly just mix the Future with each color I shoot.) the poster tack has a way of leaving a bit of residue on matte surfaces. I hope with gentle buffing and a nice coat of Future I'll get rid of that.


Cheers,
Fred
Finally getting to the "meat" of this build. Camo went on today. Probably one of the most compelling reasons to build WW2 french planes is that they have arguably the coolest camo pattern of any air force of the period. (though admittedly a bit of a pain to execute). Learned a few things doing this that I''ll apply to the Hawk75, d520, and the VG39 when I get to them.
The post-it notes work like a champ, however I may add Future between colors (or more properly just mix the Future with each color I shoot.) the poster tack has a way of leaving a bit of residue on matte surfaces. I hope with gentle buffing and a nice coat of Future I'll get rid of that.
Cheers,
Fred

Rattler

Joined: November 23, 2002
KitMaker: 512 posts
AeroScale: 104 posts

Posted: Monday, May 25, 2009 - 01:25 PM UTC
Ok so here is the Jug I'll be using...

I've gotten the cock pit all painted up an shadows here an there an some subtle weathering... washes were done with citadel inks ... the photos taken are crap... new camera so still trying to figure out the bugger....
So for now I'll just post this untill I can figure out the lighting an what not.

I've gotten the cock pit all painted up an shadows here an there an some subtle weathering... washes were done with citadel inks ... the photos taken are crap... new camera so still trying to figure out the bugger....
So for now I'll just post this untill I can figure out the lighting an what not.
thegirl

Joined: January 19, 2008
KitMaker: 6,743 posts
AeroScale: 6,151 posts

Posted: Monday, May 25, 2009 - 03:30 PM UTC
JP , I look froward to seeing the out of the decals .What did you use for decals paper ?
Carl , super build on the DVII . Mirco-sculpt puts out a might fine product . Well worth the investment . The texture decals look really sharp , rib tapes turned out good with the tamiya masking tape .
Wow Fred , you go .....You are just motoring along with this build , feel like doing another one after ?
Hi Chris and welcome to the GB , looking forward to seeing some progress

 |


