1/48 Roden's Fokker D.VII -Terri
Alberta, Canada
Joined: January 19, 2008
KitMaker: 6,743 posts
AeroScale: 6,151 posts
Posted: Saturday, October 04, 2008 - 02:28 AM UTC
I'm off to a fresh start here with this one . I'm very sorry for the last one on this . I was feeling brave the other morning and wanted to correct all my post with errors which had pic's . Trying to post pic's with out the code being on the side or all the way around . After 23 tries it didn't go very well . Frustration got the better part of me and I felt ashamed of myself and for letting you guy's down . I went and deleted things . Yes I know , not the brightest thing I've done !
Here are the new pic's now ................


Pic's of the engine .............details where added using fine copper wire , brass rod and Q-tip method for the spark plug wires . Valve springs are made from wire , hard to see it in the pic , but they are there .


Frame work so far ..................


So far this is how far I have gotten on this build .
I did have to sand the bottom inside of the fuselage for the frame to fit . Small miner sanding on the kit parts , which I was surprised on how well everything fitted together .
Alberta, Canada
Joined: January 19, 2008
KitMaker: 6,743 posts
AeroScale: 6,151 posts
Posted: Saturday, October 04, 2008 - 02:29 AM UTC
By Jove I think I got it !

Tennessee, United States
Joined: April 28, 2006
KitMaker: 286 posts
AeroScale: 45 posts
Posted: Saturday, October 04, 2008 - 02:38 AM UTC
This does look better ,but you were doing fine with the other thread you could have continued .
Well Cheers to a new start

.
North Carolina, United States
Joined: June 17, 2006
KitMaker: 478 posts
AeroScale: 391 posts
Posted: Saturday, October 04, 2008 - 03:51 AM UTC
By gosh.......I think she's "got it"!!!

Good pics

. I do like the framework.......especially for 1/48.
Regards
Steve
1/350 USS San Francisco on Slipways
1/350 HMS Warspite in Research Mode
1/32 P-39D stalled
Mendoza, Argentina
Joined: June 14, 2006
KitMaker: 222 posts
AeroScale: 219 posts
Posted: Saturday, October 04, 2008 - 06:38 AM UTC
Good for you, Terri!

I have always imagined that Paradise will be a kind of library.
Siempre imagine que el paraíso sería algún tipo de biblioteca.
Jorge Luis Borges
Östergötland, Sweden
Joined: April 04, 2006
KitMaker: 1,058 posts
AeroScale: 1,004 posts
Posted: Saturday, October 04, 2008 - 09:39 AM UTC
Go Terri, Go Terri
Don´t let the techstuff hit you. you can build, the pics talk for them self.
Go Terri
Larsa
Victoria, Australia
Joined: November 26, 2006
KitMaker: 608 posts
AeroScale: 602 posts
Posted: Saturday, October 04, 2008 - 11:10 AM UTC
Woohoo!
Good on you Terri.
Cheers,
Hugh
Alberta, Canada
Joined: January 19, 2008
KitMaker: 6,743 posts
AeroScale: 6,151 posts
Posted: Saturday, October 04, 2008 - 12:51 PM UTC
Thanks guys ! Means a lot to me on having all the great support that you guys have shown .
It sure was a learning experience though !
I'm debating one weather to use Rodens guns and replacing the jackets with PE parts .
Or use Tom's model works , which are a kit in them self .
Indiana, United States
Joined: May 14, 2007
KitMaker: 3,117 posts
AeroScale: 2,270 posts
Posted: Saturday, October 04, 2008 - 01:22 PM UTC
Is there going to be lozenge inside the cockpit? This might be a great time to try out those new lozenge decals. I wonder how they look reversed??? Stepen?
Terri, I agree with the others. You do have a talent for building these fly-thingies.
"Treat 'em Rough", Current Builds--Wingnut Rumpler
I am frequently seen with blood shot eyes from staying up past my nap time to get the right colour scheme on my latest WWI model?
Colorado, United States
Joined: January 25, 2004
KitMaker: 11,669 posts
AeroScale: 11,011 posts
Posted: Saturday, October 04, 2008 - 03:07 PM UTC
Quoted Text
Is there going to be lozenge inside the cockpit? This might be a great time to try out those new lozenge decals. I wonder how they look reversed??? Stepen?
The interiors were the reverse of the pattern with more of the fabric colour seen overall. There are several methods to this. The Microsculpt lozenge can simply flipped over and applied normally and after dried then apply a wash of dirty white or you can wait for him to bring out his version with the pattern & texture already reversed. See the Royal build or the Lozenge 101 threads. I have an image of the cockpit interior of a full-sized modern replica.
/DSCN0532b.JPG)
". . .The most important thing is to know why you build and then get the most that you can out of building." via D.D.
Alberta, Canada
Joined: January 19, 2008
KitMaker: 6,743 posts
AeroScale: 6,151 posts
Posted: Sunday, October 05, 2008 - 02:01 AM UTC
Yes there will be Lozenge inside the fuselage on the side , seat , bulk head behind the seat and bottom of the fuselage inside . Just waiting for the decals to come from MicroSculpt .
Thank-you for the kind words Carl .
Stephen , thanks for sharing the pic , it help answer a question I had on the rudder bar .
Scotland, United Kingdom
Joined: June 01, 2006
KitMaker: 1,707 posts
AeroScale: 1,119 posts
Posted: Sunday, October 05, 2008 - 03:09 AM UTC
Beautiful work Terri...and great looking pics! All the beer that you can drink on me...

"I´m going back to the front to relax"
"THE BLACK CATS FLIES TONIGHT"
"Find your enemy and shoot him down - everything else is unimportant"
"When you're out of F-8's... You're out of fighters!"
Alberta, Canada
Joined: January 19, 2008
KitMaker: 6,743 posts
AeroScale: 6,151 posts
Posted: Sunday, October 05, 2008 - 01:37 PM UTC
Thanks Jan !
North Carolina, United States
Joined: June 19, 2007
KitMaker: 604 posts
AeroScale: 600 posts
Posted: Wednesday, October 08, 2008 - 10:31 AM UTC
Terri,
The pictures and your interior look great! Glad to see your thread back on track.
RAGIII
Indiana, United States
Joined: May 14, 2007
KitMaker: 3,117 posts
AeroScale: 2,270 posts
Posted: Wednesday, October 08, 2008 - 11:00 AM UTC
So, on the reverse side, the lozenge has the cathedral glass appearance. Flipping the decals over wouldn't be 100% accurate. But my question really is, How do the decals look when reversed? Is there enough color to actually show through when they are reversed?
Terri, Appologies for hijacking your thread. But aren't we about due for more pics?
"Treat 'em Rough", Current Builds--Wingnut Rumpler
I am frequently seen with blood shot eyes from staying up past my nap time to get the right colour scheme on my latest WWI model?
Colorado, United States
Joined: January 25, 2004
KitMaker: 11,669 posts
AeroScale: 11,011 posts
Posted: Wednesday, October 08, 2008 - 01:43 PM UTC
Quoted Text
So, on the reverse side, the lozenge has the cathedral glass appearance. Flipping the decals over wouldn't be 100% accurate. But my question really is, How do the decals look when reversed? Is there enough color to actually show through when they are reversed?
Yes it is accurate to fip the lozenge decals. The decals need to be toned down by using a light cream colour to simulated the fabric. See the lozenge 101 thread page 3 for this;

". . .The most important thing is to know why you build and then get the most that you can out of building." via D.D.
Portugal
Joined: December 09, 2007
KitMaker: 168 posts
AeroScale: 159 posts
Posted: Wednesday, October 08, 2008 - 01:52 PM UTC
great job on the engine

Alberta, Canada
Joined: January 19, 2008
KitMaker: 6,743 posts
AeroScale: 6,151 posts
Posted: Wednesday, October 08, 2008 - 02:30 PM UTC
Why thank-you Rick , still need to work on the lighting a little more , but I'm starting to get the hang of it now .
Carl, no worries on the hijacking , it's always nice to have Stephen refresh our memory every now then . Now about this more pic's that you are saying to me here . As soon as the Lozenge decals come in from Microsculpt . I can start the inside of the fuselage . Right now that's the only thing which is holding back . I'm finishing up on two other projects and will have pic's up soon on them .
Thank-you Ricardo , Still have some more wiring to do , but waiting for the engine to be installed in the frame work once it's tied in with the fuselage .
Alberta, Canada
Joined: January 19, 2008
KitMaker: 6,743 posts
AeroScale: 6,151 posts
Posted: Saturday, October 11, 2008 - 01:09 PM UTC
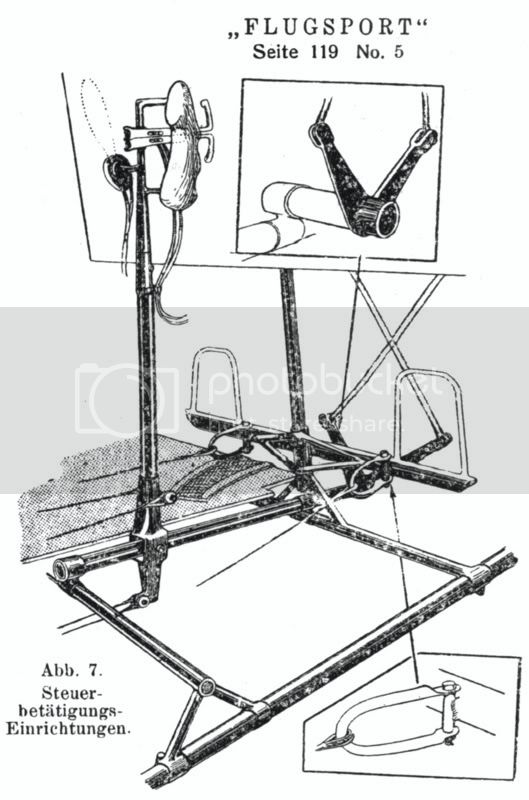
Does any one have a better photo of the rudder bar and how this is attach to the frame under the floor board ?
North Carolina, United States
Joined: June 17, 2006
KitMaker: 478 posts
AeroScale: 391 posts
Posted: Saturday, October 11, 2008 - 01:17 PM UTC
Does this help?
Regards
Steve
1/350 USS San Francisco on Slipways
1/350 HMS Warspite in Research Mode
1/32 P-39D stalled
Alberta, Canada
Joined: January 19, 2008
KitMaker: 6,743 posts
AeroScale: 6,151 posts
Posted: Saturday, October 11, 2008 - 01:32 PM UTC
That's Perfect thanks Steve , it's a good thing I only tack the floor in place , that will have to get redone . Rodens isn't very good at all and it was bothering me . was going to leave it , but ended up changing my mind .
Alberta, Canada
Joined: January 19, 2008
KitMaker: 6,743 posts
AeroScale: 6,151 posts
Posted: Thursday, October 16, 2008 - 04:20 AM UTC
Okay guys , now that the Hanriot is finished and the Nieuport set a side . I'm back on this build agian and will have some pic's posted soon .
Scotland, United Kingdom
Joined: June 01, 2006
KitMaker: 1,707 posts
AeroScale: 1,119 posts
Posted: Saturday, October 18, 2008 - 04:40 AM UTC
"I´m going back to the front to relax"
"THE BLACK CATS FLIES TONIGHT"
"Find your enemy and shoot him down - everything else is unimportant"
"When you're out of F-8's... You're out of fighters!"
Alberta, Canada
Joined: January 19, 2008
KitMaker: 6,743 posts
AeroScale: 6,151 posts
Posted: Thursday, October 23, 2008 - 12:52 AM UTC
Lozenge decals came in the mail the other day , I will have some more picks up over the weekend so that should stop Jans beer from getting warm ................................
Colorado, United States
Joined: January 25, 2004
KitMaker: 11,669 posts
AeroScale: 11,011 posts
Posted: Thursday, October 23, 2008 - 03:03 PM UTC
Just for the sake of having them in one place. For more reading on the various license built Fokker D.VII represented in kit form.
Click here Click Here IIClick Here III Click Here IV Click Here VClick Here VI". . .The most important thing is to know why you build and then get the most that you can out of building." via D.D.


