
Air Campaigns
Want to start or join a group build? This is where to start.
Want to start or join a group build? This is where to start.
Hosted by Frederick Boucher, Michael Satin
Aluminium Campaign

Siderius

Joined: September 20, 2005
KitMaker: 1,747 posts
AeroScale: 1,673 posts

Posted: Sunday, April 11, 2010 - 01:57 PM UTC
Jason, really like your Mustang! It is really a great looking bird! Don't you love Tamiya kits, shake the box and you get a great model! Again, keep building. Russell 

Posted: Sunday, April 11, 2010 - 04:52 PM UTC
Hi Jason, thanks for joining us. I'm with Russell, the P-51 looks really good. What paint did you use for the Aluminium ? I really like the sheen level.
Cheers, D
Cheers, D
werx07

Joined: February 21, 2010
KitMaker: 26 posts
AeroScale: 24 posts

Posted: Monday, April 12, 2010 - 12:52 PM UTC
Thanks guys. I agree with you Russell, Tamiya does make an easy model to build, very rarely are there ever any problems to deal with. Damian, the paint is Alclad with a coat of Future over the top . Sorry I couldn't post pics of the build progress. I am joined up for the BF-109 campaign and I'll be recording and posting the progress on that build.
Ruffus

Joined: April 12, 2005
KitMaker: 343 posts
AeroScale: 111 posts

Posted: Thursday, April 15, 2010 - 03:01 PM UTC
Very nice Mustang Jason!!
Here is a photo on my MiG-17, BMF. hopeyou like it.

Let's do some plastic.
Byron
Here is a photo on my MiG-17, BMF. hopeyou like it.

Let's do some plastic.
Byron
Ruffus

Joined: April 12, 2005
KitMaker: 343 posts
AeroScale: 111 posts

Posted: Thursday, April 15, 2010 - 03:30 PM UTC
And some WIP


It may sound crazy, but I'm thinking about painting this MiG-21 in a three color scheme over the BMF, to see the ripple effect on the paint. it may look more realistic. What do you think?
See you in Big Beautiful Bombers Campaign, among others campaigns
and remember that the airplanes and Helos are allow in the UN Campaign.
Let's do some plastic
Byron


It may sound crazy, but I'm thinking about painting this MiG-21 in a three color scheme over the BMF, to see the ripple effect on the paint. it may look more realistic. What do you think?
See you in Big Beautiful Bombers Campaign, among others campaigns

and remember that the airplanes and Helos are allow in the UN Campaign.
Let's do some plastic
Byron


29Foxtrot

Joined: September 19, 2003
KitMaker: 708 posts
AeroScale: 674 posts

Posted: Thursday, April 15, 2010 - 03:43 PM UTC
i'll join in on this one as i have a Trumpeter C47 i can do in RAAF 'Hi Viz' that I can finish off.
Posted: Thursday, April 15, 2010 - 04:58 PM UTC
Byron, very nice work on the MIG duo, what are the kits and how well did they fit together?
Rob, welcome aboard mate. I've been following the C-47 build thread, it's looking great !!
Don't forget guys, only 2 WEEKS to go now. The mad rush to finish begins !!!
Cheers, D
Rob, welcome aboard mate. I've been following the C-47 build thread, it's looking great !!
Don't forget guys, only 2 WEEKS to go now. The mad rush to finish begins !!!
Cheers, D

29Foxtrot

Joined: September 19, 2003
KitMaker: 708 posts
AeroScale: 674 posts

Posted: Thursday, April 15, 2010 - 06:58 PM UTC
It's the Trumpeter 48 scale C47 kit that was started for another campaign but never got finished.
The 'Hi Viz' is 2 seperate paints, the wing tips and tail is Humbrol # 209 Fluorescent Red gloss on a semi gloss white base and the nose cone is Model Master Fluorescent Red which is a matt finish and is NOT on a white base.
Both odf these colours are translecent and need many fine coats to apply them, the tri-colour fin flashes are painted in Model Master 'Insignia White', 'Insignia Blue' and Flat Red, they are 4x10mm each in dimensions.
The model is now coated in Alcladd II Gloss Black primmer ready for the final coat of Alclad II 'Polished Aluminium'


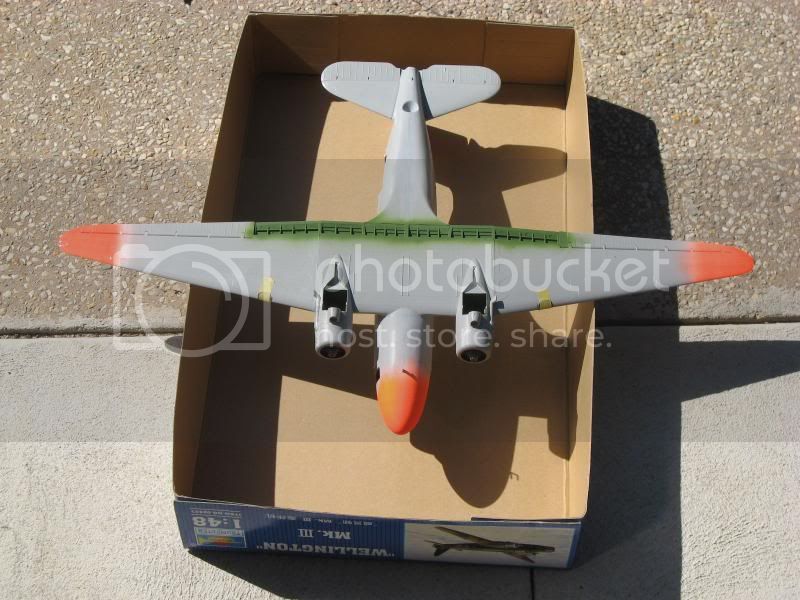
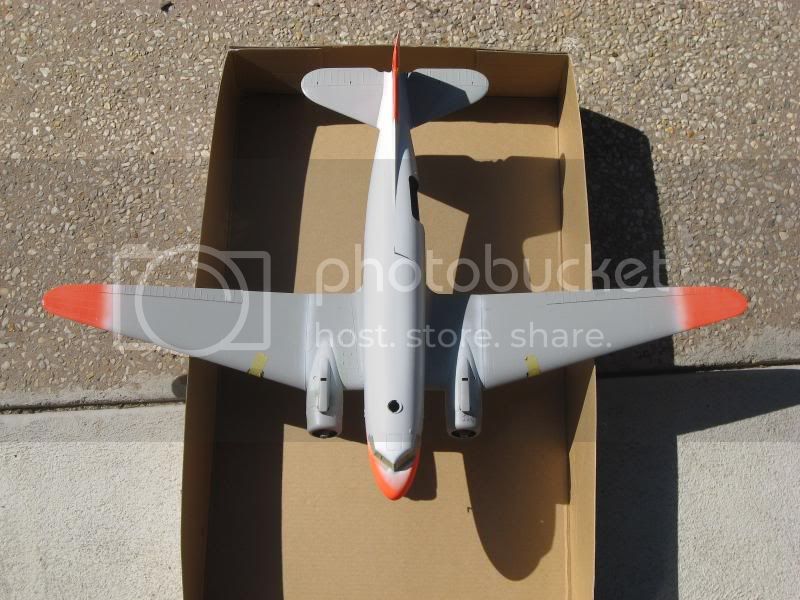
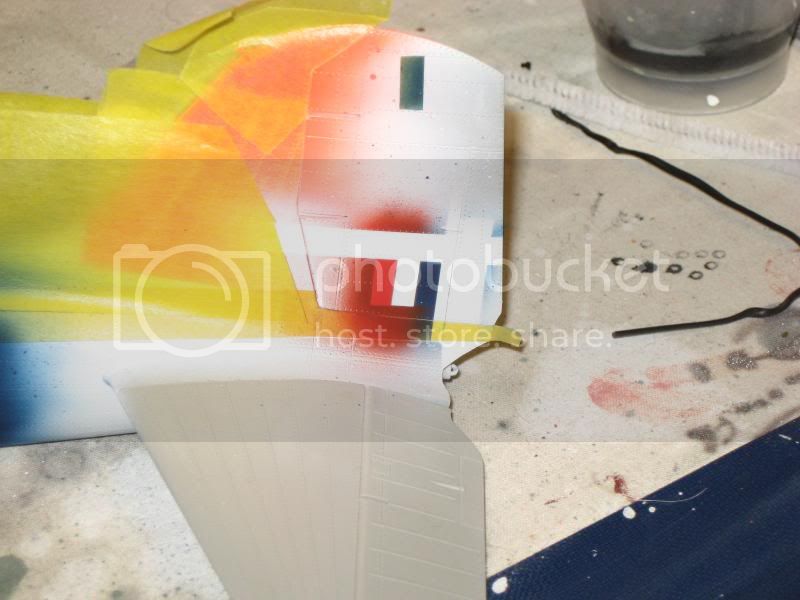
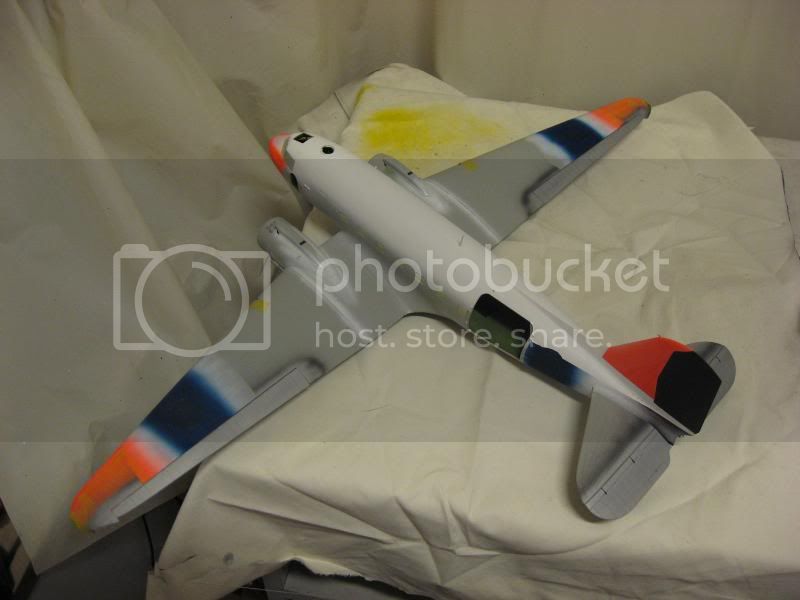


Note: The canvas doped control surfaces are painted in Tamiya XF 16 and are not on the black undercoat, which have been masked off. The next step is to mask the 'De-Icing' boots on the laeding edges before the final Alclad II coat is applied.
The decals for this bird are an OOP RooDecal sheet.
The 'Hi Viz' is 2 seperate paints, the wing tips and tail is Humbrol # 209 Fluorescent Red gloss on a semi gloss white base and the nose cone is Model Master Fluorescent Red which is a matt finish and is NOT on a white base.
Both odf these colours are translecent and need many fine coats to apply them, the tri-colour fin flashes are painted in Model Master 'Insignia White', 'Insignia Blue' and Flat Red, they are 4x10mm each in dimensions.
The model is now coated in Alcladd II Gloss Black primmer ready for the final coat of Alclad II 'Polished Aluminium'


Note: The canvas doped control surfaces are painted in Tamiya XF 16 and are not on the black undercoat, which have been masked off. The next step is to mask the 'De-Icing' boots on the laeding edges before the final Alclad II coat is applied.
The decals for this bird are an OOP RooDecal sheet.
Posted: Saturday, April 17, 2010 - 11:16 PM UTC
Ok, less than 2 weeks to go, here's the state of play as I see it . . . .
05Sultan (Rick) 1/32 Academy Nieuport 17 (FINISHED)
29Foxtrot (Rob) 1/48 Trumpeter C-47 (well underway)
Alpha_tango (Steffen) 1/48 Rest Models Heinkel 112V6 (FINISHED)
Amegan (Andrew) 1/144 Revell Constellation (FINISHED)
Atoplu (Ayhan) 1/72 Academy F-84G (FINISHED)
AussieReg (Damian) 1/48 Tamiya F-84G (FINISHED)
Automaton 1/48 MPM P-63 Kingcobra
Blueheeler (Nick) 1/72 Academy P-51D (FINISHED)
Cinzano (Fred) 1/48 Monogram AT-6 Texan
Eman (Lap) YB-49 Flying Wing EmperoR
EmperoR
Hkopper
Jaypee (John-Paul) Shorts SC-1 (FINISHED)
Jmartine (James) 1/48 Testors P-51 In-flight display
JollyRoger Confirmed as IN but TOP SECRET at this stage !!
Lakota (Don) 1/72 Kopro Convair XFY-1 Pogo (I really wanna see that one)
Littorio
MikeMx (Michael) Airfix Dassault Super Mystere
Moeggo (David) 1/32 Hasegawa Ki-44 (Absolutely STUNNING and FINISHED !!)
Mschwartzmann
Murdo 1/48 Revell C-47 Skytrain RAF Scheme (FINISHED)
NickZour (Nick) 1/72 MPM Gloster Meteor plus resin and PE goodies (Almost there)
Nito74 (John)
Phantom2 (Stefan) 1/48 Tamiya F-84G Thunderjet
Philippus (Philip) 1/48 Revell P-47N
PolarBear (Bjorn) 1/48 Eduard Mirage 111 (Soooooo close to finished))
RotorHead67 1/48 Monogram F-84G plus Aires and True Details goodies
Ruffus (Byron) Mig 17 (FINISHED)
SellSword
SGTJKJ (Jesper) 1/72 Matchbox B-17 (Old 3-colour kit, FINISHED)
Siderius (Russell) 1/72 Hasegawa Ki44 SHoki (FINISHED)
SimonH (Simon) 1/72 Airfix Gloster Gladiator
Skyhawk
Spongya (Andras)
TacFireGuru (Mike) Hasegawa P-47 Eggplane (Crashed and Burned, sad loss to the squadron)
Tallguy
Tedmamere 1/48 Czech Models Cessna UC-78 (FINISHED and superbly so)
Tobar (Thomas) 1/48 Tamiya P-47D Bubbletop
Vanize (Vance) 1/48 Tamiya P-51D (with True Details and Aires goodies)
ViperAtl (Joe) 1/72 Hasegawa B-26 Marauder (FINISHED)
VonCuda (Hermon) 1/48 Tamiya F-84G (FINISHED)
Warreni
Werx07(Jason) 1/72 Tamiya P-51 (FINISHED)
Wolfsangel (Charlie) G4M Betty
That's 44 enlisted for 16 finished at this stage, with 1 crashed and burned on final approach (RIP eggplane).
There are a lot of builds underway and close to completion, and some superb work going on there, so I hope we can sneak a few more into the final tally come April 30.
We'll have a final check-in after closing date.
Cheers, D
Phantom2

Joined: April 18, 2006
KitMaker: 708 posts
AeroScale: 678 posts

Posted: Sunday, April 18, 2010 - 12:09 AM UTC
Hi all!
I just want to say I´m almost done, but I have changed my subject!
Thre has been a lot of F-84 Thunderjets, so when I got the Trumpeter F-100C Sabre (in the same scale), I decided that´s gonna be my build!
So, Aussie, can you please change my build to Trumpeter F-100C in 1/48.
She´s almost done by now, only painting left, so I will get her done in time!
Pics to come soon!
Cheers!
Stefan E
Posted: Sunday, April 18, 2010 - 10:49 AM UTC
Thanks Stefan, consider it done. I can't alter the last post but it will show in the next.
Looking forward to pics. Cheers, D
Looking forward to pics. Cheers, D
Wolfsangel

Joined: January 15, 2010
KitMaker: 221 posts
AeroScale: 28 posts

Posted: Sunday, April 18, 2010 - 07:02 PM UTC
Hey Damian and everybody,
I've been trying to have some alone time with "Betty" but alas can only find snippets of time, microcosms really, to devote myself to her. She's the only one who truly understands me and my AMS.
Patiently waiting in my office for my attention (detailing engines that are impossible to see without a flashlight and a dental mirror), my caress (with sanding stick and paper), my passion (to find and punch in the face the sadistic Tamiya engineer who made such a beautiful kit on the outside and left 40+, yes 40+, ejector pin marks on the visible parts of the interior in between the frame detail), and my time (between work, the ludicrous judicial system, kittens, ducks, another puppy, the neighbors cattle, my Daughter's Chickens, their attendant Raccoons, my cantankerous Truckster, my cranky wife, and those wretched offspring of mine what with their Boy Sprouts, Future Farmers of socializing... I mean America, and me taking the time to type this drivel).
I've managed to get the subs together, finished the exterior, and am on the interior. With a little luck (and using my free time between 3 and 5 AM) I should be able to throw some paint on this sexy beast by the weekend. Then I can start making her look like the cheap tramp I really want her to be! "Rode hard and put away wet" as it were. I'll try to get some pictures up when I'm finished gluing my fingers together.
Posted: Sunday, April 18, 2010 - 08:34 PM UTC
Charlie, that was as much a social commentary as a progress report. Very well said and I'm sure most if not all of us can relate. If you can prise your fingers apart at some stage, point a camera it the tramp and light her up for us ??
Cheers, D
Cheers, D
NickZour

Joined: May 01, 2008
KitMaker: 1,437 posts
AeroScale: 1,241 posts

Posted: Sunday, April 18, 2010 - 10:29 PM UTC
Don't worry Mr. Damian I'm almost done 
I'm just keeping it for surprise

Cheers Nick


I'm just keeping it for surprise


Cheers Nick


PolarBear

Joined: February 23, 2005
KitMaker: 820 posts
AeroScale: 629 posts

Posted: Sunday, April 18, 2010 - 11:30 PM UTC
Quoted Text
PolarBear (Bjorn) 1/48 Eduard Mirage 111 (Soooooo close to finished))
I sure am!!! Minor detalis and misiles to go!


Unfortunately, the pictures above where shot in poor light conditions. I'll try to do better for my next (and final???) update!
Cheers! // PolarBear

Posted: Monday, April 19, 2010 - 01:21 AM UTC
Very nice Mirage, Bjorn. The markings look great on the aluminium finish.
Looking forward to see it finished.
Looking forward to see it finished.

JMartine

Joined: October 18, 2007
KitMaker: 1,698 posts
AeroScale: 96 posts

Posted: Monday, April 19, 2010 - 04:06 AM UTC
Joe – Very nice job on the Marauder; invasion lines look good, painted on? Never mind, just read the answer  I also jump projects, depends on time and mood : )
Murdo – RAF Dakota looks good, different and interesting subject.
Nick – nice finish, looking forward to the final product!
Byron – MiG looks good; is that the Hasegawa MiG combo kit?
I will post my status later this week, as I restart my P51s builds including the one for this campaign. Cheers
 I also jump projects, depends on time and mood : )
Murdo – RAF Dakota looks good, different and interesting subject.
Nick – nice finish, looking forward to the final product!
Byron – MiG looks good; is that the Hasegawa MiG combo kit?
I will post my status later this week, as I restart my P51s builds including the one for this campaign. Cheers
vanize

Joined: January 30, 2006
KitMaker: 1,954 posts
AeroScale: 1,163 posts

Posted: Monday, April 19, 2010 - 06:39 AM UTC
Well, I might actually be able to finish by the deadline for one (crossing my fingers!)
here are a couple update pics.
the first shows the Mr Surfacer I used to fill the panel lines on the laminar flow wings. P-51 wings were puttied, sanded smooth and painted, even on the machines delivered in bare aluminum (the wings were painted with silver lacquer paint top and bottom).
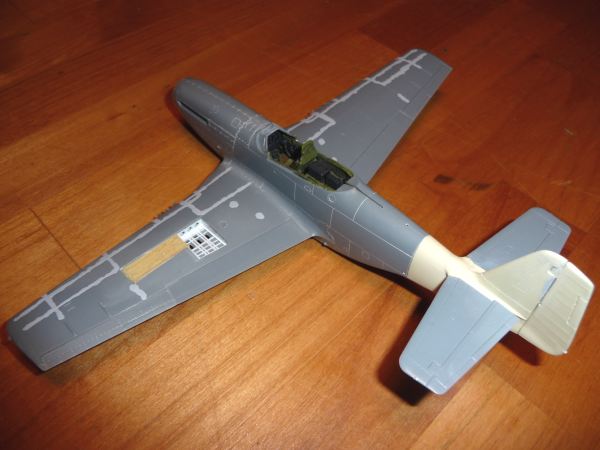
After sanding the puttied seams, I painted the aircraft overall with "silver leaf' spray lacquer spray paint from tamiya's range. This showed lots f flaws that I hit with Mr Surfacer and sanded out with 400 then 600 wet or dry sandpaper.
I was fairly happy with the second attempt with the silver leaf spray paint, so I masked the invasion and recognition stripes as well as the black nose for the squadron identifier.
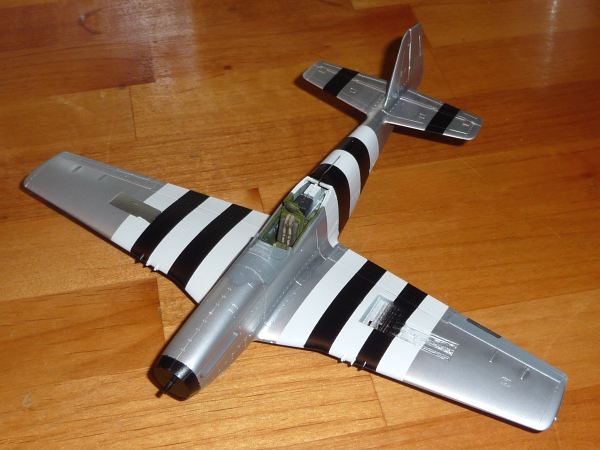
I experimented with using Bare Metal Foil on an aileron. i wasn't satisfied with the result and removed it, which also removed the silver paint on that aileron (i later sanded smooth as you can see in the picture). I also tried the foil on the starboard ammo bay cover to better effect, but the paint for the invasion stripes did not like sticking to it...
I'll be finishing the model as "Hoo Flung Dung"/"City of Paris" flown by Major Robert McWherter of the 382nd FS, 363rd FG, 9th AAF.
here are a couple update pics.
the first shows the Mr Surfacer I used to fill the panel lines on the laminar flow wings. P-51 wings were puttied, sanded smooth and painted, even on the machines delivered in bare aluminum (the wings were painted with silver lacquer paint top and bottom).

After sanding the puttied seams, I painted the aircraft overall with "silver leaf' spray lacquer spray paint from tamiya's range. This showed lots f flaws that I hit with Mr Surfacer and sanded out with 400 then 600 wet or dry sandpaper.
I was fairly happy with the second attempt with the silver leaf spray paint, so I masked the invasion and recognition stripes as well as the black nose for the squadron identifier.

I experimented with using Bare Metal Foil on an aileron. i wasn't satisfied with the result and removed it, which also removed the silver paint on that aileron (i later sanded smooth as you can see in the picture). I also tried the foil on the starboard ammo bay cover to better effect, but the paint for the invasion stripes did not like sticking to it...
I'll be finishing the model as "Hoo Flung Dung"/"City of Paris" flown by Major Robert McWherter of the 382nd FS, 363rd FG, 9th AAF.
Ruffus

Joined: April 12, 2005
KitMaker: 343 posts
AeroScale: 111 posts

Posted: Monday, April 19, 2010 - 06:45 AM UTC
Quoted Text
Byron – MiG looks good; is that the Hasegawa MiG combo kit?
Well, no, this are in 1/48; the MiG-21 is Smer, while the MiG-17 is Hobbycraft. not show stoppers, but they build up nicely, the cockpit needs LOTS of work, if that is your thing, the detail is negative but oversize; at the time I get this, they were the only game in town, (and as far the MiG-21SMT is concern, still is) So, you have to work with what you have at hand.

Let's do some plastic.
Byron Leal
JMartine

Joined: October 18, 2007
KitMaker: 1,698 posts
AeroScale: 96 posts

Posted: Tuesday, April 20, 2010 - 07:52 AM UTC
Thanks for the info Byron.
Good update vance, paint job looking good!
Good update vance, paint job looking good!
Phantom2

Joined: April 18, 2006
KitMaker: 708 posts
AeroScale: 678 posts

Posted: Tuesday, April 20, 2010 - 09:28 AM UTC
Hi all!
An F-100C Super Sabre has been on the very top of my”want-to-build” list for years.
Ever since I found, and bought this colourful decal sheet;

If you like your aircrafts well maintained and extremely colourful (as I do!), THIS aircraft is a dream come true!

NMF and all these colourful bands, it can’t be better then this and this is an aircraft I just had to build!
The problem (at the time when I bought the decals) was that no kit of the F-100C existed (yet)!
CE had a conversion set for the old ESCI F-100E kit, thus they made some –C decals.
I bought the decals on the spot, and started looking for a kit, I found an ESCI F-100E on E-bay to a fair price.
When I got the kit, I realized that this was an old, old horse, and there were no way I would “sacrifice” my wonderful decals on this.
I put the decals away in my collection and the time went by.
To my surprise and joy, Trumpeter released an F-100E in 1/32 some years ago.
I got the kit, and Cutting Edge was fast enough to release some decal-sheets for the kit.
I got some Cutting Edge decals for it, not Lavens ac, but another very colourful F-100E!
Two years passed by, and then just got under the radar and suddenly it was here, Trumpeter´s F-100C in 1/48!
FINALLY, I got my dream-kit, and I could do Col. Laven´s aircraft!
The box is of the usual Trumpeter-style, very tight, and very sturdy with a rather mediocre box art.

As usual, when it comes to Trumpeter, they manage to select some of the blandest aircrafts and miss all the nice and colourful ones.

Well, I just don’t like Trumpeters decals and usually I wouldn’t use them anyway, so that’s no big deal for me.
Besides that, I already had the decals I wanted!
But I will but several more kits and build a Camouflaged version too!


Inside the box there are several grey sprues in the usual light grey Trumpeter plastic.
Detail is finely recessed and quite restrained, best I have ever seen in a Trumpeter box, so far!
No sign of flash and the moulding seams are very fine, practically invisible.
Actually, this is the best I have seen in any kit from Trumpeter, well done!
A look at the sprues;


The clear parts are clear and free from scratches, and take a closer look; there’s NO SEAM running down the canopy, thus no need to sand and polish the canopy!
Trumpeter has already done that for you!

Each sprue comes in its own bag, as does the clear part and the decals.
There’s lots of “not accounted for” parts, these hints of things to come, an F-100E is already on the list, an F-100F two-seater (Wild Weasel?) is probably another.

In this kit Trumpeter has placed the dreaded ejection-marks on the inside of several parts, on surfaces that will be hidden or out of sight.


Nice Wheels;

The seat is acceptable, but I’ll use a resin seat from Avionix (former Black Box). As I already had one.


One”problem” is the weaponry; all fits the later versions –E/F, and can’t be used on the –C.
The –C could not use Sidewinders or napalm-pods, but you don’t get the most common “early” weaponry, ordinary “iron Bombs” (as Mk.117, Mk.82).
You have to get these from other kits!
The supersonic tanks looks good, tough!
I will use some weapons from this set;

This was more of an in-box review, but in the next part the build will begin!
Cheers
Stefan E
An F-100C Super Sabre has been on the very top of my”want-to-build” list for years.
Ever since I found, and bought this colourful decal sheet;

If you like your aircrafts well maintained and extremely colourful (as I do!), THIS aircraft is a dream come true!

NMF and all these colourful bands, it can’t be better then this and this is an aircraft I just had to build!
The problem (at the time when I bought the decals) was that no kit of the F-100C existed (yet)!
CE had a conversion set for the old ESCI F-100E kit, thus they made some –C decals.
I bought the decals on the spot, and started looking for a kit, I found an ESCI F-100E on E-bay to a fair price.
When I got the kit, I realized that this was an old, old horse, and there were no way I would “sacrifice” my wonderful decals on this.
I put the decals away in my collection and the time went by.
To my surprise and joy, Trumpeter released an F-100E in 1/32 some years ago.
I got the kit, and Cutting Edge was fast enough to release some decal-sheets for the kit.
I got some Cutting Edge decals for it, not Lavens ac, but another very colourful F-100E!
Two years passed by, and then just got under the radar and suddenly it was here, Trumpeter´s F-100C in 1/48!
FINALLY, I got my dream-kit, and I could do Col. Laven´s aircraft!
The box is of the usual Trumpeter-style, very tight, and very sturdy with a rather mediocre box art.

As usual, when it comes to Trumpeter, they manage to select some of the blandest aircrafts and miss all the nice and colourful ones.

Well, I just don’t like Trumpeters decals and usually I wouldn’t use them anyway, so that’s no big deal for me.
Besides that, I already had the decals I wanted!
But I will but several more kits and build a Camouflaged version too!


Inside the box there are several grey sprues in the usual light grey Trumpeter plastic.
Detail is finely recessed and quite restrained, best I have ever seen in a Trumpeter box, so far!
No sign of flash and the moulding seams are very fine, practically invisible.
Actually, this is the best I have seen in any kit from Trumpeter, well done!
A look at the sprues;


The clear parts are clear and free from scratches, and take a closer look; there’s NO SEAM running down the canopy, thus no need to sand and polish the canopy!
Trumpeter has already done that for you!

Each sprue comes in its own bag, as does the clear part and the decals.
There’s lots of “not accounted for” parts, these hints of things to come, an F-100E is already on the list, an F-100F two-seater (Wild Weasel?) is probably another.

In this kit Trumpeter has placed the dreaded ejection-marks on the inside of several parts, on surfaces that will be hidden or out of sight.


Nice Wheels;

The seat is acceptable, but I’ll use a resin seat from Avionix (former Black Box). As I already had one.


One”problem” is the weaponry; all fits the later versions –E/F, and can’t be used on the –C.
The –C could not use Sidewinders or napalm-pods, but you don’t get the most common “early” weaponry, ordinary “iron Bombs” (as Mk.117, Mk.82).
You have to get these from other kits!
The supersonic tanks looks good, tough!
I will use some weapons from this set;

This was more of an in-box review, but in the next part the build will begin!
Cheers
Stefan E
Ruffus

Joined: April 12, 2005
KitMaker: 343 posts
AeroScale: 111 posts

Posted: Tuesday, April 20, 2010 - 01:45 PM UTC
Now GO!! and get some aluminum foil, or are you going to take the "easy" way of painting the BMF, come on man!, is not that hard, and the F-100 does not have any compound curve. Go!! Go!! Go!!
Byron
Byron
NickZour

Joined: May 01, 2008
KitMaker: 1,437 posts
AeroScale: 1,241 posts

Posted: Thursday, April 22, 2010 - 01:13 AM UTC
I'm finished 

I'll place the model in a wooden base & I'll sent you pictures
Cheers Nick


I'll place the model in a wooden base & I'll sent you pictures

Cheers Nick


29Foxtrot

Joined: September 19, 2003
KitMaker: 708 posts
AeroScale: 674 posts

Posted: Thursday, April 22, 2010 - 05:30 AM UTC
Sadly my C47 has been put on hold, due to 2 major reasons:
Firstly I have to go over to Adelaide for 3 weeks and Secondly the local H.S's are out of Alclad II 'Polished Aluminium', so this bird will have to wait untill I return on may 13th before I can complete it.
Firstly I have to go over to Adelaide for 3 weeks and Secondly the local H.S's are out of Alclad II 'Polished Aluminium', so this bird will have to wait untill I return on may 13th before I can complete it.
Phantom2

Joined: April 18, 2006
KitMaker: 708 posts
AeroScale: 678 posts

Posted: Thursday, April 22, 2010 - 09:52 AM UTC
Hi all!
Let´s start building ”the Hun”!
First thing done was to paint the interior in the usual “Dark Gull Grey”, and the instruments black.
When everything was dry I gave the parts a dry-brush with silver, to pick out the details.
Please excuse the lousy pic!


The instrument panel was treated the same way, but here I used gloss black for the instruments.

You do get a decal for the instruments, but I don’t want my cockpit to look like “Coney Island”, so I decided to use the good ol´ paint instead.
Dark gull grey panel, gloss black instrument and dial faces from Mike Grant.
Every decal must be cut individually, so it will take a bit longer, but It´s easy enough, and the decals work perfectly with Micro-set and –sol.
It took me no more then about 20min to do this panel.
And the result speaks for itself;


Some placards in the cockpit;

I used Alclad steel to paint the exhaust, Humbrol70 Brick Red
for the burner rings, and finally a black wash to bring out detail and create some depth in the otherwise flat parts.

I also used Alclad steel on the burner tube and the exhaust.
Then I could glue the assembly in place.

The cockpit is glued on top of the intake trunking, and the whole assembly is glued in place.
The fit is easy and the cockpit and wheelwell gives a very positive location.
Looks far more complicated then it really is, but very effective and simple, and the fit is excellent.


With all the inside stuff in place I could join the fuselage halves.
Don’t forget the nose weight; this kit is a sure tail sitter, if not properly weighted in the nose.
I used a fishing weight of about 30grams (10oz.)

This is a great moment in every models creation;


In spite of all the stuff inside, it fitted perfectly!
Some filling on the underside of the nose, some in front of the windshield, and some on the spine was needed.
Very small amounts needed and easy to sand away.


Same with the lower rear end;

The instrument panel is mounted from above, together with the hud.
I had to cut the IP about 2-3mm as it sat a tad too high.
Not, enough, the hud should lie flat, with the edges flush wit the outer edges!

No problems!
The”cups” for the landing lights are separate parts, I STRONGLY advise anybody building this kit, to glue these before the fuselage halves are joined!

Mind the orientation on these parts, the cut in the cups should point out, towards the sides!
The wings were a perfect fit!

Now she’s looking like an aeroplane!
Stefan E
Let´s start building ”the Hun”!
First thing done was to paint the interior in the usual “Dark Gull Grey”, and the instruments black.
When everything was dry I gave the parts a dry-brush with silver, to pick out the details.
Please excuse the lousy pic!


The instrument panel was treated the same way, but here I used gloss black for the instruments.

You do get a decal for the instruments, but I don’t want my cockpit to look like “Coney Island”, so I decided to use the good ol´ paint instead.
Dark gull grey panel, gloss black instrument and dial faces from Mike Grant.
Every decal must be cut individually, so it will take a bit longer, but It´s easy enough, and the decals work perfectly with Micro-set and –sol.
It took me no more then about 20min to do this panel.
And the result speaks for itself;


Some placards in the cockpit;

I used Alclad steel to paint the exhaust, Humbrol70 Brick Red
for the burner rings, and finally a black wash to bring out detail and create some depth in the otherwise flat parts.

I also used Alclad steel on the burner tube and the exhaust.
Then I could glue the assembly in place.

The cockpit is glued on top of the intake trunking, and the whole assembly is glued in place.
The fit is easy and the cockpit and wheelwell gives a very positive location.
Looks far more complicated then it really is, but very effective and simple, and the fit is excellent.


With all the inside stuff in place I could join the fuselage halves.
Don’t forget the nose weight; this kit is a sure tail sitter, if not properly weighted in the nose.
I used a fishing weight of about 30grams (10oz.)

This is a great moment in every models creation;


In spite of all the stuff inside, it fitted perfectly!
Some filling on the underside of the nose, some in front of the windshield, and some on the spine was needed.
Very small amounts needed and easy to sand away.


Same with the lower rear end;

The instrument panel is mounted from above, together with the hud.
I had to cut the IP about 2-3mm as it sat a tad too high.
Not, enough, the hud should lie flat, with the edges flush wit the outer edges!

No problems!
The”cups” for the landing lights are separate parts, I STRONGLY advise anybody building this kit, to glue these before the fuselage halves are joined!

Mind the orientation on these parts, the cut in the cups should point out, towards the sides!
The wings were a perfect fit!

Now she’s looking like an aeroplane!
Stefan E
 |


