Air Campaigns
Want to start or join a group build? This is where to start.
Official BF 109 Campaign
AussieReg
Staff MemberAssociate Editor
AUTOMODELER
#007
_VISITCOMMUNITY
Victoria, Australia
Joined: June 09, 2009
KitMaker: 8,156 posts
AeroScale: 3,756 posts
Posted: Sunday, May 30, 2010 - 01:29 PM UTC
Super detail work Hermann, going really well on your build !!

I've been plodding along and playing with some masking methods so it's been going slowly. Got the RLM75 on today.


Cheers, D
thegirl
_VISITCOMMUNITY
Alberta, Canada
Joined: January 19, 2008
KitMaker: 6,743 posts
AeroScale: 6,151 posts
Posted: Monday, May 31, 2010 - 02:42 AM UTC
Very nice Hermann , your cockpit is great !

Hey D ! , looking most excellent so far . What did you use for the masking ?

I do have some news here to share with you kind folks . In a few weeks I might be away for a bit . If that is the case Damian will take over the campiagn and lead you guy's into victory . Will keep you folks up-dated on this .

Thanks
AussieReg
Staff MemberAssociate Editor
AUTOMODELER
#007
_VISITCOMMUNITY
Victoria, Australia
Joined: June 09, 2009
KitMaker: 8,156 posts
AeroScale: 3,756 posts
Posted: Monday, May 31, 2010 - 03:15 AM UTC
Hi Terri. Fingers crossed it doesn't come to that, but if it does we will miss you and I will keep the troops in line until you return.

For my masking I have been using old manilla folder card, tracing an outline of the wing, sketching in the desired camouflage lines, then cutting the various shapes. I hold them in place with very thin spots of blue-tac and spray from directly above the surface. The lines are nice and crisp with no noticeable overspray going under the mask.

If you look at the pic from above, the right wing has been done freehand for the RLM75, the masks will be used for the RLM83.

Cheers, D
thegirl
_VISITCOMMUNITY
Alberta, Canada
Joined: January 19, 2008
KitMaker: 6,743 posts
AeroScale: 6,151 posts
Posted: Tuesday, June 01, 2010 - 02:36 AM UTC
Thanks D
AussieReg
Staff MemberAssociate Editor
AUTOMODELER
#007
_VISITCOMMUNITY
Victoria, Australia
Joined: June 09, 2009
KitMaker: 8,156 posts
AeroScale: 3,756 posts
Posted: Saturday, June 05, 2010 - 04:19 PM UTC
Hi all, progress report and request for advice . . .

Camo is on


Next step is to give it a quick coat of clear then I want to do something to blend the colours, and give some weathering and streaking effects. I'm going to try airbrushing with highly thinned paint (should be called tinted thinner maybe??). Should I go with a dark colour like RLM66 or a pale colour in a grey or a buff, or maybe a bit of each to simulate some staining as well as some fading ??

My thoughts are to go with the pale colour first, then clear coat and decals, then the darker staining streaks after to weather the markings as well.

As always, thanks in advance.

Cheers, D
Bigrip74
_VISITCOMMUNITY
Texas, United States
Joined: February 22, 2008
KitMaker: 5,026 posts
AeroScale: 2,811 posts
Posted: Saturday, June 05, 2010 - 05:11 PM UTC
Keep it up D., I am using your post as a guide for my Airfix 109F build. Which is sitting next to the P-51B, I am playing both at the same time.

Bob

warreni
_VISITCOMMUNITY
South Australia, Australia
Joined: August 14, 2007
KitMaker: 5,926 posts
AeroScale: 2,201 posts
Posted: Saturday, June 05, 2010 - 06:05 PM UTC
Hi Everyone.

This was going to be for the Aces II campaign, but I am not one for trolling through photos looking for a picture of a specific plane. I would rather spend my time building things..

SO here is my finished 1/32 Eduard Bf109E-1. I had quite a few problems with the nose area of the aircraft as my fuselage was warped but it was not apparent until I had the fuselage together and wings on. At that stage it was a bit late to try and unwarp it and I had to cut and sand until I got everything to fit OK. Other problem I found was that the machine guns under the top of the nose did not allow the panel to fit over them so I had to remove the piece before putting the cowl in place.. which of course was also a bit of a pain due to the previously mentioned warpage.

Anyway, here it is.. Totally OOB except for the antenna wires


Maybe if I am lucky I can find another subject for the Aces High II campaign.. with a photo in the instructions..
Bigrip74
_VISITCOMMUNITY
Texas, United States
Joined: February 22, 2008
KitMaker: 5,026 posts
AeroScale: 2,811 posts
Posted: Saturday, June 05, 2010 - 06:21 PM UTC
Warren, that is a really nice build and the canopy looks great. Nice Job.

Bob
EDC
_VISITCOMMUNITY
Christchurch, New Zealand
Joined: January 16, 2006
KitMaker: 101 posts
AeroScale: 74 posts
Posted: Saturday, June 05, 2010 - 09:29 PM UTC
Hi Guys, I just bought a 1/32 Hasegawa Bf109e for my next build, so I think I'll have to join this campaign.
thegirl
_VISITCOMMUNITY
Alberta, Canada
Joined: January 19, 2008
KitMaker: 6,743 posts
AeroScale: 6,151 posts
Posted: Sunday, June 06, 2010 - 02:42 PM UTC
Nice build Warren ! Canopy masking turned out nice and clean .

Glad to have you on Grant !
hkopper
_VISITCOMMUNITY
Florida, United States
Joined: March 01, 2008
KitMaker: 529 posts
AeroScale: 340 posts
Posted: Monday, June 07, 2010 - 04:03 AM UTC
So far I've joined the fuselage halves:


I also assembled the wings with no issue. The only problems arose with the addition of PE details for the wheel well. I just couldn't get the PE to conform and wrap around the well:


Thats it for today ..thanks for watching,

Hermann
Emeritus
_VISITCOMMUNITY
Uusimaa, Finland
Joined: March 30, 2004
KitMaker: 2,845 posts
AeroScale: 1,564 posts
Posted: Tuesday, June 08, 2010 - 02:21 AM UTC
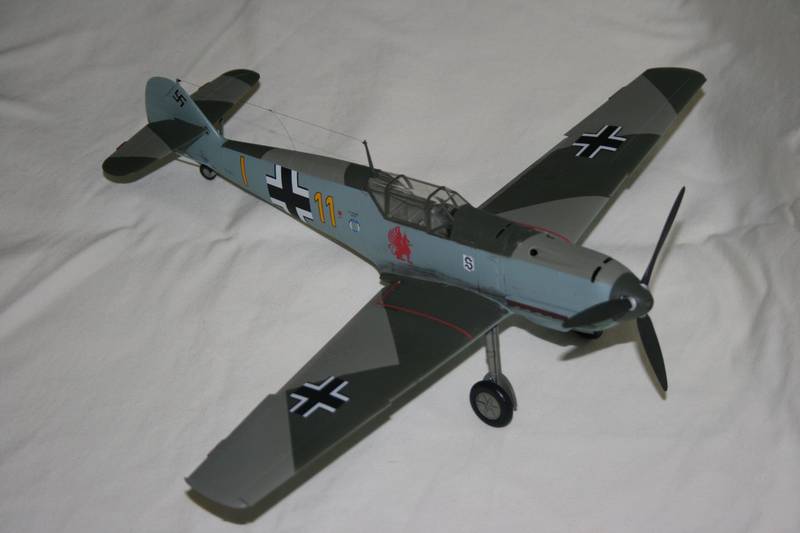
Well well, time for another update after quite a while.

In addition to removing the umbrella mounts of the trop version from the left fuselage half, the two filler hatches of the MW-50 boost system had to be filled, as this is to be a G-6, not a G-14. (and as this is the G-14 boxing I have, it of course isn't mentioned in the instructions)


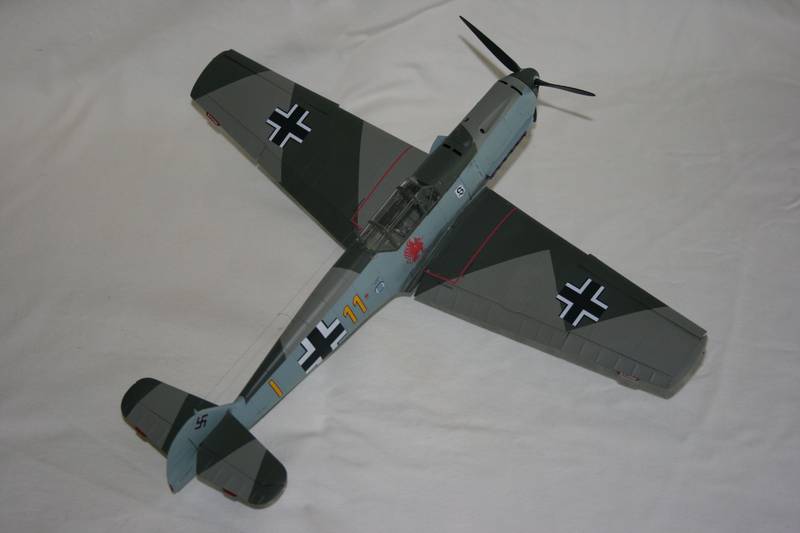
The cockpit's done and the build's ready for closing the fuselage:


As the PE fret supplied in the Aires cockpit set lacked the two prominent handles on the instrument panel, I resorted to slightly modified bomb rack pins from Eduard's Hellcat. Another thing missing was the magneto selector switch knob, which I replicated with a tiny ball of milliput. The gunsight is from Quickboost, as the cockpit set supplied a Revi 12.
Here's a better pic of the sight:

The colored sun shade glass was tinted with now discontinued Citadell brown ink.


A bit strangely, the acetate film going behind the main instrument panel covereted only half of the PE panel (where the gauges are located). To get rid of the resulting step in the back, I glued in a second piece of film from some left-over pieces I had in my spares box.


I did some decal shopping last week and now I got the full stencils I was longing for:

Looks like I can also use the national markings as well.


thegirl
_VISITCOMMUNITY
Alberta, Canada
Joined: January 19, 2008
KitMaker: 6,743 posts
AeroScale: 6,151 posts
Posted: Wednesday, June 09, 2010 - 03:55 AM UTC
Excellent progress Hermann and Eetu !

Hermann , are you planning on leaving the cowl panels off to show off the engine ? The details you added to this area really sharpen up the over all effect , well done

Eetu , I always admire your painting skills and the detailing you add to your builds . Now only if you would tackle a WW 1 subject !
thegirl
_VISITCOMMUNITY
Alberta, Canada
Joined: January 19, 2008
KitMaker: 6,743 posts
AeroScale: 6,151 posts
Posted: Thursday, June 10, 2010 - 04:21 AM UTC
Here is where I'm at with my build . Ready for primer , some what .....


Bigrip74
_VISITCOMMUNITY
Texas, United States
Joined: February 22, 2008
KitMaker: 5,026 posts
AeroScale: 2,811 posts
Posted: Thursday, June 10, 2010 - 04:29 AM UTC
Terri, what kit is that? Looking good so far.

Bob
PolarBear
_VISITCOMMUNITY
Västra Götaland, Sweden
Joined: February 23, 2005
KitMaker: 820 posts
AeroScale: 629 posts
Posted: Thursday, June 10, 2010 - 09:31 AM UTC
Hi all!

Looks like this campaign has been off to a tremendous start! I truly enjoyed browsing through all the entries in this thread! Great work so far!

Here's my project! The Avia S-199. My plan is to try some new (to me, that is) techniques of shading, chipping and wheathering! All ideas on how to acheive a wheathered, war-torn, sun-bleached, dirty and grimy look are most welcome! Enough with them shiny birds - I'm going sully with this one!


Cheers! // PolarBear
Bigrip74
_VISITCOMMUNITY
Texas, United States
Joined: February 22, 2008
KitMaker: 5,026 posts
AeroScale: 2,811 posts
Posted: Thursday, June 10, 2010 - 10:01 AM UTC
Björn, nice set of goodies there. I will watch for the pictures, looks like an interesting build.

Bob
thegirl
_VISITCOMMUNITY
Alberta, Canada
Joined: January 19, 2008
KitMaker: 6,743 posts
AeroScale: 6,151 posts
Posted: Friday, June 11, 2010 - 02:05 AM UTC

Quoted Text

Terri, what kit is that? Looking good so far.

Bob


Hi Bob , the kit is Hasegawa Messerschmitt Bf109E " Hahn" . Kit number 09746-2400 . Nice kit and the fit is great ! only needed filling in the one spot . Cockpit could use better detail , but that is just me .
Red4
_VISITCOMMUNITY
California, United States
Joined: April 01, 2002
KitMaker: 4,287 posts
AeroScale: 1,164 posts
Posted: Friday, June 11, 2010 - 01:54 PM UTC
Well I finally got started late this afternoon. Gotta love the ease with which Hasegawa 109's go together. I added Eduard color PE belts to the seat. Other than that the interior is OOB. At this rate it will be ready for paint in the next couple of days. I am making a concentrated effort to finish builds for all of the campaigns I am entered in..Lord willin' and the creek don't rise So far so good. I chose this one based on the interesting paint scheme it wore as a night fighter. Half of the bottom is black, as is the landing gear legs which will be a nice change of pace from RLM 02. More to follow. Thanks, "Q"

Bigrip74
_VISITCOMMUNITY
Texas, United States
Joined: February 22, 2008
KitMaker: 5,026 posts
AeroScale: 2,811 posts
Posted: Friday, June 11, 2010 - 02:04 PM UTC
Matt, you are in deep trouble with all of the campaigns that you have enlisted. But as fast as you build there should be no problem. This scheme I will wait to see some photos of.

Bob
Red4
_VISITCOMMUNITY
California, United States
Joined: April 01, 2002
KitMaker: 4,287 posts
AeroScale: 1,164 posts
Posted: Friday, June 11, 2010 - 02:59 PM UTC
Tell me about it Bob. lol. Check out my U2 Speed build over on the Cold War forum. That set me back a couple days on my campaign builds...ok, maybe not.. lol. The scheme on this one is Gray Violet and green over light blue with one lower wing in flat black. Leading edges are wavy. And with the large US tank slung under it, it sets it apart as well. Thanks, "Q"
thegirl
_VISITCOMMUNITY
Alberta, Canada
Joined: January 19, 2008
KitMaker: 6,743 posts
AeroScale: 6,151 posts
Posted: Saturday, June 12, 2010 - 02:51 AM UTC
Hi Matt , this will be interesting markings . Looking forward to it . I'm only in two campaigns more then enough for me . Don't know how you guy's can be in so many at once .
Red4
_VISITCOMMUNITY
California, United States
Joined: April 01, 2002
KitMaker: 4,287 posts
AeroScale: 1,164 posts
Posted: Saturday, June 12, 2010 - 03:45 AM UTC

Quoted Text

Don't know how you guy's can be in so many at once .

I've cloned myself. "Q"
Emeritus
_VISITCOMMUNITY
Uusimaa, Finland
Joined: March 30, 2004
KitMaker: 2,845 posts
AeroScale: 1,564 posts
Posted: Saturday, June 12, 2010 - 08:46 AM UTC

Quoted Text


Eetu , I always admire your painting skills and the detailing you add to your builds . Now only if you would tackle a WW 1 subject !


Thanks! Glad to hear you like my stuff.
Tackle a WW1 subject? I have! A Sopwith Camel, some half-a-decade ago. Looking at it now makes me realize how much my work has improved since, but still think it turned pretty neat.
Though I haven't built much WW1 stuff, I'll never say never.

Jumping back to monoplane era this thread is all about, here's my 109 at the moment, fuselage glued together moments ago.


Dryfitting the gunsight to it's mounting hole: