

Eetu, the gunsight is fantastic. Nice work so far keep the photos coming.
Bob
Air Campaigns
Want to start or join a group build? This is where to start.
Want to start or join a group build? This is where to start.
Hosted by Frederick Boucher, Michael Satin
Official BF 109 Campaign

Bigrip74

Joined: February 22, 2008
KitMaker: 5,026 posts
AeroScale: 2,811 posts

Posted: Saturday, June 12, 2010 - 09:15 AM UTC
Red4
Joined: April 01, 2002
KitMaker: 4,287 posts
AeroScale: 1,164 posts

Posted: Sunday, June 13, 2010 - 07:38 AM UTC
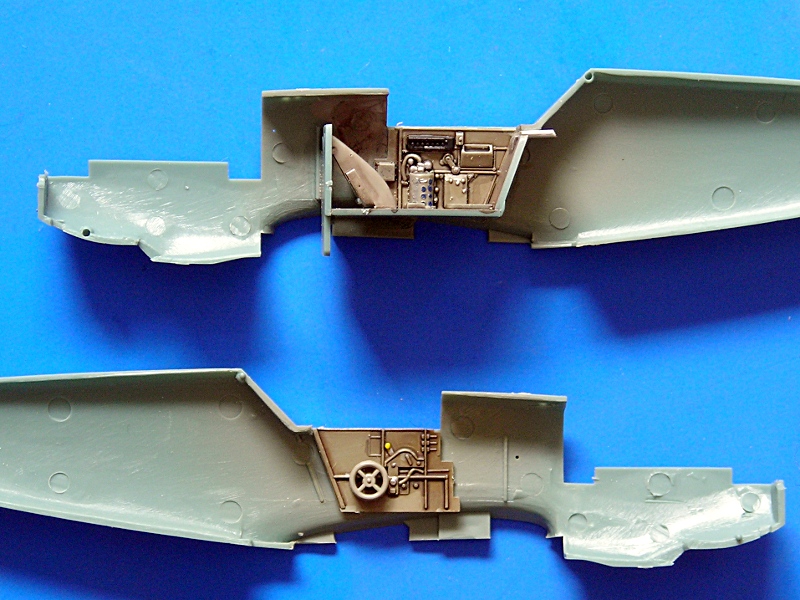
I made a little more progress on my G-10 night fighter. Waiting on some Mr. Disolved putty to dry so I can continue. I got the small items such as the spinner, props, exhaust and lading gear painted. I added brake lines to the gear legs and installed and painted the tires. The compression struts are wrapped in BMF rather than painted. They will tone down in apprearance once a flat coat is applied. There is a seam that is visible on the bottom scoop. Rather than try and dress it I cut a piece of .005 sheet and glued it over it. Once painted it won't be seen inside the scoop. Thanks, "Q" 


Bigrip74
Joined: February 22, 2008
KitMaker: 5,026 posts
AeroScale: 2,811 posts
Posted: Sunday, June 13, 2010 - 08:44 AM UTC
Matt: nice job so far, have you run into any fit problems with the wing?
Here is where I am at with my Airfix Bf109F, poor fit at all joints fuselage, wing, tailplane, canopy, but tape and Squadron will help me to destroy any detail that was on the surface. I may even try to rescribe
  after the sanding and filing. The only item that I was pleased with was the Tamiya tape ida for seat belts that I borrowed from this site. Well look and laugh, I cried


Notice the plastic shims to fill the fuselage seams, I did not sand the halves but there was a gap that ran from the nose to the cockpit thas connected at the nose became wider in the middle then connected at the cockpit again. I wonder what happen at the manufacturerer
  Oh well Airfix and Revell keeps me on my toes.
Bob
Here is where I am at with my Airfix Bf109F, poor fit at all joints
fuselage, wing, tailplane, canopy, but tape and Squadron will help me to destroy any detail that was on the surface. I may even try to rescribe after the sanding and filing. The only item that I was pleased with was the Tamiya tape ida for seat belts that I borrowed from this site. Well look and laugh, I cried 


Notice the plastic shims to fill the fuselage seams, I did not sand the halves but there was a gap that ran from the nose to the cockpit thas connected at the nose became wider in the middle then connected at the cockpit again.
I wonder what happen at the manufacturerer Oh well Airfix and Revell keeps me on my toes. Bob
Red4
Joined: April 01, 2002
KitMaker: 4,287 posts
AeroScale: 1,164 posts
Posted: Sunday, June 13, 2010 - 09:06 AM UTC
No major fit issues with mine Bob. The rack for the drop tank ended up sitting off center when I went to install it into the holes I opened up from inside the wing.  I popped it off, removed the locating pins and then re-attached it so that it was centered on the wing bottom. Otherwise it is fitting very nice. Keep at it with the Airfix kit, you'll be a better modeler when you're done. Instead of trying to rescribe, try painting them on. Same method I did with that U2 over on the Cold War forums. You could use a really diluted black and just mist the trailing edges of where the panels would be. Trying rescribe over putty is usually never productive as it ends up cracking/breaking. Just a suggestion.... I hear ya' about Revell and Airfix keeping you on your toes.. lol. "Q"
I popped it off, removed the locating pins and then re-attached it so that it was centered on the wing bottom. Otherwise it is fitting very nice. Keep at it with the Airfix kit, you'll be a better modeler when you're done. Instead of trying to rescribe, try painting them on. Same method I did with that U2 over on the Cold War forums. You could use a really diluted black and just mist the trailing edges of where the panels would be. Trying rescribe over putty is usually never productive as it ends up cracking/breaking. Just a suggestion.... I hear ya' about Revell and Airfix keeping you on your toes.. lol. "Q"Bigrip74
Joined: February 22, 2008
KitMaker: 5,026 posts
AeroScale: 2,811 posts
Posted: Sunday, June 13, 2010 - 09:46 AM UTC
Matt, you have pricked up my ears re: the painting on scribing lines. I will look at your U2 post, have you any other advice on the matter?
Bob
Bob
Red4
Joined: April 01, 2002
KitMaker: 4,287 posts
AeroScale: 1,164 posts
Posted: Sunday, June 13, 2010 - 10:50 AM UTC
No problem. Glad to help. Don't try to replace every single one of them. I would do the main ones that follow the wing spar, and a few front to aft, a couple lengthwise on the fuselage, and again, a couple that go around it. You can trick the eye into believing it is seeing what isn't there. Go lightly at first and build your color. Easeir to darken it a bit than knock it down if it gets too heavy. If the paint is more pronounced in some areas of the line than others, don't sweat it. As long as they are complete from start to finish it'll look the part. Would suggest giving it a try on a scrap kit first. Hope it helps and good luck.
"Q"
"Q"

AussieReg

#007

Joined: June 09, 2009
KitMaker: 8,156 posts
AeroScale: 3,756 posts
Posted: Monday, June 14, 2010 - 12:35 AM UTC
Hiya folks (volks ??). I have managed to spend some time on this build last night and most of the top/port side decals and stencils are in place. I'm very happy with the performance of these decals, from the Revell Bf 109 K-4 kit. I use Mr Mark Setter and Softer, very sparingly, and the decals settle very nicely into the contours and panel lines. Once the decals are on I will give it a coat of clear and then on to some weathering.

All critiques welcome, I'm enjoying this build a lot.
P.S. Thanks Q for the advice via PM
P.P.S. This is a Hasegawa kit, the Revell decals were swapped for the kit decals with Tony (Longknife). Has anybody heard from Tony, he has been AWOL for many months now ???
Cheers, D
All critiques welcome, I'm enjoying this build a lot.
P.S. Thanks Q for the advice via PM
P.P.S. This is a Hasegawa kit, the Revell decals were swapped for the kit decals with Tony (Longknife). Has anybody heard from Tony, he has been AWOL for many months now ???
Cheers, D


thegirl

Joined: January 19, 2008
KitMaker: 6,743 posts
AeroScale: 6,151 posts
Posted: Monday, June 14, 2010 - 04:10 AM UTC
Nice progress Matthew and Bob  My build is still waiting for it's primer
Damian , wow dude ! you are doing one very nice job on this build . One of your best so far . Might not be a Chevy , but still very impressive
My build is still waiting for it's primer Damian , wow dude ! you are doing one very nice job on this build . One of your best so far . Might not be a Chevy , but still very impressive
Bigrip74
Joined: February 22, 2008
KitMaker: 5,026 posts
AeroScale: 2,811 posts
Posted: Monday, June 14, 2010 - 05:32 AM UTC
Damian I agree with Terri, very impressive even though it is not a chevy  . Very nice camo, decals so far, keep the photos coming. I have not heard from (longknife) either.
Bob
. Very nice camo, decals so far, keep the photos coming. I have not heard from (longknife) either.Bob

md72

#439
Joined: November 05, 2005
KitMaker: 4,950 posts
AeroScale: 3,192 posts

Posted: Monday, June 14, 2010 - 05:38 AM UTC
Quoted Text
One of your best so far . Might not be a Chevy
Yes, but D sees it as the lone Chevy in a sky full of Ford built bombers.
Looks really good Damian!


Snorri23
Joined: March 25, 2010
KitMaker: 514 posts
AeroScale: 244 posts
Posted: Monday, June 14, 2010 - 05:45 AM UTC
As far as I know the fuel tank was off set from centre to compensate for the torque. As for adding photos to the forum I am confused. I read the faq et fail to obtain the page or such which it is talking about. Thus I have up loaded my photos on my gallery. Would graciously accept any assistance in solving my delimina.
Bigrip74
Joined: February 22, 2008
KitMaker: 5,026 posts
AeroScale: 2,811 posts
Posted: Monday, June 14, 2010 - 06:20 AM UTC
[quote]Yes, but D sees it as the lone Chevy in a sky full of Ford built bombers.
md72 [quote]
Mark can I use your quote, sounds great!
Bob
md72 [quote]
Mark can I use your quote, sounds great!
Bob
Bigrip74
Joined: February 22, 2008
KitMaker: 5,026 posts
AeroScale: 2,811 posts
Posted: Monday, June 14, 2010 - 10:41 AM UTC
I cut the shims off, applied plastic over the bad fit at the air scooop, tape, nasty putty, and sanded a little.


Took the tape off and found that I will need to reapply tape and sand much more.
Bob


Took the tape off and found that I will need to reapply tape and sand much more.
Bob

Siderius
Joined: September 20, 2005
KitMaker: 1,747 posts
AeroScale: 1,673 posts
Posted: Monday, June 14, 2010 - 03:27 PM UTC
Well, late to the party again I see. Oh well, here is the entry I intend to build for this campaign. Of course it is in the somewhat small scale of 1/72. Yes, those are my feet at the bottom of the photo! Russell

I'm actually thinking of doing the underside and side fuselage color in the dreaded RLM 84!!! No say it isn't so! Where is your supporting reference material Russell!
RussellI'm actually thinking of doing the underside and side fuselage color in the dreaded RLM 84!!! No say it isn't so! Where is your supporting reference material Russell!

Red4
Joined: April 01, 2002
KitMaker: 4,287 posts
AeroScale: 1,164 posts
Posted: Monday, June 14, 2010 - 03:58 PM UTC
My G-10 night fighter is making progress. I attempted to apply the the spinner spiral decal and was rewarded with a shattered decal. I cut thin strips of Tamiya tape and made a spiral with it, then filled in the areas I didn't want black paint on. Didn't come out too bad, but I think I will redo it. Camo is applied and is drying. The green initially called for RLM 83, but after shooting it, I decided it was too light in color, so I found a slightly darker color and went with it. I like it much better. All the paint pattern is free hand. Paints used were Aeromaster, Floquil, and Humbrol cut with lacquer thinner. All three go down really smooth. Only drawback is they take a while longer to dry than say Model Master. I can live with that. This particular paint scheme is why I chose this plane. Different than most 109's, plus the heavy weapons load out. More pics to follow as I make more progress. Thanks, "Q" 


I cut thin strips of Tamiya tape and made a spiral with it, then filled in the areas I didn't want black paint on. Didn't come out too bad, but I think I will redo it. Camo is applied and is drying. The green initially called for RLM 83, but after shooting it, I decided it was too light in color, so I found a slightly darker color and went with it. I like it much better. All the paint pattern is free hand. Paints used were Aeromaster, Floquil, and Humbrol cut with lacquer thinner. All three go down really smooth. Only drawback is they take a while longer to dry than say Model Master. I can live with that. This particular paint scheme is why I chose this plane. Different than most 109's, plus the heavy weapons load out. More pics to follow as I make more progress. Thanks, "Q" Siderius
Joined: September 20, 2005
KitMaker: 1,747 posts
AeroScale: 1,673 posts
Posted: Monday, June 14, 2010 - 04:15 PM UTC
Great job Matt. I don't know if I knew that 109's were used as night fighters. Of course I am familiar with the Wild Sau tactics used by 190's, just didn't know 109's did duty. Interesting. Russell 
P.S. Damian, your 109 looks great, I like it!
P.S. Damian, your 109 looks great, I like it!
Bigrip74
Joined: February 22, 2008
KitMaker: 5,026 posts
AeroScale: 2,811 posts
Posted: Monday, June 14, 2010 - 04:41 PM UTC
Nice job Matt, love that spinner.
Bob
Bob

werx07
Joined: February 21, 2010
KitMaker: 26 posts
AeroScale: 24 posts
Posted: Monday, June 14, 2010 - 05:12 PM UTC
It's nice to see so many nice builds coming along. I finally got around to doing some more work on mine. I decided to go with a different paint scheme.


jaypee

Joined: February 07, 2008
KitMaker: 1,699 posts
AeroScale: 1,384 posts

Posted: Monday, June 14, 2010 - 07:23 PM UTC
Excellent details Werx.
Here is my 4th Gunsight. Pinged the kit one.
Built 4 up and lost the best 2 pinging into the boxes in the spare room. Grrrr
This one is the third best but it will have to do. Not much return for 2 hours bench time

Here is my 4th Gunsight. Pinged the kit one.
Built 4 up and lost the best 2 pinging into the boxes in the spare room. Grrrr
This one is the third best but it will have to do. Not much return for 2 hours bench time

Bigrip74
Joined: February 22, 2008
KitMaker: 5,026 posts
AeroScale: 2,811 posts
Posted: Monday, June 14, 2010 - 07:30 PM UTC
the gunsight looks great JP, and the 109 also looks good.
Bob
Bob

alpha_tango

Joined: September 07, 2005
KitMaker: 5,609 posts
AeroScale: 5,231 posts
Posted: Tuesday, June 15, 2010 - 04:21 AM UTC
Hi gang
some very nice builds already!!!
I started the Academy Bf109E-3 "Heinz Bär" kit as a "quick" build for the campaign. I just want to try the camo-decals, but I will not do Heinz Bär but Gerhard Schöpfel. The personal markings will come from an old Techmod sheet ... here is the pit so far:
all the best
Steffen

Bigrip74
Joined: February 22, 2008
KitMaker: 5,026 posts
AeroScale: 2,811 posts
Posted: Tuesday, June 15, 2010 - 08:09 AM UTC
Nice office there Steffen, how did you wash it and what were the colors. I am not an RLM intuitive person (I do not know much about German colors).
Bob
Bob
alpha_tango
Joined: September 07, 2005
KitMaker: 5,609 posts
AeroScale: 5,231 posts
Posted: Tuesday, June 15, 2010 - 08:15 AM UTC
Hi Bob
it is Gunze with Devlan Mud Wash (Citadel/Games Workshop) also a bit of Badab black here and there. Colour balance is a bit to the red ... it looks better in person. All in all this shall be OOB and no fancy stuff. I just want to try the decals...
I have another 109 project running .. .started it at the beginning of the year but cannot forsee when it will be finished (so you may have guessed already) it is a slight bit more ambitious
BTW I started a BLog in "WW2"
cheers
Steffen
Bigrip74
Joined: February 22, 2008
KitMaker: 5,026 posts
AeroScale: 2,811 posts
Posted: Tuesday, June 15, 2010 - 09:49 AM UTC
Steffen, thanks for the reply I will research those colors more.
Bob
Bob
Red4
Joined: April 01, 2002
KitMaker: 4,287 posts
AeroScale: 1,164 posts
Posted: Tuesday, June 15, 2010 - 01:51 PM UTC
Not much left to do on this one. Waiting on the gloss coat to dry, then decals flat coat and final assembly. More to follow. Thanks, "Q"


 |

WEB HOSTING BY


Copyright ©2021 AeroScale and Kitmaker Network, a subsidiary of Silver Star Enterprises
All Rights Reserved. Please read our Conditions of Use and Privacy Policy.
All Rights Reserved. Please read our Conditions of Use and Privacy Policy.