Official Sea Plane Campaign Thread
Victoria, Australia
Joined: August 23, 2007
KitMaker: 629 posts
AeroScale: 539 posts
Posted: Sunday, December 27, 2009 - 05:39 PM UTC
Quoted Text
Hello All,
I sent in a request for a gallery. I am very sorry about missing that for the campaign.
I hope all of you will forgive me for the lapse
Actually there has been a gallery for this campaign from the very start, so no lapse at all Bruce. It's in the "aeroscale campaigns 2009" section.
Andrew
Current Projects:
Eduard 1/48 F6F-3 Hellcat
Hasegawa 1/350 Yukikaze
1/6 JJ Models Sarah "Gothic"

#021
Joined: August 02, 2007
KitMaker: 2,458 posts
AeroScale: 197 posts
Posted: Sunday, December 27, 2009 - 09:59 PM UTC
Hello Andrew,
When I looked for the gallery I looked at the active campaigns section and could not find it. It has all of Armorama, MSW and some others there so I guessed I forgot to ask for a gallery.
This is my first campaign here and this site is set up different from the sites I normally run campaigns on.
Thanks for clearing it up.
Cheers,
Bruce

Fair Winds and Following Sea's, Always.
To my Friends, Death is as Light as a Feather, Duty is as Heavy as a Mountain.
I will all have my Hand on your Shoulder. Do not grieve for me I will allways be there for You.
California, United States
Joined: April 01, 2002
KitMaker: 4,287 posts
AeroScale: 1,164 posts
Posted: Monday, December 28, 2009 - 04:19 AM UTC
I found the gallery and yes it is buried. Unless you know where to look it proves difficult to find.

I'll get my pics posted to the gallery asap. I also made some progress on my Albatross last night by getting the white and Intl. Orange shot on her. Hoping to continue today. Thanks, "Q"


"Don't fear the night, fear what hunts at night"
California, United States
Joined: April 01, 2002
KitMaker: 4,287 posts
AeroScale: 1,164 posts
Posted: Monday, December 28, 2009 - 10:50 AM UTC
"Don't fear the night, fear what hunts at night"
Colorado, United States
Joined: January 25, 2004
KitMaker: 11,669 posts
AeroScale: 11,011 posts
Posted: Monday, December 28, 2009 - 07:16 PM UTC
Quoted Text
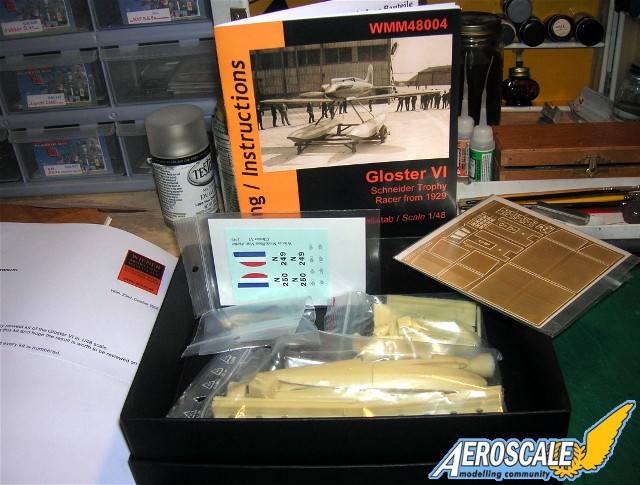
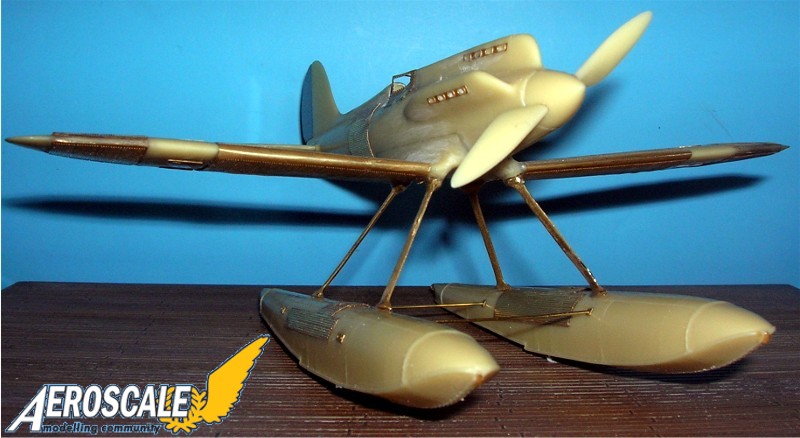
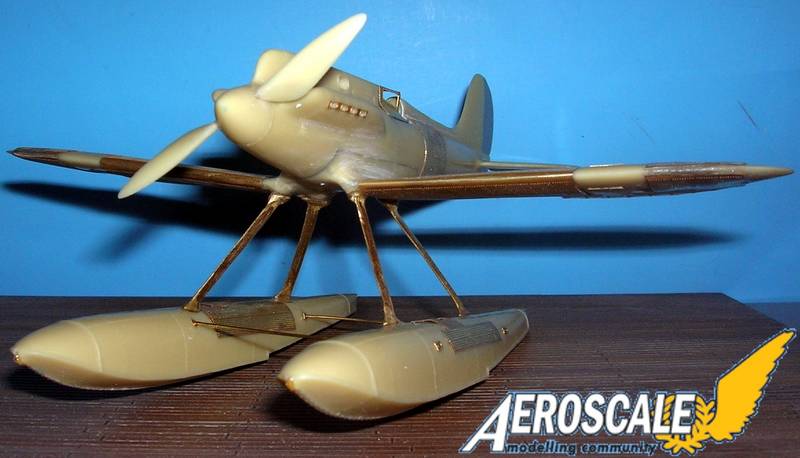
Two Gloster aircraft (in the 1929 air race) were registered with RAF numbers N249 & N250. They showed promise and high speed, but also had significant problems with fuel supply when banking that led to engine cut-outs. For such a risky business as low-altitude air-racing, this was an unacceptable risk and the aircraft were withdrawn from competition in the 1929 Schneider Trophy, leaving the way clear for the Supermarine S.6 to win. . . Now in the Austrian Aviation birthplace from Wiener Modellbau Manufactur we are given an excellent kit. My review example came with no warp in the resin. Definately a high quality kit. The float / pontoon struts are poured brass instead of typical white metal found in other kits. This is a great boon as it will add strength and longevity to the over-all build.
The build has been underway for a few days now.
Here I added some bits to the cockpit. Not having much to go on for the cockpit I have to admit to some gizmology.

The Sutton Farm Pilot Harness was developed late in WWI and under a series of modifications served well into WWII on British aircraft. Here I am including an Eduard prepainted PE fret.
Here is the pilot's right side fuselage joint. It reminds me of the moldings of the Pfalz D.III / IIIa types.
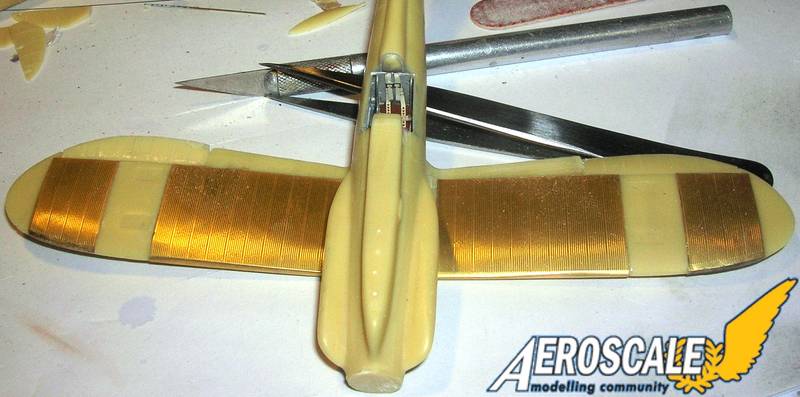
Here are the PE pieces representing the wing mounted (upper and lower surfaces)radiator. The trick here is to anchor the PE parallel to the aileron and work it like laying wall to wall carpeting. Work carefully to wrap it around the wing leading edge.
". . .The most important thing is to know why you build and then get the most that you can out of building." via D.D.
Colorado, United States
Joined: January 25, 2004
KitMaker: 11,669 posts
AeroScale: 11,011 posts
Posted: Monday, December 28, 2009 - 07:26 PM UTC
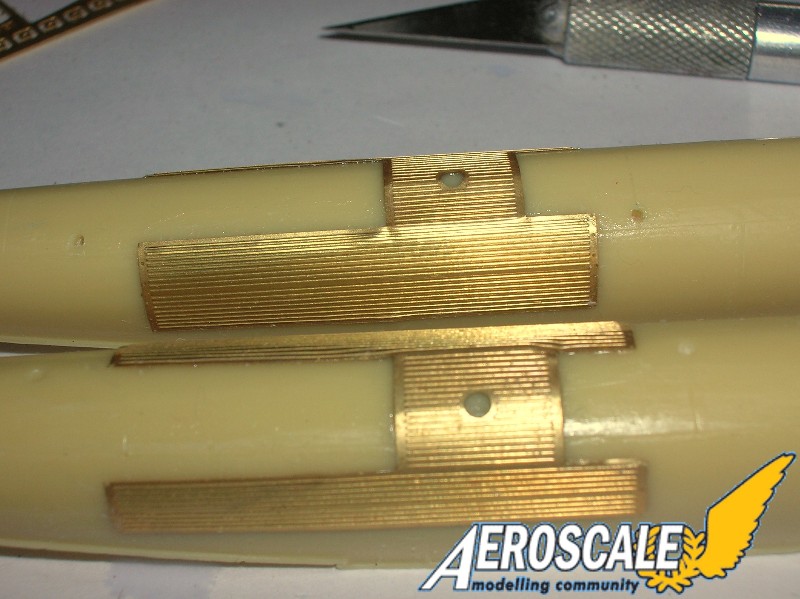
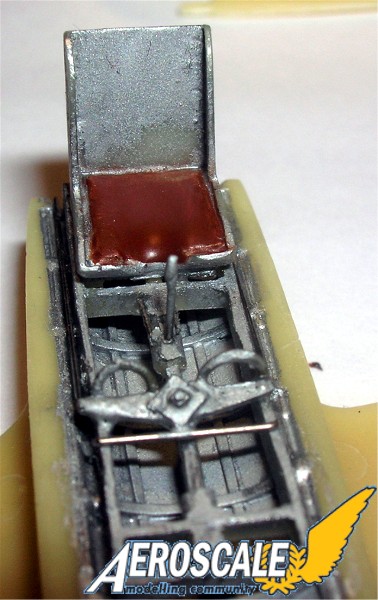
Here are the float radiator applications.
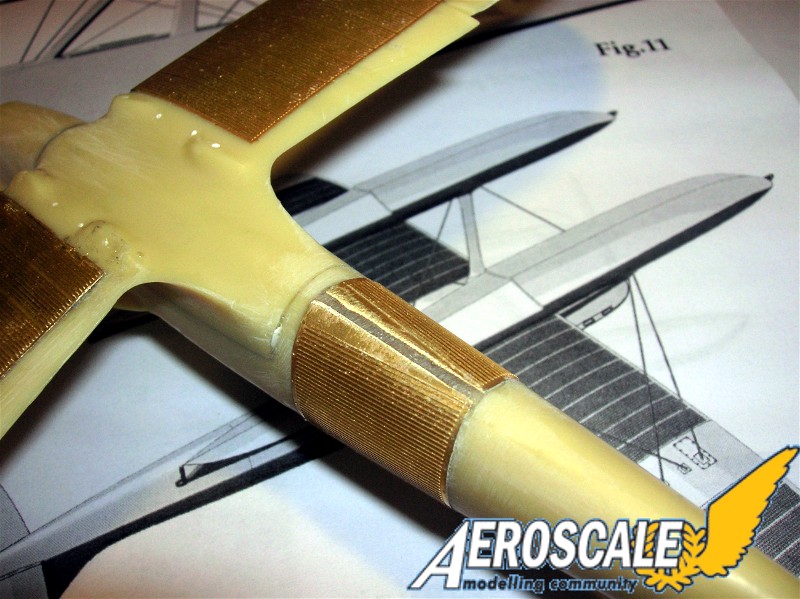
This is a shot of the underbelly and the lower sections of the fuselage mounted radiators.
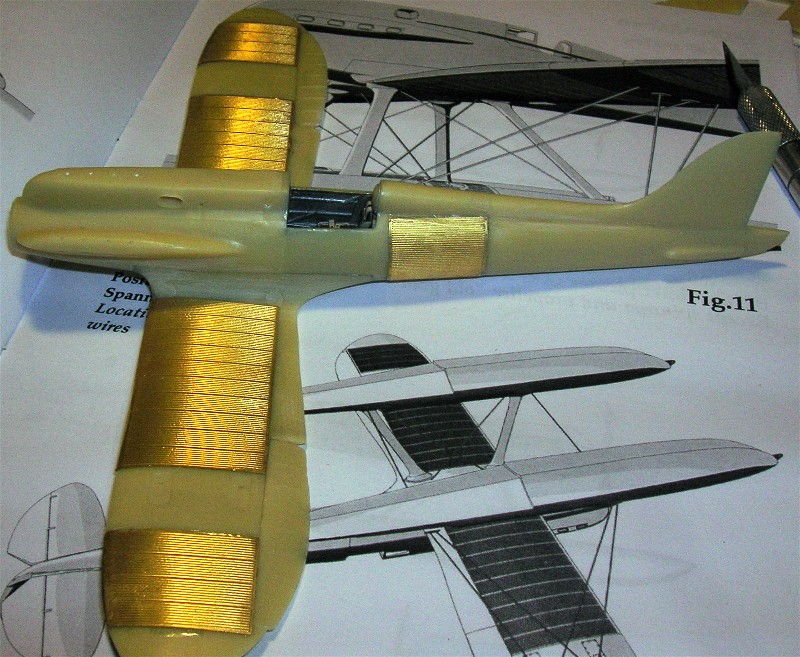
The fuselage and wing radiators are in place.
". . .The most important thing is to know why you build and then get the most that you can out of building." via D.D.
California, United States
Joined: April 01, 2002
KitMaker: 4,287 posts
AeroScale: 1,164 posts
Posted: Tuesday, December 29, 2009 - 03:17 AM UTC
Nice looking build so far Stephen. What is the color scheme going to be? "Q"
"Don't fear the night, fear what hunts at night"
Colorado, United States
Joined: January 25, 2004
KitMaker: 11,669 posts
AeroScale: 11,011 posts
Posted: Tuesday, December 29, 2009 - 04:31 AM UTC
I have two to choose from. All "old gold" or British "blue fuselage and old gold wings".
". . .The most important thing is to know why you build and then get the most that you can out of building." via D.D.
#021
Joined: August 02, 2007
KitMaker: 2,458 posts
AeroScale: 197 posts
Posted: Tuesday, December 29, 2009 - 05:31 AM UTC
Hello Stephen,
Good looking build. Thanks for explaining how you did all of the PE it will help when I do my build.
I think that I would go with the blue/gold. It breaks up the color scheme.
Thanks for the update,
Cheers,
Bruce
Fair Winds and Following Sea's, Always.
To my Friends, Death is as Light as a Feather, Duty is as Heavy as a Mountain.
I will all have my Hand on your Shoulder. Do not grieve for me I will allways be there for You.
Colorado, United States
Joined: January 25, 2004
KitMaker: 11,669 posts
AeroScale: 11,011 posts
Posted: Tuesday, December 29, 2009 - 08:38 PM UTC
Greetings Bruce here is a bit more.
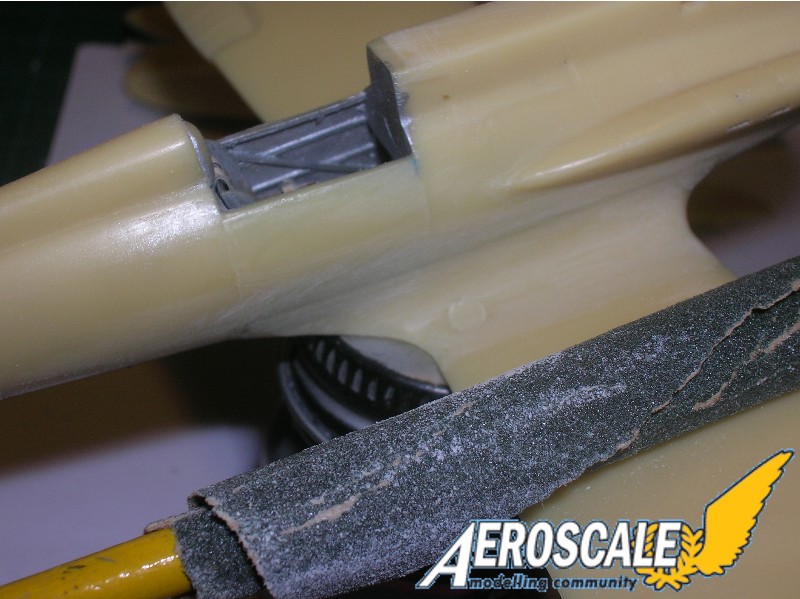
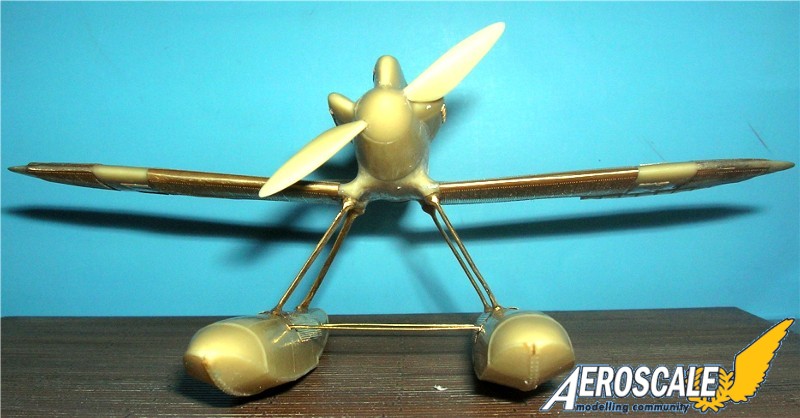
A bit of pine the tail on the Gloster. Brass pins only folks. Never any white metal or steel.
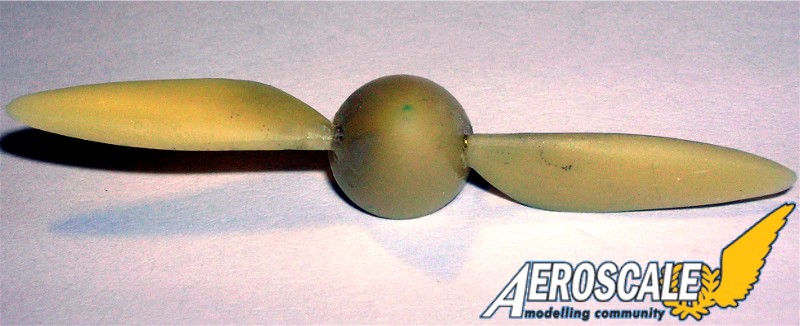
The propeller is 3 pieces and pinned together as well.
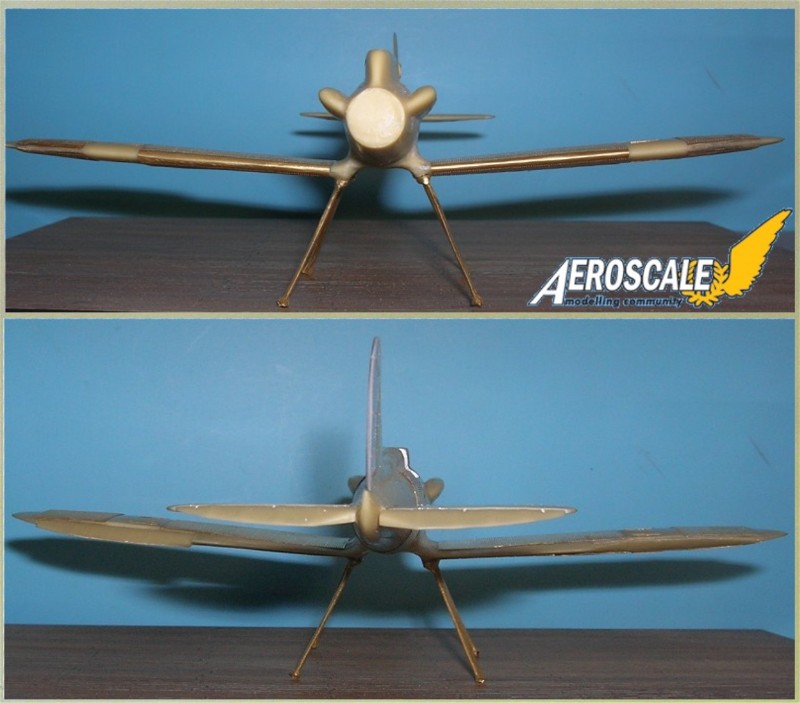
Getting everything level concerning the landing gear legs is critical.
Side views.
". . .The most important thing is to know why you build and then get the most that you can out of building." via D.D.
#041
Kobenhavn, Denmark
Joined: July 20, 2006
KitMaker: 10,069 posts
AeroScale: 3,788 posts
Posted: Tuesday, December 29, 2009 - 08:44 PM UTC
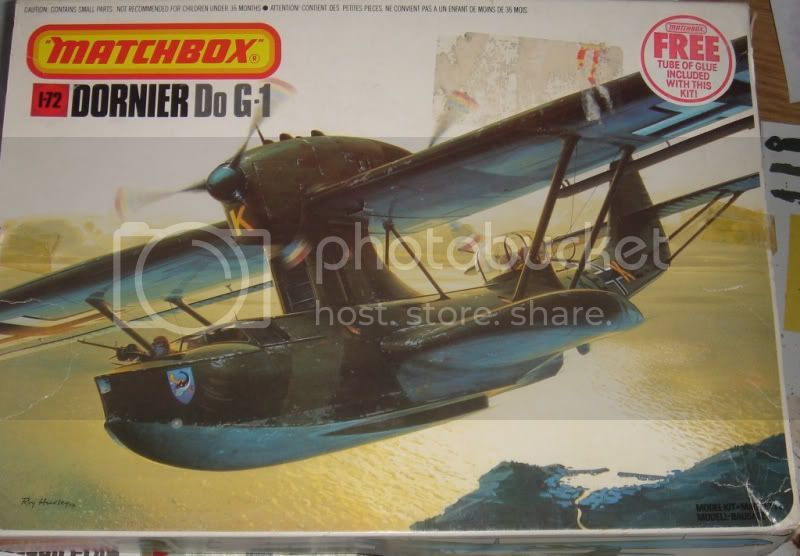
I have now changed my mind about what to build for this campaign. I got a cheap old Matchbox kit on ebay. That brings out the memories seeing those old plastic frames in three colours. One almost gets misty eyed

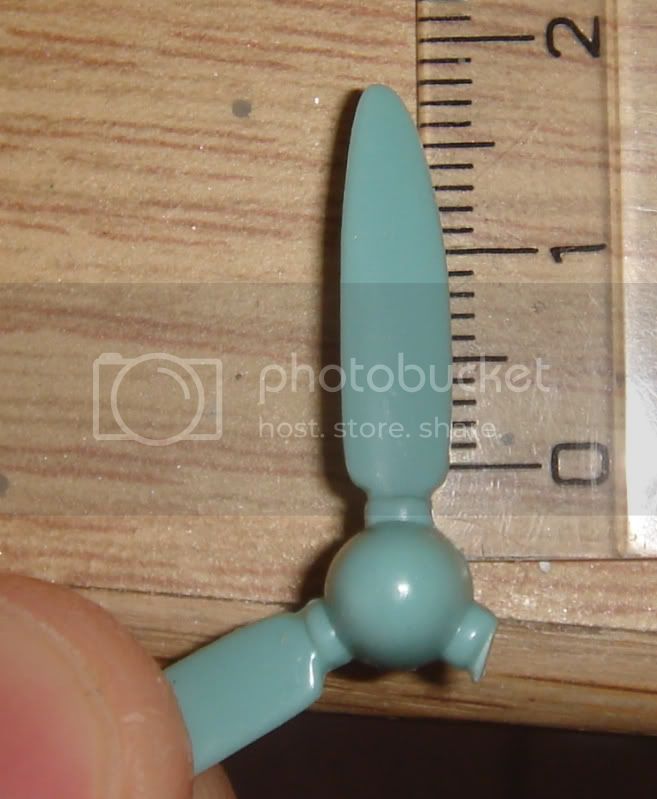
Unfortunently one of the propellers are broken and the missing part gone forever. I am a little concerned to try to make a propeller from scratch as I think this is beyond my skills.
Can anybody help with a spare propeller(blade)? Alternatively two propellers since this aircraft is both a pusher and puller driven aircraft.
As this is an old Matchbox kit and details are sparce and rough to say the least, I am not too worried about the propeller blade fitting perfectly.
More to follow when construction begins


Campaign'oholic - 252+ campaigns completed
AussieReg
 Associate Editor
#007
Victoria, Australia
Joined: June 09, 2009
KitMaker: 8,156 posts
AeroScale: 3,756 posts
Posted: Tuesday, December 29, 2009 - 10:47 PM UTC
Hey Jesper, great minds think alike my friend. I got started on my old matchbox He115 today, got all of the major sub-assemblies together and test fitted. Seems ok. Interior detail, well these pilots obviously didn't need any controls at all, it was done with mind-power alone.

I won't be doing anything on the interior of this one, it will be my first try at German splinter camoflage so I will focus on the painting and weathering.
More soon. Cheers, D
ON the bench
Revell 1/24 '53 Corvette (building as '54)
Revell 1/24 BMW 507 Coupe and Cabrio
Italeri 1/48 Me262 B-1a/U1 Nightfighter
Monogram 1/24 '57 Chevy Nomad
Dragon 1/350 USS Frank Knox DD-742
#041
Kobenhavn, Denmark
Joined: July 20, 2006
KitMaker: 10,069 posts
AeroScale: 3,788 posts
Posted: Tuesday, December 29, 2009 - 11:49 PM UTC
Quoted Text
Hey Jesper, great minds think alike my friend. I got started on my old matchbox He115 today, got all of the major sub-assemblies together and test fitted. Seems ok. Interior detail, well these pilots obviously didn't need any controls at all, it was done with mind-power alone.
More soon. Cheers, D
I can only agree fully - especially to the first point
Yes, these old Matchbox aircraft do not have much interior, but on the other hand not much can be seen through 2mm think clear curved styrene anyway

Campaign'oholic - 252+ campaigns completed
Merlin
Senior Editor #017
United Kingdom
Joined: June 11, 2003
KitMaker: 17,582 posts
AeroScale: 12,795 posts
Posted: Wednesday, December 30, 2009 - 12:25 AM UTC
Hi there
Something tells me I'm going to have to change my Campaign entry... this beauty arrived in the post this morning!:
It's a good job I haven't started the Widgeon yet!
All the best
Rowan

BEWARE OF THE FEW...
As I grow older, I regret to say that a detestable habit of thinking seems to be getting a hold of me. - H. Rider Haggard
Ontario, Canada
Joined: January 03, 2007
KitMaker: 1,505 posts
AeroScale: 595 posts
Posted: Wednesday, December 30, 2009 - 02:55 AM UTC
merlin..thats Swweeeeeeeet looking...
Projects:
K44 Anti Tank gun
Diana
Albatros DIII
Merlin
Senior Editor #017
United Kingdom
Joined: June 11, 2003
KitMaker: 17,582 posts
AeroScale: 12,795 posts
Posted: Wednesday, December 30, 2009 - 07:38 AM UTC
Quoted Text
merlin..thats Swweeeeeeeet looking...
Hi Jim
Yes, it's a real stunner! I took some photos this afternoon and the quality is amazing. I'll try to get the Review published in the next couple of days and then start planning the build. I've a lot on my plate at the moment, so I won't rush headlong into it, but this will be by far the most complex biplane I've tackled and should be a really exciting challenge.

All the best
Rowan
BEWARE OF THE FEW...
As I grow older, I regret to say that a detestable habit of thinking seems to be getting a hold of me. - H. Rider Haggard
Merlin
Senior Editor #017
United Kingdom
Joined: June 11, 2003
KitMaker: 17,582 posts
AeroScale: 12,795 posts
Posted: Wednesday, December 30, 2009 - 09:10 AM UTC
Quoted Text
A bit of pine the tail on the Gloster. Brass pins only folks. Never any white metal or steel.
Hi Stephen
Lovely work so far.
Do you advise against steel etc because of the risk of rust? I always do use brass rod, but I'd never really thought about the possible shortcomings of other materials.
All the best
Rowan
BEWARE OF THE FEW...
As I grow older, I regret to say that a detestable habit of thinking seems to be getting a hold of me. - H. Rider Haggard
California, United States
Joined: April 01, 2002
KitMaker: 4,287 posts
AeroScale: 1,164 posts
Posted: Wednesday, December 30, 2009 - 05:48 PM UTC
"Don't fear the night, fear what hunts at night"
AussieReg
Associate Editor #007
Victoria, Australia
Joined: June 09, 2009
KitMaker: 8,156 posts
AeroScale: 3,756 posts
Posted: Wednesday, December 30, 2009 - 06:06 PM UTC
Looks great Q, that Dayglo Orange is a real eye-catcher. Any chance of some more angles of the Albatross ??
Cheers, D
ON the bench
Revell 1/24 '53 Corvette (building as '54)
Revell 1/24 BMW 507 Coupe and Cabrio
Italeri 1/48 Me262 B-1a/U1 Nightfighter
Monogram 1/24 '57 Chevy Nomad
Dragon 1/350 USS Frank Knox DD-742
Colorado, United States
Joined: January 25, 2004
KitMaker: 11,669 posts
AeroScale: 11,011 posts
Posted: Wednesday, December 30, 2009 - 06:49 PM UTC
Yes Rowan, Absolutely - Resin never completely cures. Using steel or potmetal wire rod will begin a rusting process that will degrade the glue joint over a period of a few short weeks. Resin does not react with brass except to latch on tightly.
". . .The most important thing is to know why you build and then get the most that you can out of building." via D.D.
Colorado, United States
Joined: January 25, 2004
KitMaker: 11,669 posts
AeroScale: 11,011 posts
Posted: Wednesday, December 30, 2009 - 06:51 PM UTC
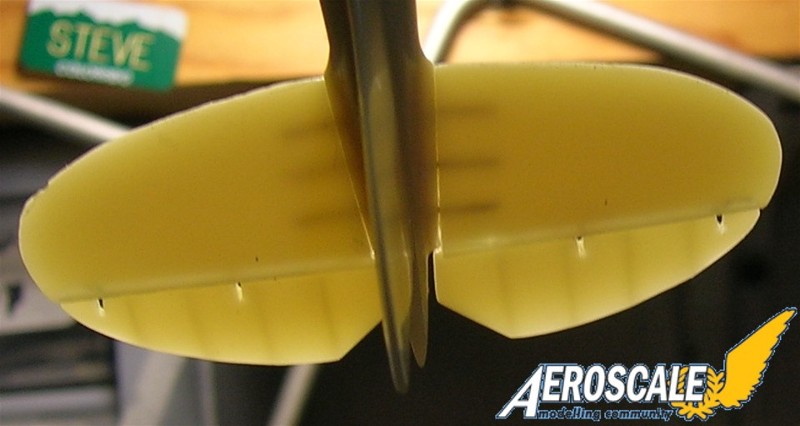
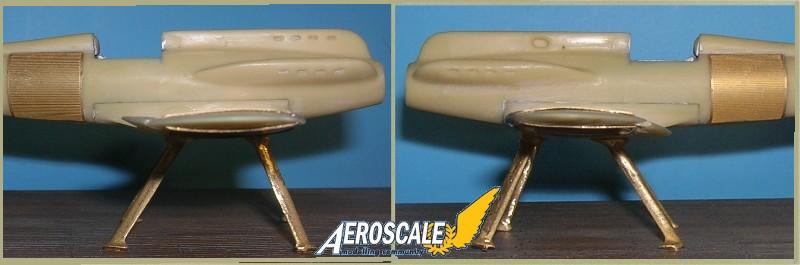
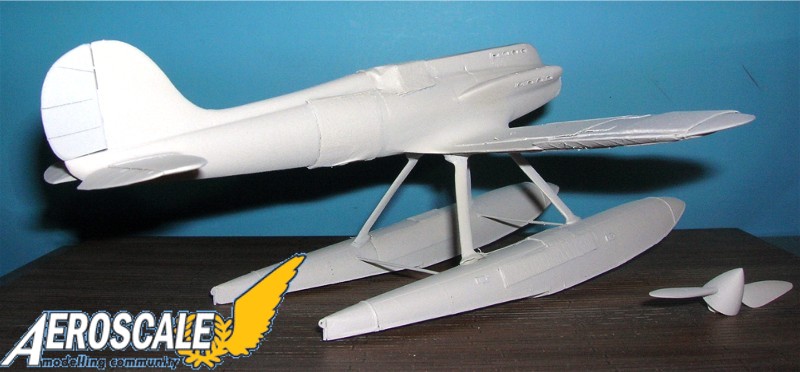
Next I add the floats and prep for the finish.
Here is that instrument panel Terri asked about.
With the floats attached.
Here is where the leveling pays off.
head on.
". . .The most important thing is to know why you build and then get the most that you can out of building." via D.D.
Colorado, United States
Joined: January 25, 2004
KitMaker: 11,669 posts
AeroScale: 11,011 posts
Posted: Wednesday, December 30, 2009 - 06:55 PM UTC
After masking I begin the priming.
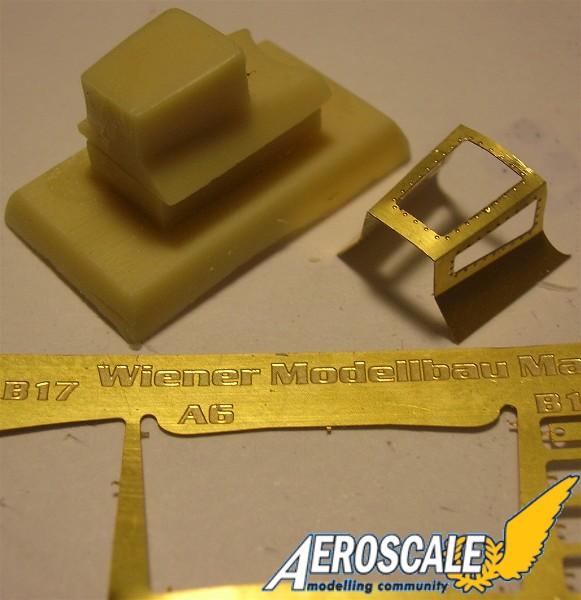
This is the brass etch canopy and the resin block you need to form it.
Primed for the finish.
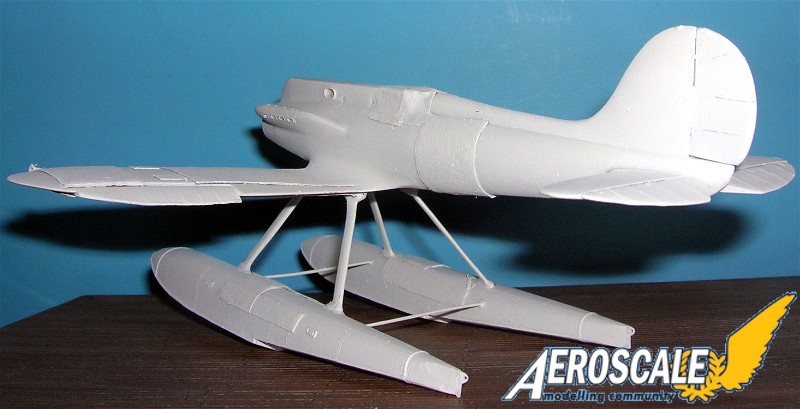
Note the prop & spinner get their prime coat too.
". . .The most important thing is to know why you build and then get the most that you can out of building." via D.D.
California, United States
Joined: April 01, 2002
KitMaker: 4,287 posts
AeroScale: 1,164 posts
Posted: Wednesday, December 30, 2009 - 07:12 PM UTC
Quoted Text
Looks great Q, that Dayglo Orange is a real eye-catcher. Any chance of some more angles of the Albatross ?? Cheers, D
Thanks for the kudos. It is a real b*** to photograph.
But, I will get some more pics of it, however they will have to wait as the kit is currently in a display case at the local hobby shop as part of an in the case contest, and I am leaving for Italy for 2 weeks in a couple days. Thanks again for the kudos, much appreciated. "Q"
"Don't fear the night, fear what hunts at night"
Ontario, Canada
Joined: January 03, 2007
KitMaker: 1,505 posts
AeroScale: 595 posts
Posted: Thursday, December 31, 2009 - 02:40 AM UTC
Great looking builds everyone!..and thanks for the tip on resin and pinning there Stephen, I learned something new!
Projects:
K44 Anti Tank gun
Diana
Albatros DIII
#012
Wyoming, United States
Joined: November 07, 2003
KitMaker: 3,098 posts
AeroScale: 79 posts
Posted: Thursday, December 31, 2009 - 11:06 AM UTC
Quoted Text
Can anybody help with a spare propeller(blade)?
Hi Jesper,
I received a bunch of spare aircraft parts from Spongya awhile back. I am not sure what all is in there but I might be able to help you out. If you could give me the basic measurements and all of that good stuff I can see what I have and maybe I will have what you need.
HARV
If any white man tries to destroy what is mine, or take what is mine, or take my lands, I will take my gun, get on my horse, and go punish him. Chief Low Dog - Oglala Sioux Chief