

 ...go for it!
Air Campaigns
Want to start or join a group build? This is where to start.
Want to start or join a group build? This is where to start.
Hosted by Frederick Boucher, Michael Satin
Official Sea Plane Campaign Thread

JimMrr

Joined: January 03, 2007
KitMaker: 1,505 posts
AeroScale: 595 posts
Posted: Thursday, November 19, 2009 - 10:47 AM UTC
Yeah Andy ,,I bought that kit and im glad I did ....its sweeeeet ...go for it!
...go for it!

VonCuda

Joined: November 28, 2005
KitMaker: 2,216 posts
AeroScale: 1,080 posts
Posted: Thursday, November 19, 2009 - 11:50 AM UTC
A little update on my Goose. One engine down and one to go. Not my best work but it'll do.
[imghttp://i152.photobucket.com/albums/s161/VonCuda/Grumman%20Goose/001-3.jpg?t=1258674398][/img]
I'm having some major fit issues with this kit right now. The top of the fuselage is glued and looks great. Unfortunatly I failed to trim the inner bulkheads before I glued the halves together so now I have a 4mm gap along the bottom side. Nothing I can't fix.........
Hermon

VonCuda
Joined: November 28, 2005
KitMaker: 2,216 posts
AeroScale: 1,080 posts
Posted: Thursday, November 19, 2009 - 11:51 AM UTC
Oops! Let me try again.

Hermon
Hermon
Tigerbait
Joined: September 28, 2005
KitMaker: 347 posts
AeroScale: 179 posts
Posted: Friday, November 20, 2009 - 08:44 AM UTC
Sorry for the bad quality pics ... the wife took the camera  ... any way ... Its together for the most part

... any way ... Its together for the most part
JimMrr
Joined: January 03, 2007
KitMaker: 1,505 posts
AeroScale: 595 posts
Posted: Friday, November 20, 2009 - 09:16 AM UTC
thats a wild looking plane there Todd!!

litespeed


Joined: October 15, 2009
KitMaker: 1,976 posts
AeroScale: 1,789 posts
Posted: Friday, November 20, 2009 - 12:09 PM UTC
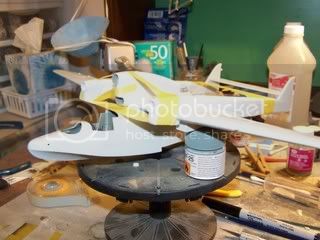
Hi all
Making some progress on my tiger moth with floats. I have been delayed waiting for paints to arrive. It is intresting looking at photos of my work. It seems to reveal a whole lot of faults and doesnt warrant looking at to closely. But I am having fun..
tim
Making some progress on my tiger moth with floats. I have been delayed waiting for paints to arrive. It is intresting looking at photos of my work. It seems to reveal a whole lot of faults and doesnt warrant looking at to closely. But I am having fun..
tim


JimMrr
Joined: January 03, 2007
KitMaker: 1,505 posts
AeroScale: 595 posts
Posted: Friday, November 20, 2009 - 12:15 PM UTC
I like what im seeing Tim...the insturment panels are especially nice!
It is true that the camera picks out things our eyes may miss,but that is actually a good thing! I use pics to help me improve my work .
It is true that the camera picks out things our eyes may miss,but that is actually a good thing! I use pics to help me improve my work .
VonCuda
Joined: November 28, 2005
KitMaker: 2,216 posts
AeroScale: 1,080 posts
Posted: Friday, November 20, 2009 - 01:43 PM UTC
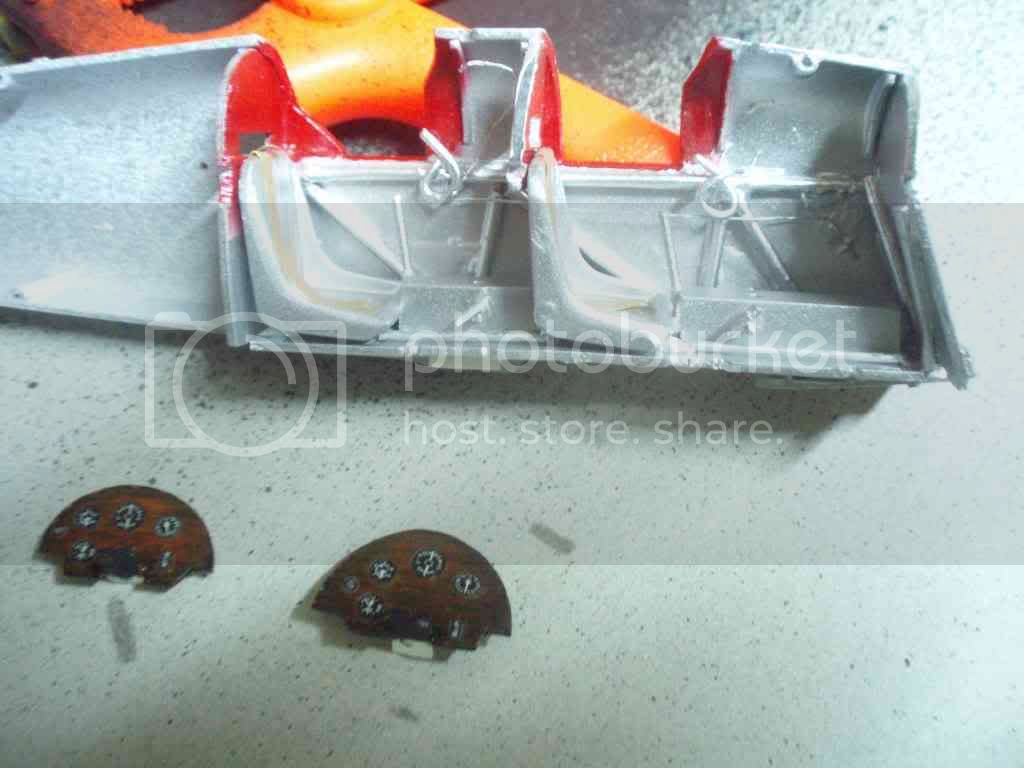
I'm having some fit issues with my kit. The bottom half of the fuselage wouldn't go together. I guess the main reason is that I forgot to trim down the interior bulkheads before I started glueing things together. :
Anyway, the white stuff is styrene I used to fill the gap. The sections behind the tailwheel still has to be filled. Second pic shows the gap......or CRATER......between the rear top of the wing and the fuselage. I'm begining to wonder if I need to make a trip out to the autoparts store and get myself a gallon of Bondo.


Back to the bench,
Hermon
Anyway, the white stuff is styrene I used to fill the gap. The sections behind the tailwheel still has to be filled. Second pic shows the gap......or CRATER......between the rear top of the wing and the fuselage. I'm begining to wonder if I need to make a trip out to the autoparts store and get myself a gallon of Bondo.
Back to the bench,
Hermon

AussieReg

#007

Joined: June 09, 2009
KitMaker: 8,156 posts
AeroScale: 3,756 posts
Posted: Friday, November 20, 2009 - 04:31 PM UTC
Hi All, some great work going on here so far !!
Todd, I will be dusting off my BV138 soon to get started for this campaign, yours is looking real good. Any fit issues so far? Are you going to do the Minesweeper variant as well?
Cheers, D
Todd, I will be dusting off my BV138 soon to get started for this campaign, yours is looking real good. Any fit issues so far? Are you going to do the Minesweeper variant as well?
Cheers, D

Tigerbait
Joined: September 28, 2005
KitMaker: 347 posts
AeroScale: 179 posts
Posted: Friday, November 20, 2009 - 08:59 PM UTC
Damian, no not going to do the minesweeper I don't think .... fit issues galore ... the fuselage halves are troublesome and the engine/tail booms to the wings are horendous to say the least. The radios behind the pilot/copilot will NEVER be seen ... there is a panel that fits on each side of the lower fuselage ... well ... they don't fit all that well either ... and being all raised panel lines you lose A LOT in the filling and sanding process ... I think stretched sprue will be the answer to that problem
JimMrr
Joined: January 03, 2007
KitMaker: 1,505 posts
AeroScale: 595 posts
Posted: Saturday, November 21, 2009 - 02:33 AM UTC
Hermon,dont stress it...thats a good clean repair job youve done there!....things happen..

Emeritus

Joined: March 30, 2004
KitMaker: 2,845 posts
AeroScale: 1,564 posts

Posted: Saturday, November 21, 2009 - 06:41 AM UTC
Coming along nicely:
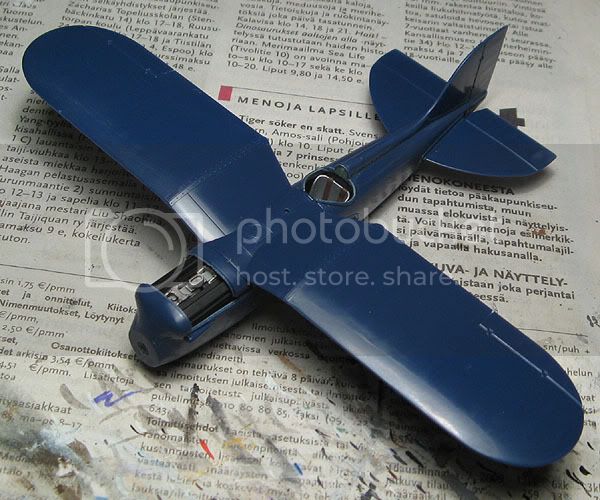
The fuselage went together flawlessly, as well as the upper wing and the horizontal stabilisers. The only places requiring any puttying were a small gap on headrest portion of the cockpit opening and a tiny gauge on the fuselage spine behind the cockpit. The latter not being a fault of the kit, though, except perhaps for the somewhat hard plastic used, but me removing the parts from the sprue).
It's almost the time to start painting, I think. (I'll most likely glue the upper engine hatch shut, as there's not much to be seen, and to preserve the beautiful lines of the aircraft)
The bi/floatplane configuration as well as the different color of the wing and float struts further courages separate painting and finishing of subassemblies. Fortunately the fit seems to be as superb as it has been so far.

The fuselage went together flawlessly, as well as the upper wing and the horizontal stabilisers. The only places requiring any puttying were a small gap on headrest portion of the cockpit opening and a tiny gauge on the fuselage spine behind the cockpit. The latter not being a fault of the kit, though, except perhaps for the somewhat hard plastic used, but me removing the parts from the sprue).
It's almost the time to start painting, I think.
(I'll most likely glue the upper engine hatch shut, as there's not much to be seen, and to preserve the beautiful lines of the aircraft)The bi/floatplane configuration as well as the different color of the wing and float struts further courages separate painting and finishing of subassemblies. Fortunately the fit seems to be as superb as it has been so far.
JimMrr
Joined: January 03, 2007
KitMaker: 1,505 posts
AeroScale: 595 posts
Posted: Saturday, November 21, 2009 - 06:52 AM UTC
looking good Eetu! very nice
here is an update on the Stranny, the fuselage is together and the wee divots and shimmys cleaned up ...I went on th scribe the top and bottom of the fuselage. There is a circular panel behind the wing, so I drilled and stuck a thumbtack into the fuselage to use as a good solid scribe template..scribing is being done using a solid sewing needle in a pinvise..


I still have some clean up work to do on this than we move on..
here is an update on the Stranny, the fuselage is together and the wee divots and shimmys cleaned up ...I went on th scribe the top and bottom of the fuselage. There is a circular panel behind the wing, so I drilled and stuck a thumbtack into the fuselage to use as a good solid scribe template..scribing is being done using a solid sewing needle in a pinvise..
I still have some clean up work to do on this than we move on..

CMOT70
Joined: August 23, 2007
KitMaker: 629 posts
AeroScale: 539 posts
Posted: Saturday, November 21, 2009 - 06:08 PM UTC
All the base colours are onto the F1M2, i'm doing the kits 3rd option. All colours are Tamiya instead of Gunze for a change. It now gets left for a day before i put the clear gloss laquer on ready for decals.

Andrew
Andrew
JimMrr
Joined: January 03, 2007
KitMaker: 1,505 posts
AeroScale: 595 posts
Posted: Sunday, November 22, 2009 - 01:41 AM UTC
Good toning job there Andrew!! Youre giving me the itch to build this kit...I hear it calling from my closet..."build me ...build me"...Its looking really good
Tigerbait
Joined: September 28, 2005
KitMaker: 347 posts
AeroScale: 179 posts
Posted: Sunday, November 22, 2009 - 01:51 AM UTC
Hermon, use some sheet plastic and make a shim like you did for the other gaps ... it'll be easier to sand than Bondo.
VonCuda
Joined: November 28, 2005
KitMaker: 2,216 posts
AeroScale: 1,080 posts
Posted: Sunday, November 22, 2009 - 03:59 AM UTC
Tod, that's what I did. So far this kit has been eating squadron putty, sheet styrene, Zap-a-gap glue, and anything else I can think of to stick in all the holes.
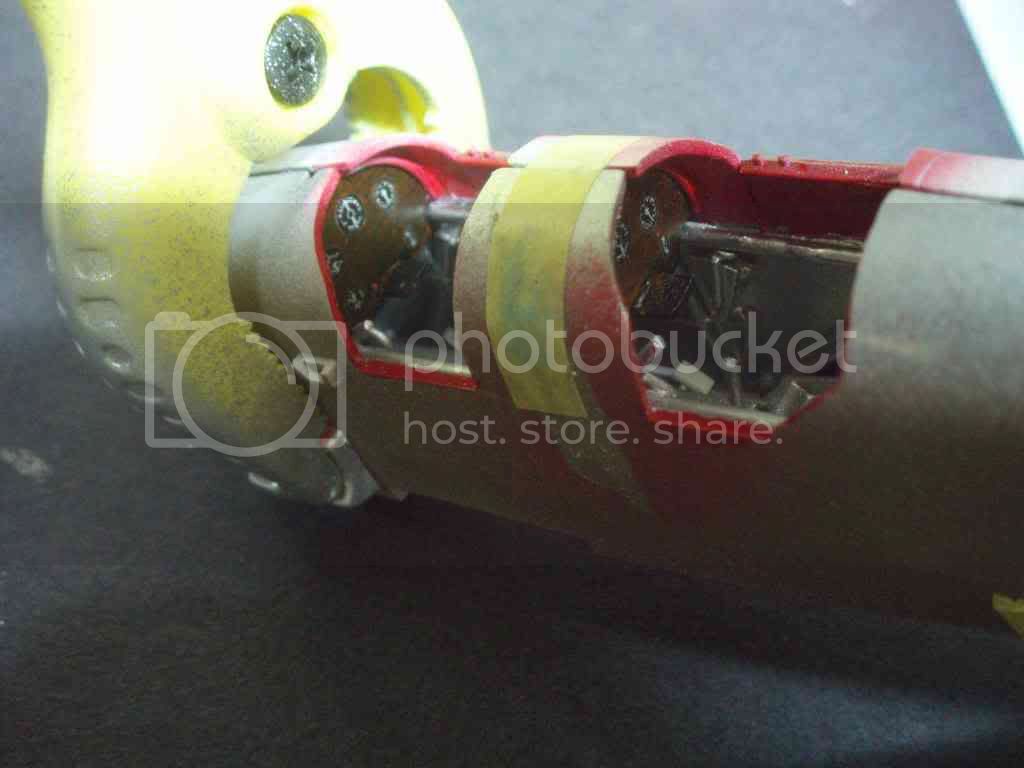
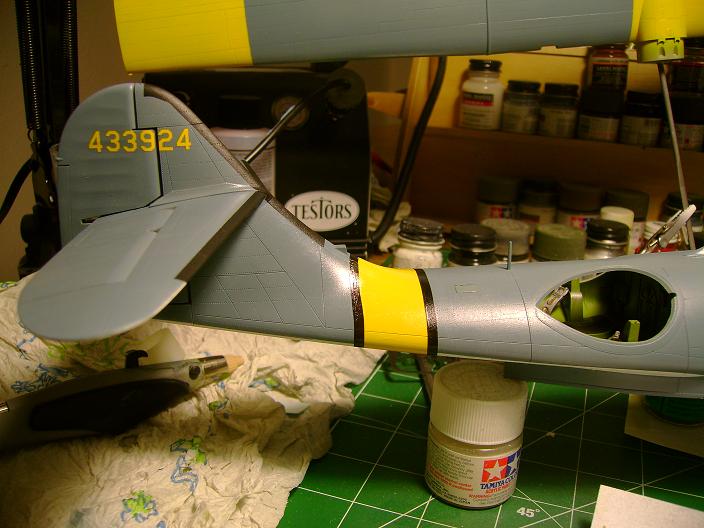
Here is what that big gap looks like now. I'll still have to do a bit more sanding and fix a couple of tiny sink marks but it's looking alot better. I also added some rivets. I used the smallest drill bit I had and they're way out of scale but I'm hoping after painting and a wash they'll be OK.

Next shot is the windscreen. I HATE two piece windscreens but it isn't a perfect world so I'm trying to deal with it. I added some small pieces of evergreen to the top-inside to strengthen it up after it was dipped in Future.

And here is the great fit ( NOT ) of that windscreen to the fuselage. So far I've spent about 4 hours tinkering with this part of the project. I still have a long way to go but she's looking alot better than when I started. I hope to have the windscreen fitted and the edges sanded and feathered in with the fuselage by the end of the day.

I'm battling a ferocious head cold right now so I had to lay outta church today. Hopefully I can knock out 10 or 12 hours at the bench and get all of these fit problems fixed. I'd like to start laying on some paint by the middle of the week.
Hermon
Here is what that big gap looks like now. I'll still have to do a bit more sanding and fix a couple of tiny sink marks but it's looking alot better. I also added some rivets. I used the smallest drill bit I had and they're way out of scale but I'm hoping after painting and a wash they'll be OK.
Next shot is the windscreen. I HATE two piece windscreens but it isn't a perfect world so I'm trying to deal with it. I added some small pieces of evergreen to the top-inside to strengthen it up after it was dipped in Future.
And here is the great fit ( NOT ) of that windscreen to the fuselage. So far I've spent about 4 hours tinkering with this part of the project. I still have a long way to go but she's looking alot better than when I started. I hope to have the windscreen fitted and the edges sanded and feathered in with the fuselage by the end of the day.
I'm battling a ferocious head cold right now so I had to lay outta church today. Hopefully I can knock out 10 or 12 hours at the bench and get all of these fit problems fixed. I'd like to start laying on some paint by the middle of the week.
Hermon
JimMrr
Joined: January 03, 2007
KitMaker: 1,505 posts
AeroScale: 595 posts
Posted: Sunday, November 22, 2009 - 04:12 AM UTC
My sympathies Hermon,for your cold AND that windscreen....Ive heard all about the infamous windscreen on that kit..so far your repair work looks really really good..
VonCuda
Joined: November 28, 2005
KitMaker: 2,216 posts
AeroScale: 1,080 posts
Posted: Sunday, November 22, 2009 - 09:48 AM UTC
Thanks Jim. RIght now my head feels like a family of hippos are square dancing inside my skull.
I managed to get the windscreen fitted and glued into place. Everything is buttoned up and I've gone over all the panel lines with a fine tipped Sharpie.

I think I'm gonna set her aside for now..........go drink a bottle of NyQuil..........and get ready for work tomorrow.
Hermon
I managed to get the windscreen fitted and glued into place. Everything is buttoned up and I've gone over all the panel lines with a fine tipped Sharpie.
I think I'm gonna set her aside for now..........go drink a bottle of NyQuil..........and get ready for work tomorrow.
Hermon
JimMrr
Joined: January 03, 2007
KitMaker: 1,505 posts
AeroScale: 595 posts
Posted: Sunday, November 22, 2009 - 11:11 AM UTC
Looking Good Hermon..may I ask you about the sharpie lined panels?..is this for pre-shading?..are you using Baremetal foil for masking the glass?
Get some rest,and mabe a sick-day is in order..
Get some rest,and mabe a sick-day is in order..
VonCuda
Joined: November 28, 2005
KitMaker: 2,216 posts
AeroScale: 1,080 posts
Posted: Sunday, November 22, 2009 - 12:01 PM UTC
Jim, the Sharpie is indeed for pre-shading. I only do this when the color of the plane is very dark. In this case both the camo colors for this scheme are pretty dark. The Sharpie does tend to bleed through quiet a bit on lighter colors.
And yes, your eagle eye has picked out my other trick. I have been using BMF for masking canopies for a long time. It's so easy to get it to conform to all the tight corners and nooks and cranny's just by using a toothpick.
Can't take tomorrow off. Have a huge 200 year old oak tree to take down at one of the schools I take care of. It died last year and has been hanging over the school so the man with chainsaw qualification (me) is in great demand. 
Hermon.....the Nyquil induced coma model builder
And yes, your eagle eye has picked out my other trick. I have been using BMF for masking canopies for a long time. It's so easy to get it to conform to all the tight corners and nooks and cranny's just by using a toothpick.
Can't take tomorrow off. Have a huge 200 year old oak tree to take down at one of the schools I take care of. It died last year and has been hanging over the school so the man with chainsaw qualification (me) is in great demand.
Hermon.....the Nyquil induced coma model builder

Keeperofsouls2099
Joined: January 14, 2009
KitMaker: 2,798 posts
AeroScale: 2,443 posts
Posted: Sunday, November 22, 2009 - 12:34 PM UTC
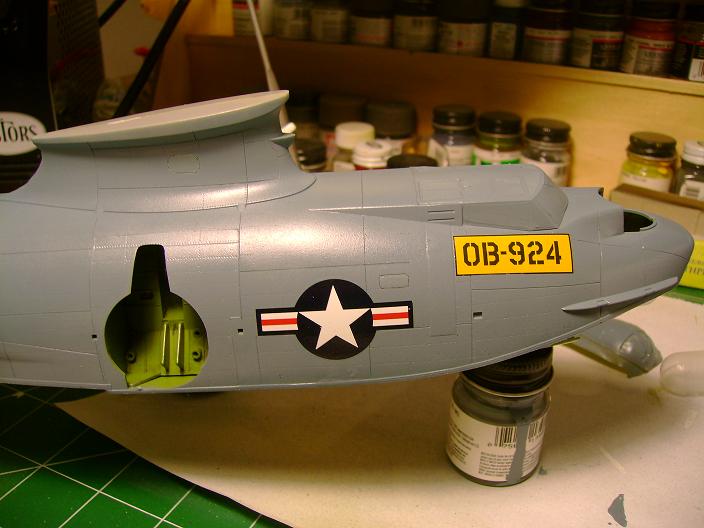
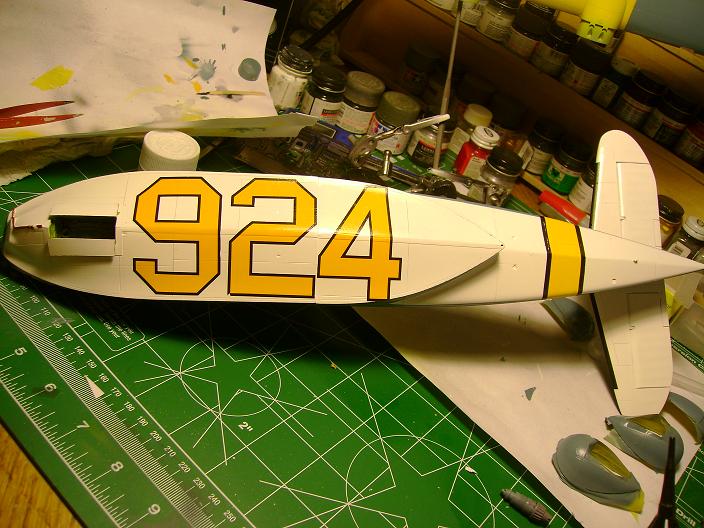
Ok i have an update most painting done on the big pcs.still have black stripe
to paint on the wing leading edge.i got most of the decals on and kleared everything
will let dry over night.And continue.Everybody is doing a great job very well detailed and
it will be exciting to see them finished,
Ran out of mask today and bought painter's mask,has anyone used this?if so please tell me how it went dont want to ruin what i got going, Need alternative to tamiya's expensive mask.
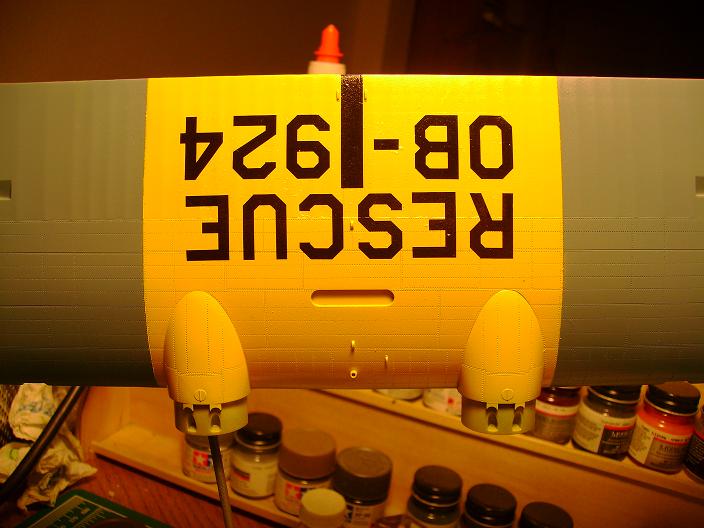
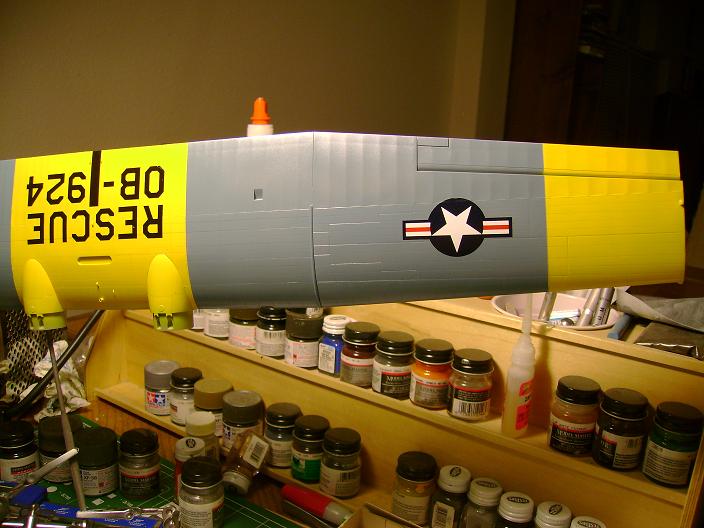
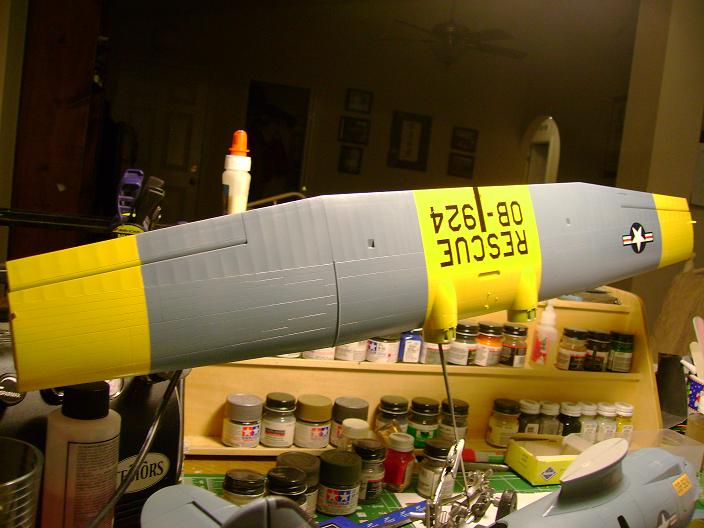
Build On.
Justin
to paint on the wing leading edge.i got most of the decals on and kleared everything
will let dry over night.And continue.Everybody is doing a great job very well detailed and
it will be exciting to see them finished,
Ran out of mask today and bought painter's mask,has anyone used this?if so please tell me how it went dont want to ruin what i got going,
Need alternative to tamiya's expensive mask. Build On.
Justin

JimMrr
Joined: January 03, 2007
KitMaker: 1,505 posts
AeroScale: 595 posts
Posted: Sunday, November 22, 2009 - 12:35 PM UTC
Quoted Text
I have been using BMF for masking canopies for a long time. It's so easy to get it to conform to all the tight corners and nooks and cranny's just by using a toothpick.
the man with chainsaw qualification (me) is in great demand.
Hermon.....the Nyquil induced coma model builder
Careful with that Axe,eugene!...lol..(thats Pink Floyd,by the way) ...seriously...careful using Nyquil and chainsaws!...
I use BMF also,but Im new at it...I found with my Mavis that I ended up with nasy residue left from the adhesive backing..I must have left it on too long..I tend to juggle my projects..
whats your take on that ?I have a 1:72 Revell-Japan Sally Im doing now and ill be taking the masking off inthe next day or so...
Wow Justin...thats impressive mask and paintwork....are ALL of those markings masked and painted? Im impressed !!! nice clean work dude!

grayghost666
#021
Joined: August 02, 2007
KitMaker: 2,458 posts
AeroScale: 197 posts
KitMaker: 2,458 posts
AeroScale: 197 posts

Posted: Sunday, November 22, 2009 - 01:00 PM UTC
Hello All,
Great Job Everyone. I am learning more from all of you Master Builders then any book I have read(so far).
@ Hermon,
Be very careful with that chain saw, I ended in the Hospital last year when a tree kicked the wrong way and I busted up some ribs and such. So Please be very careful.
@ Justin,
Great job on you on the paint work. thanks for the photo's and please tell us how you did it.
To everyone else, Keep up the good work.
Cheers,
Bruce

Tigerbait
Joined: September 28, 2005
KitMaker: 347 posts
AeroScale: 179 posts
Posted: Sunday, November 22, 2009 - 01:13 PM UTC
Justin, I use the blue 3M painters tape a fair amount ... Its low tac(almost too low tac) so if the paint is down good it won't pull it up and gives good crisp lines ... the width is the only problem ... I seem to recall only being able to get 1 inch width or wider at the stores. Hope that helps a little.
Hermon, excellent job on the gaps!!!! Good luck on that canopy!!!! and that cold!!!!
Hermon, excellent job on the gaps!!!! Good luck on that canopy!!!! and that cold!!!!
 |

WEB HOSTING BY


Copyright ©2021 AeroScale and Kitmaker Network, a subsidiary of Silver Star Enterprises
All Rights Reserved. Please read our Conditions of Use and Privacy Policy.
All Rights Reserved. Please read our Conditions of Use and Privacy Policy.