

Air Campaigns
Want to start or join a group build? This is where to start.
Want to start or join a group build? This is where to start.
Hosted by Frederick Boucher, Michael Satin
Official Sea Plane Campaign Thread

JimMrr

Joined: January 03, 2007
KitMaker: 1,505 posts
AeroScale: 595 posts
Posted: Friday, November 27, 2009 - 05:02 AM UTC
Thats good to know Hermon,thanks!...mabe ill ACTUALLY finish the 1:72 scale Fe2B I'm scratchbuilding ..


VonCuda

Joined: November 28, 2005
KitMaker: 2,216 posts
AeroScale: 1,080 posts
Posted: Friday, November 27, 2009 - 06:21 AM UTC
No problem Mr. Jim. Glad I could help. BTW, the thread/monofilament Stephen is talking about is darn near the perfect scale. You don't wanna go to Wal-Mart and pick up any 30lbs. test fishing line to use.............yes, I MAY or may not have done this in the past. 

My goose has recieved it's base coat of green and it was looking quite beautiful. As I started to apply the greyish second color of the camo scheme it came out purple.
I don't suppose the RAF ever used any purple camo schemes did they? I'm working on a repaint right now. Hope to have some progress pic's up soon.
Hermon
My goose has recieved it's base coat of green and it was looking quite beautiful. As I started to apply the greyish second color of the camo scheme it came out purple.
I don't suppose the RAF ever used any purple camo schemes did they?
I'm working on a repaint right now. Hope to have some progress pic's up soon.Hermon


mj
Joined: March 16, 2002
KitMaker: 1,331 posts
AeroScale: 325 posts
Posted: Friday, November 27, 2009 - 08:53 AM UTC
WOW, great work being done here. Andrew, that "Pete" is a real beauty. If I ever weather an aircraft that well, I'll be able to die a happy man.
One of the benefits of building OOB in 1/72 scale, is you usually build quickly, and my entry is no exception. Here is my 1/72 Hasegawa Zero floatplane. It was an eBay win, so not sure how recent the kit is. The decals looked pretty old, but went down nicely anyway. One color kits are fun sometimes, and certainly quick. It was a pleasure participating in this Campaign, and I may not be over yet. There are so many great seaplane kits out there, and many in my stash. I'm eyeing a 1/144 mini-craft kit of a Pan Am Clipper, and a 1/144 Trumpeter kit of a "Kawanishi" seaplane, and asking myself why I shouldn't keep going. My philosophy of kit building is pretty similar to that of my golf game...if you can't be good, at least be quick! .
So, here is my first entry, and hopefully, not my last -


Thanks for giving me a great reason to get this kit built, and I look forward to enjoying the rest of the builds going on here.
Cheers,
Mike
One of the benefits of building OOB in 1/72 scale, is you usually build quickly, and my entry is no exception. Here is my 1/72 Hasegawa Zero floatplane. It was an eBay win, so not sure how recent the kit is. The decals looked pretty old, but went down nicely anyway. One color kits are fun sometimes, and certainly quick. It was a pleasure participating in this Campaign, and I may not be over yet. There are so many great seaplane kits out there, and many in my stash. I'm eyeing a 1/144 mini-craft kit of a Pan Am Clipper, and a 1/144 Trumpeter kit of a "Kawanishi" seaplane, and asking myself why I shouldn't keep going. My philosophy of kit building is pretty similar to that of my golf game...if you can't be good, at least be quick!
. So, here is my first entry, and hopefully, not my last -
Thanks for giving me a great reason to get this kit built, and I look forward to enjoying the rest of the builds going on here.
Cheers,
Mike
VonCuda
Joined: November 28, 2005
KitMaker: 2,216 posts
AeroScale: 1,080 posts
Posted: Friday, November 27, 2009 - 09:28 AM UTC
Dang Mike, are you sure the whole family isn't helping you build? That was fast. Looks great too. I'm always amazed when people build 1/72 kits and make them look that good. Really nice work 
Here are a couple of update pic's on my Goose. The Future coat is screwing with the flash and making it look way to shiny. Hope to start some decals soon.


Yeah, I know the paint colors are not an exact match. Heck, I'm not even sure they're close but it is what it is and so far I'm happy with it.
Hermon
That was fast. Looks great too. I'm always amazed when people build 1/72 kits and make them look that good. Really nice work Here are a couple of update pic's on my Goose. The Future coat is screwing with the flash and making it look way to shiny. Hope to start some decals soon.
Yeah, I know the paint colors are not an exact match. Heck, I'm not even sure they're close but it is what it is and so far I'm happy with it.
Hermon
Red4
Joined: April 01, 2002
KitMaker: 4,287 posts
AeroScale: 1,164 posts

Posted: Friday, November 27, 2009 - 09:32 AM UTC
Here's my entry into the foray.
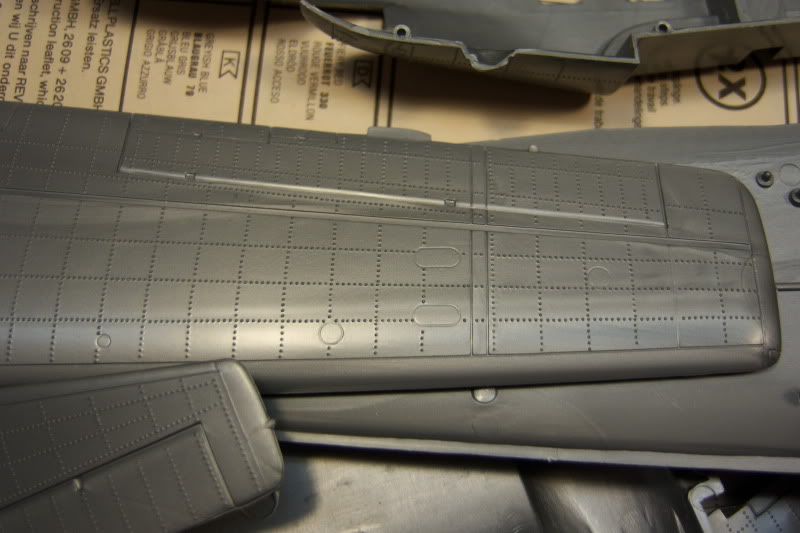
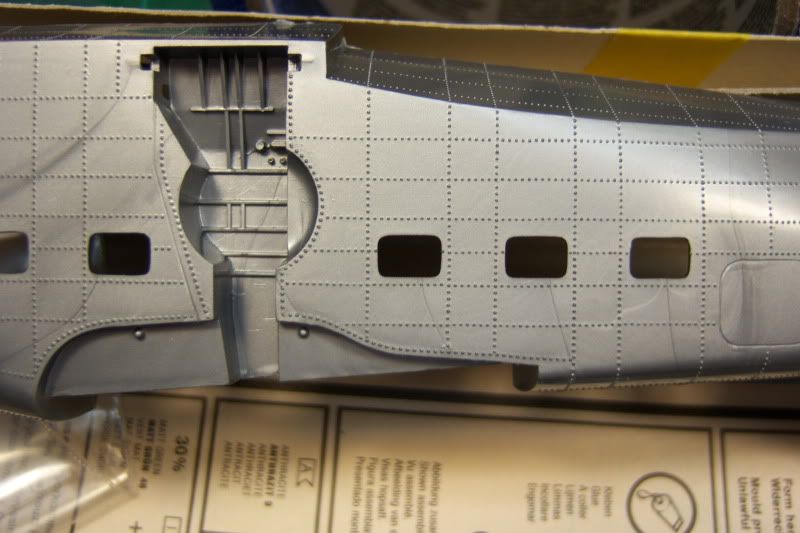
mmmmm, notice all the raised rivets... Those will sanded down and rescribed later.

That's the beauty of working with silver plastic. Even after sanding the rivets and panel lines off, you can still see where they were at which provides for a nice guide when it's time to replace them. More to follow. Probably won't get much done in the next couple of weeks as finals for college take place over this time. Gotta study!! "Q"
mmmmm, notice all the raised rivets...
Those will sanded down and rescribed later.That's the beauty of working with silver plastic. Even after sanding the rivets and panel lines off, you can still see where they were at which provides for a nice guide when it's time to replace them. More to follow. Probably won't get much done in the next couple of weeks as finals for college take place over this time. Gotta study!! "Q"
JimMrr
Joined: January 03, 2007
KitMaker: 1,505 posts
AeroScale: 595 posts
Posted: Friday, November 27, 2009 - 10:12 AM UTC
@mike- nice Zero!...very well done and impressive that its 1:72ski!
@Hermon- your paint is coming out good ..no purple in sight!
@Matthew- neat looking plane...raised rivets?
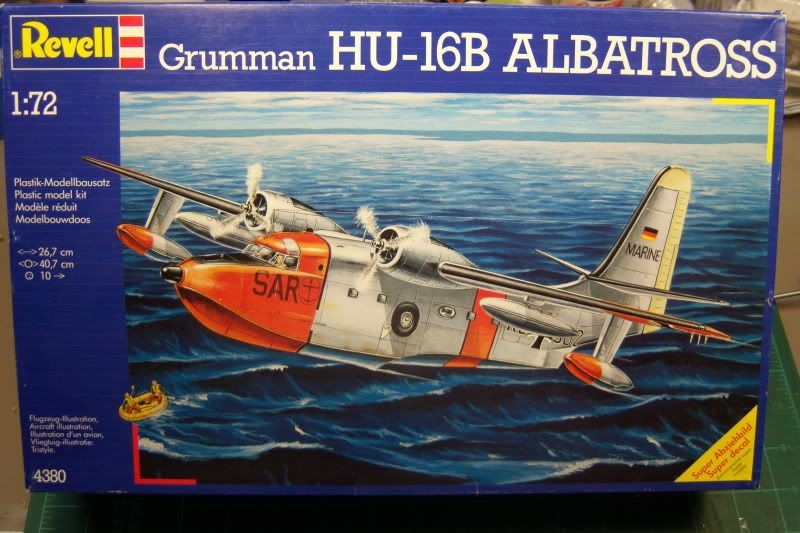
I have my fuselage sides riveted now ,working on the top and bottom ..pics to follow..
@Hermon- your paint is coming out good ..no purple in sight!
@Matthew- neat looking plane...raised rivets?
I have my fuselage sides riveted now ,working on the top and bottom ..pics to follow..
Red4
Joined: April 01, 2002
KitMaker: 4,287 posts
AeroScale: 1,164 posts
Posted: Friday, November 27, 2009 - 12:01 PM UTC
Quoted Text
Not any more. I took a break from the books and sanded all of them off. Have started redoing them with my pounce wheels. Only have the fuselage left to do. Will need to polish everything out once complete, but it looks good so far. It will wear a different paint scheme too. Won't say it is going ot be just yet, but you'll know it when you see it. Definitely colorful @Matthew- neat looking plane...raised rivets?
Thanks, "Q" 
discordian
Joined: May 28, 2009
KitMaker: 239 posts
AeroScale: 95 posts
Posted: Friday, November 27, 2009 - 11:53 PM UTC
ooh... is there a good thread describing this heated pin technique?
This is my first biplane.
Thanks to all for the feedback.
I'm going to get back to it tonight, I hope, as my work room has been stuffed floor to ceiling with stashed stuff to clear room for my son's birthday party today.
This is my first biplane.
Thanks to all for the feedback.
I'm going to get back to it tonight, I hope, as my work room has been stuffed floor to ceiling with stashed stuff to clear room for my son's birthday party today.
VonCuda
Joined: November 28, 2005
KitMaker: 2,216 posts
AeroScale: 1,080 posts
Posted: Saturday, November 28, 2009 - 02:24 AM UTC
Scott, it's so easy you don't even need a thread to learn it.
Attach/glue both ends of the line at the points where you want them anchored into the model. Leave some slack in the line so you don't have to hold it while the glue dries. Once the glue is dried, heat a pin or sewing needle or anything small and metal. When the pin is hot (not glowing red or anything, just hot) just pass it over or under the slack part of the line. The heat from the pin will shrink up the line and draw it taught. Depending on how much slack you put into the line when you glued it on you may have to repeat the pin process a few times. Eventually you'll end up with a nice tight line. The only thing to watch out for is not actually touching the line with the heated pin which will cause the line to melt and break.
Practice with some line streched between an empty sprue tree. It really is super easy.
Hope this helped.
Hermon
VonCuda
Joined: November 28, 2005
KitMaker: 2,216 posts
AeroScale: 1,080 posts
Posted: Saturday, November 28, 2009 - 04:03 AM UTC
Update. Decals are on now all that's left are the landing gear and some touch-ups and a flat coat and the floats.


Hermon
Hermon

old-dragon
Joined: August 30, 2005
KitMaker: 3,289 posts
AeroScale: 289 posts
Posted: Saturday, November 28, 2009 - 04:34 AM UTC
Quoted Text
Update. Decals are on now all that's left are the landing gear and some touch-ups and a flat coat and the floats. Hermon
She's looking good...I dropped a float last week and bent the heck out of a white metal strut and of course when I went to bend it back it snapped...it's pinned and reglued now but I need to get back to it.
So, your a {head?} custodian, huh? I used to work for St Charles 303 long ago...issues between my real boss{ARA} and the school principal took me out of that job.
Time to go prep the snowblower for the coming season and then some modeling time!
old-dragon
Joined: August 30, 2005
KitMaker: 3,289 posts
AeroScale: 289 posts
Posted: Saturday, November 28, 2009 - 04:35 AM UTC
Everybody's planes are looking really nice...keep up the great work guys.
VonCuda
Joined: November 28, 2005
KitMaker: 2,216 posts
AeroScale: 1,080 posts
Posted: Saturday, November 28, 2009 - 12:55 PM UTC
Bob, I'm actually not a custodian. I'm the gounds maintenance forman. I cut trees and grass and athletic fields, dig and replace waterlines/sewer lines, snow removal etc. Hey, it pays the bills.
Hermon
Hermon
mj
Joined: March 16, 2002
KitMaker: 1,331 posts
AeroScale: 325 posts
Posted: Saturday, November 28, 2009 - 05:08 PM UTC
I've decided I was having way too much fun with this Campaign to be finished so early. Looks like I'm in for round 2 

Cheers,
Mike
Cheers,
Mike
JimMrr
Joined: January 03, 2007
KitMaker: 1,505 posts
AeroScale: 595 posts
Posted: Sunday, November 29, 2009 - 03:06 AM UTC
@Hermon...good looking plane ...sharp!...
Grounds maintenance sounds like a GREAT job!..Im 43, was downsized ,and im looking at the reality of having to choose another career...yours sounds great!..Im considering becoming a wood burning stove/fireplace salesman..
@MJ..I just finished a Ki-97 myself in 1:72 ...its a great aircraft!..
Grounds maintenance sounds like a GREAT job!..Im 43, was downsized ,and im looking at the reality of having to choose another career...yours sounds great!..Im considering becoming a wood burning stove/fireplace salesman..
@MJ..I just finished a Ki-97 myself in 1:72 ...its a great aircraft!..

Keeperofsouls2099
Joined: January 14, 2009
KitMaker: 2,798 posts
AeroScale: 2,443 posts
Posted: Sunday, November 29, 2009 - 04:26 AM UTC
Heres my update guys....
I got my landing gear done and installed.After i had installed them i noticed it was still a tail sitter so i removed the forward gunner's bubble and intalled MORE weight.I have it sitting nice now.I also got the rear blisters installed fusalage is pretty much done just need to put on a few detail bits.I also removed all the mask from the canopy and windows.......


@Hermon
Looking good like the exhaust.
@Jim
wow impressive its still big in that scale
hoping to get my wing mounted and start work on the engine's. complete booms and get those mounted,machine guns,antenna arrays........ETC.
Build On,
Justin
I got my landing gear done and installed.After i had installed them i noticed it was still a tail sitter so i removed the forward gunner's bubble and intalled MORE weight.I have it sitting nice now.I also got the rear blisters installed fusalage is pretty much done just need to put on a few detail bits.I also removed all the mask from the canopy and windows.......
@Hermon
Looking good like the exhaust.
@Jim
wow impressive its still big in that scale
hoping to get my wing mounted and start work on the engine's. complete booms and get those mounted,machine guns,antenna arrays........ETC.
Build On,
Justin

JimMrr
Joined: January 03, 2007
KitMaker: 1,505 posts
AeroScale: 595 posts
Posted: Sunday, November 29, 2009 - 06:04 AM UTC
Thats a cool lookin cat Justin!
VonCuda
Joined: November 28, 2005
KitMaker: 2,216 posts
AeroScale: 1,080 posts
Posted: Sunday, November 29, 2009 - 07:37 AM UTC
Justin, that wash has really brought out the details in your Cat. Looking sweet.
I have my Goose sitting on real wheels at last instead of paint jars. Floats are on as are the rear stabilizers. All that's left are the props, some rigging wires on the floats, a flat wash and peeling off the masks.

Jim, I'm lucky to have the job that I have. Been there 4 years and have moved up the ladder quickly. Times are really hard here in Western N.C.
Wood burning stove/fireplace salesman doesn't sould like a bad occupation in a place like Canada. Hey, if it pays the bills.....
BTW, you guys are killing me with those 1/72 kits. It's unbelievable how great ya'll make them look in such a small scale. With my meathooks I'll stick with 1/48 and above.
Hermon
I have my Goose sitting on real wheels at last instead of paint jars. Floats are on as are the rear stabilizers. All that's left are the props, some rigging wires on the floats, a flat wash and peeling off the masks.
Jim, I'm lucky to have the job that I have. Been there 4 years and have moved up the ladder quickly. Times are really hard here in Western N.C.
Wood burning stove/fireplace salesman doesn't sould like a bad occupation in a place like Canada. Hey, if it pays the bills.....
BTW, you guys are killing me with those 1/72 kits. It's unbelievable how great ya'll make them look in such a small scale. With my meathooks I'll stick with 1/48 and above.
Hermon
ludwig113

Joined: February 05, 2008
KitMaker: 1,381 posts
AeroScale: 1,110 posts

Posted: Sunday, November 29, 2009 - 07:51 AM UTC
blimey,you guys dont hang around do you!
i'm still filling gaps and sanding
but once i've drilled the 20 or so rigging holes i should be ready for the primer...
i'm still filling gaps and sanding
but once i've drilled the 20 or so rigging holes i should be ready for the primer...

AussieReg

#007

Joined: June 09, 2009
KitMaker: 8,156 posts
AeroScale: 3,756 posts
Posted: Sunday, November 29, 2009 - 09:08 AM UTC
Paul,
Filling gaps and sanding !!! I haven't progressed past opening the box for a peek !!
Cheers, D
Filling gaps and sanding !!! I haven't progressed past opening the box for a peek !!
Cheers, D

JimMrr
Joined: January 03, 2007
KitMaker: 1,505 posts
AeroScale: 595 posts
Posted: Sunday, November 29, 2009 - 12:06 PM UTC
Hey Hermon,Canada isnt THAT cold!..at least where I live,anyways. I spent a winter about 3 hours drive north of here and it was so cold that if you went outside without your nose covered, and tried to breath in, your nostrils would snap-freeze shut!...thats invigorating!!!..having said that ,they say we get snow this week!
Youre Goose is looking sweet!...and before i forget ...happy thanksgiving to our American freinds out there..
Youre Goose is looking sweet!...and before i forget ...happy thanksgiving to our American freinds out there..
VonCuda
Joined: November 28, 2005
KitMaker: 2,216 posts
AeroScale: 1,080 posts
Posted: Sunday, November 29, 2009 - 01:16 PM UTC
Jim, having your nose snap freeze shut isn't as bad as having your willy snap off while writing your name in the snow. 
Err......ok. Here is the Goose in all her glory, done. This is a nice kit if you have experience but for the beginner I'd say run far far away from this one.


I have another sea plane in my stash and if I get time I may build it for this campaign. Hope ya'll like the Goose and thanks for the great campain Bruce and Jim.!
Hermon
Err......ok. Here is the Goose in all her glory, done. This is a nice kit if you have experience but for the beginner I'd say run far far away from this one.
I have another sea plane in my stash and if I get time I may build it for this campaign. Hope ya'll like the Goose and thanks for the great campain Bruce and Jim.!
Hermon
mj
Joined: March 16, 2002
KitMaker: 1,331 posts
AeroScale: 325 posts
Posted: Sunday, November 29, 2009 - 02:18 PM UTC
Very nice Goose, Hermon. It's one of my favorite planes, and you did it proud. I think this Campaign runs until Sept. of next year, so I hope we'll see you working on that second entry soon.
Justin, man, that Cat keeps looking better and better every time you post. You're doing a really great job on it.
Jim, I hope my 1/144 version comes out looking as good as your 1/72nd did. I like it!
Cheers,
Mike
Justin, man, that Cat keeps looking better and better every time you post. You're doing a really great job on it.
Jim, I hope my 1/144 version comes out looking as good as your 1/72nd did. I like it!
Cheers,
Mike
Keeperofsouls2099
Joined: January 14, 2009
KitMaker: 2,798 posts
AeroScale: 2,443 posts
Posted: Monday, November 30, 2009 - 12:27 AM UTC
alright so last night i got my engine's done and assembled with PE spark plug wires
and my wing on and mated with the fusalage.I also opened up the air intakes on the
bottom.......


P.S. I took the pictures in my new photo booth so my pictures should be a lot better now. :-
Build On,
Justin
and my wing on and mated with the fusalage.I also opened up the air intakes on the
bottom.......
P.S. I took the pictures in my new photo booth so my pictures should be a lot better now. :-
Build On,
Justin
JimMrr
Joined: January 03, 2007
KitMaker: 1,505 posts
AeroScale: 595 posts
Posted: Monday, November 30, 2009 - 02:14 AM UTC
@Hermon- many thanks for joining us! Hoping youll build yet another ..
@Mike-.cant wait to see yours!
@Justin- wow-photo booth!...lucky guy... Your engines are looking top notch there!
Still riveting the fuselage here.. once that is done,and I start on the wings Ill post pics. I picked up a neat trick from a VERY good aircraft builder,George Burfield, yesterday, and I will try it on this kit. Ill post pics of the technique..its simple and adds a really cool patina to the paint..
@Mike-.cant wait to see yours!
@Justin- wow-photo booth!...lucky guy... Your engines are looking top notch there!
Still riveting the fuselage here..
once that is done,and I start on the wings Ill post pics. I picked up a neat trick from a VERY good aircraft builder,George Burfield, yesterday, and I will try it on this kit. Ill post pics of the technique..its simple and adds a really cool patina to the paint.. |

WEB HOSTING BY


Copyright ©2021 AeroScale and Kitmaker Network, a subsidiary of Silver Star Enterprises
All Rights Reserved. Please read our Conditions of Use and Privacy Policy.
All Rights Reserved. Please read our Conditions of Use and Privacy Policy.