Air Campaigns
Want to start or join a group build? This is where to start.
Official Sea Plane Campaign Thread
Keeperofsouls2099
_VISITCOMMUNITY
Florida, United States
Joined: January 14, 2009
KitMaker: 2,798 posts
AeroScale: 2,443 posts
Posted: Sunday, November 08, 2009 - 12:36 PM UTC
Ok so ive finally got some stuff done on my PBY.Went to a concert last night and im
recovering today so i had some time


First i started by finishing the interior and cockpit........


I then got the fusalage halfs painted and ready for the cocpit........


Then I assembled the cockpit and installed .45 bullet's behind the cocpit wall
for the weight issue.....


Thats it for now good luck with surgery bruce.hope to have you back soon.
Builds are looking real good guys keep up the good work.


Build On,
Justin
old-dragon
_VISITCOMMUNITY
Illinois, United States
Joined: August 30, 2005
KitMaker: 3,289 posts
AeroScale: 289 posts
Posted: Sunday, November 08, 2009 - 02:37 PM UTC
Hollow points woulda looked better -
JimMrr
_VISITCOMMUNITY
Ontario, Canada
Joined: January 03, 2007
KitMaker: 1,505 posts
AeroScale: 595 posts
Posted: Sunday, November 08, 2009 - 02:41 PM UTC
nice paintwork Justin..the wash is very subtle..that kit looks like the moldings are top notch!
Were all with you tomorrow Bruce ,dont forget that! I know theres going to be alot of praying for you here in town, as I have alerted several people I know of the need for prayer here ..and make sure you let us know youre ok ASAP...please?
JackFlash
_VISITCOMMUNITY
Colorado, United States
Joined: January 25, 2004
KitMaker: 11,669 posts
AeroScale: 11,011 posts
Posted: Sunday, November 08, 2009 - 04:54 PM UTC

Quoted Text

My mistake .....thats what I get for looking and not seeing.....I thought it was the original spitfire ...oops...Ill be quiet now ..


You get quiet on us and well send the local constabulary around for a health and welfare check!
Merlin
Staff MemberSenior Editor
AEROSCALE
#017
_VISITCOMMUNITY
United Kingdom
Joined: June 11, 2003
KitMaker: 17,582 posts
AeroScale: 12,795 posts
Posted: Sunday, November 08, 2009 - 11:12 PM UTC
Hi Bruce

Good luck tomorrow. My thoughts will be with you along with the others' - take good care of yourself.

All the best

Rowan
litespeed
Staff MemberNews Reporter
AEROSCALE
_VISITCOMMUNITY
England - North West, United Kingdom
Joined: October 15, 2009
KitMaker: 1,976 posts
AeroScale: 1,789 posts
Posted: Monday, November 09, 2009 - 01:28 AM UTC
Hi Bruce
All the best, hope everything goes perfectly.
tim
JimMrr
_VISITCOMMUNITY
Ontario, Canada
Joined: January 03, 2007
KitMaker: 1,505 posts
AeroScale: 595 posts
Posted: Tuesday, November 10, 2009 - 10:43 AM UTC


Here is my update......tomorrow I will look at the window glazings on the fuselage side ,then we close up and rivet!
Keeperofsouls2099
_VISITCOMMUNITY
Florida, United States
Joined: January 14, 2009
KitMaker: 2,798 posts
AeroScale: 2,443 posts
Posted: Tuesday, November 10, 2009 - 04:56 PM UTC
lookin good jim nice detail work.Like the leather detail


Build on,
Justin
JimMrr
_VISITCOMMUNITY
Ontario, Canada
Joined: January 03, 2007
KitMaker: 1,505 posts
AeroScale: 595 posts
Posted: Tuesday, November 10, 2009 - 11:54 PM UTC

Quoted Text

lookin good jim nice detail work.Like the leather detail


Thanks Justin..its a combination of oilpaints:Brown Madden, Yellow Ochre, and White blended
I want to put on a layer of dullcote before I close up the fuselage
jaypee
_VISITCOMMUNITY
Scotland, United Kingdom
Joined: February 07, 2008
KitMaker: 1,699 posts
AeroScale: 1,384 posts
Posted: Wednesday, November 11, 2009 - 04:05 AM UTC
Nice drybrushing work there.

I think I might do the do-x as well for this campaign I'll see how it goes. Got a lot of great photos from the bundesarchiv

http://www.bild.bundesarchiv.de/archives/barchpic/search/_1257954329/?search[view]=minigallery

Most interesting is that the rear props are only two bladed. The kit and most builds use four bladed all round.
Nice shot of the interior. I may put some gizmology in behind the glass. On the bridge at least.

As for the sunderland. sanding all those engines seems too much like hard work. I made a mould of the sanded
engine with milliput. I 've left it to cure. So tonight I'll try to make a copy of it.


JimMrr
_VISITCOMMUNITY
Ontario, Canada
Joined: January 03, 2007
KitMaker: 1,505 posts
AeroScale: 595 posts
Posted: Wednesday, November 11, 2009 - 05:34 AM UTC
Very cool Mr Foster ......cant wait to see pics!

yes and no off topic here ...We should take time to remember those who have fallen in the name of freedom on this day ...it is Rememberance day here in Canada


Bless every soldier fallen in battle,no matter the flag flown..
JackFlash
_VISITCOMMUNITY
Colorado, United States
Joined: January 25, 2004
KitMaker: 11,669 posts
AeroScale: 11,011 posts
Posted: Thursday, November 12, 2009 - 06:04 PM UTC
Amen Jim.


Quoted Text

"Well then, I'll begin at the beginnin!"


Gloster VI


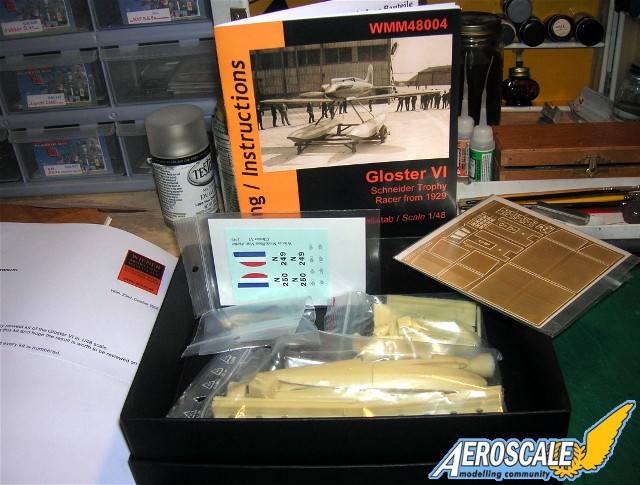
The Gloster VI was a racing seaplane developed as a contestant for the 1929 Schneider Trophy by the Gloster aircraft company.

The aircraft was known as the Golden Arrow, partly in reference to its colour, the distinctive three-lobed cowling of the 'broad-arrow' Napier Lion engine, but also to another contemporary Lion-powered record-breaker, Henry Segrave's Golden Arrow land speed record car.

Two aircraft were registered with RAF numbers N249 & N250.

They showed promise and high speed, but also had significant problems with fuel supply when banking that led to engine cut-outs. For such a risky business as low-altitude air-racing, this was an unacceptable risk and the aircraft were withdrawn from competition in the 1929 Schneider Trophy, leaving the way clear for the Supermarine S.6 to win. An alternative theory for the withdrawal is rumoured to have been an accident to the lorry delivering the engines from Napier, and insufficient time to repair the damage until the day after.

On 10 September 1929, the day after the Supermarine S.6 had won the Trophy, N249 returned to flight. Flight Lieutenant George Stainforth flew her over a measured mile course for a top speed of 351.3 mph and a ratified world absolute speed record, averaged over four of 336.3 mph. This record was held only briefly, as a later run by Squadron Leader Augustus Orlebar in the S.6 managed to raise it over 350 mph.

During the final Schneider Trophy in 1931, the Gloster VI was still in service with the High Speed Flight for training purposes. (From the Wikipedia free encyclopedia.)
JackFlash
_VISITCOMMUNITY
Colorado, United States
Joined: January 25, 2004
KitMaker: 11,669 posts
AeroScale: 11,011 posts
Posted: Thursday, November 12, 2009 - 06:15 PM UTC
Here is what you get in the box.


website here.
JimMrr
_VISITCOMMUNITY
Ontario, Canada
Joined: January 03, 2007
KitMaker: 1,505 posts
AeroScale: 595 posts
Posted: Friday, November 13, 2009 - 12:32 AM UTC
wow Stephen, I can see this one finished in my minds eye and she sure is purty!
its going to look beutiful!

I just got word that Bruce is recovering nicely .........and providing an appropriate degree of trouble to the nursing staff! lol... GO BRUCE !!
Emeritus
_VISITCOMMUNITY
Uusimaa, Finland
Joined: March 30, 2004
KitMaker: 2,845 posts
AeroScale: 1,564 posts
Posted: Friday, November 13, 2009 - 02:05 AM UTC
Some more progress. Yesterday I primed pretty much all the interior & other detail parts.


After watching the dvd and taking screenshots for reference, a few thing became apparent. Firstly, some of the color suggestions in the instructions are just plain wrong: the cockpit most certainly isn't neutral grey, but closer to the blue of the exterior (leaning a bit to grey perhaps), the control stick handle isn't black, but brass/gold color, etc.
And secondly, the case of the rigging wires. Naturally, it's understable that the wires are omitted from action scenes (it's a traditional animated film). But then there's one single scene where any wires are shown. With the majority of the non-action scenes showing the plane without rigging, I'll go without them too.

Going back to the cockpit, there also seems to be a framework on the cockpit sidewalls plus some additional doohickeys there not included in the kit, but I think I'll pass doing them this time, as the cockpit opening isn't very large and thus the interior not that visible when finished.
And it greatly increases the chances I'll get it actually done!
BobCard
_VISITCOMMUNITY
Florida, United States
Joined: August 09, 2006
KitMaker: 1,008 posts
AeroScale: 14 posts
Posted: Friday, November 13, 2009 - 02:29 AM UTC
Great to hear about Bruce,
Bob
jaypee
_VISITCOMMUNITY
Scotland, United Kingdom
Joined: February 07, 2008
KitMaker: 1,699 posts
AeroScale: 1,384 posts
Posted: Friday, November 13, 2009 - 02:36 AM UTC
Hear hear, get back with us soon, big man.

I'll toast your health with a goodly measure of Glengoynes finest.
JimMrr
_VISITCOMMUNITY
Ontario, Canada
Joined: January 03, 2007
KitMaker: 1,505 posts
AeroScale: 595 posts
Posted: Friday, November 13, 2009 - 06:08 AM UTC
BTW JP I saw the pic of the Dornier you are going to do and all I can say is THAT IS COOOL!..Ive never seen that aircraft before
BobCard
_VISITCOMMUNITY
Florida, United States
Joined: August 09, 2006
KitMaker: 1,008 posts
AeroScale: 14 posts
Posted: Sunday, November 15, 2009 - 09:24 AM UTC
Just an update from the weekend,


Had to stop to let things dry,
Bob
JimMrr
_VISITCOMMUNITY
Ontario, Canada
Joined: January 03, 2007
KitMaker: 1,505 posts
AeroScale: 595 posts
Posted: Sunday, November 15, 2009 - 10:54 AM UTC
wow Bob!..impressive work...and FAST!..
I have my fuselage halves together ,now its putty time and then on to more panel lines and riveting!
Keeperofsouls2099
_VISITCOMMUNITY
Florida, United States
Joined: January 14, 2009
KitMaker: 2,798 posts
AeroScale: 2,443 posts
Posted: Sunday, November 15, 2009 - 12:04 PM UTC
Heres an update from I.......


Got the rear end done and installed.With some weathering.......

Got the fuselage assembled and ready for paint.lots of sanding but no filler really
and i got the wing assembled and painted and futured the whit on the bottom...

BIGGEST plane ive done so my work bench is a little messy still waiting for
US NAVY BLUE GREY to arrive from testors.when that gets here i can carry on.
builds are looking great guys check back in in a couple days.....


Build On,
Justin
JimMrr
_VISITCOMMUNITY
Ontario, Canada
Joined: January 03, 2007
KitMaker: 1,505 posts
AeroScale: 595 posts
Posted: Sunday, November 15, 2009 - 12:39 PM UTC
Nice work justin...very subtle paint..im impressed!
VonCuda
_VISITCOMMUNITY
North Carolina, United States
Joined: November 28, 2005
KitMaker: 2,216 posts
AeroScale: 1,080 posts
Posted: Sunday, November 15, 2009 - 01:32 PM UTC
Sorry guys. My little dog was killed last Saturday and I haven't spent any time at the bench since then. When I feel more in the mood, I'll get back to my Goose and take some progress pics

Bob & Justin, really nice work so far.


Hermon
Keeperofsouls2099
_VISITCOMMUNITY
Florida, United States
Joined: January 14, 2009
KitMaker: 2,798 posts
AeroScale: 2,443 posts
Posted: Sunday, November 15, 2009 - 03:59 PM UTC
sorry to hear about your dog hermon.thanks jim...


Build On,
Justin
JimMrr
_VISITCOMMUNITY
Ontario, Canada
Joined: January 03, 2007
KitMaker: 1,505 posts
AeroScale: 595 posts
Posted: Monday, November 16, 2009 - 12:48 AM UTC
My deepest sympathies Hermon....I know were all thinking of you here ..all the best to you and your family.