Official Sea Plane Campaign Thread
Florida, United States
Joined: January 14, 2009
KitMaker: 2,798 posts
AeroScale: 2,443 posts
Posted: Sunday, November 22, 2009 - 03:15 PM UTC
Hello all thanks for the nice comment's. yes everything is paint except for the letters,
numbers,and emblems.lots of masking tape and about a gallon of decal set.

@Bruce nice to have you back glad to see your recovering and will continue with us.

@JIm thanks for your kind words its nice to have your hard work noticed.

@Tigerbait,thanks for replying to question low tac might actually be good as i have a problem with the tamiya mask lifting my paint sometimes.I have to detac it on my pants leg most of the time.
Build On,
Justin
P.S.....The kit comes with all the leading edge stripes in the decal set I decided not use them and paint my own. didn't like the way they looked.paint always looks better to me anyways.

"From time to time, the tree of liberty must be watered with the blood of
tyrants and patriots."
- Thomas Jefferson
IPMS#47611
Florida, United States
Joined: January 14, 2009
KitMaker: 2,798 posts
AeroScale: 2,443 posts
Posted: Sunday, November 22, 2009 - 03:22 PM UTC
JIm i just noticed i didnt know people in Canada used DUDE thats awesome.I live in Florida you can come surf anytime!
Build On,
Justin
"From time to time, the tree of liberty must be watered with the blood of
tyrants and patriots."
- Thomas Jefferson
IPMS#47611
Ontario, Canada
Joined: January 03, 2007
KitMaker: 1,505 posts
AeroScale: 595 posts
Posted: Monday, November 23, 2009 - 01:25 AM UTC
LOL,,,Id probably break my damn-fool neck!...theres 2 places Id like to visit in the US ....Louisiana bayous and the Florida keys ...I prefer my waves nice and small..lol
Projects:
K44 Anti Tank gun
Diana
Albatros DIII
North Carolina, United States
Joined: November 28, 2005
KitMaker: 2,216 posts
AeroScale: 1,080 posts
Posted: Monday, November 23, 2009 - 10:05 AM UTC
Justin those decals and paint job are SICK! You're either a helluva fast learner or you've been at this a good long while. As for the painters tape, I use it all the time. I only use the Tamiya tape for fine detail stuff.
Jim, did you Future your canopy before masking with BMF? Sometimes I end up with a little residue but a Q-tip and a bit of thinner usually takes it off. Follow that up with a dab more Future and it's all good.
Bruce, been there....done that too my friend. Hey, we bought a new saw last month for the school system that has a 42" bar and chain. I'll take a pic and show it to ya. It's a monster.
Tod, thanks for the kudos. The gap actually turned out better than I thought it would.
Hermon

"Those who would give up Essential Liberty
to purchase a little Temporary Safety,
deserve neither Liberty nor Safety."
Benjamin Franklin
Ontario, Canada
Joined: January 03, 2007
KitMaker: 1,505 posts
AeroScale: 595 posts
Posted: Monday, November 23, 2009 - 11:11 AM UTC
Hermon, yes I did future my canopies first...was that my mistake?..I am a wee bit concerned for my poor Sally as I have alot ...alot ..of masking to remove ...all BMF..I applied the first part of her camo today! looking good.....so far..

Projects:
K44 Anti Tank gun
Diana
Albatros DIII
Florida, United States
Joined: January 14, 2009
KitMaker: 2,798 posts
AeroScale: 2,443 posts
Posted: Monday, November 23, 2009 - 02:06 PM UTC
About 15 years just recently started doing planes when i joined this site.Again thanks alot for the kind comments guys.But im still not done painting update soon.
Build On,
Justin
"From time to time, the tree of liberty must be watered with the blood of
tyrants and patriots."
- Thomas Jefferson
IPMS#47611
Florida, United States
Joined: January 14, 2009
KitMaker: 2,798 posts
AeroScale: 2,443 posts
Posted: Monday, November 23, 2009 - 04:44 PM UTC
Here is my update...........

You can see in the back ground fusalage with Promodler wash applied love that stuff!
and my masking job for the black stripe on wing leading edge......

Here is the fusalage with the Promodler wash removed....It turned out better than
I expected......will spray with flat coat later.....


Mask removed just had a few touch ups where the mask lifted my paint

Will apply Promodler tomorrow must let Klear dry over night...
I would also just like to say ive learned most of what i know from this site and you
guys .So the the site is working and teaching people alot......
Build On,
Justin
"From time to time, the tree of liberty must be watered with the blood of
tyrants and patriots."
- Thomas Jefferson
IPMS#47611
Ontario, Canada
Joined: January 03, 2007
KitMaker: 1,505 posts
AeroScale: 595 posts
Posted: Monday, November 23, 2009 - 11:29 PM UTC
Looking good there Justin!..tell us, what is your take on the Promodeller wash?..can you give us a wee product review?..
Projects:
K44 Anti Tank gun
Diana
Albatros DIII
North Carolina, United States
Joined: November 28, 2005
KitMaker: 2,216 posts
AeroScale: 1,080 posts
Posted: Tuesday, November 24, 2009 - 11:42 AM UTC
Promodeler wash is the bomb! Of course it could be said that Promodeler wash is contributing to the "dumbing down" of America since it takes all the headache and hassel out of weathering.


Looks awsome Justin. I smell a model of the month contestant.
Hermon
"Those who would give up Essential Liberty
to purchase a little Temporary Safety,
deserve neither Liberty nor Safety."
Benjamin Franklin
Scotland, United Kingdom
Joined: February 07, 2008
KitMaker: 1,699 posts
AeroScale: 1,384 posts
Posted: Tuesday, November 24, 2009 - 12:52 PM UTC
yeah justin that is lookin spectacular.
Started work on the sundy tonight. Hurrah. Test fitting the canopy revealed the instrument panel was too high so rather than sand it back I broke it off and carved out a notch at the bottom this way it saves the great work done to get it looking so good.
This is a good thing to inherit a build from a great modeller it lets me see how they have done things in an up close way.
Also started scribing the main panel lines. I've done the fore port section and it looks ok but i'll need to study the refs to get the rear section planned out right. This 40 year old plastic carves really well. much better than the brittle stuff you get nowadays. Mind you modern plastic usually comes already scribed
Keep it up folks this is already looking like the campaign of the year.
Florida, United States
Joined: January 14, 2009
KitMaker: 2,798 posts
AeroScale: 2,443 posts
Posted: Tuesday, November 24, 2009 - 01:26 PM UTC
Thanks Hermon.Have a F4U-D in the MOM this month hoping for my first win
Alright I've been using Promodeler wash for probably the last 6 builds ive done its great stuff
and it goes a LONG way.I still have 3 quarters of a bottle left although that may change
after this build.But check it out for your self
http://www.promodeller.com/ And if you want to see it action check it out here
http://www.youtube.com/watch?v=dNF-cXEn0zk@JP Thank you Sir its coming along and im liking the way it is turning out.
Build On,
Justin
"From time to time, the tree of liberty must be watered with the blood of
tyrants and patriots."
- Thomas Jefferson
IPMS#47611
Victoria, Australia
Joined: August 23, 2007
KitMaker: 629 posts
AeroScale: 539 posts
Posted: Tuesday, November 24, 2009 - 11:56 PM UTC
The F1M2 Pete is finished. This kit really does represent Hasegawa at their best i think. When they do kits like this one they are every bit the equal in quality as Tamiya, even the decals performed perfectly...something that has always been the weakness of the two big Japanese firms.
Even though Japanese aircraft are notorious for their paint wear, most of the pics on the 2 pages here:
http://www.ijnafphotos.com/jbwf1m1.htm show that Pete's seemed to fair much better than most Japanese aircraft for paint wear. I suppose operating from water probably didn't throw up as much coral and sand as land based aircraft.


Andrew
Current Projects:
Eduard 1/48 F6F-3 Hellcat
Hasegawa 1/350 Yukikaze
1/6 JJ Models Sarah "Gothic"
Florida, United States
Joined: January 14, 2009
KitMaker: 2,798 posts
AeroScale: 2,443 posts
Posted: Wednesday, November 25, 2009 - 12:21 AM UTC
Wow good job on the pete i like the paint chipping very nice job
Build On,
Justin
"From time to time, the tree of liberty must be watered with the blood of
tyrants and patriots."
- Thomas Jefferson
IPMS#47611
Ontario, Canada
Joined: January 03, 2007
KitMaker: 1,505 posts
AeroScale: 595 posts
Posted: Wednesday, November 25, 2009 - 01:27 AM UTC
That is a very inspirational piece youve done Andrew!..the toning is spot-on..nice subtle chipping also.
Projects:
K44 Anti Tank gun
Diana
Albatros DIII
Alabama, United States
Joined: October 06, 2009
KitMaker: 34 posts
AeroScale: 22 posts
Posted: Wednesday, November 25, 2009 - 05:10 AM UTC
Andrew, the Pete looks great. The F1M2 has been on my to-do-list for a while now
North Carolina, United States
Joined: November 28, 2005
KitMaker: 2,216 posts
AeroScale: 1,080 posts
Posted: Wednesday, November 25, 2009 - 07:36 AM UTC
Yes the paint and weathering is awsome, but the rigging is also top notch. As for the paint chipping, it's nice to see a Japanese plane from time to time that doesn't look beat all to he**. Sometimes less is more.
Beautiful job Andrew.
Hermon
"Those who would give up Essential Liberty
to purchase a little Temporary Safety,
deserve neither Liberty nor Safety."
Benjamin Franklin
Ontario, Canada
Joined: January 03, 2007
KitMaker: 1,505 posts
AeroScale: 595 posts
Posted: Wednesday, November 25, 2009 - 10:21 AM UTC
Andrew,is youre Pete out-of box?
Projects:
K44 Anti Tank gun
Diana
Albatros DIII
Victoria, Australia
Joined: August 23, 2007
KitMaker: 629 posts
AeroScale: 539 posts
Posted: Wednesday, November 25, 2009 - 05:34 PM UTC
Quoted Text
Andrew,is youre Pete out-of box?
Yes 100% OOB. And without the Hasegawa detail-up set...actually the brass rigging from the detail-set would improve the model for sure. Otherwise i don't see an aftermarket set really adding much to this kit.
Thanks for the comments everyone. Much appreciated.
Andrew
Current Projects:
Eduard 1/48 F6F-3 Hellcat
Hasegawa 1/350 Yukikaze
1/6 JJ Models Sarah "Gothic"

#021
Joined: August 02, 2007
KitMaker: 2,458 posts
AeroScale: 197 posts
Posted: Wednesday, November 25, 2009 - 10:12 PM UTC
Hello All,
I have seen some great work from some Great Plane Master Builders along with some great tips.
@ Justin,
Great Job so far. Thanks for the link for the weathering products. I need to get some for my Many, Many Builds.
@ Andrew,
Great Job on your build. I do hope you will enter it in a contest, I think you have a winner there.
@ To everyone else,
Great Job you are doing, I am a little late in showing my thanks to all of you for being in this campaign. Jim has been keeping me updated on all of your great work.
If you are done with your build, Please remember to get a photo in the gallery for your ribbon,
Keep up the good work,
Cheers,
Bruce
Fair Winds and Following Sea's, Always.
To my Friends, Death is as Light as a Feather, Duty is as Heavy as a Mountain.
I will all have my Hand on your Shoulder. Do not grieve for me I will allways be there for You.
Uusimaa, Finland
Joined: March 30, 2004
KitMaker: 2,845 posts
AeroScale: 1,564 posts
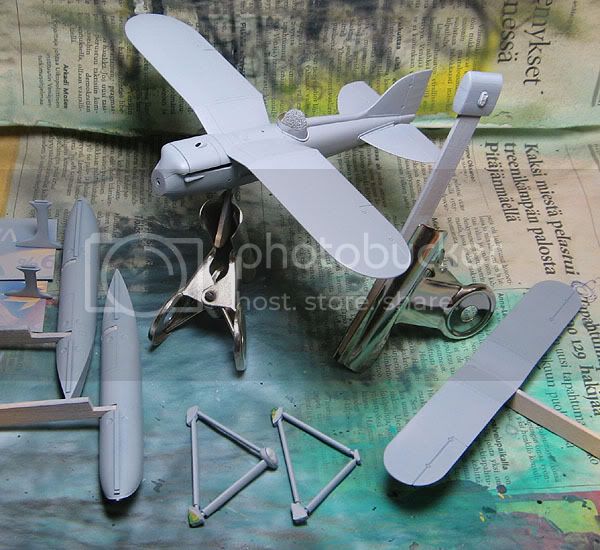
Posted: Thursday, November 26, 2009 - 02:05 AM UTC
^ I second that, great builds coming up here.

Here's my entry at the moment, primer's on:
Ontario, Canada
Joined: January 03, 2007
KitMaker: 1,505 posts
AeroScale: 595 posts
Posted: Thursday, November 26, 2009 - 03:29 AM UTC
looking good Eetu...
My update is tardy..I still have to rivet...I have finished doing panel lines on the fuselage..
Projects:
K44 Anti Tank gun
Diana
Albatros DIII
New Jersey, United States
Joined: May 28, 2009
KitMaker: 239 posts
AeroScale: 95 posts
Posted: Thursday, November 26, 2009 - 02:56 PM UTC
Hi all.
I started mine this evening as the kids were kind enough to go to sleep early.
I'm disappointed with the interior of this kit (MPM Arado Ar 95). They provide a nice PE and film dashboard and a resin control yoke but that's really it. Weird. Not even a seat for the rear gunner. So I'll definitely be doing closed canopy and concentrating on the exterior.
They give decals and painting diagrams (that look like they were faxed and then scanned into a pdf) for three versions. I'm choosing Spanish Civil War Condor Legion.
A bit of advice from biplane builders, please ... what's a good material to use for 1:72 rigging?
Pics will come...
Colorado, United States
Joined: January 25, 2004
KitMaker: 11,669 posts
AeroScale: 11,011 posts
Posted: Thursday, November 26, 2009 - 05:29 PM UTC
Quoted Text
Hi all. . .A bit of advice from biplane builders, please ... what's a good material to use for 1:72 rigging? Pics will come...
smoke coloured invisible sewing thread - inexpensive monofilament at any sewing or Craft shop.
". . .The most important thing is to know why you build and then get the most that you can out of building." via D.D.
Ontario, Canada
Joined: January 03, 2007
KitMaker: 1,505 posts
AeroScale: 595 posts
Posted: Friday, November 27, 2009 - 03:17 AM UTC
another possibility would be stretched sprue perhaps? The guys on the early Aviation forum turned me on to that recently and i like it because you can tighten it with a heated pin...but I admit Iv never used it for 1:72 so i dont know how that would go...Stephen would know better than I for sure..
Projects:
K44 Anti Tank gun
Diana
Albatros DIII
North Carolina, United States
Joined: November 28, 2005
KitMaker: 2,216 posts
AeroScale: 1,080 posts
Posted: Friday, November 27, 2009 - 04:00 AM UTC
Jim, the monofilament can also be tightened with a heated pin. It's the only reason an idiot like me can even attempt rigging and aerial wires.

Hermon
"Those who would give up Essential Liberty
to purchase a little Temporary Safety,
deserve neither Liberty nor Safety."
Benjamin Franklin