

Torsten very nice job on the Widows
I have one in my stash, certainly taking notes and paying attention to your build when/if I attempt mine down the road.
Allen nice recovery on the booms; a technique to keep in mind if I ever need to perform similar surgery.
Best wishes to any nonplastic member who needs mending!
Air Campaigns
Want to start or join a group build? This is where to start.
Want to start or join a group build? This is where to start.
Hosted by Frederick Boucher, Michael Satin
Twin Boom 2010 Official Campaign Thread

JMartine

Joined: October 18, 2007
KitMaker: 1,698 posts
AeroScale: 96 posts

Posted: Sunday, February 21, 2010 - 03:18 AM UTC

camogirl

Joined: October 20, 2005
KitMaker: 1,045 posts
AeroScale: 622 posts

Posted: Sunday, February 21, 2010 - 04:27 AM UTC
Quoted Text
Allen, a really neat fix on your twisted booms, it all came up beautifully. Speaking of repairs, how is Sam, I hope her recovery is going as planned ???
Well the consultant at hospital we saw last week announced the monstrosity might have to be on for an extra 4 -6 weeks. What concerns me is we didn't get to see the up to date x-rays and all he said was they were fine
 I was then told if I had any questions I would have to ask next week grrrrrrr
  I do have some ankle movement though
Ive managed to get my entry to the airbrushing stage however I think we might be stuck at ready to airbrush stage for a while as I can not stand long enough to airbrush and where the spray bay is Im unable to sit down to do it as well
Im happy to get some leg progress pics for you
 it does not look that bad now the stitches are out and the thread holes have started to heal. I'll pop them into the original break thread.

KrisMax

Joined: January 23, 2010
KitMaker: 156 posts
AeroScale: 139 posts
Posted: Sunday, February 21, 2010 - 11:16 PM UTC
Torsten, those P-61's are looking great. Looks like you're on the home straight now. By comparison, I'm a few weeks behind you, with more filling/sanding and canopy masking ahead of me. It's been good to have your posts to keep me focussed on the task. Thanks!
Allen, good fix for the twisted booms. That's the sort of thing I don't look forward to, but it usually turns out to be fun and the results make it well worth the effort.
If I can get some time at the workbench this week I will post an update at the weekend.

Simon
Allen, good fix for the twisted booms. That's the sort of thing I don't look forward to, but it usually turns out to be fun and the results make it well worth the effort.
If I can get some time at the workbench this week I will post an update at the weekend.
Simon

BlackWidow

Joined: August 09, 2009
KitMaker: 1,732 posts
AeroScale: 1,336 posts
Posted: Tuesday, February 23, 2010 - 08:40 AM UTC
@Damian, James, Simon
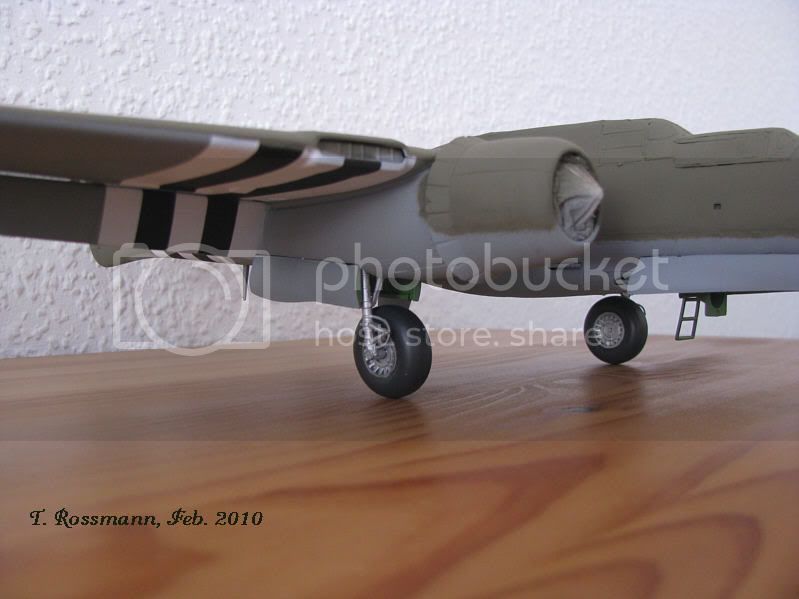
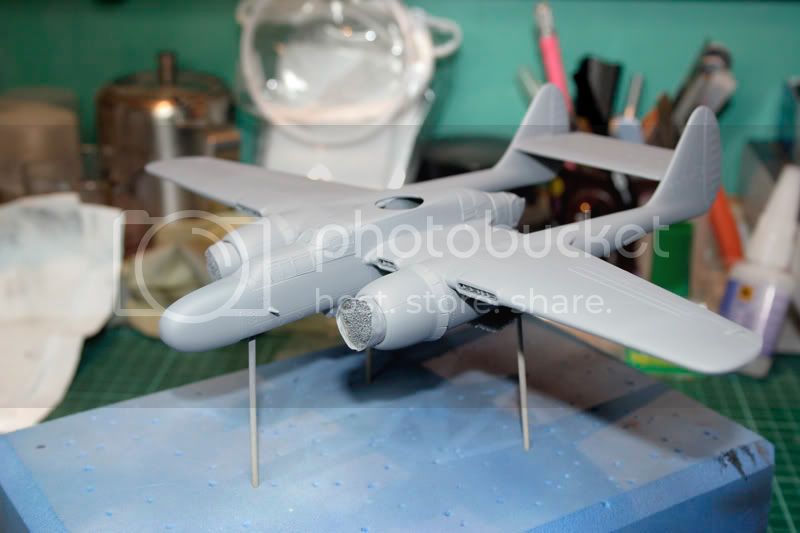
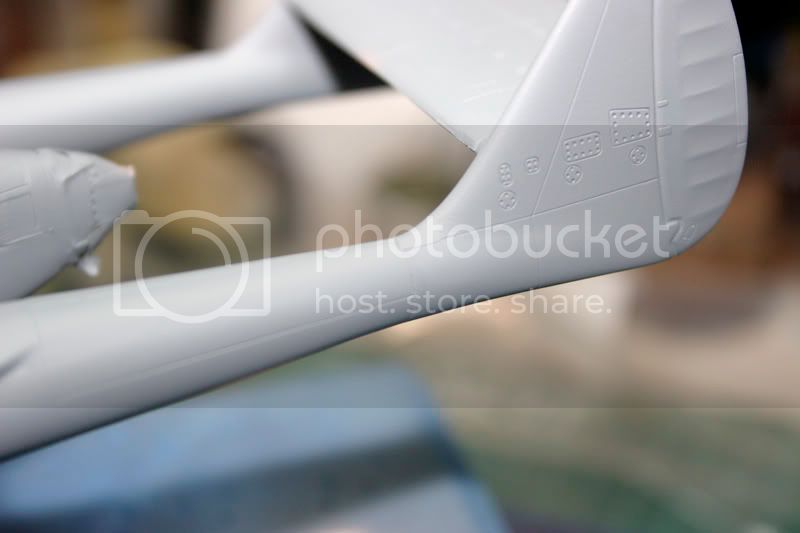
Thanks for your comments, guys! Yes, I can already see the end of Northrop's assembly line, though there are still many small parts to be glued to the kits. In the last 2 days I came a bit further. Lady Gen is now completly painted (though I have to repaint some small parts ) and today I demasked both birds.  Especially these D-Day-Stripes on Lady Gen look fantastic. More pictures in a few days. Glad I can help you with my photos.
@Allen
Well fixed this boom, mate! I don't know what I would have done if this would have happened to me ....
@Samantha
Good to see you back here in the campaign. Hope to see you also back soon at the workbench.
Happy modelling
Torsten
Thanks for your comments, guys!
Yes, I can already see the end of Northrop's assembly line, though there are still many small parts to be glued to the kits. In the last 2 days I came a bit further. Lady Gen is now completly painted (though I have to repaint some small parts ) and today I demasked both birds. Especially these D-Day-Stripes on Lady Gen look fantastic. More pictures in a few days. Glad I can help you with my photos.@Allen
Well fixed this boom, mate! I don't know what I would have done if this would have happened to me ....
@Samantha
Good to see you back here in the campaign. Hope to see you also back soon at the workbench.
Happy modelling
Torsten

SGTJKJ

#041

Joined: July 20, 2006
KitMaker: 10,069 posts
AeroScale: 3,788 posts

Posted: Tuesday, February 23, 2010 - 10:19 PM UTC
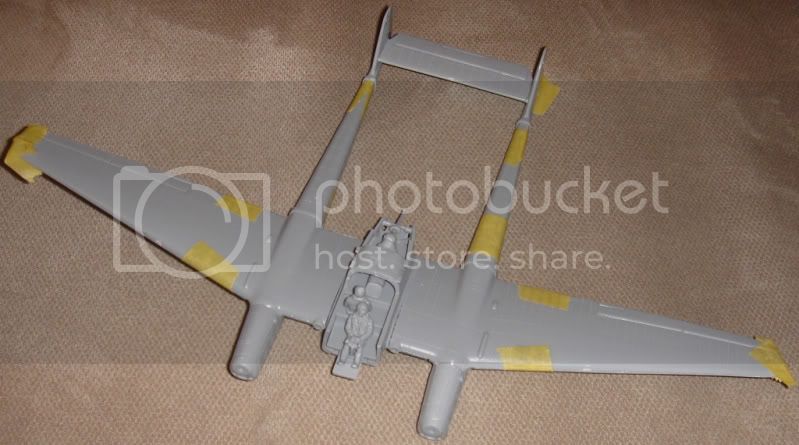
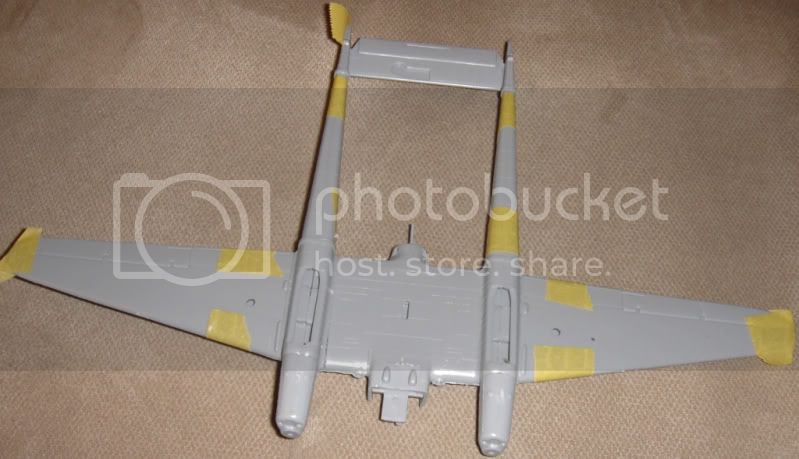
I have now also started on my entry for this campaign. I am going (very) old school. My kit will be the old Airfix FW 189 A2. I think this kit is actually older than me 
There is only one decal option in the kit, so choices are limited. However, it looks like it is based on a real aircraft and not just a teoretical example. I even found a picture of it in one of my references.
Construction was very fast and the kit went together well so far. Some snading and filling will be required, but that is minor details. It only took a couple of hours in front of a soccer champions league match.
More to follow soon.
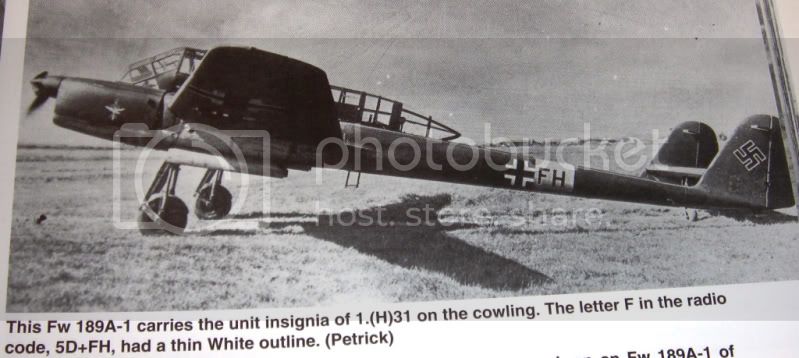


AussieReg
#007
Joined: June 09, 2009
KitMaker: 8,156 posts
AeroScale: 3,756 posts
Posted: Tuesday, February 23, 2010 - 11:55 PM UTC
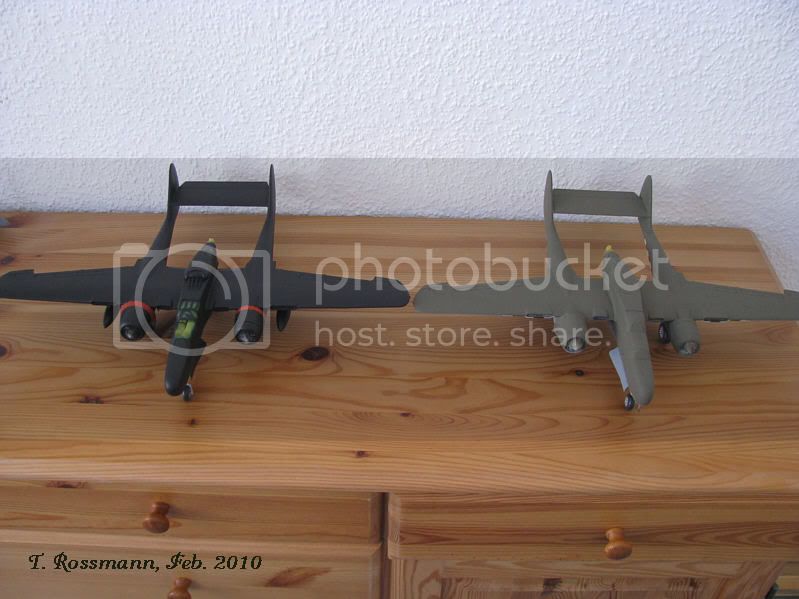
Hi Jesper. Nice quick work on the 189. Those booms just look so fragile, like dragonflies.
It's funny how sometimes doing a quick OOB gives you that sense of accomplishment that motivates you to put a bit more effort into the more complicated, but stalled, builds.
Thanks for sharing, and I look forward to more progress pics.
Cheers, D
It's funny how sometimes doing a quick OOB gives you that sense of accomplishment that motivates you to put a bit more effort into the more complicated, but stalled, builds.
Thanks for sharing, and I look forward to more progress pics.
Cheers, D

BlackWidow
Joined: August 09, 2009
KitMaker: 1,732 posts
AeroScale: 1,336 posts
Posted: Saturday, February 27, 2010 - 09:11 AM UTC
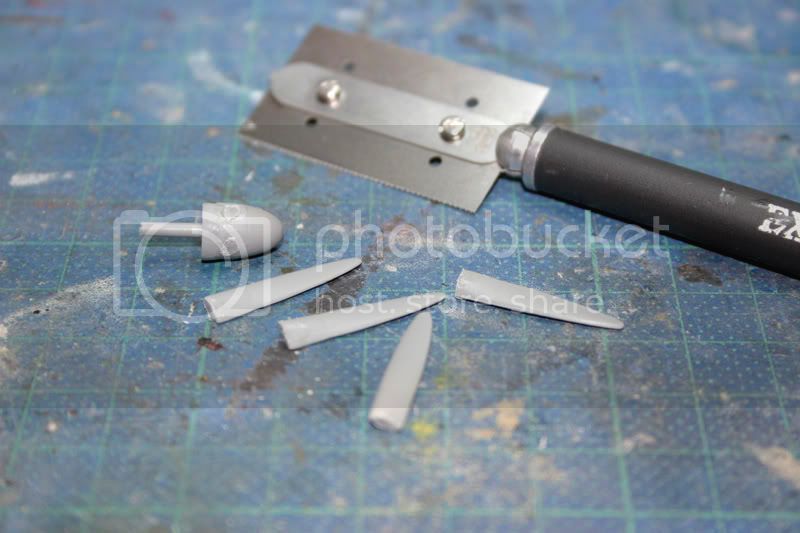
Well, slowly but surely I can see the finish line .... Both beauties are ready for some Future shine now. I will start with that tomorrow. I just finished with some last minor works on small parts, which will be attached right at the end. It's now 8 weeks since I started this vintage dual combo, exactly on 1. January. Here are the latest photos from today afternoon. I hope this gives some motivation for all the other Monogram P-61 builders. Yes you can!


The Spook is still without pitot because she first gets her kissing lips there ....
Happy modelling
Torsten
Both beauties are ready for some Future shine now. I will start with that tomorrow. I just finished with some last minor works on small parts, which will be attached right at the end. It's now 8 weeks since I started this vintage dual combo, exactly on 1. January. Here are the latest photos from today afternoon. I hope this gives some motivation for all the other Monogram P-61 builders. Yes you can! The Spook is still without pitot because she first gets her kissing lips there ....
Happy modelling
Torsten

RotorHead67
Joined: May 07, 2003
KitMaker: 1,174 posts
AeroScale: 226 posts

Posted: Saturday, February 27, 2010 - 09:51 AM UTC
Quoted Text
Hi all!
I have decided that I´ll build a Revell/Monogram P-61 Black Widow.
One of my very first models I ever built was the old, old Airfix P-61!
It had a strikingly beutiful Lady as nose art, naturally It was the "Lady In the Dark"!
So that´s what I´m gonna build, but this time in 1/48th scale (I´m older now!)!
Cheers!
Stefan,
Perfect choice!!! The 61 is my favorite twin as well. I cant decide whether to do a P-61 0r an F-5E photo recon. HMMMMM
Stefan E


Keeperofsouls2099
Joined: January 14, 2009
KitMaker: 2,798 posts
AeroScale: 2,443 posts
Posted: Saturday, February 27, 2010 - 01:39 PM UTC
wow those black widows are coming along nicely excellant paint work!
@jasper very nice work cant wait to see that canopy work!
Build On,
Justin
@jasper very nice work cant wait to see that canopy work!
Build On,
Justin


Tomcat31
#042
Joined: November 18, 2006
KitMaker: 2,828 posts
AeroScale: 1,720 posts

Posted: Saturday, February 27, 2010 - 07:11 PM UTC
Yesterday's progress....
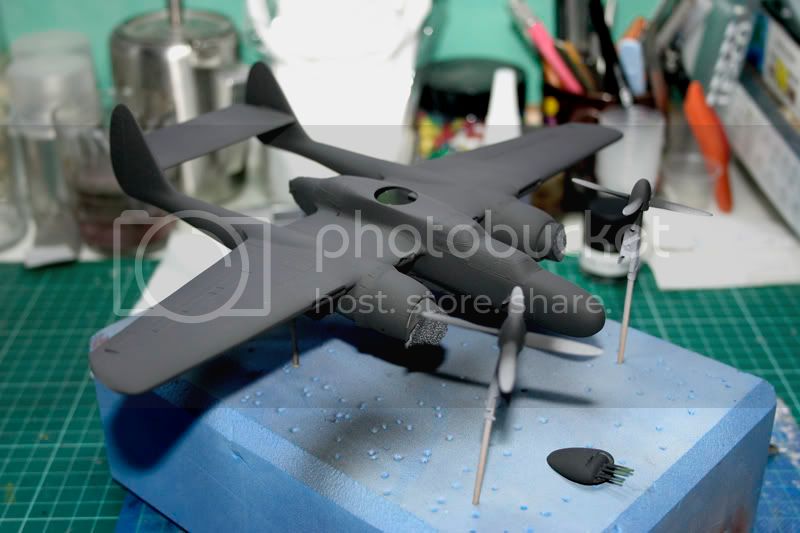
Finally got to the primer coat
Don't think I did too bad a job after removing and reattaching the fins
One thing to be careful of is the prop blades are individual in this kit and they aren't "handed" so there is no positive location for them. As such I managed to get all of my blades the wrong way round ( only realised as I was about to prime them) So out came the saw and they were removed from the hub.
The Blades and Hub was cleaned up
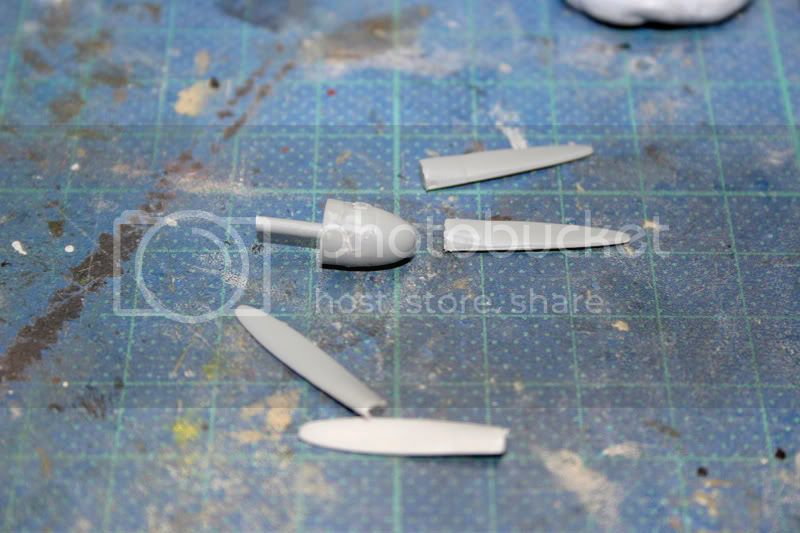
then they were drilled and pinned
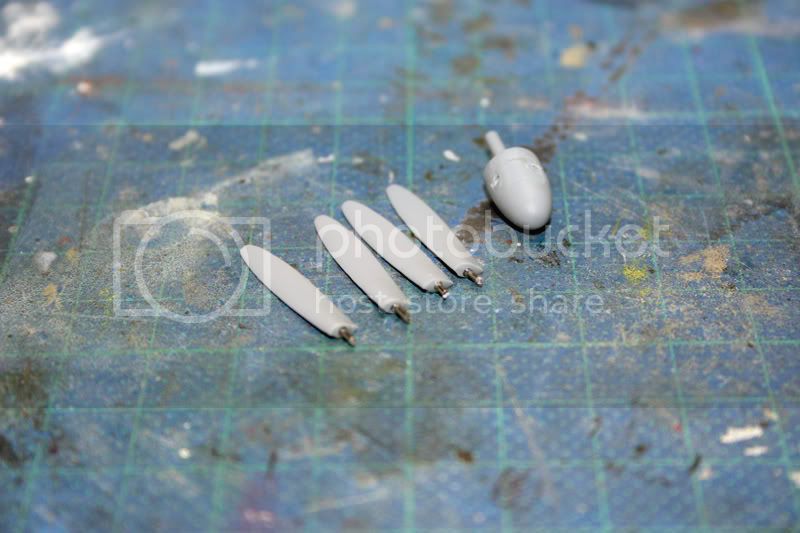
And the finished result

Hopefully I'll get to the spray bay today and get some black on the old girl
Finally got to the primer coat
Don't think I did too bad a job after removing and reattaching the fins
One thing to be careful of is the prop blades are individual in this kit and they aren't "handed" so there is no positive location for them. As such I managed to get all of my blades the wrong way round
( only realised as I was about to prime them) So out came the saw and they were removed from the hub.The Blades and Hub was cleaned up
then they were drilled and pinned
And the finished result
Hopefully I'll get to the spray bay today and get some black on the old girl

KrisMax
Joined: January 23, 2010
KitMaker: 156 posts
AeroScale: 139 posts
Posted: Saturday, February 27, 2010 - 10:58 PM UTC
Great work on the P-61s Torsten, those invasion stripes look spot on.
I've managed a few hours this week. I put the major parts together and filled/sanded wing roots. I've also masked the canopies, so they're the two most arduous tasks out of the way. The fit so far is about the same as other Revel Monogram models I've done, but, as Torsten has already pointed out, the clear parts fit is not good,so that's my next hurdle. Anyway, here are some pics.


Thanks for looking.
Simon
I've managed a few hours this week. I put the major parts together and filled/sanded wing roots. I've also masked the canopies, so they're the two most arduous tasks out of the way. The fit so far is about the same as other Revel Monogram models I've done, but, as Torsten has already pointed out, the clear parts fit is not good,so that's my next hurdle. Anyway, here are some pics.
Thanks for looking.
Simon
Tomcat31
#042
Joined: November 18, 2006
KitMaker: 2,828 posts
AeroScale: 1,720 posts
Posted: Sunday, February 28, 2010 - 09:19 AM UTC
Quick update (with no pics) got most of the black on today but ran out of paint with just the top half of one wing to spray.  downside is I was trying a new method of putting a little red brown in the paint mix so a black wash will show up better. Fortunately i have another couple of days off so hopefully I can repaint the whole aircraft again tomorrow
downside is I was trying a new method of putting a little red brown in the paint mix so a black wash will show up better. Fortunately i have another couple of days off so hopefully I can repaint the whole aircraft again tomorrow AussieReg
#007
Joined: June 09, 2009
KitMaker: 8,156 posts
AeroScale: 3,756 posts
Posted: Monday, March 01, 2010 - 01:41 PM UTC
Hi all, I'm back on deck after moving house over the weekend. Excellent progress shots coming in once again. Torsten, those 2 Widows look really good. All of that hard work really pays off now !!
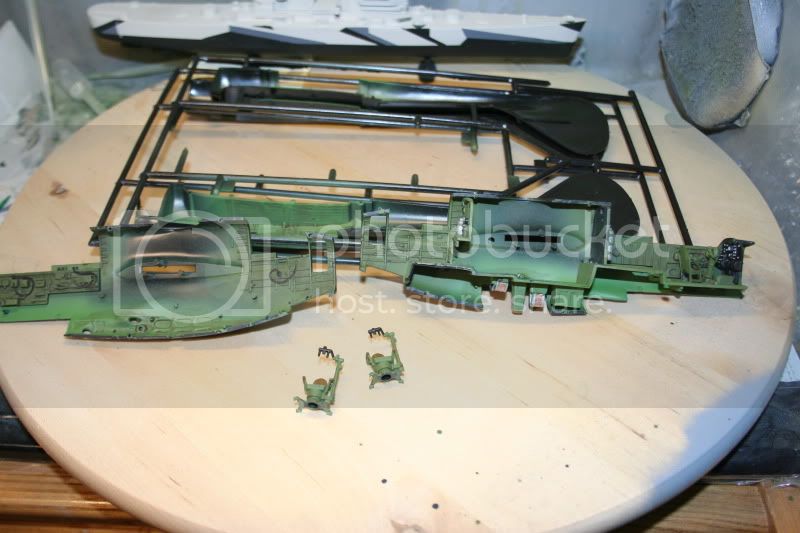
Allen, you really wouldn't know that radical surgery (sorry) had taken place on those booms, or on the props. For "scale black" I use a 50/50 mix of Tamiya Flat Black and Red Brown, it comes up nicely and as you said it gives the post-wash a lift as well.
Simon, your big Widow is coming along very nicely so far, I hope the glass goes according to plan for you.
Thanks for posting and keep up the excellent work guys.
Cheers, D
Tomcat31
#042
Joined: November 18, 2006
KitMaker: 2,828 posts
AeroScale: 1,720 posts
Posted: Tuesday, March 02, 2010 - 10:18 AM UTC
Quoted Text
Thanks D. I did try the 50/50 mix but I thought it looked a little too brown for to me so i went for a 75/25 mix and this was the outcome at the end of play yesterdayAllen, you really wouldn't know that radical surgery (sorry) had taken place on those booms, or on the props. For "scale black" I use a 50/50 mix of Tamiya Flat Black and Red Brown, it comes up nicely and as you said it gives the post-wash a lift as well.
No work done to it today as I decided to concentrate my efforts on the Phantom and P-47 that I also doing at the moment.
discordian
Joined: May 28, 2009
KitMaker: 239 posts
AeroScale: 95 posts
Posted: Wednesday, March 03, 2010 - 01:37 AM UTC
OK - finally some progress pics. Not going as quickly as I hoped, but it's coming along now. I'm trying to finish up the ship you see in the background of one of the shots.

camogirl
Joined: October 20, 2005
KitMaker: 1,045 posts
AeroScale: 622 posts
Posted: Wednesday, March 03, 2010 - 10:16 AM UTC
Ive got somewhere with mine. It has been primed and managed to get the black and white invasion stripes I'll see if Allen will kindly take some pics for me
camogirl
Joined: October 20, 2005
KitMaker: 1,045 posts
AeroScale: 622 posts
Posted: Friday, March 05, 2010 - 09:54 AM UTC
Tomorrow should see the Yellow, Neutral Grey and Olive Drab go onto the kit. Does depend on how I feel and if Im up to it. It took me ages to mask off a small white line on the nose could I get the tape to stay put well eventually after attaching itself to anything but the kit first 
camogirl
Joined: October 20, 2005
KitMaker: 1,045 posts
AeroScale: 622 posts
Posted: Saturday, March 06, 2010 - 06:01 AM UTC
Wooo progress we have a painted P-38


Hopefully will get some Klear on after tea and might be able to start decalling tonight or tomorrow, then just washes, adding props and U/C and that should be me finished
Hopefully will get some Klear on after tea and might be able to start decalling tonight or tomorrow, then just washes, adding props and U/C and that should be me finished
JMartine
Joined: October 18, 2007
KitMaker: 1,698 posts
AeroScale: 96 posts
Posted: Sunday, March 07, 2010 - 02:22 AM UTC
Jesper Very nice job on an old kit; interesting craft.
Torsten Beautiful widows some day I will gather the nerver (and skills) to try my monogram P61 kit.
Allen clean recovery from the boom re-attachment, nice job. And nice recovery on the props; have to keep that in mind when I do props .
Simon nice job, lots of masking! Look forward to the rest.
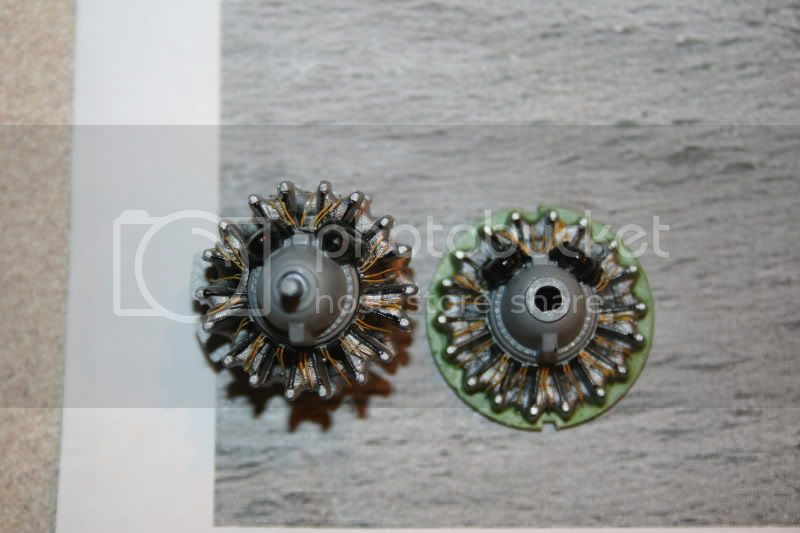
Scott neat wiring job on the engines.
Samantha great paint job, hope my P38s look half as good as that! Also reminds me NOT to attach props to early in the build, which I tend to always do being a newbie
cheers all
Torsten Beautiful widows some day I will gather the nerver (and skills) to try my monogram P61 kit.
Allen clean recovery from the boom re-attachment, nice job. And nice recovery on the props; have to keep that in mind when I do props .
Simon nice job, lots of masking! Look forward to the rest.
Scott neat wiring job on the engines.
Samantha great paint job, hope my P38s look half as good as that! Also reminds me NOT to attach props to early in the build, which I tend to always do being a newbie
cheers all
Tomcat31
#042
Joined: November 18, 2006
KitMaker: 2,828 posts
AeroScale: 1,720 posts
Posted: Sunday, March 07, 2010 - 04:41 AM UTC
Well I had an Epic Failure today when I started to decal. The Dragon decals stick worse that superglue to fingers.
I didn't get a chance to get the first red walkway line in place correctly and it had set it self in place. I tried water, microsol, Mr Mark Softener and ever Daco Strong Decal solvent and it still wouldn't budge
In the end I had to bite the bullet and sand it off and respray and re-Klear the wing
Next step will be to mask off and spray the walk lines
camogirl
Joined: October 20, 2005
KitMaker: 1,045 posts
AeroScale: 622 posts
Posted: Sunday, March 07, 2010 - 05:18 AM UTC
Is it cruel I had a semi laughing fit while watching Allen try and wrestle the decal off the kit, Ive seen and partaken in many occasions wrestling trying to get the decal onto the kit but never off
I now have a decaled and weathered plane going to leave the weathering to set and hopefully get some more pics later. Hmmm maybe tomorrow I can get the U/C on, props painted and attached, drop tanks on then I think it will just need a varnish and Im done
I now have a decaled and weathered plane
going to leave the weathering to set and hopefully get some more pics later. Hmmm maybe tomorrow I can get the U/C on, props painted and attached, drop tanks on then I think it will just need a varnish and Im done BlackWidow
Joined: August 09, 2009
KitMaker: 1,732 posts
AeroScale: 1,336 posts
Posted: Sunday, March 07, 2010 - 08:22 AM UTC
Quoted Text
Well I had an Epic Failure today when I started to decal. The Dragon decals stick worse that superglue to fingers.
I didn't get a chance to get the first red walkway line in place correctly and it had set it self in place. I tried water, microsol, Mr Mark Softener and ever Daco Strong Decal solvent and it still wouldn't budge
In the end I had to bite the bullet and sand it off and respray and re-Klear the wing
Next step will be to mask off and spray the walk lines
That is really nerve breaking, Allen! I use for my deacls "Adhesol Decal Laying Solution" from Agama (czech manufacture) and never had problems either with it or the decals. It's a sticky liquid, a bit like glue and keeps the decal on the surface. If the decal is in wrong position, I can wash it off with a wet brush of water. Maybe you can try that one next time. You might get it at Hannants, as they sell Xtracrylics, which is the same sauce as Agama.
Btw, I used the Monogram decal sheet for "Lady Gen" and there the walk ways are just straight red lines which I had to cut in shape. Took me 2 evenings and the lines are not enough. Ihad to leave out the red triangles ..... The Revell sheet is better. Will test it in the next days.
@Scott
Good process on your Widow! Can't wait to see, how yours will look like in the end! Good luck with all this filling and sanding ....!
@Sam
Good to see you back at the workbench and your "California Cutie" coming to an end. Unfortunatly the real plane doesn't exist anymore, crashing at an air show in 1996 (?), killing its pilot .....

Happy modelling
Torsten
KrisMax
Joined: January 23, 2010
KitMaker: 156 posts
AeroScale: 139 posts
Posted: Monday, March 08, 2010 - 09:25 PM UTC
Allen, sounds like one of those near disasters with the decals, and you've got me sweatin' coz I'll be putting mine on soon. I've had problems on previous kits with walkway lines, they're about the most awkward decals to place. At least with masking and painting the lines you should have an end result that will be better than decals 
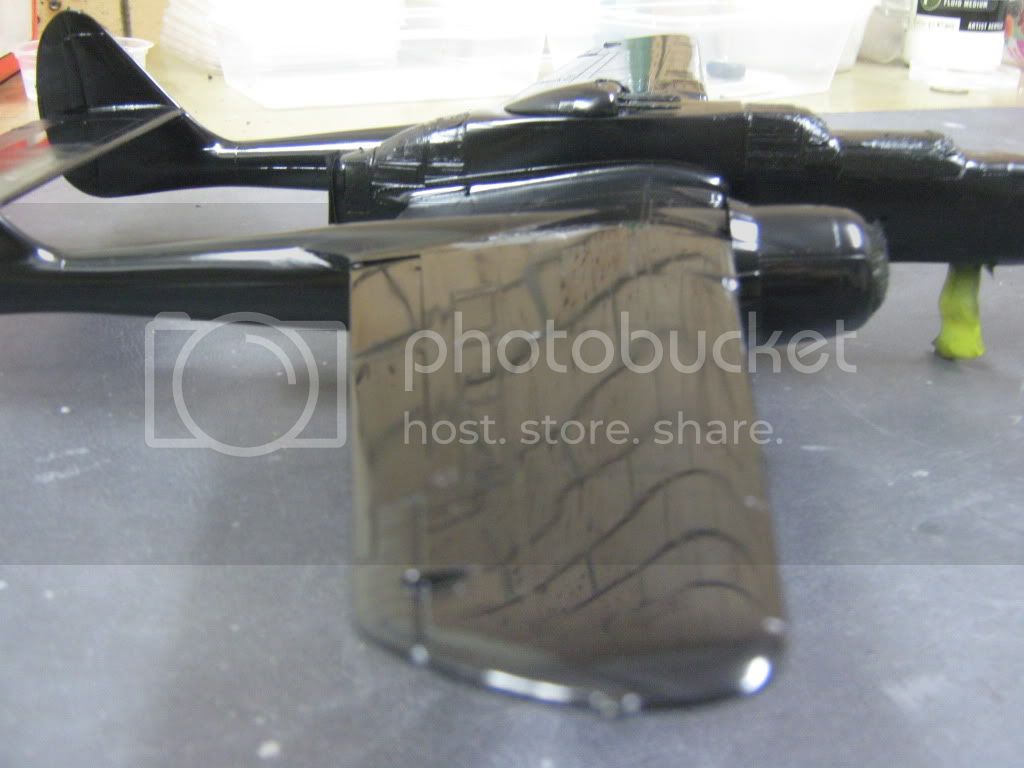
I put the gloss black on last night (added some blue but I can't tell).

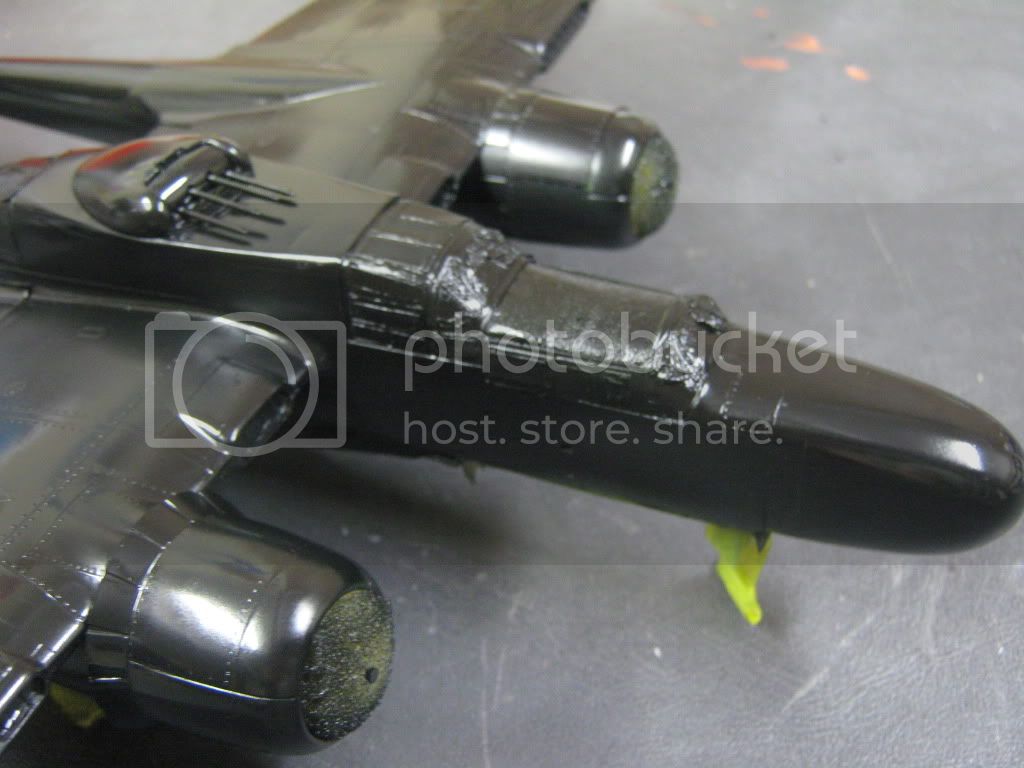
Photo below shows the level of gloss. I'm not sure if I should tone it down or not. I think it looks good, but maybe not authentic? Any suggestions?
Cheers all
I put the gloss black on last night (added some blue but I can't tell).
Photo below shows the level of gloss. I'm not sure if I should tone it down or not. I think it looks good, but maybe not authentic? Any suggestions?
Cheers all

Blueheeler
Joined: March 18, 2008
KitMaker: 347 posts
AeroScale: 223 posts

Posted: Tuesday, March 09, 2010 - 11:47 PM UTC
Looking very good Simon I dont know enough about her, but maybe a nice wash to bring the gloss down a bit? As I said, looks good as is.
Have managed to get the camera working again. Here's my Bronco ready for all the little bits and pieces and a wash to dirty her up a little. Enjoy
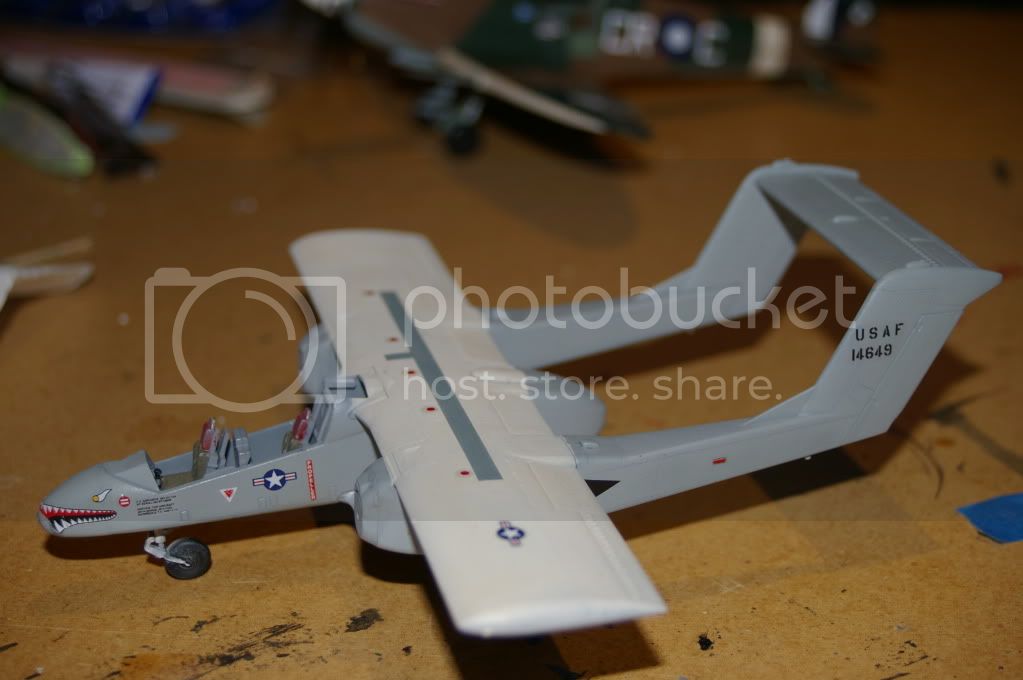
I dont know enough about her, but maybe a nice wash to bring the gloss down a bit? As I said, looks good as is.Have managed to get the camera working again. Here's my Bronco ready for all the little bits and pieces and a wash to dirty her up a little. Enjoy

KrisMax
Joined: January 23, 2010
KitMaker: 156 posts
AeroScale: 139 posts
Posted: Wednesday, March 10, 2010 - 08:43 PM UTC
Quoted Text
Looking very good Simon
Thanks Nick, will put decals on, exhaust stains, and see how it looks then.
Interesting nose markings on your Bronco - a sheep in wolf's clothing.
 |

WEB HOSTING BY


Copyright ©2021 AeroScale and Kitmaker Network, a subsidiary of Silver Star Enterprises
All Rights Reserved. Please read our Conditions of Use and Privacy Policy.
All Rights Reserved. Please read our Conditions of Use and Privacy Policy.