Lone Star 1:48 RAF FE 8 vac
England - South East, United Kingdom
Joined: November 06, 2005
KitMaker: 1,667 posts
AeroScale: 1,551 posts
Posted: Sunday, March 13, 2011 - 08:46 PM UTC
Another well executed recovery.

As for matching the paint, close enough, I imagine a lot of the finish on the originals could be rather patchy as time touchups sunlight and dirt took their toll.
Still can't cure the AMS even with sausage finger implants & olde eyes.
Alberta, Canada
Joined: January 19, 2008
KitMaker: 6,743 posts
AeroScale: 6,151 posts
Posted: Tuesday, March 15, 2011 - 12:40 AM UTC
Quoted Text
Another well executed recovery. 
As for matching the paint, close enough, I imagine a lot of the finish on the originals could be rather patchy as time touchups sunlight and dirt took their toll.
Thanks Keith

It is very close but I had to use Testors acrlyic Olive drab and brown for the mix . Was out of the tamiya olive drab . I did make my masking line up agaist the panel line and under the fuselage as well which the shade difference is more noticeable .
I now have the lower wings attached and did a test run with the struts with the top wing in place double checking to make sure every thing is line up . Tonight will be starting to drill out the rigging holes so the wire hoop attachment points can be fixed in place . Will have some pic's up soon .
British Columbia, Canada
Joined: February 11, 2007
KitMaker: 96 posts
AeroScale: 25 posts
Posted: Tuesday, March 15, 2011 - 03:00 AM UTC
The ammo bins look great Terri.
Ted
United States
Joined: May 23, 2008
KitMaker: 2 posts
AeroScale: 1 posts
Posted: Tuesday, March 15, 2011 - 09:20 AM UTC
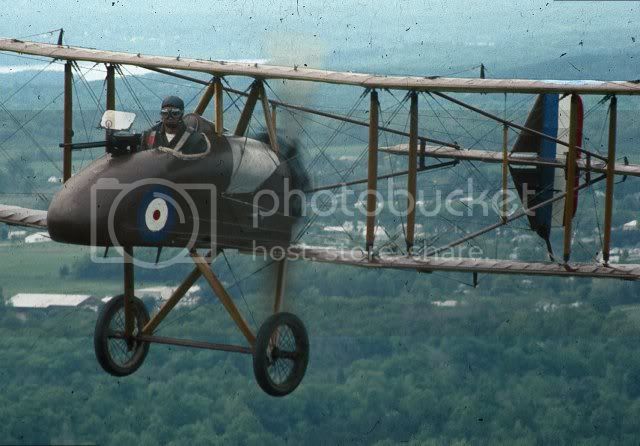
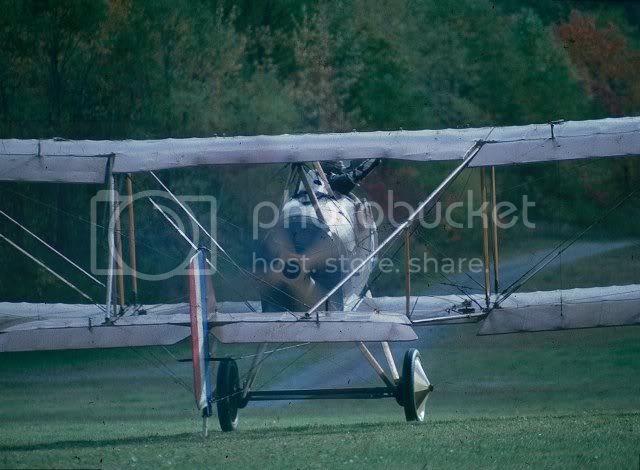
Hey Terri! Been watching this build with interest, you do some very fine work indeed. Here are a couple of pictures of Cole Palen flying his FE at Rhinebeck for those days when you might need a little inspiration!
Keep up the good work!
Cheers,
Geoff


Alberta, Canada
Joined: January 19, 2008
KitMaker: 6,743 posts
AeroScale: 6,151 posts
Posted: Wednesday, March 16, 2011 - 12:24 AM UTC
Thanks Ted for the kind comment

Hi Geoff and welcome to Aeroscale . Thanks for sharing the pic's of Cole's Fe 8 . I have seen other photo's a reproduction FE 8 on the net but I haven't seen these yet .
Alberta, Canada
Joined: January 19, 2008
KitMaker: 6,743 posts
AeroScale: 6,151 posts
Posted: Saturday, March 19, 2011 - 04:41 PM UTC
Made a bit progress since the last up-date and will have pic's up as soon as the gallery is back up and running . The main part of the weathering is done on the fuselage and wings . Rigging has started as well with the placements of the attachment points . The top wing is ready to be mounted and the struts fixed in place .
Removed by original poster on 03/20/11 - 15:10:19 (GMT).
Removed by original poster on 03/20/11 - 15:12:29 (GMT).
Alberta, Canada
Joined: January 19, 2008
KitMaker: 6,743 posts
AeroScale: 6,151 posts
Posted: Sunday, March 20, 2011 - 03:16 AM UTC


Still have to get used to using photobucket on this site .
I did the weathering by first spraying thinned Tamiya smoke over the wing ribs on the upper and lower surfaces . Once dried this was sealed with dull cote for the next step . I mixed up a mix of grey and dark brown pastel and went over the top surface ribs with the mix working it in . The under surfaces got the same treatment using a sand yellow followed a buff from Tamiya's weathering systeme . Everything got a final dull cote to lock it all in place .
The prop is also ready for the tips to be painted brass and finish off the bosses. Rigging attachment points are in lace and the top wing is ready to be mounted .
More to follow soon. . .
Västra Götaland, Sweden
Joined: February 19, 2010
KitMaker: 1,473 posts
AeroScale: 1,450 posts
Posted: Sunday, March 20, 2011 - 04:02 AM UTC
HI Terri
Looking great – your CDL and PC10 is really shaping up very nicely with the weathering treatment

This is going to look fantastic once its together.
Best Regards
Mikael
_________________________________________________________
Just finished the Wingnut Wings Taube. On to the Junkers D.1
Alberta, Canada
Joined: January 19, 2008
KitMaker: 6,743 posts
AeroScale: 6,151 posts
Posted: Sunday, March 20, 2011 - 12:55 PM UTC
Thanks Mikael for the kind comment

England - South East, United Kingdom
Joined: November 06, 2005
KitMaker: 1,667 posts
AeroScale: 1,551 posts
Posted: Sunday, March 20, 2011 - 07:54 PM UTC
It looks real good Terri, the weathering really sets it off and tones the decals in well. The CDL looks sweet too, a long build with its little hiccups is really showing off your abilities.
Great
K
Still can't cure the AMS even with sausage finger implants & olde eyes.
Alberta, Canada
Joined: January 19, 2008
KitMaker: 6,743 posts
AeroScale: 6,151 posts
Posted: Monday, March 21, 2011 - 11:25 AM UTC
Thanks Keith

Well , you don't learn anything if you don't try and when hiccups do happen learning how to fix them puts you closer to improving ones skills as builder .
Alberta, Canada
Joined: January 19, 2008
KitMaker: 6,743 posts
AeroScale: 6,151 posts
Posted: Saturday, March 26, 2011 - 08:28 AM UTC
Finally was able to back at the bench after spending a week away and got some progress done .
Top wing in now mounted and the rigging has also started . The pullys for the rear controls have also been made out 10 card with a punch set . better to add these items now then later when the tail booms and more rigging is added .


Alberta, Canada
Joined: January 19, 2008
KitMaker: 6,743 posts
AeroScale: 6,151 posts
Posted: Sunday, March 27, 2011 - 12:17 PM UTC
Rigging of the main wings is now finished .

England - South East, United Kingdom
Joined: November 06, 2005
KitMaker: 1,667 posts
AeroScale: 1,551 posts
Posted: Sunday, March 27, 2011 - 12:34 PM UTC
Won't be long now....lovely rigging work Terri, I really want to see this with the tail on

Go Terri
K
Still can't cure the AMS even with sausage finger implants & olde eyes.
Västra Götaland, Sweden
Joined: February 19, 2010
KitMaker: 1,473 posts
AeroScale: 1,450 posts
Posted: Monday, March 28, 2011 - 12:12 AM UTC
HI Terri,
Wow – what a lovely build – rigging looks superb, and I really like the PC10 finish – You've had your ups and downs with this build, and I'm seriously impressed you stuck with it (I doubt I'd have the stamina to persevere myself)
This is going to be one beautiful model.
Best Regards
Mikael
_________________________________________________________
Just finished the Wingnut Wings Taube. On to the Junkers D.1
Alberta, Canada
Joined: January 19, 2008
KitMaker: 6,743 posts
AeroScale: 6,151 posts
Posted: Monday, March 28, 2011 - 01:28 AM UTC
Quoted Text
Won't be long now....lovely rigging work Terri, I really want to see this with the tail on 
Go Terri
K
So do I Keith , it's been long build for me , but has been very enjoyable so far even with the few hiccups

Alberta, Canada
Joined: January 19, 2008
KitMaker: 6,743 posts
AeroScale: 6,151 posts
Posted: Monday, March 28, 2011 - 01:37 AM UTC
Quoted Text
HI Terri,
Wow – what a lovely build – rigging looks superb, and I really like the PC10 finish – You've had your ups and downs with this build, and I'm seriously impressed you stuck with it (I doubt I'd have the stamina to persevere myself)
This is going to be one beautiful model.
Best Regards
Mikael
Thanks Mikael for the kind comment . Still have a few touch ups to do and a few more detail bits here and there before this assemlby part is finished . I did miss some rigging holes and had to remove the control surfaces on the left side so I was able to get the pin vice in there and drill out them holes . Not sure how I missed them but I did.
The next step will be finishing the detail on the tail booms before the get painted . Then i can but them in place and fix the tail in place . Then I will be ready for round two of the rigging . Still though there is a fair bit still left to do on this build , but it is comforting to know that I'm getting closer to wrapping this one up . Would like to have finished some time in April so I can enter it in model of the month .
For now my attention will be on the build review of Roden's N.24 bis so I will try and have up-dates when progress has been made

Alberta, Canada
Joined: January 19, 2008
KitMaker: 6,743 posts
AeroScale: 6,151 posts
Posted: Sunday, April 10, 2011 - 04:20 PM UTC
Colorado, United States
Joined: January 25, 2004
KitMaker: 11,669 posts
AeroScale: 11,011 posts
Posted: Sunday, April 10, 2011 - 05:00 PM UTC
". . .The most important thing is to know why you build and then get the most that you can out of building." via D.D.
Alberta, Canada
Joined: January 19, 2008
KitMaker: 6,743 posts
AeroScale: 6,151 posts
Posted: Monday, April 11, 2011 - 12:18 PM UTC
Thanks Stephen !

Västra Götaland, Sweden
Joined: February 19, 2010
KitMaker: 1,473 posts
AeroScale: 1,450 posts
Posted: Monday, April 11, 2011 - 11:02 PM UTC
Very, very nice indeed Terri, this is going to look great on the display shelf

Mikael
_________________________________________________________
Just finished the Wingnut Wings Taube. On to the Junkers D.1
North Carolina, United States
Joined: June 19, 2007
KitMaker: 604 posts
AeroScale: 600 posts
Posted: Tuesday, April 12, 2011 - 02:39 PM UTC
Terri,
The FE has been an inspiration for scratchbuilding, perserverance, and outstanding technique! Looks phenominal!
RAGIII
Texas, United States
Joined: February 22, 2008
KitMaker: 5,026 posts
AeroScale: 2,811 posts
Posted: Tuesday, April 12, 2011 - 02:59 PM UTC
Terri, I see enough rigging to spool my fishing reel. Nice job of a real hard (in my case) rigging step.
Bob
If it aint broke dont fix it.


 This is going to look fantastic once its together.


