

Good job Aaron, congrats on getting it finished ! After all of the issues you've faced it came up very nicely.
Don't forget to upoad a pic or two to the Campaign Gallery HERE when you get a chance.
Cheers, D
Air Campaigns
Want to start or join a group build? This is where to start.
Want to start or join a group build? This is where to start.
Hosted by Frederick Boucher, Michael Satin
OFFICIAL: Anti-Shipping Campaign

AussieReg

#007

Joined: June 09, 2009
KitMaker: 8,156 posts
AeroScale: 3,756 posts
Posted: Friday, March 04, 2011 - 11:44 PM UTC


Kiwi_Modeller
Joined: August 13, 2010
KitMaker: 188 posts
AeroScale: 62 posts

Posted: Saturday, March 05, 2011 - 12:34 AM UTC
yeh nice Aaron looks great man, the colors and weathering came out real good.
cheers,
Graham
cheers,
Graham

611_sqd

Joined: January 24, 2011
KitMaker: 470 posts
AeroScale: 99 posts
Posted: Saturday, March 05, 2011 - 02:00 AM UTC
Silly question. How? I see the gallery and I see on the top right the upload image and where to do it there. But it looks like that is just uploading it to my account and not the Anti-shipping gallery specifically
Thanks guys. This was a hard build. Harder because I need a bit more experience but learning is what its all about. That was my first German camo and I was happy with it for my skill level. It wouldn't stand up next to the cool Dornier here but yeah the camo went ok. The panel lines on the kit and the panel lines on the instructions were different. Which I think the instructions were right and the kit was wrong. Meant I had to eyeball stuff a little more than being able to line everything up. I can see ways to improve that for the next one and looking at what you guys did with different things has already shown me some new tricks that I hadn't thought of. So that's cool and will only help me improve. The weathering is probably a little heavy but I was happy how it turned out. Was a mix of drybrushing a deep chainmail kind of silver and then some different chalk pigments to give it the dusty look.
Although I didn't enjoy the build I did enjoy building with all of you guys. Was a good experience.
vertigo

Joined: November 11, 2004
KitMaker: 388 posts
AeroScale: 225 posts

Posted: Saturday, March 05, 2011 - 04:21 AM UTC
I think it's looking pretty good Aaron, it was a difficult kit as you've said.
I've been doing some more research into the Buccaneer and I've come across a bit of a problem. My original plan was to produce a Royal Navy aircraft fitted with Sea Eagle missiles. However the Fleet Air Arm retired their Buccaneers in 1978 and the Sea Eagle didn't come into service until 1985. Therefore the Royal Navy didn't fit Sea Eagles to their Buccaneers, their anti-shipping missile was the TV Martel.
The RAF used Sea Eagles on their maritime patrol Buccaneers leaving me with two options. I can either take a few of my Sea Eagles, pop off their heads and replace them with TV Martel heads or I can try and remove the bomb bay on the Buccaneer and replace it with the bulged RAF version.
I think I'm going to try for the missiles, replacing the bomb bay at this stage would be messy.

611_sqd
Joined: January 24, 2011
KitMaker: 470 posts
AeroScale: 99 posts
Posted: Saturday, March 05, 2011 - 04:27 AM UTC
I'd go with the missile option. I'm all for cool looking end products but sometimes a major mod can go wrong. As you say the missiles are a easier option. If you had desperately wanted to do the RAF version then it would be a different matter.
vertigo
Joined: November 11, 2004
KitMaker: 388 posts
AeroScale: 225 posts
Posted: Saturday, March 05, 2011 - 04:39 AM UTC
I might pick up another Buccaneer in the future and do an RAF version from the Gulf War but that's another project for another campaign.

rochaped

Joined: August 27, 2010
KitMaker: 679 posts
AeroScale: 669 posts

Posted: Saturday, March 05, 2011 - 04:44 AM UTC
Hi Everyone,
I'll try to keep up with some photos of the assembly & painting steps of this project, although time is a scarce commodity at my house.
The kit seems much more friendly than I anticipated, with little fuss in a dry assembly test, but not without the odd issue, more like 2 odd findings:
1- there is a strange lump in the rearward part of the fuselage ( hard to see in the photo) possibly a consequence of poor moulding seams. 2- the strange upper wing BalkenKreuz supplied in the decal sheet. Looks like someone used the box's drawings as a blue print for the decal sheet

Some interior scratching on-going


Finally the Citroen car, a little but rather nice kit, up to Tamiya standard, but some smaller parts are either absent or could be improved. So came Eduard etched parts to the rescue.
The exterior body

and a poor shot of the interior just to show the etched door/window handles

Thanks everyone!
Best
Pedro
I'll try to keep up with some photos of the assembly & painting steps of this project, although time is a scarce commodity at my house.
The kit seems much more friendly than I anticipated, with little fuss in a dry assembly test, but not without the odd issue, more like 2 odd findings:
1- there is a strange lump in the rearward part of the fuselage ( hard to see in the photo) possibly a consequence of poor moulding seams. 2- the strange upper wing BalkenKreuz supplied in the decal sheet. Looks like someone used the box's drawings as a blue print for the decal sheet
Some interior scratching on-going
Finally the Citroen car, a little but rather nice kit, up to Tamiya standard, but some smaller parts are either absent or could be improved. So came Eduard etched parts to the rescue.
The exterior body
and a poor shot of the interior just to show the etched door/window handles
Thanks everyone!
Best
Pedro
611_sqd
Joined: January 24, 2011
KitMaker: 470 posts
AeroScale: 99 posts
Posted: Saturday, March 05, 2011 - 07:36 AM UTC
I like the car its pretty cool.

camogirl

Joined: October 20, 2005
KitMaker: 1,045 posts
AeroScale: 622 posts

Posted: Saturday, March 05, 2011 - 09:25 AM UTC
Decalling done 


KrisMax
Joined: January 23, 2010
KitMaker: 156 posts
AeroScale: 139 posts
Posted: Saturday, March 05, 2011 - 12:13 PM UTC
@Damien, Your Sparviero is flawless! I tend to over-weather my models - trying to cover up the mistakes, I think. I like the minimal weathering you do - obviously nothing nasty to hide!
@Samantha, I'm impressed. The decals around the nose and nacelles couldn't have been easy, I think I would have been scared off! But it looks great. Congrats.
@Samantha, I'm impressed. The decals around the nose and nacelles couldn't have been easy, I think I would have been scared off! But it looks great. Congrats.
AussieReg
#007
Joined: June 09, 2009
KitMaker: 8,156 posts
AeroScale: 3,756 posts
Posted: Saturday, March 05, 2011 - 02:35 PM UTC
Pedro, very nice start indeed. The Citroen will make a really nice additional piece in the display cabinet as well.
Camo, great job on the markings, it's a really striking scheme you're onto there !
Simon, thank you sir ! The finish has a lot more to do with the great fit of the kit than it does my skills, but I will graciously accept your kind words anyway
Cheers, D
Camo, great job on the markings, it's a really striking scheme you're onto there !
Simon, thank you sir ! The finish has a lot more to do with the great fit of the kit than it does my skills, but I will graciously accept your kind words anyway
Cheers, D

29Foxtrot
Joined: September 19, 2003
KitMaker: 708 posts
AeroScale: 674 posts

Posted: Saturday, March 05, 2011 - 10:09 PM UTC
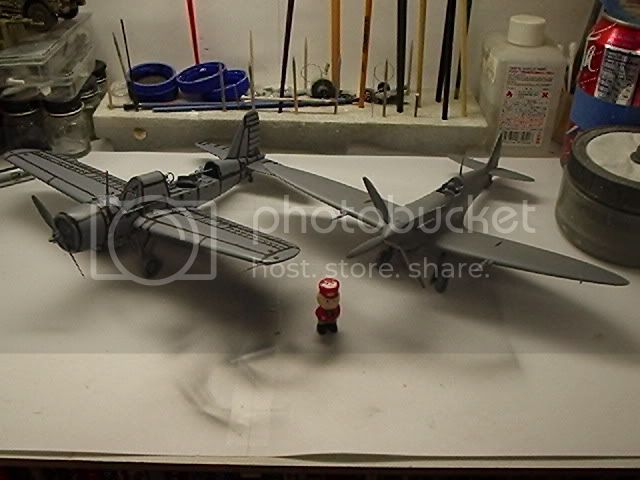
Started on the 32 scale Trumpeter Mk II Swordfish, done the basic interior framework, a little wire to the the engine cylinders, added a portion of plastic to fill the hollowed exhaust section of the cowling and painted the fin flash markings on the rudder post.

Pre-assembly paint work.

Basic ignition loom.

Filling to the hollow section of cowling exhaust.

Painting of the fin flash, Insignia White and masked ready for the RED.

RED applied and ready for masking.

Insignia Blue applied and masking removed.
Sam,
Excellent work on the 'Bat Nosed' B25, I built the same kit some years ago as 'My Favorite' an RAAF bird for a client.
Pre-assembly paint work.
Basic ignition loom.
Filling to the hollow section of cowling exhaust.
Painting of the fin flash, Insignia White and masked ready for the RED.
RED applied and ready for masking.
Insignia Blue applied and masking removed.
Sam,
Excellent work on the 'Bat Nosed' B25, I built the same kit some years ago as 'My Favorite' an RAAF bird for a client.


Tomcat31
#042
Joined: November 18, 2006
KitMaker: 2,828 posts
AeroScale: 1,720 posts

Posted: Saturday, March 05, 2011 - 11:27 PM UTC
Quoted Text
once you follow the link do you have to log in? The gallery has a habit of taking you back to the home page once you have logged in, which means when you try to upload it saves to your personal area. If this is the case once you're logged into the gallery go to AeroscaleSilly question. How? I see the gallery and I see on the top right the upload image and where to do it there. But it looks like that is just uploading it to my account and not the Anti-shipping gallery specifically

Then go to Aeroscale Campaigns
Then go to Campaigns 2010
Then Click on the Campaign you need (Origami is shown as an example)

Then you should be able to upload the photos there. Just to note that although you are uploading to the gallery it image size does come off of your quota for storage space
Hope this helps

611_sqd
Joined: January 24, 2011
KitMaker: 470 posts
AeroScale: 99 posts
Posted: Sunday, March 06, 2011 - 04:01 AM UTC
@Allen Thanks mate. I think I got it right and the images are there. I think it was doing exactly what you said as it looked like it was going to be loading to a personal gallery rather than the campaign one. That was a very helpful post you did
Tomcat31
#042
Joined: November 18, 2006
KitMaker: 2,828 posts
AeroScale: 1,720 posts
Posted: Sunday, March 06, 2011 - 04:36 AM UTC
No problems, I'm thinking of making a sticky on uploading images to the gallery as a few people have been confused by the process the last couple of months.
611_sqd
Joined: January 24, 2011
KitMaker: 470 posts
AeroScale: 99 posts
Posted: Sunday, March 06, 2011 - 06:10 AM UTC
That would be a good idea I think. Its not that hard but it SEEMS to be a little tricky so its easy to second guess oneself as to if they are doing it right. A sticky would be a cool thing for something that would be used a lot I imagine.

bf443
Vendor

Joined: May 16, 2003
KitMaker: 895 posts
AeroScale: 457 posts

Posted: Sunday, March 06, 2011 - 06:23 AM UTC
Greetings everyone,
Rob, really nice fin flashes painting them is the way to go
I was able to prime the Kingfisher the other day. While it was drying I primed a Spitfire Mk.IIIV for another build. After the primer cured I applied pre-shade using an ink marker. I used this three times now and it works just fine especially on small kits. Paint to follow soon and sentry is on guard!
All the best,
Brian
29Foxtrot
Joined: September 19, 2003
KitMaker: 708 posts
AeroScale: 674 posts
Posted: Monday, March 07, 2011 - 03:38 PM UTC
Brian,
Thanks for the kind words, your Kingfisher is looking good. Painted fin flashes on aircraft look better than the decals, this is the 3rd bird that I painted the fin flashes onto.
All,
Done a little 'extra' to the rear fuselage frames on the 32 scale Swordfish.

The 48 Tamiya Swordfish is almost completed, pix to follow on that bird soon.
Thanks for the kind words, your Kingfisher is looking good. Painted fin flashes on aircraft look better than the decals, this is the 3rd bird that I painted the fin flashes onto.
All,
Done a little 'extra' to the rear fuselage frames on the 32 scale Swordfish.
The 48 Tamiya Swordfish is almost completed, pix to follow on that bird soon.
KrisMax
Joined: January 23, 2010
KitMaker: 156 posts
AeroScale: 139 posts
Posted: Sunday, March 13, 2011 - 01:02 AM UTC
Hi,
First progress report on the Dauntless. Finished painting all the interior parts. Just need to assemble everything.


There's lots of great detail on this kit, so I'm doing my best to do it justice. A very enjoyable build so far!
Simon
First progress report on the Dauntless. Finished painting all the interior parts. Just need to assemble everything.
There's lots of great detail on this kit, so I'm doing my best to do it justice. A very enjoyable build so far!
Simon
AussieReg
#007
Joined: June 09, 2009
KitMaker: 8,156 posts
AeroScale: 3,756 posts
Posted: Sunday, March 13, 2011 - 01:22 AM UTC
@ Brian, I am very interested to see how that pre-shading technique turns out, thanks for posting the progress.
@ Rob, very nice work on the extra fuselage framing !
@ Simon, excellent paintwork on the office, how is everything going together on that kit so far?
Carry on chaps, we still have a way to go yet !
Cheers, D
@ Rob, very nice work on the extra fuselage framing !
@ Simon, excellent paintwork on the office, how is everything going together on that kit so far?
Carry on chaps, we still have a way to go yet !
Cheers, D
29Foxtrot
Joined: September 19, 2003
KitMaker: 708 posts
AeroScale: 674 posts
Posted: Sunday, March 13, 2011 - 03:16 AM UTC
Hi All,
Spent Saturday the 12th at the Melbourne Toy and Hobby Fair so it's back to the workbench and the Swordfish.
Thanks Damian, the extra framework would have looked much better if I used the clear fuselage halves, but a small part can be seen from the rear gunners station. I've made several other additions to this build, [building a folded wing bird], the rigging is cotton coated in a watered down PVA mix, [stops the cotton from turning fury], the three open holes in the lower fuselage plate have been fitted in using some Evergreen card, decided to finish this build as a 'weather beaten' RNFAA Atlantic scheme complete with the AEAF bands.
Used the kit decals for the instrument panel and used some clear blue on the compass plate.

Fuselage interior completed and ready to join up the two halves.

Either side of the lower wing center section.


Fuselage joined and rigging added.

I painted the inside of each wing half, as the redish primer will show threw when the rib sections will be drilled out and painted wood.
Spent Saturday the 12th at the Melbourne Toy and Hobby Fair so it's back to the workbench and the Swordfish.
Thanks Damian, the extra framework would have looked much better if I used the clear fuselage halves, but a small part can be seen from the rear gunners station. I've made several other additions to this build, [building a folded wing bird], the rigging is cotton coated in a watered down PVA mix, [stops the cotton from turning fury], the three open holes in the lower fuselage plate have been fitted in using some Evergreen card, decided to finish this build as a 'weather beaten' RNFAA Atlantic scheme complete with the AEAF bands.
Used the kit decals for the instrument panel and used some clear blue on the compass plate.
Fuselage interior completed and ready to join up the two halves.
Either side of the lower wing center section.
Fuselage joined and rigging added.
I painted the inside of each wing half, as the redish primer will show threw when the rib sections will be drilled out and painted wood.
bf443
Vendor
Joined: May 16, 2003
KitMaker: 895 posts
AeroScale: 457 posts
Posted: Sunday, March 13, 2011 - 11:29 AM UTC
Greetings everyone,
I had some time today to work on the Kingfisher. I have the anti-submarine or Measure 2 Scheme camouflage applied (Dark Gull Grey upper surfaces and Insignia white for lower and sides). I lightened the second coat of Grey with some white to simulate sun fading. It definitely makes the Kingfisher stand out in my opinion. Im going to stop where Im at and let the paint fully cure before taking on the detail painting. Still much to do and Sentry is on Guard.
All the best,
Brian
KrisMax
Joined: January 23, 2010
KitMaker: 156 posts
AeroScale: 139 posts
Posted: Sunday, March 13, 2011 - 11:36 PM UTC
Quoted Text
@ Simon, excellent paintwork on the office, how is everything going together on that kit so far?
Carry on chaps, we still have a way to go yet !
Cheers, D
Thanks, D
This is an excellent kit with great detail and fit......... BUT
The perforated dive brakes/flaps are warped - I think Martin had the same issue earlier. I'll be speaking to the guys at my local club for tips to straighten them out, as I'd like to show them in the down position.
More concerning, I just tried putting the seat belt decals on the seats. They cracked into thousands of tiny pieces, even though they've been in a sealed bag until today.
 The good news is I've got some time to work out what to do before I have to decal up the plane. Any suggestions would be appreciated.
Cheers, Simon
29Foxtrot
Joined: September 19, 2003
KitMaker: 708 posts
AeroScale: 674 posts
Posted: Monday, March 14, 2011 - 06:36 AM UTC
Simon,
Regarding the warped Dive Brakes on the SBD, I assume this is the 48 scale offering from Accurate Minatures, or is it the Hasegawa kit ?.
To straighten the dive brakes, try either of these idea's:
A:
soak the plastic in luke warm water for a short period {10 -15 minutes} once removed from water press between 2 blocks, or 2 pieces of thin board [about 1/4 inch thick] and clamp all round.
B:
Use a hair dryer on low heat for a minute or two and clamp between blocks or a section of board mentioned above and clamp all round.
Hope this helps a little.
KrisMax
Joined: January 23, 2010
KitMaker: 156 posts
AeroScale: 139 posts
Posted: Monday, March 14, 2011 - 11:00 PM UTC
Yes, Rob, it's the Acc Min kit. Thanks for the tips, I will give it a try.
Also, I am hopeful of locating a replacement sheet of decals. Superscale do a couple for this plane, so I am waiting for confirmation from suppliers that they have one in stock.
Build back on track!
Simon
Also, I am hopeful of locating a replacement sheet of decals. Superscale do a couple for this plane, so I am waiting for confirmation from suppliers that they have one in stock.
Build back on track!
Simon
 |

WEB HOSTING BY


Copyright ©2021 AeroScale and Kitmaker Network, a subsidiary of Silver Star Enterprises
All Rights Reserved. Please read our Conditions of Use and Privacy Policy.
All Rights Reserved. Please read our Conditions of Use and Privacy Policy.