Air Campaigns
Want to start or join a group build? This is where to start.
OFFICIAL: Anti-Shipping Campaign
vertigo
_VISITCOMMUNITY
Dublin, Ireland
Joined: November 11, 2004
KitMaker: 388 posts
AeroScale: 225 posts
Posted: Saturday, February 19, 2011 - 03:29 AM UTC


This is the Buccaneer kit from Airfix. It can be built up to represent three different aircraft:
~ A Buccaneer S.2D with the Royal Navy Fleet Air Arm, 1976.
~ A Buccaneer S.Mk.50 with the South African Air Force, this comes with South African style slipper tanks, 1970
~ A Buccaneer S.2B with the Royal Air Force, Gulf War 1991.

The kit also comes with a nice variety of ordinance:
~ 4 SNEB Mantra rocket pods.
~ 2 Paveway II LGB's
~ 1 AIM-9L Sidewinder
~ 1 Pave Spike laser designator
~ 1 ECM Pod

But there's also a hidden gem inside the kit that's no longer referenced by the instructions. Four missiles that can either be built up as Sea Eagles, Radar Martels, or T.V. Martels.

I was lucky enough to find a copy of the older instructions for these on Britmodeller.

So I'll be doing the Royal Navy Buccaneer S.2D fitted with the Sea Eagles and a-ship hunting I will go.
611_sqd
_VISITCOMMUNITY
Ontario, Canada
Joined: January 24, 2011
KitMaker: 470 posts
AeroScale: 99 posts
Posted: Saturday, February 19, 2011 - 03:48 AM UTC
I am doing the Airfix Ju-88 and its a right pig of a kit. I hope the Buc is a better kit. Not that many Buc kits available now.

Future is on and drying.

@Pedro Honesty I kind of muddle my way through with colors sometimes. I think I have given some rivet counters minor strokes with how I approach colors
windysean
_VISITCOMMUNITY
Wisconsin, United States
Joined: September 11, 2009
KitMaker: 1,917 posts
AeroScale: 563 posts
Posted: Saturday, February 19, 2011 - 09:12 AM UTC
My aircraft is about done. Decals make her pretty. I'm just working up a torpedo and cart to stick underneath...
Decalsprof-20110218-1046
(The Academy decals are not very opaque, but they laid down well. This scheme is busy enough that it's not too apparent, so I didn't bother to double them per my original plan. It's a secret between us, ha ha)
TorpedoAndCartPieces-20110219-1436
In searching for torpedo images, I learned about the wooden packaging that the torpedoes wore to control their speed and shed upon hitting the water.
thanks,
Sean.
AussieReg
Staff MemberAssociate Editor
AUTOMODELER
#007
_VISITCOMMUNITY
Victoria, Australia
Joined: June 09, 2009
KitMaker: 8,156 posts
AeroScale: 3,756 posts
Posted: Saturday, February 19, 2011 - 10:01 AM UTC
Excellent, a new player and some really good progress going on here !

@Aaron 611 - Great job on the camo. It's good to see that you didn't give up on this dog and I'm looking forward to seeing it with markings.

@Martin - The SBD looks really good, your pre-shading worked a treat !

@Sean - Your Avenger looks great all decalled up. Great work on the torpedo as well, very nice scratch job.

It really is time for me to stir up all the guys who have enlisted and gone AWOL. I will send out a few PM's thisarvo and see who's listening.
vertigo
_VISITCOMMUNITY
Dublin, Ireland
Joined: November 11, 2004
KitMaker: 388 posts
AeroScale: 225 posts
Posted: Saturday, February 19, 2011 - 11:16 AM UTC
So I was wondering if anyone could help me with some paint queries?

Airfix have put the recommended color for my Royal Navy bird as Humbrol Extra Dark Sea Grey (123). I'm trying to find the closest Revell acrylic equivalent. Has anyone any idea's?
611_sqd
_VISITCOMMUNITY
Ontario, Canada
Joined: January 24, 2011
KitMaker: 470 posts
AeroScale: 99 posts
Posted: Saturday, February 19, 2011 - 02:32 PM UTC
They have Revell - 51 Acrylic Gloss - Ultramarine Blue Scale 18ml #36151 I might add a little grey to it. As I think the RN Buc's were a blue grey.
vertigo
_VISITCOMMUNITY
Dublin, Ireland
Joined: November 11, 2004
KitMaker: 388 posts
AeroScale: 225 posts
Posted: Sunday, February 20, 2011 - 06:28 AM UTC

Quoted Text

They have Revell - 51 Acrylic Gloss - Ultramarine Blue Scale 18ml #36151 I might add a little grey to it. As I think the RN Buc's were a blue grey.


I've been thinking either Gunship Grey or Greyish Blue, both appear close to the Royal Navy color.

A bit of an update on the Buccaneer:

I've spent most of the afternoon performing surgery on the landing gears. There isn't any option to display them closed so a little hacking and improvising was required.

There's quite a few plug holes visible on the kit as well; two on the underside of tail wing and one each on the intakes. Some flash here and there as well, especially on the Sea Eagles.

Still I can't help but love the shape and size of this thing. It should finish up quite nicely. I hopefully intend to display it with a flying stand.
camogirl
_VISITCOMMUNITY
England - North East, United Kingdom
Joined: October 20, 2005
KitMaker: 1,045 posts
AeroScale: 622 posts
Posted: Sunday, February 20, 2011 - 11:24 AM UTC
Well its sort of together just about ready to start spraying. I will be glad to get it over and done with Trying to get mine finished before end of feb with the other campaigns Ive enlisted starting in March. Got my fingers crossed the spraying is easier


Just a bit of filling due to fit issue thank goodness the front is painted over rather than clear

AussieReg
Staff MemberAssociate Editor
AUTOMODELER
#007
_VISITCOMMUNITY
Victoria, Australia
Joined: June 09, 2009
KitMaker: 8,156 posts
AeroScale: 3,756 posts
Posted: Sunday, February 20, 2011 - 12:58 PM UTC

Quoted Text

Well its sort of together just about ready to start spraying. I will be glad to get it over and done with Trying to get mine finished before end of feb with the other campaigns Ive enlisted starting in March.


Looking good Sam, nice work !

I know what you mean about March, I've got 5 builds to start on March 1

@ vertigo, the Buccaneer will look great in flight mode, it's lines remind me of the Voodoo I'm building right now for the Century Series Campaign.

Cheers, D
29Foxtrot
_VISITCOMMUNITY
Victoria, Australia
Joined: September 19, 2003
KitMaker: 708 posts
AeroScale: 674 posts
Posted: Sunday, February 20, 2011 - 03:03 PM UTC
Hi All,

Finally being home after a 6 week sojourn over to Adelaide {and no models to do while there}, I have been doing more to the Swordfish Mk I {as it is a contract build}, the decals have not been added to the under lower wing as yet. But these are the progress pix of to what stage I have got this subject.

The markings are the kit option for Lt A.W.D. Beale RNFAA from HMS Ark Royal of the Bismarck atteckers in 1941.


The Beaufighter has been put on hold for the time being.
Kiwi_Modeller
_VISITCOMMUNITY
Queensland, Australia
Joined: August 13, 2010
KitMaker: 188 posts
AeroScale: 62 posts
Posted: Sunday, February 20, 2011 - 06:45 PM UTC
Nice one Rob that looks sweet, mesa lika dat
cheers,
Graham
vertigo
_VISITCOMMUNITY
Dublin, Ireland
Joined: November 11, 2004
KitMaker: 388 posts
AeroScale: 225 posts
Posted: Monday, February 21, 2011 - 05:11 AM UTC
I purchased some mini files today to get down to some serious work; the Buccaneer has some small gaps around the tail and forthcoming gaps when the fuselage is joined.

Unfortunately the only filler I have at hand is Revell's Modelling Putty, it does the job but it dries way to fast so there isn't a lot of time to play with it.
611_sqd
_VISITCOMMUNITY
Ontario, Canada
Joined: January 24, 2011
KitMaker: 470 posts
AeroScale: 99 posts
Posted: Monday, February 21, 2011 - 07:20 AM UTC
Putty wise I like Vallejo's. If you let it set it behaves as regular putty. But while its still soft if you use a Q-tip.cotton bud dipped in water it can wash away the excess. No filing needed. Not perfect for every occasion. I have had trouble with Tamiya's. I found it to be more like cement and harder to use. I have never used Revells.
BlackWidow
_VISITCOMMUNITY
European Union
Joined: August 09, 2009
KitMaker: 1,732 posts
AeroScale: 1,336 posts
Posted: Monday, February 21, 2011 - 08:49 AM UTC

Quoted Text

Unfortunately the only filler I have at hand is Revell's Modelling Putty, it does the job but it dries way to fast so there isn't a lot of time to play with it.


I mix my filler every time I need some. Just pour a few drops of liquid glue in a small metal bowl (e.g. from a tea light) and add some (just a little bit) ordinary household flour to it. I use tools from my dentist to mix and applicate on the kit. Let it dry over night, the next day you can sand it and it looks perfect. It's quicker, better and cheaper than any filler/putty made by model kit companies. Once I tried Mr. White Putty from Gunze and it dried very quick in the tube. Just forget that.

Happy modelling!
Torsten
Tomcat31
#042
_VISITCOMMUNITY
England - North East, United Kingdom
Joined: November 18, 2006
KitMaker: 2,828 posts
AeroScale: 1,720 posts
Posted: Monday, February 21, 2011 - 11:47 AM UTC
Done some more to the Vindicator...

Started to wire the engines as I didn't like the flat thick representation of the wiring loom from the kit parts or the flat wires from Eduard.


I also finally figured a way to secure the instrument panel


Filling took some effort while trying not to loose the doped fabric effect of the rear fuselage


Next will be to finish the engine build the cowl and start securing the canopy and masking

As always comments, suggestions and critique are welcomed
SUNDON
_VISITCOMMUNITY
England - South East, United Kingdom
Joined: January 19, 2009
KitMaker: 158 posts
AeroScale: 155 posts
Posted: Tuesday, February 22, 2011 - 04:47 AM UTC
Made a fair amount of progress now.


Decals are on.


Decals went on ok with some micro set/sol .


I've also finished most of the other parts.


And now getting ready to attach them before I start weathering.


Looking forward to finishing now.

Thanks for looking.

Martin
611_sqd
_VISITCOMMUNITY
Ontario, Canada
Joined: January 24, 2011
KitMaker: 470 posts
AeroScale: 99 posts
Posted: Tuesday, February 22, 2011 - 10:17 AM UTC
The flaps dive brakes whatever those suckers are look a little warped. Were they like that on the real planes or is that just some warping in the plastic?
SUNDON
_VISITCOMMUNITY
England - South East, United Kingdom
Joined: January 19, 2009
KitMaker: 158 posts
AeroScale: 155 posts
Posted: Tuesday, February 22, 2011 - 07:13 PM UTC

Quoted Text

The flaps dive brakes whatever those suckers are look a little warped. Were they like that on the real planes or is that just some warping in the plastic?


The warped (and to small)dive breakes are the only fault I've found with this kit and will be delt with as I'm building the Dauntless with them closed.

Thanks .

MARTIN
611_sqd
_VISITCOMMUNITY
Ontario, Canada
Joined: January 24, 2011
KitMaker: 470 posts
AeroScale: 99 posts
Posted: Wednesday, February 23, 2011 - 02:38 AM UTC
I was curious as I remembered several years ago I saw a F4U up close. I always pictured the fighters as these sleek perfect machines. Like in the movies, comics and even most of the photo's. But getting up close it was far from sleek in some ways. The panels fitted snuggly but were not as smooth as I thought they would be and the wheel bays were a mass of wires and cables.

I don't know a real lot about the Dauntless and was curious as I imagine the stresses the brakes would endure in a dive would be pretty severe and how well the metal handled it.
Removed by original poster on 02/23/11 - 16:42:32 (GMT).
Removed by original poster on 02/23/11 - 16:49:24 (GMT).
SUNDON
_VISITCOMMUNITY
England - South East, United Kingdom
Joined: January 19, 2009
KitMaker: 158 posts
AeroScale: 155 posts
Posted: Wednesday, February 23, 2011 - 10:42 PM UTC
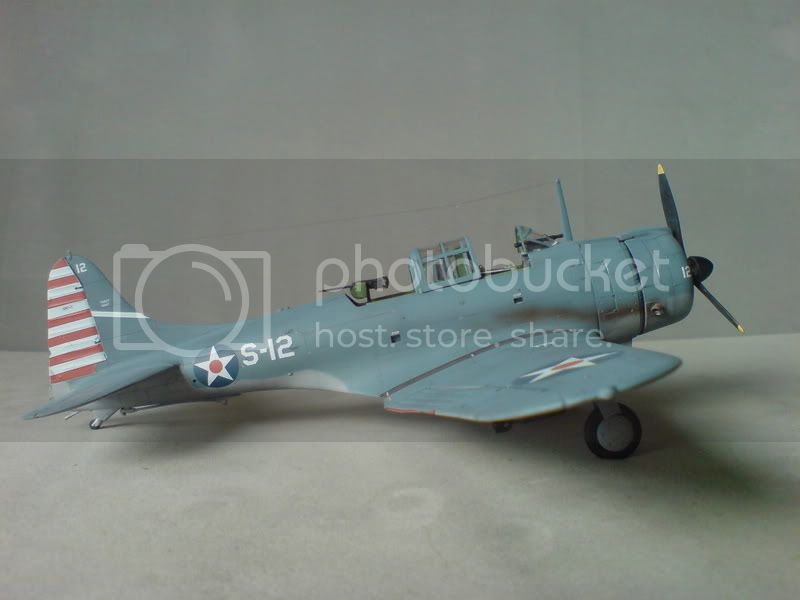
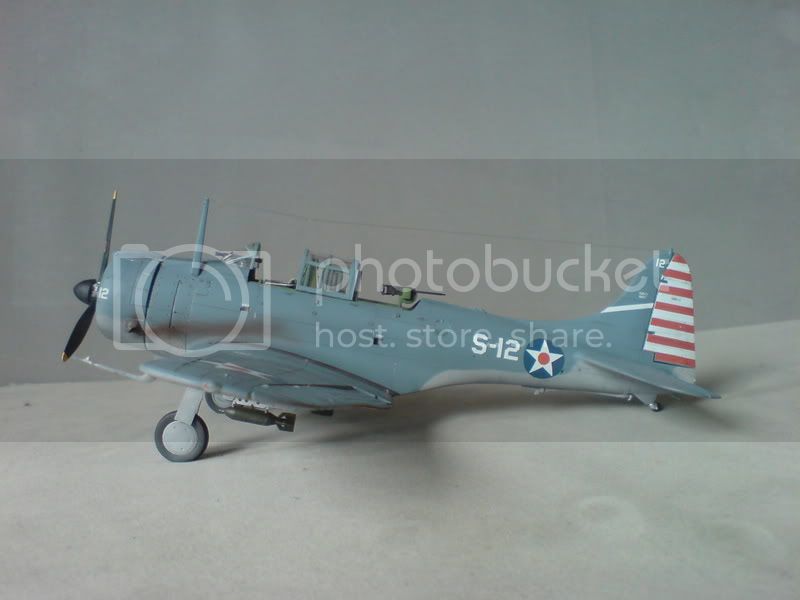
I spent all day yesterday on the Dauntless and now I've finished.


Built OOB with the addition of some home made harnesses and some fishing line for the radio antenna.


Markings are of Ensign John Leppla from the USS Lexington during the battle of the Corl Sea.


Painted using mainly Tamiya acrylic paints .The smaller parts I used Revell Aqua and Vallejo for the hand brush painting.


The weathering was done with a light oil paint wash and some exhaust stains with some dark brown and some Tamiya smoke.


This kit went together realy well with no real big problems.


I've realy enjoyed this campaign and this build and am looking forward to seeing everybody's compleated builds. I'm also tempted to build my Italeri Avenger in the time remaining.

Thanks for any comments and for looking and good luck to everone else in their builds.

Martin
KrisMax
_VISITCOMMUNITY
Queensland, Australia
Joined: January 23, 2010
KitMaker: 156 posts
AeroScale: 139 posts
Posted: Wednesday, February 23, 2011 - 10:56 PM UTC
Martin,

I really like your Dauntless, the paint finish and decalling looks really neat.
It's just as well I like it because I have the exact same kit to build for this campaign, which I am about to start. I might be reviewing your posts for any hints.

Damo, please note my subject for the campaign. I'll start posting updates in the next week or so.

Simon
AussieReg
Staff MemberAssociate Editor
AUTOMODELER
#007
_VISITCOMMUNITY
Victoria, Australia
Joined: June 09, 2009
KitMaker: 8,156 posts
AeroScale: 3,756 posts
Posted: Thursday, February 24, 2011 - 12:10 AM UTC
Lovely job Martin, your SBD looks great ! I really like the extra effort you put in on the dive brakes and the antenna, they really raise the level of the finished build. Don't forget to drop a pic or two in the Campaign Gallery HERE to qualify for your ribbon.


Quoted Text

Damo, please note my subject for the campaign. I'll start posting updates in the next week or so.
Simon


Hi Simon, thanks for joining the fun. Either I'm losing my marbles (no comments thanks guys) or you're building something stealthy, 'cos I can't find a post where you nominated your build for this Campaign. Wotcha got planned for our viewing pleasure ??

Cheers, D
windysean
_VISITCOMMUNITY
Wisconsin, United States
Joined: September 11, 2009
KitMaker: 1,917 posts
AeroScale: 563 posts
Posted: Thursday, February 24, 2011 - 01:38 AM UTC
A quick post, here at work.
I can see the finish line from here, still a few more hours yet.
Since the campaign rules state that the weapon must show, I've been wracking my brain with the torpedo load, making it more interesting out of the plane, not tucked in the underside, so here's what I've pieced together from stuff around my workspace:
Pen shaft
chopped sprue wheels and prop shaft
cone section from jet drop tank
paperclip drawbar
styrene strips and card
tie-down chains from stretched sprue
elevation wheels from railroad boxcar extra parts (brake components?)
masking tape to represent thin plywood
scratchbuilttorpedo-20110223-2132
scratchbuilttorpedoft-20110223-2132
thanks for looking,
Sean.