OFFICIAL: The Century Series Campaign

#439
Washington, United States
Joined: November 05, 2005
KitMaker: 4,950 posts
AeroScale: 3,192 posts
Posted: Tuesday, January 18, 2011 - 04:30 AM UTC
Quoted Text
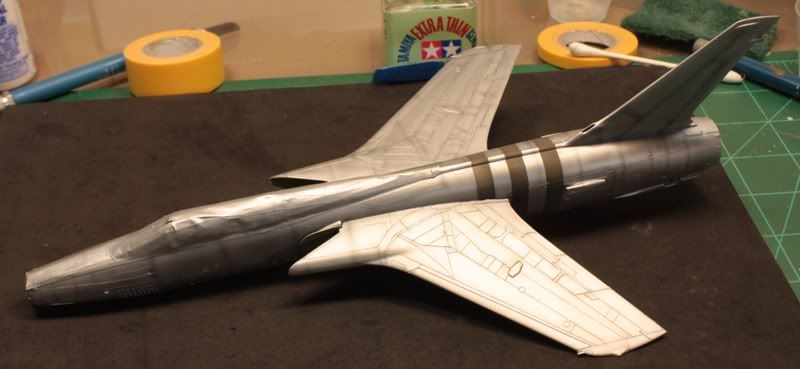
Since the canopy's have rounded corners I punched discs that matched the curves and laid them in place. Now I'll trim them out with the straight runs and fill the remainder with larger pieces. Using the discs is a lot easier than trying to get tape to bend.
Great tip Matt! I may steal it for my thud.

Hanger Queens in Waiting:
Monogram 1/72 F8F-1
Corsair the Sky Pirate - 1/72 Ace A-7D
Century Series - Airfix 1/72 F-105G
Anti Shipping - Academy 1/72 PBJ-1D
Academy 1/72 F-84E
Florida, United States
Joined: January 14, 2009
KitMaker: 2,798 posts
AeroScale: 2,443 posts
Posted: Tuesday, January 18, 2011 - 10:16 AM UTC
"From time to time, the tree of liberty must be watered with the blood of
tyrants and patriots."
- Thomas Jefferson
IPMS#47611
Florida, United States
Joined: January 14, 2009
KitMaker: 2,798 posts
AeroScale: 2,443 posts
Posted: Tuesday, January 18, 2011 - 02:59 PM UTC
So usually I use testors decal set and I kept hearing about how great micro set and micro sol is.So i finally broke down and tried it for the first time holy s#$T Balls I will never go back to testors again


"From time to time, the tree of liberty must be watered with the blood of
tyrants and patriots."
- Thomas Jefferson
IPMS#47611
Texas, United States
Joined: June 29, 2010
KitMaker: 5,854 posts
AeroScale: 372 posts
Posted: Tuesday, January 18, 2011 - 04:46 PM UTC
I think everyone who has tried that stuff has become an instant convert

Hey guys, I was just wondering what greens you all are using for your interiors and wheel bays? My build is an F-106 if that makes any difference.
#439
Washington, United States
Joined: November 05, 2005
KitMaker: 4,950 posts
AeroScale: 3,192 posts
Posted: Tuesday, January 18, 2011 - 06:36 PM UTC
For my F-105, Airfix recommended Humbrol Light Grey, looks like I used Dark Gull Gray FS 36231. Not the same old zinc chromate...
Hanger Queens in Waiting:
Monogram 1/72 F8F-1
Corsair the Sky Pirate - 1/72 Ace A-7D
Century Series - Airfix 1/72 F-105G
Anti Shipping - Academy 1/72 PBJ-1D
Academy 1/72 F-84E
Florida, United States
Joined: January 14, 2009
KitMaker: 2,798 posts
AeroScale: 2,443 posts
Posted: Wednesday, January 19, 2011 - 12:25 AM UTC
I used Polly scale zinc chromite
"From time to time, the tree of liberty must be watered with the blood of
tyrants and patriots."
- Thomas Jefferson
IPMS#47611
California, United States
Joined: April 01, 2002
KitMaker: 4,287 posts
AeroScale: 1,164 posts
Posted: Wednesday, January 19, 2011 - 12:51 AM UTC
Model Master Interior Green cut with some medium green for tonal variations. "Q"
"Don't fear the night, fear what hunts at night"
California, United States
Joined: April 01, 2002
KitMaker: 4,287 posts
AeroScale: 1,164 posts
Posted: Wednesday, January 19, 2011 - 10:44 AM UTC
"Don't fear the night, fear what hunts at night"
North Carolina, United States
Joined: November 28, 2005
KitMaker: 2,216 posts
AeroScale: 1,080 posts
Posted: Wednesday, January 19, 2011 - 12:58 PM UTC
Looking good guys.
Justin, the heat painting around the burner can looks great. I'm still having trouble believing all the rivet detail on that kit. Gonna have to break down and buy one some day.
Matt, with a small tarmak dio and some maintenance equipment scattered around that pig would look straight out of Nam. Nice job on the tone down too. That's pretty much how I like to do my NMF's.
As for me, I'm back to work after taking care of the wife for 2 weeks. Plenty of 14 hour work days ahead so I'm hoping I can get my Dagger finished by the deadline.

Hermon

"Those who would give up Essential Liberty
to purchase a little Temporary Safety,
deserve neither Liberty nor Safety."
Benjamin Franklin
Florida, United States
Joined: January 14, 2009
KitMaker: 2,798 posts
AeroScale: 2,443 posts
Posted: Wednesday, January 19, 2011 - 01:12 PM UTC
thanks for noticing cuda

"From time to time, the tree of liberty must be watered with the blood of
tyrants and patriots."
- Thomas Jefferson
IPMS#47611
Texas, United States
Joined: June 29, 2010
KitMaker: 5,854 posts
AeroScale: 372 posts
Posted: Wednesday, January 19, 2011 - 04:10 PM UTC
Great, thanks guys! That gives me a decent baseline that I can roll with.
Justin: I second Hermon's comments. Your wheel bays look great as always too
#047
England - East Anglia, United Kingdom
Joined: September 13, 2005
KitMaker: 2,016 posts
AeroScale: 475 posts
Posted: Wednesday, January 19, 2011 - 11:51 PM UTC
Hi guys

Everybody having fun!!??
J... how fun is Alcland !!!,just stinks a bit, the Hun looks superb,I love those wells
Q.. that is a bloddy brilliant idea for masking canopy corners,I'm glad I've got that Waldron punch and die set!,the Thuds looking ACE
Hermon... man those decals come up short ,I hate it when that happens

happenend to me several times,now you got to try to match the red with paint now! BUMMOX!!
Back to my seat and tub
Pics soon
Andy

Major Caryle,
"Shall we have a go at the far end now,sir?"
Lt Colonel "Johnny" Frost,
"Having a go,is hardly text book terminology Harry"
Major Caryle,
"But you'll let us try sir?"
A Bridge Too Far
Lottery Campaign "Oh de Vichy"
California, United States
Joined: April 01, 2002
KitMaker: 4,287 posts
AeroScale: 1,164 posts
Posted: Thursday, January 20, 2011 - 09:21 AM UTC
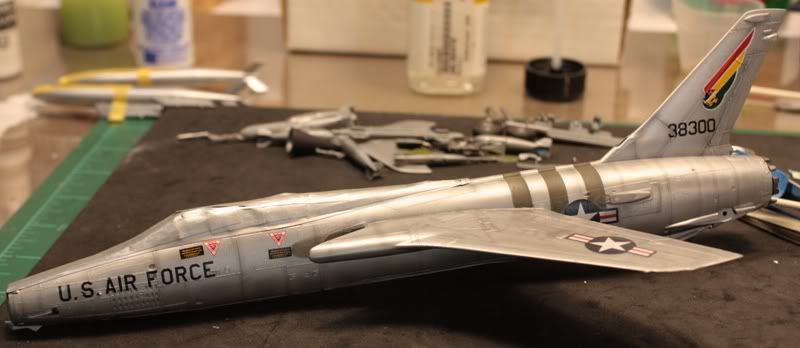
Thanks Andy. Glad it helps. Well, after making several attempts to decal my Thud I finally succeeded. I won't go into details, but lets just say that it has taken three days and many attempts to get to this point.


I still need to add the red warning stripes for the turbine, wing walks, and the refueling probe door. I will be doing that with some red striped decal material I have. Cut and paste at it finest.
Anyway, here she is. Trying to get her wrapped up by tomorrow as I leave for vacation on Saturday. Thanks, "Q"
ps. Markings are fictitious and come from the spares box.

"Don't fear the night, fear what hunts at night"
Texas, United States
Joined: January 30, 2006
KitMaker: 1,954 posts
AeroScale: 1,163 posts
Posted: Thursday, January 20, 2011 - 10:30 AM UTC
Quoted Text
So usually I use testors decal set and I kept hearing about how great micro set and micro sol is.So i finally broke down and tried it for the first time holy s#$T Balls I will never go back to testors again
just be careful using it on tamiya decals!
California, United States
Joined: April 01, 2002
KitMaker: 4,287 posts
AeroScale: 1,164 posts
Posted: Thursday, January 20, 2011 - 02:43 PM UTC
"Don't fear the night, fear what hunts at night"
Florida, United States
Joined: January 14, 2009
KitMaker: 2,798 posts
AeroScale: 2,443 posts
Posted: Thursday, January 20, 2011 - 03:04 PM UTC
Nice finish Q.
"From time to time, the tree of liberty must be watered with the blood of
tyrants and patriots."
- Thomas Jefferson
IPMS#47611
Florida, United States
Joined: January 14, 2009
KitMaker: 2,798 posts
AeroScale: 2,443 posts
Posted: Thursday, January 20, 2011 - 03:23 PM UTC
"From time to time, the tree of liberty must be watered with the blood of
tyrants and patriots."
- Thomas Jefferson
IPMS#47611
Florida, United States
Joined: January 14, 2009
KitMaker: 2,798 posts
AeroScale: 2,443 posts
Posted: Thursday, January 20, 2011 - 03:35 PM UTC
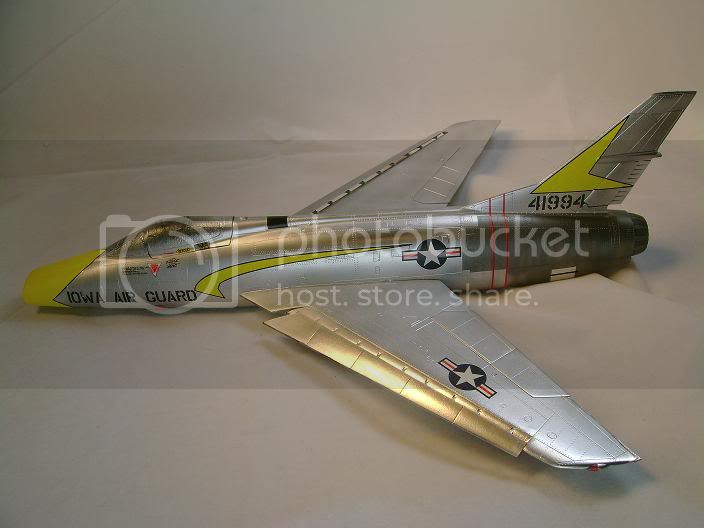
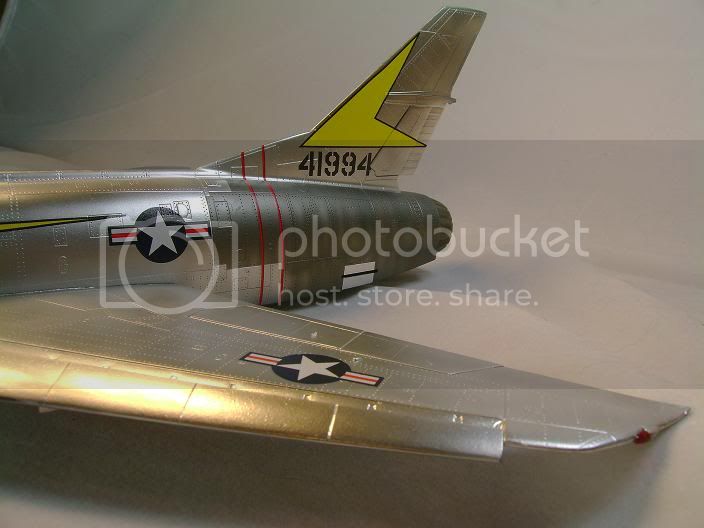
I found the Decals in this kit to be really good except #24 is printed backwards and upside down so I didn't use it.Its a little black strip on the top of the vertical stabilizer
"From time to time, the tree of liberty must be watered with the blood of
tyrants and patriots."
- Thomas Jefferson
IPMS#47611
Texas, United States
Joined: June 29, 2010
KitMaker: 5,854 posts
AeroScale: 372 posts
Posted: Thursday, January 20, 2011 - 03:50 PM UTC
Q: Sweet! Not often I get to see one of those in a natural finish like that
Justin: Those decals actually look really good on that bird, even if they perhaps don't exist. Sounds like decal 24 would be easy enough to mask and paint. Just out of curiosity, how do you guys get those thin red stripes to go on so straight?
Florida, United States
Joined: January 14, 2009
KitMaker: 2,798 posts
AeroScale: 2,443 posts
Posted: Thursday, January 20, 2011 - 03:59 PM UTC
Patience and a lot of cussing .
I usually try to line mine up with the nearest panel line.
"From time to time, the tree of liberty must be watered with the blood of
tyrants and patriots."
- Thomas Jefferson
IPMS#47611
Florida, United States
Joined: January 14, 2009
KitMaker: 2,798 posts
AeroScale: 2,443 posts
Posted: Thursday, January 20, 2011 - 04:03 PM UTC
Oh forgot I didn't mask and paint because all of the f-100c's I have looked at in the NMF have not had it.
"From time to time, the tree of liberty must be watered with the blood of
tyrants and patriots."
- Thomas Jefferson
IPMS#47611
California, United States
Joined: April 01, 2002
KitMaker: 4,287 posts
AeroScale: 1,164 posts
Posted: Thursday, January 20, 2011 - 04:07 PM UTC
Thanks for the kudos guys, as to the red stripe issue...Justin hit it on the head...years of practice....and cussing.
I also keep the surface fairly wet to allow for easier moving into place, then use a Q-tip to carefully draw off the excess water. Once the water is taken away, I just let things set and dry. Then set everything in place with another clear coat. Hope that helps. "Q"
"Don't fear the night, fear what hunts at night"
Texas, United States
Joined: June 29, 2010
KitMaker: 5,854 posts
AeroScale: 372 posts
Posted: Thursday, January 20, 2011 - 05:08 PM UTC
Alright then, at least I know what to expect
Alright J, 'nough said. Looking forward to seeing the final touches

Guys, I finally had a moment to dig into my 1/48 RMX F-106 and now have somewhat of a heavy heart as I have discovered that it is covered in raised panel lines. I've been wanting to build some of these for quite some time which has added to the disappointment... oh well, c'est la vie...
And then dummy me, I realized that I was saving that one for the Delta Wing Campaign, but I don't yet have the heart to look inside the box for my 1/48 RMX F-101 Voodoo

California, United States
Joined: April 01, 2002
KitMaker: 4,287 posts
AeroScale: 1,164 posts
Posted: Friday, January 21, 2011 - 01:08 AM UTC
Jeremy, Don't let raised panels lines dash your hopes. All is not lost. A little forethought and planning ahead and you can have a nice looking build. Monograms F-101 has some excellent cockpit and wheel well detail for the age of the kit and their 106 is equally as nice. Just take your time with them. Once you get a couple of kits with raised panel lines under your belt you'll see that they aren't that hard to deal with. Keep your spirits up. "Q"
"Don't fear the night, fear what hunts at night"
North Carolina, United States
Joined: November 28, 2005
KitMaker: 2,216 posts
AeroScale: 1,080 posts
Posted: Friday, January 21, 2011 - 01:34 AM UTC
Jeremy, raised panel lines are nothing to back away from. The standard fix is to sand them all off and then rescribe them. I'm too lazy to do it the right way though. All I do is sand off ONLY the raised panel lines that are destroyed when sanding seams such as fuselage joints etc. Then using the ol' preshading method I just paint them back on. Unless you put your nose 6 inches away from the model you'll never see the difference.
This is exactly how I did my F-102 and you can't tell the raised portions are missing at all.
Hermon
"Those who would give up Essential Liberty
to purchase a little Temporary Safety,
deserve neither Liberty nor Safety."
Benjamin Franklin