Air Campaigns
Want to start or join a group build? This is where to start.
Want to start or join a group build? This is where to start.
Hosted by Frederick Boucher, Michael Satin
OFFICIAL: The Century Series Campaign
Removed by original poster on 05/05/11 - 16:23:56 (GMT).
Removed by original poster on 05/05/11 - 16:29:11 (GMT).
flyboy92187

Joined: March 30, 2011
KitMaker: 199 posts
AeroScale: 150 posts

Posted: Thursday, May 05, 2011 - 05:31 AM UTC
Posted: Sunday, May 08, 2011 - 10:09 PM UTC
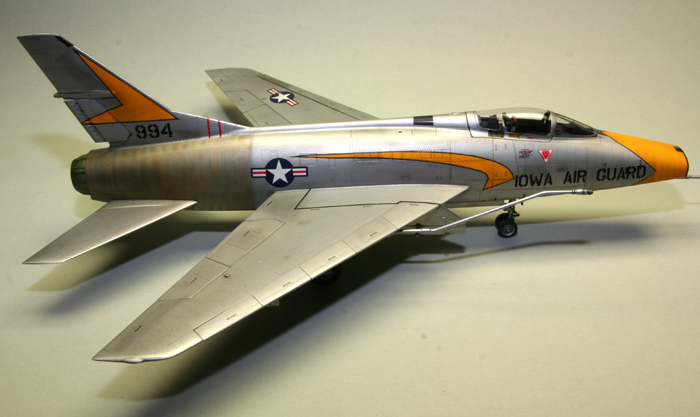
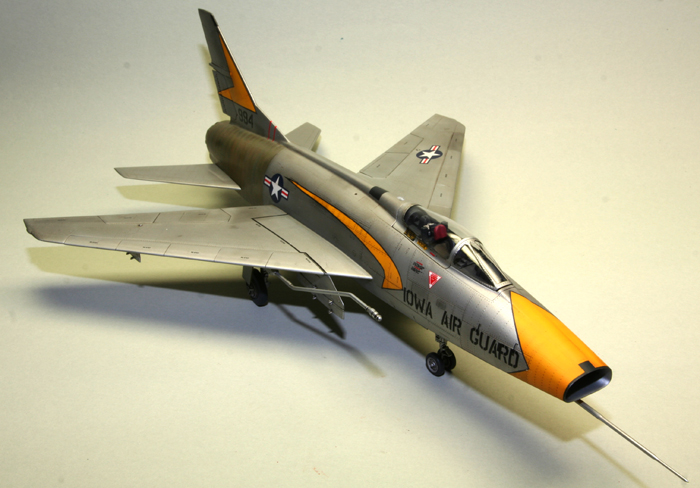
Wow! That is one silver bird, Michael. Looks great although almost to shiny. Very striking finish.
I am making slow progress on my Starfighter, but I am slowly getting there. More to follow as I progress.
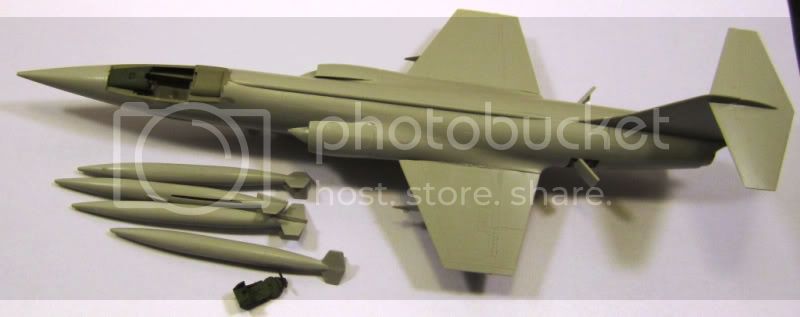
I am making slow progress on my Starfighter, but I am slowly getting there. More to follow as I progress.

Posted: Monday, May 09, 2011 - 04:10 AM UTC
Wow Michael,them ground crew boys have been putting overtime in polishing that bird up  stunning mate ,stunning had to put my shades on

you done a bang up job on the zorst colours,gotta just love Alclad!
Jesper,that there 104 looks bloddy great mate,keep up the the great work buddy.
crack on boys
Andy

 stunning mate ,stunning had to put my shades on

you done a bang up job on the zorst colours,gotta just love Alclad!
Jesper,that there 104 looks bloddy great mate,keep up the the great work buddy.
crack on boys
Andy


flyboy92187

Joined: March 30, 2011
KitMaker: 199 posts
AeroScale: 150 posts

Posted: Monday, May 09, 2011 - 08:56 AM UTC
Thank you gents. Well, it is rather shiny, but the lighting/flash kinda makes it pop more. I debated post shading the panel lines, but nothing in my mind beats a sleek polished aluminum cold war bird. Takes me back to my first time seeing the F-86... They just look so sharp! (hence why I have an original sabre tattooed on my ribs.) I cannot wait to see what you do with that Starfighter. Are you going to make it the aluminum? Or other markings?
Posted: Thursday, May 12, 2011 - 08:08 PM UTC
Thanks for the comments, Andy and Michael.
A little more progress on my 1/72 F-104 bird. I am struggeling a little with the cockpit. Decals are actually quite ok for this scale. It is getting there and I think it will look ok overall when finished - especially considering it is 1/72.
Michael, The scheme I am going for is the Italian anniversary scheme on the box art. There are some quite colourful markings and a nice camouflage. The underside will be aluminium, so not all camouflage. A little cold war aluminium finish will be included

More to follow


A little more progress on my 1/72 F-104 bird. I am struggeling a little with the cockpit. Decals are actually quite ok for this scale. It is getting there and I think it will look ok overall when finished - especially considering it is 1/72.
Michael, The scheme I am going for is the Italian anniversary scheme on the box art. There are some quite colourful markings and a nice camouflage. The underside will be aluminium, so not all camouflage. A little cold war aluminium finish will be included


More to follow


flyboy92187

Joined: March 30, 2011
KitMaker: 199 posts
AeroScale: 150 posts

Posted: Friday, May 13, 2011 - 04:09 AM UTC
Those anniversery schemes are pretty cool, and will definitely be watching the remainder of your build. Is that just styrene on the inside of the cockpit? As I have only been back in the game for about a year, I like picking up new things, and am usually disappointed by the lack of 1/72 cockpit details. And what you did looks pretty cool.
Posted: Sunday, May 15, 2011 - 08:34 PM UTC
Awesome work with the Alclad, Michael!!! Really...
Here's were I am, guys, ready for assembly:
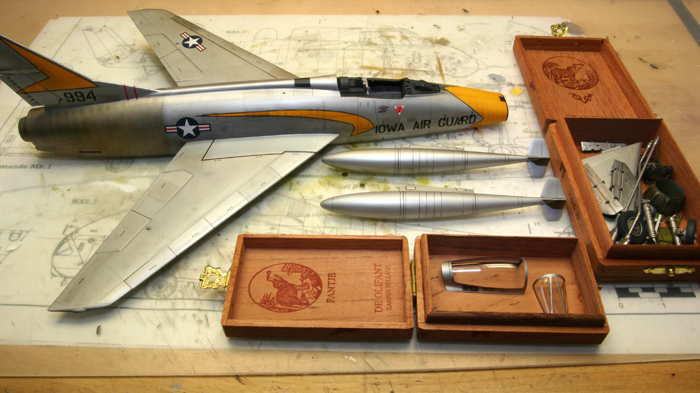
Started yesterday evening, she already stands on her own legs
Here's were I am, guys, ready for assembly:
Started yesterday evening, she already stands on her own legs

Posted: Sunday, May 15, 2011 - 11:13 PM UTC
Thanks for the comment, Michael.
The cockpit is the standard styrene cockpit included in the kit. I have not done anything than paint it and add decals. I will do a bit of weathering, but in this scale the styrene cockpits are not so bad.
The cockpit is the standard styrene cockpit included in the kit. I have not done anything than paint it and add decals. I will do a bit of weathering, but in this scale the styrene cockpits are not so bad.
mtnflyer

Joined: March 08, 2009
KitMaker: 394 posts
AeroScale: 360 posts

Posted: Monday, May 16, 2011 - 02:59 AM UTC
Rebilda - Your just about there, and well done I must say. Masterful job on the canopy; clean and sharp edged. Looks like glass. Congradulations on effort!
Jesper - The 104 is coming along just wonderfully. Is the Italeri affair a reboxing of the Hasegawa offering, would you know? I have an unbuilt Hasa thats likely 25 years old, but still looks to be a great kit.
You'll be finished another one before the summer holiday is here. Very well done.
Jesper - The 104 is coming along just wonderfully. Is the Italeri affair a reboxing of the Hasegawa offering, would you know? I have an unbuilt Hasa thats likely 25 years old, but still looks to be a great kit.
You'll be finished another one before the summer holiday is here. Very well done.
Posted: Tuesday, May 17, 2011 - 01:26 AM UTC
Thanks Guy!
I'm done, pic's in the gallery. Here's some more:

A little dark I'm afraid. Still struggling with my lighting. Any hints on that?
Comments welcome.
I'm done, pic's in the gallery. Here's some more:
A little dark I'm afraid. Still struggling with my lighting. Any hints on that?
Comments welcome.
mtnflyer

Joined: March 08, 2009
KitMaker: 394 posts
AeroScale: 360 posts

Posted: Tuesday, May 17, 2011 - 02:00 AM UTC
Leo, I like it! Natural looking and not too polished. A very decent effort, indeed.
As far as photo lighting goes, diffused natural light is always best when possible. And even with modern digital cameras, a sturdy tripod is usually required for macro work. Works every time.
As far as photo lighting goes, diffused natural light is always best when possible. And even with modern digital cameras, a sturdy tripod is usually required for macro work. Works every time.
Posted: Tuesday, May 17, 2011 - 04:52 AM UTC
Thanks for the kind words, Guy. I was going for the 'used' look ao satin and matte varnish only.
I meant what kind of lighting to use indoors with a SLR, 55mm lens and tripod. Daylight pics are no problem but indoors you can see yourself....
I meant what kind of lighting to use indoors with a SLR, 55mm lens and tripod. Daylight pics are no problem but indoors you can see yourself....
Posted: Tuesday, May 17, 2011 - 06:14 AM UTC
Nice work guys. I'm still filling an sanding on the Thud... 

Middle_Franconian

Joined: January 02, 2011
KitMaker: 279 posts
AeroScale: 239 posts

Posted: Tuesday, May 17, 2011 - 07:23 AM UTC
@ Leo: Chapeau!! Nice Hun! How do you get the hood so shiny? WD40 or polishing just before melting?
P.S.: Time to have a together!
Servus,
Sebastian
P.S.: Time to have a
 together!
Servus,
Sebastian
Posted: Tuesday, May 17, 2011 - 09:08 AM UTC
Thanks man! A little polishing then WD40.
Yeah! Beer!
Got some Nastro Azzurro and some Peroni stored for just that occasion!
See you soon!
Yeah! Beer!
Got some Nastro Azzurro and some Peroni stored for just that occasion!
See you soon!
Posted: Tuesday, May 24, 2011 - 02:16 AM UTC
Looking great boys
Leo ,thats looks lovely mate,well done ,I need more info on the beer!!!!


Andy
Leo ,thats looks lovely mate,well done
 ,I need more info on the beer!!!!


Andy
Posted: Wednesday, May 25, 2011 - 09:21 AM UTC
Not sure if I'll have my Voodoo finished on time. Had a lot going on the last few weeks so not much progress beyond the cockpit has been done. To make things worse I've now been called up for jury duty the last 2 weeks of June. God knows if I'll get a chance to do much on it while thats going on.
I'll keep bashing away at it but its not looking promising.
I'll keep bashing away at it but its not looking promising.
Blueheeler

Joined: March 18, 2008
KitMaker: 347 posts
AeroScale: 223 posts

Posted: Wednesday, May 25, 2011 - 06:39 PM UTC
Hi all,
Well, I have managed to finish off my entry, but am not happy with the kit at all. It is Hasegawa's offering of the Thud in 1/72 and to to say the kit is a bad one would be an understatement; so much flash and the cockpit was extremly basic with the pilot moulded into the bang seat. Also, the decals that I was going to use from the kit broke up when I tried to use them. I will try and post some photos soon as both my cameras have gone U/S and Im trying to figure out the camera on my phone....
Well, I have managed to finish off my entry, but am not happy with the kit at all. It is Hasegawa's offering of the Thud in 1/72 and to to say the kit is a bad one would be an understatement; so much flash and the cockpit was extremly basic with the pilot moulded into the bang seat. Also, the decals that I was going to use from the kit broke up when I tried to use them. I will try and post some photos soon as both my cameras have gone U/S and Im trying to figure out the camera on my phone....
Posted: Monday, May 30, 2011 - 12:27 AM UTC
Hi Guys 
Happy bank holiday! I can't believe I've got a day off
I went to the De Havilland museum yesterday to get some up close pics of the mosquito for another campaign .
.
I took my 4 planes outside and primed them with a rattle can,only for it to p
 swith rain when they were drying off


They might be ok,just waiting for them to dry
Steve and anybody else,if you need more time I will add more time on to finish,please let me know and I will extend (ooohhh)
Happy Hols
Andy

Happy bank holiday! I can't believe I've got a day off

I went to the De Havilland museum yesterday to get some up close pics of the mosquito for another campaign
 .
.I took my 4 planes outside and primed them with a rattle can,only for it to p

 swith rain when they were drying off


They might be ok,just waiting for them to dry

Steve and anybody else,if you need more time I will add more time on to finish,please let me know and I will extend (ooohhh)
Happy Hols
Andy
Posted: Wednesday, June 01, 2011 - 11:12 AM UTC
A little more progress on my Starfighter. Almost at the finish line now with just a few details to add.
More to follow.


More to follow.


Posted: Thursday, June 02, 2011 - 11:30 AM UTC
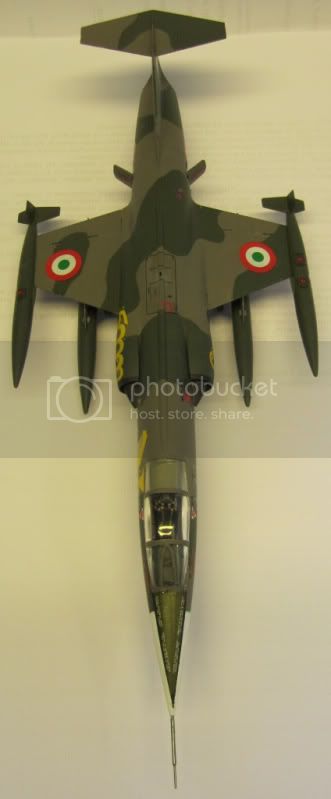
Here is my finished Italeri 1/72 Starfighter in Italian markings.
A great little kit and very enjoyable to build despite having to handpaint it due to being in the process of relocating.
Comments welcome



A great little kit and very enjoyable to build despite having to handpaint it due to being in the process of relocating.
Comments welcome


oraora

Joined: June 19, 2002
KitMaker: 216 posts
AeroScale: 128 posts

Posted: Monday, June 06, 2011 - 09:20 PM UTC
Nice Starfighter build, jesper. I'm also completing a Starfighter, a 72nd revell kit but using ROCAF markings.
Posted: Tuesday, June 07, 2011 - 12:53 AM UTC
Quoted Text
Hi Guys
Happy bank holiday! I can't believe I've got a day off
I went to the De Havilland museum yesterday to get some up close pics of the mosquito for another campaign.
I took my 4 planes outside and primed them with a rattle can,only for it to p
swith rain when they were drying off


They might be ok,just waiting for them to dry
Steve and anybody else,if you need more time I will add more time on to finish,please let me know and I will extend (ooohhh)
Happy Hols
Andy
An extension would be great if everyone else is cool with it. I'll see if I can get some progress pics up by the end of the week anyway.
Thats a cool looking starfighter and very nicely painted.
 |


