Thanks Emeritus.
looking around, those seem to be out of production.
looks like i get to try my hand at scratch building missiles - that might come much later though...
Air Campaigns
Want to start or join a group build? This is where to start.
Want to start or join a group build? This is where to start.
Hosted by Frederick Boucher, Michael Satin
OFFICIAL: Mischievous MiGs Campaign
vanize

Joined: January 30, 2006
KitMaker: 1,954 posts
AeroScale: 1,163 posts

Posted: Monday, January 17, 2011 - 08:09 AM UTC
vanize

Joined: January 30, 2006
KitMaker: 1,954 posts
AeroScale: 1,163 posts

Posted: Monday, January 17, 2011 - 09:53 AM UTC
Quoted Text
Good job matching the pre-painted interior colour of the PE. Seems spot-on to me. Btw, what paints did you use?
There's always the possibility of another shade being used on the set I got for my Zvezda BIS kit, but any tips and pointers would sure come in handy.
I mixed two PollyS colors, an odd green and a darkish blue - I don't remember the color names offhand, but will update when i get home to let you know.
FYI, I think the Eduard color is too dark to really be the russian cockpit color, but whatever...
EDC

Joined: January 16, 2006
KitMaker: 101 posts
AeroScale: 74 posts

Posted: Monday, January 17, 2011 - 02:51 PM UTC
Hi all, I've joined the campaign. I'm going to be building the Tamiya/Italeri 1/72 Mig-29. I'm building it out of the box, so hopefully it will be a quick build. From what's in the box it looks fairly promising. 
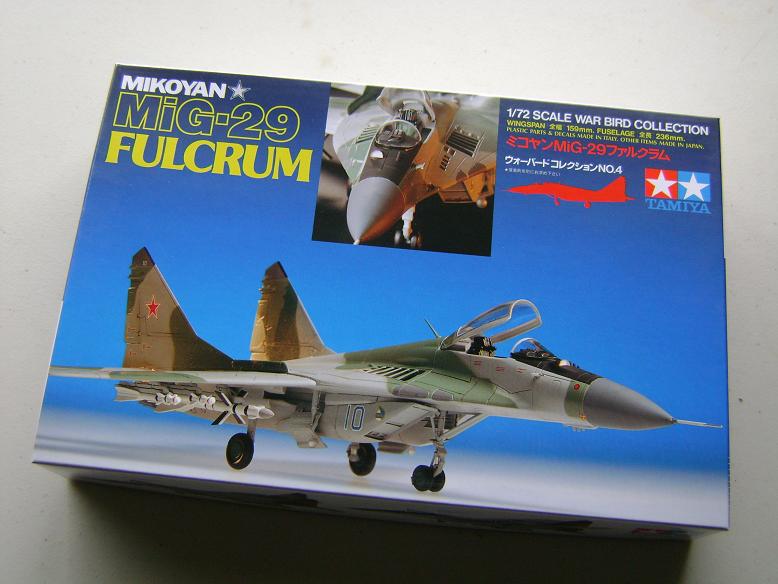
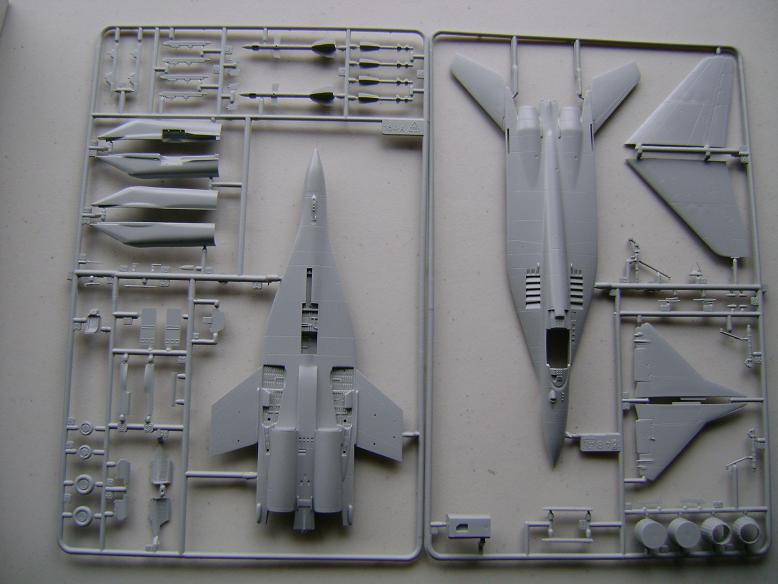


vanize

Joined: January 30, 2006
KitMaker: 1,954 posts
AeroScale: 1,163 posts

Posted: Monday, January 17, 2011 - 05:17 PM UTC
Quoted Text
Quoted Text
Good job matching the pre-painted interior colour of the PE. Seems spot-on to me. Btw, what paints did you use?
There's always the possibility of another shade being used on the set I got for my Zvezda BIS kit, but any tips and pointers would sure come in handy.
I mixed two PollyS colors, an odd green and a darkish blue - I don't remember the color names offhand, but will update when i get home to let you know.
FYI, I think the Eduard color is too dark to really be the russian cockpit color, but whatever...
So it was Polly Scale paints: about 2/3rds RLM 25 Green and 1/3rd Israeli Early Camo Blue (give or take 1/3rd...). The RLM 25 has some of the essential odd 'color-ness' of the russian interior color, and just needs some blue tinting.

atoplu

Joined: August 17, 2003
KitMaker: 753 posts
AeroScale: 174 posts

Posted: Monday, January 17, 2011 - 08:21 PM UTC
My Mig is done.
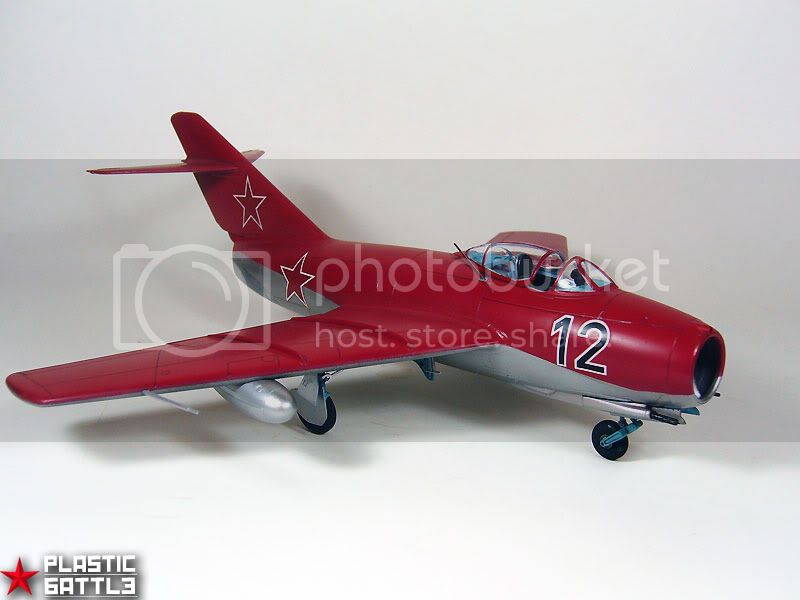
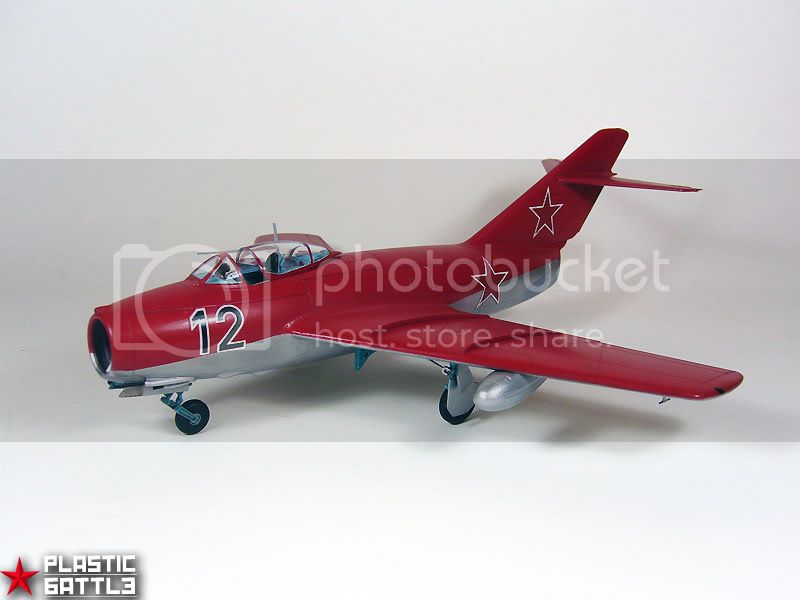


Red4

Joined: April 01, 2002
KitMaker: 4,287 posts
AeroScale: 1,164 posts

Posted: Wednesday, January 19, 2011 - 01:00 AM UTC
Very nice Ayhan, looks good. Make sure to post a pic or two in the gallery. I will be late getting mine started. Too much stuff to be done before leaving for vacation. But, I have plenty of time to get going once I get home. Keep your sprues empty everyvbody. See you all soon. "Q" 

vanize

Joined: January 30, 2006
KitMaker: 1,954 posts
AeroScale: 1,163 posts

Posted: Wednesday, January 19, 2011 - 02:48 AM UTC
Quoted Text
My Mig is done.
I'm always amazed about how quickly you can produce quality models...

Emeritus

Joined: March 30, 2004
KitMaker: 2,845 posts
AeroScale: 1,564 posts

Posted: Wednesday, January 19, 2011 - 02:55 AM UTC
Quoted Text
Quoted Text
FYI, I think the Eduard color is too dark to really be the russian cockpit color, but whatever...
So it was Polly Scale paints: about 2/3rds RLM 25 Green and 1/3rd Israeli Early Camo Blue (give or take 1/3rd...). The RLM 25 has some of the essential odd 'color-ness' of the russian interior color, and just needs some blue tinting.
Yep, it seems quite dark to me too, but the pre-painted finish looks so nice. Painting over the pre-painted interior colour with a small brush would be an option, but the details are just so miniscule.
Thanks. I'll look into it. I don't remember ever seeing Polly Scale paints sold over here, but that's a good start for looking alternatives from other manufacturers.


ronbee

Joined: October 11, 2010
KitMaker: 14 posts
AeroScale: 9 posts

Posted: Thursday, January 20, 2011 - 09:43 AM UTC
Hi all,
I just joined the campaign. I'm thinking about building the Zvezda Mig 21Bis (1:72). I recieved it as a christmas present. At the moment i'm still busy on an Eduard Lavochkin 7 in 1:48 scale. Very nice kit.
I read that Eduard is comming up with an Mig 21 in 1:48th scale in march. I think it's promising.
If I will build the Zvezda, I will choose the USSR decals, don't really like the Finnish or Polish looks.


Red4

Joined: April 01, 2002
KitMaker: 4,287 posts
AeroScale: 1,164 posts

Posted: Friday, January 21, 2011 - 01:15 AM UTC
Looking forward to seeing your work Ronald. Thanks for joining the campaign. "Q" 

Red4

Joined: April 01, 2002
KitMaker: 4,287 posts
AeroScale: 1,164 posts

Posted: Friday, January 21, 2011 - 10:49 AM UTC
Well, I was going to wait until I got back from vacation to start my Mig but I couldn't wait. I got all of my vacation prep last minute running around taken care of early this morning and had the rest of the day to tinker with this thing. No pics for now as the camera gear is packed for our trip. But, the subject is the Hasegawa Mig-29 in 1/72 scale. To say there isn't much to this kit is like calling a bear furry. The cockpit consists of decals for the consoles and IP. I added some generic styrene box shapes to the interior sides and some belts to the seat to liven it up a bit. Hoping that with some paint on it, things will look more like what they should. All parts are cleaned up at this point and bagged. Just need to start painting. Will probably be able to finish it out in a couple of days once I get back. Thanks, "Q" 

EDC

Joined: January 16, 2006
KitMaker: 101 posts
AeroScale: 74 posts

Posted: Friday, January 21, 2011 - 01:31 PM UTC
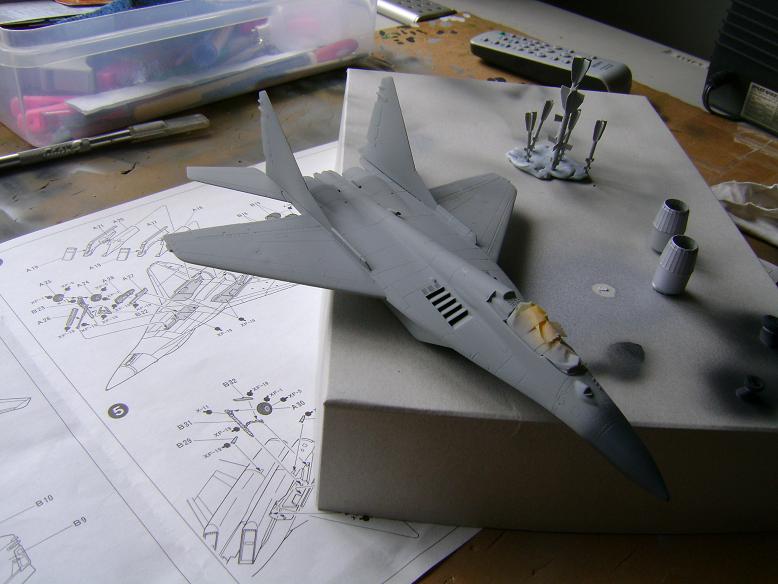
Making quick progress on my Mig-29. The kit is okay, but is very simple and a bit rough in places. It's reminded me how beautiful the aircraft is though. I might have to build one of these in a bigger scale.

vanize

Joined: January 30, 2006
KitMaker: 1,954 posts
AeroScale: 1,163 posts

Posted: Saturday, January 22, 2011 - 06:44 AM UTC
That is quick progress! looking good, grant!
EDC

Joined: January 16, 2006
KitMaker: 101 posts
AeroScale: 74 posts

Posted: Saturday, January 22, 2011 - 09:12 AM UTC
Quoted Text
That is quick progress! looking good, grant!
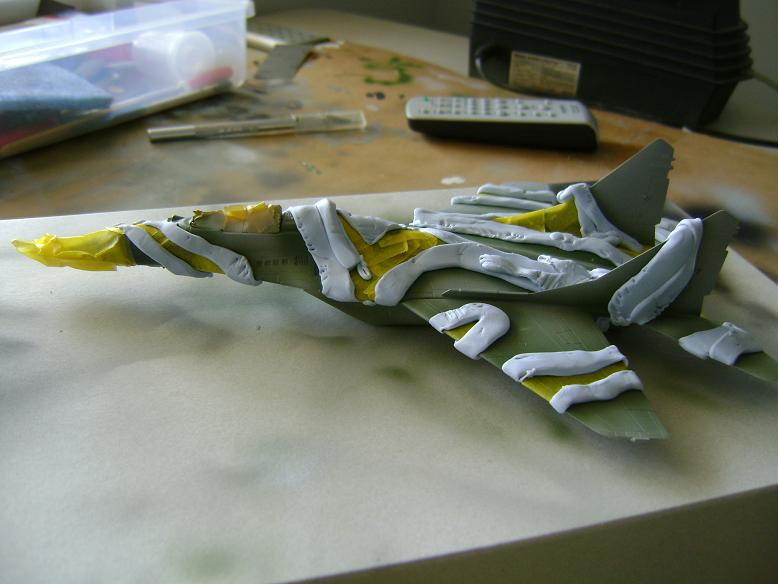
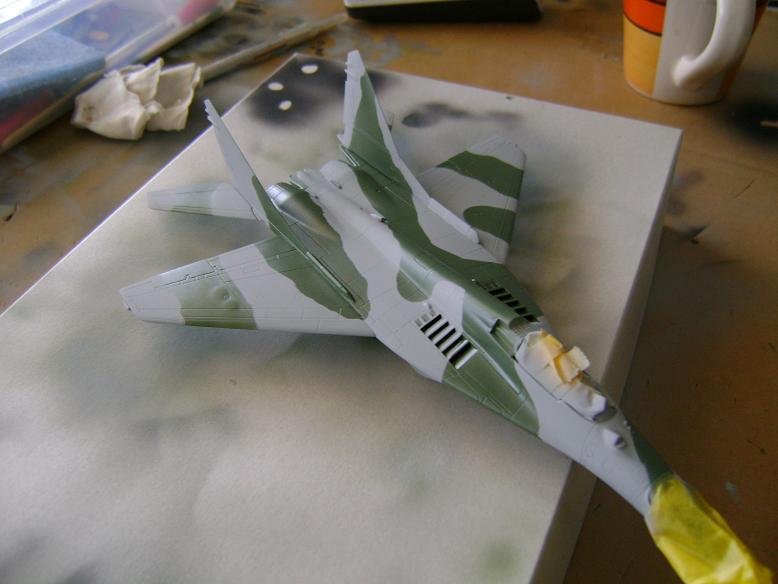
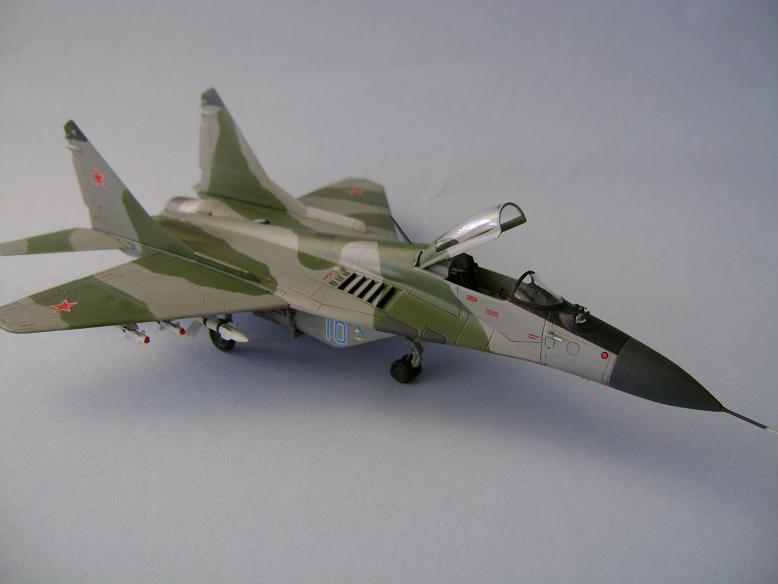
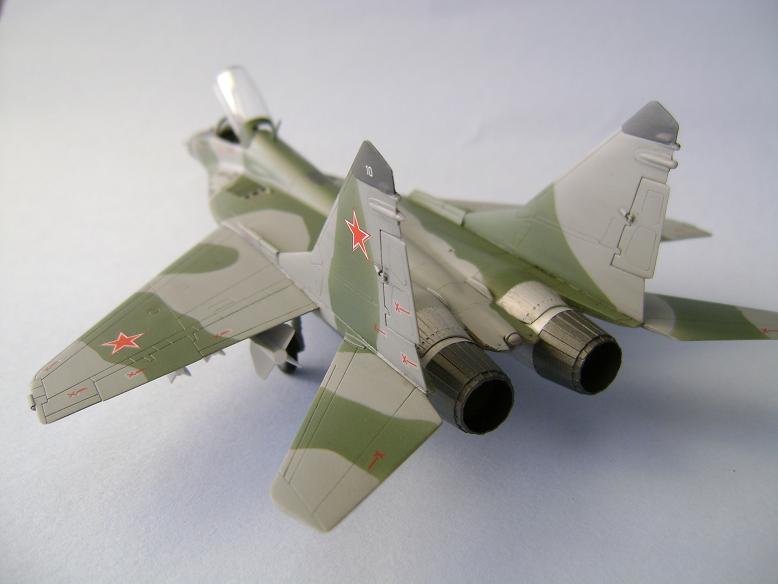
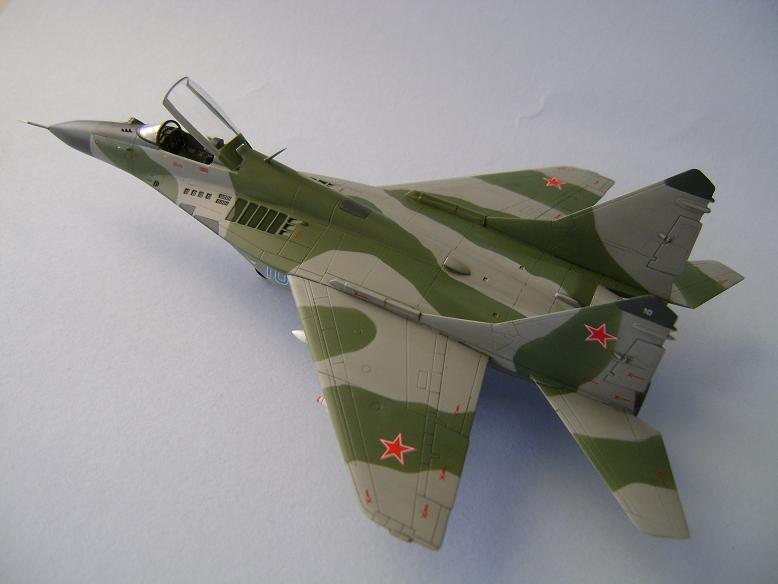
Cheers! Here's some more progress. I wasn't convinced with the green/grey colour listed in the instructions, so I mixed up something myself. It still looks too dark to me. Certain liberties were taken with the camo pattern.
 Just waiting on it to dry a bit so I can mask off some details for some more paint.
EDC

Joined: January 16, 2006
KitMaker: 101 posts
AeroScale: 74 posts

Posted: Saturday, January 22, 2011 - 05:18 PM UTC
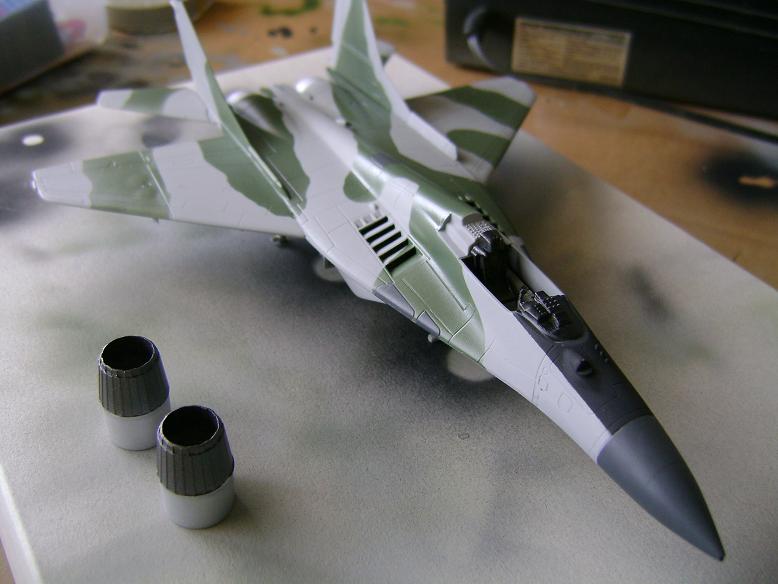
Finished working on this for the weekend. It needs a couple of touch ups, and then glossing for the decals. I'll probably finish it off next weekend.


Bigrip74

Joined: February 22, 2008
KitMaker: 5,026 posts
AeroScale: 2,811 posts

Posted: Sunday, January 23, 2011 - 12:14 PM UTC
Grant, nice paint job what masking material are you using. I have not seen grey tack before, I am always on the look out for cheaper ways to build you may have hit on something.
Ok guys I have (3) questions:
1. I am building the Academy Mig 17PF and know nothing about the cockpit or the colors. Here is where I am at what should I do to make the office somewhat official. Black instrument panel? side panels?

2. What should be done to the seat and control stick?

3. The box art shows a two tone brown Syrian a/c but the instructions indicate blue undersides and a green / brown upper any suggestions.
Bob
Ok guys I have (3) questions:
1. I am building the Academy Mig 17PF and know nothing about the cockpit or the colors. Here is where I am at what should I do to make the office somewhat official. Black instrument panel? side panels?

2. What should be done to the seat and control stick?

3. The box art shows a two tone brown Syrian a/c but the instructions indicate blue undersides and a green / brown upper
 any suggestions.
Bob
EDC

Joined: January 16, 2006
KitMaker: 101 posts
AeroScale: 74 posts

Posted: Sunday, January 23, 2011 - 05:36 PM UTC
Hi Bob, it actually is blue, the light and my cruddy camera makes it look otherwise. I usually recycle it, and it has a million and one other uses in modelling. 

mykroft

Joined: November 14, 2009
KitMaker: 270 posts
AeroScale: 264 posts

Posted: Monday, January 24, 2011 - 03:55 AM UTC
I've been building up the main fuselage initially as I need to hit the shop for some Interior Blue-Green before I can start on the cockpit. After some test fitting I decided to join the main wings to the lower fuselage first as that provided more positive location to the main gear bays & outer intake sides.

Zvezda MiG-31 by mawz_models, on Flickr
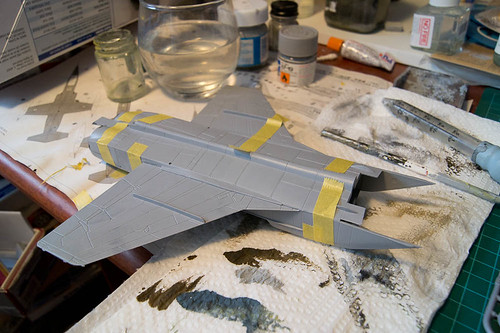
Zvezda MiG-31 by mawz_models, on Flickr
Now the build gets back-burnered for a week or so until I can start on the cockpit.

Zvezda MiG-31 by mawz_models, on Flickr

Zvezda MiG-31 by mawz_models, on Flickr
Now the build gets back-burnered for a week or so until I can start on the cockpit.
vanize

Joined: January 30, 2006
KitMaker: 1,954 posts
AeroScale: 1,163 posts

Posted: Monday, January 24, 2011 - 07:31 PM UTC
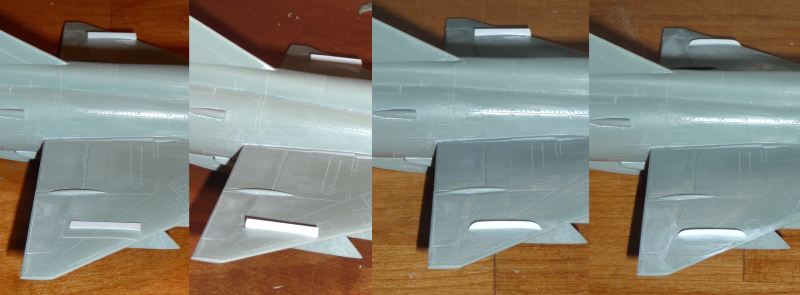
Made some new wing fences yesterday - the kit ones were not tall enough. Mine are still not quite as tall as they should be, but they'll have to do, and they look a lot better a about 1/3rd the thickness of the kit ones anyway
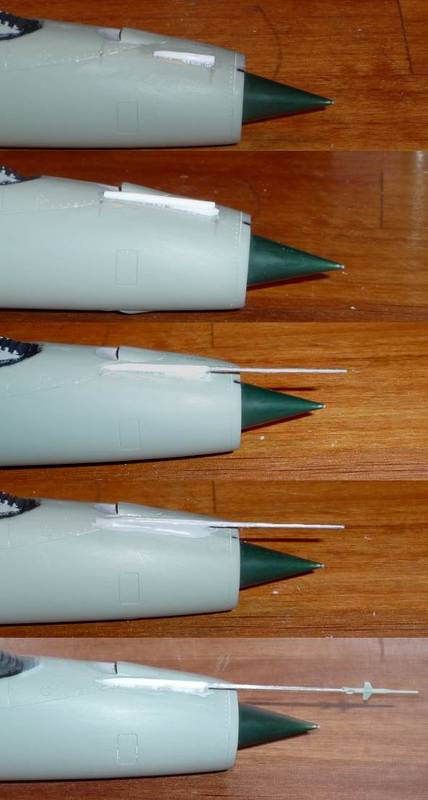
Tonight I scratch-built the pitot tube, which was broken in my kit and really not adequate for the job anyway. Pictures of that tomorrow.

Tonight I scratch-built the pitot tube, which was broken in my kit and really not adequate for the job anyway. Pictures of that tomorrow.
vanize

Joined: January 30, 2006
KitMaker: 1,954 posts
AeroScale: 1,163 posts

Posted: Wednesday, January 26, 2011 - 09:57 AM UTC
Ok, update on my MiG-21Bis
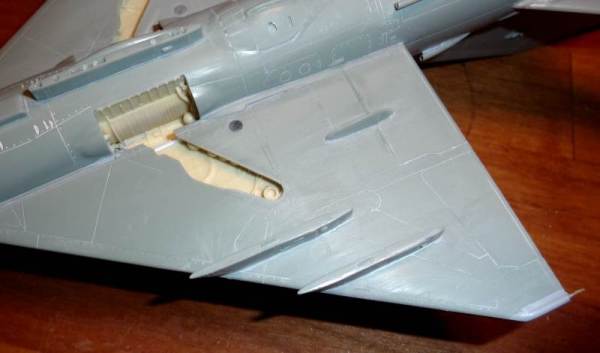
I am not going to put stores on the center-line rack, so I detailed it out (upper left). Also added the little wingtip fairing for the static discharge wire (bottom right):
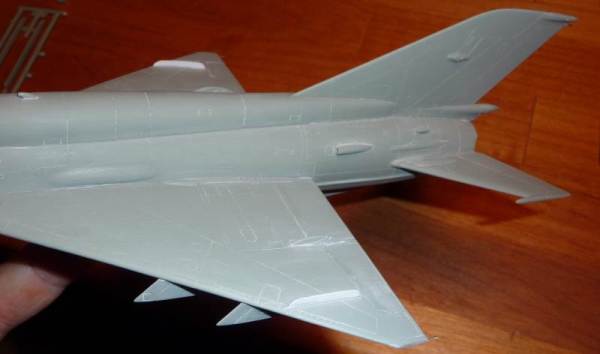
I discovered that the Bis has a different upper fairing between the flaps and ailerons and simultaneously figured out what the mysterious kit part not mentioned anywhere in the instructions went:
As mentioned before, my kit came with a broken pitot tube part, and the kit version wasn't really all that great anyway. So I made my own out of plastic stock and a stainless steel tube (slotted into a hole drilled with a pin vise and small bit). the complicated tip of the kit part is installed at the tip once the rest is constructed (it just slots into the tube and I should be able to leave it removable in case I want to transport the finished model):
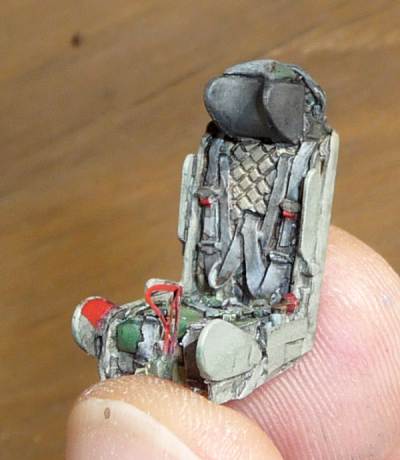
The painted up resin KM-1 ejection seat. I still can't remember the manufacturer. I think it painted up nicely:
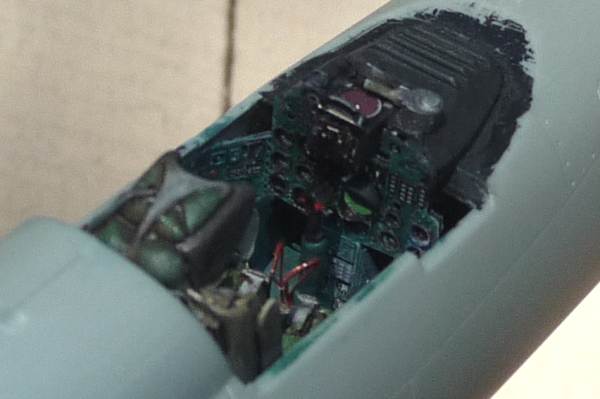
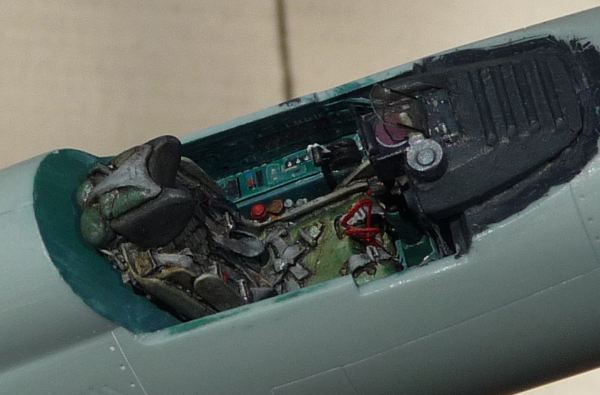
A couple shots of the completed cockpit - the Eduard pre-colored cockpit set worked out pretty well in conjunction with the resin seat. I detailed the forward combing in a representative, rather than exact, way. Mig-21s seem to be rather busy under the windscreen, and I wanted to reflect that. Also hand-fashioned the throttle quadrant because the Eduard version was unmanageable.The area behind the seat is rather bare, but will never be seen once the canopy (which I will leave closed) is installed.
I am not going to put stores on the center-line rack, so I detailed it out (upper left). Also added the little wingtip fairing for the static discharge wire (bottom right):

I discovered that the Bis has a different upper fairing between the flaps and ailerons and simultaneously figured out what the mysterious kit part not mentioned anywhere in the instructions went:

As mentioned before, my kit came with a broken pitot tube part, and the kit version wasn't really all that great anyway. So I made my own out of plastic stock and a stainless steel tube (slotted into a hole drilled with a pin vise and small bit). the complicated tip of the kit part is installed at the tip once the rest is constructed (it just slots into the tube and I should be able to leave it removable in case I want to transport the finished model):

The painted up resin KM-1 ejection seat. I still can't remember the manufacturer. I think it painted up nicely:

A couple shots of the completed cockpit - the Eduard pre-colored cockpit set worked out pretty well in conjunction with the resin seat. I detailed the forward combing in a representative, rather than exact, way. Mig-21s seem to be rather busy under the windscreen, and I wanted to reflect that. Also hand-fashioned the throttle quadrant because the Eduard version was unmanageable.The area behind the seat is rather bare, but will never be seen once the canopy (which I will leave closed) is installed.


eoinryan

Joined: April 30, 2010
KitMaker: 232 posts
AeroScale: 66 posts

Posted: Saturday, January 29, 2011 - 06:47 AM UTC
Hi Bob,
I think everyone has dilema's about Soviet cockpit interiors!
I was just talking about it last week on the Close Air Support thread.
Matt Quiroz just built a fantastic Hind gunship and you can check out the build on the CAS thread. Model Master recently brought out a Soviet Cockpit Interior which he used in his Hind and it looks pretty impressive.
If you are lucky enough to live in the US of A you should be able to pick it up fairly easily. I heard that Model Master paints are now being imported into the UK but I haven't come across any yet.
I used a blend of Citadel Sky Blue and Citadel Rotting Flesh (I have to rely sometimes on Fantasy/Sci-Fi shop to source acryllic paints locally) with mixed results.
Good luck with the search!
Eoin
PS if anyone can recommend a UK website that supplies Model Master acryllics, can you let us know?
Eoin

Bigrip74

Joined: February 22, 2008
KitMaker: 5,026 posts
AeroScale: 2,811 posts

Posted: Saturday, January 29, 2011 - 08:00 AM UTC
Eoin, thanks for the information it helps.
Bob
Bob
EDC

Joined: January 16, 2006
KitMaker: 101 posts
AeroScale: 74 posts

Posted: Saturday, January 29, 2011 - 08:38 AM UTC
Hi all, I'm calling this one finished. Painted with Tamiya and Vellejo acrylics. I gave it an oil wash. I also just discovered Vellejo matt varnish which I was really pleased with.
Grant
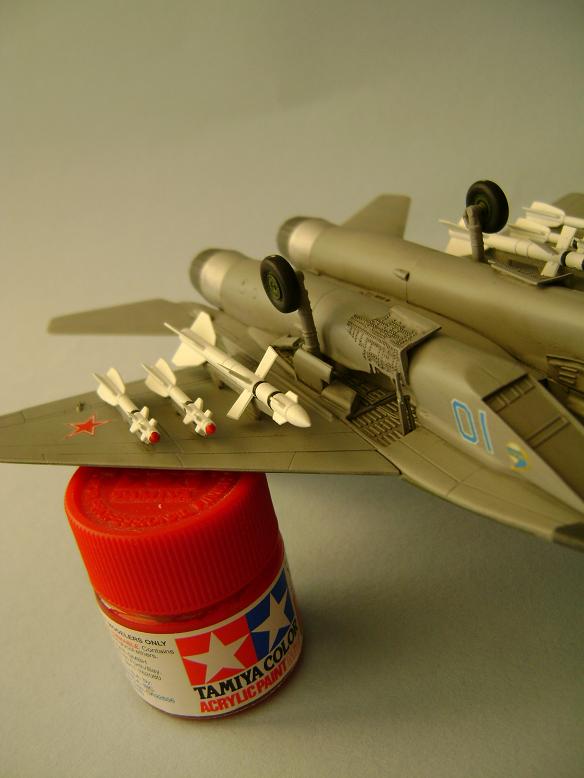
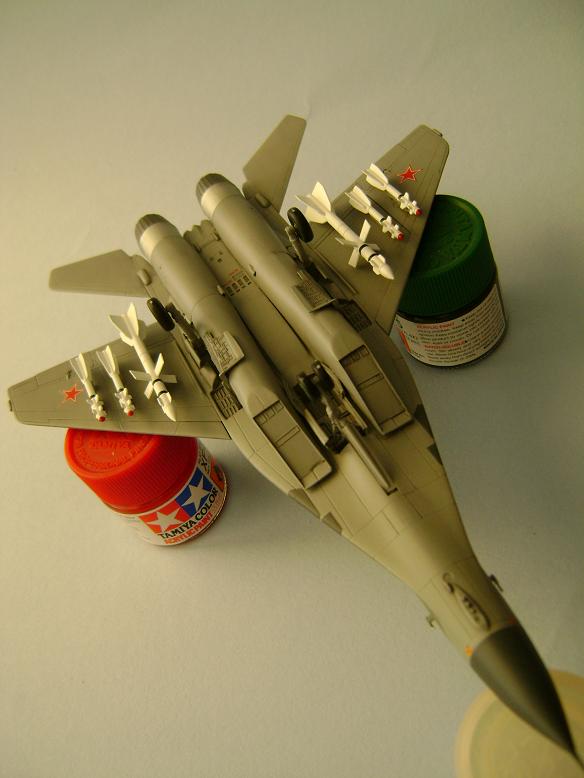
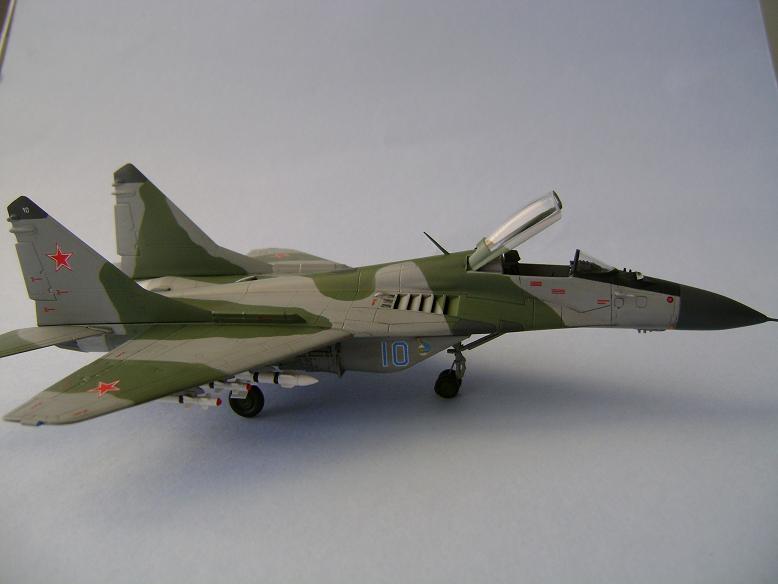
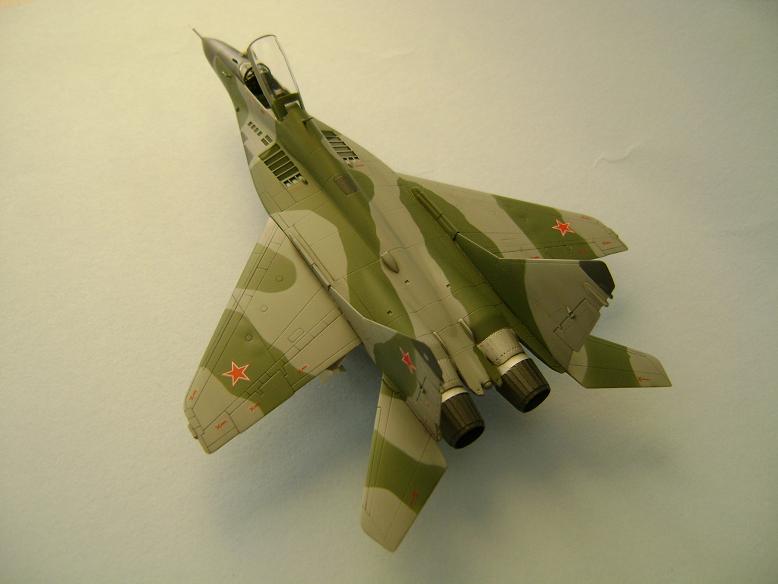
Grant


Bigrip74

Joined: February 22, 2008
KitMaker: 5,026 posts
AeroScale: 2,811 posts

Posted: Saturday, January 29, 2011 - 12:29 PM UTC
Well done Grant.
Bob
Bob
EDC

Joined: January 16, 2006
KitMaker: 101 posts
AeroScale: 74 posts

Posted: Saturday, January 29, 2011 - 07:17 PM UTC
Cheers Bob. I'm tempted to do another Mig now.
 |


