


Air Campaigns
Want to start or join a group build? This is where to start.
Want to start or join a group build? This is where to start.
Hosted by Frederick Boucher, Michael Satin
OFFICIAL: "Zerstorer!" Campaign Thread

SgtRam

#197


Joined: March 06, 2011
KitMaker: 3,971 posts
AeroScale: 511 posts

Posted: Monday, March 21, 2011 - 12:09 PM UTC
Alright, off I go. Lets see how this one turns out.

mykroft
Joined: November 14, 2009
KitMaker: 270 posts
AeroScale: 264 posts

Posted: Tuesday, March 22, 2011 - 03:00 AM UTC
Well, the Mosquito's coming along nicely so far:
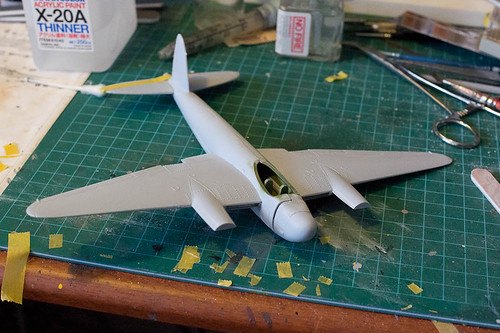
Airfix Mosquito NF.XIX 1/72 by mawz_models, on Flickr
The real heavy lifting is in fixing that nose gap though, that's next.
Airfix Mosquito NF.XIX 1/72 by mawz_models, on Flickr
The real heavy lifting is in fixing that nose gap though, that's next.

Bigrip74

Joined: February 22, 2008
KitMaker: 5,026 posts
AeroScale: 2,811 posts

Posted: Tuesday, March 22, 2011 - 09:53 AM UTC
@ Graham. you Raj and Anthony dont play fair, I want out of the sand box  Actually your builds are giving me some tips on painting. Now to work on my putty skills which I hate to do when it comes to the wing roots. So I was about to ask for everyones help when I came across this link and thought that it was great.
https://aeroscale.kitmaker.net/forums/98974&page=1
Bob
Actually your builds are giving me some tips on painting. Now to work on my putty skills which I hate to do when it comes to the wing roots. So I was about to ask for everyones help when I came across this link and thought that it was great.https://aeroscale.kitmaker.net/forums/98974&page=1
Bob

Kiwi_Modeller

Joined: August 13, 2010
KitMaker: 188 posts
AeroScale: 62 posts

Posted: Tuesday, March 22, 2011 - 04:44 PM UTC
LOL Bob now now no tossin ya toys out the sand box , seriously tho the painting isnt really that hard i dont know about the other guys but all i do is thin the paint a little more than normal and lower the pressure on the ab to around 10 psi, mine has a built in air adjuster so i can get even lower if i need to then simply spray little bits at a time building it up to where you want.
those German schemes are more time consuming but with practice and time they look neat.
that links very handy i hadnt thought of using nail polish remover but it makes sense rather than sanding it an loosing the detail.
cheers,
Graham
, seriously tho the painting isnt really that hard i dont know about the other guys but all i do is thin the paint a little more than normal and lower the pressure on the ab to around 10 psi, mine has a built in air adjuster so i can get even lower if i need to then simply spray little bits at a time building it up to where you want.those German schemes are more time consuming but with practice and time they look neat.
that links very handy i hadnt thought of using nail polish remover but it makes sense rather than sanding it an loosing the detail.
cheers,
Graham

AussieReg

#007
Joined: June 09, 2009
KitMaker: 8,156 posts
AeroScale: 3,756 posts
Posted: Tuesday, March 22, 2011 - 05:26 PM UTC
Graham, beautiful job mate, and thanks for joining us with your build and sharing your work.
I use Mr Surfacer 500 and 1000 applied with a brush, then use the Gunze Aqueous Thinner on a Q-tip to smooth it out. If you mask off the offending seam nice and close sometimes you don't need to sand at all.
Cheers, D
Quoted Text
that links very handy i hadnt thought of using nail polish remover but it makes sense rather than sanding it an loosing the detail.
cheers,
Graham
I use Mr Surfacer 500 and 1000 applied with a brush, then use the Gunze Aqueous Thinner on a Q-tip to smooth it out. If you mask off the offending seam nice and close sometimes you don't need to sand at all.
Cheers, D

Bigrip74
Joined: February 22, 2008
KitMaker: 5,026 posts
AeroScale: 2,811 posts
Posted: Tuesday, March 22, 2011 - 05:33 PM UTC
D, does that thinner do anything to the plastic?
Bob
Bob
AussieReg
#007
Joined: June 09, 2009
KitMaker: 8,156 posts
AeroScale: 3,756 posts
Posted: Tuesday, March 22, 2011 - 06:00 PM UTC
Quoted Text
D, does that thinner do anything to the plastic?
Bob
No mate, it's acrylic thinner for the Gunze Mr Hobby and Mr Color paints. Very similar to the Tamiya acrylic thinner, mostly isopropyl alcohol I think.

lawlzw

Joined: April 05, 2009
KitMaker: 120 posts
AeroScale: 26 posts

Posted: Tuesday, March 22, 2011 - 06:52 PM UTC
Nice work guys... here's my progress so far:

As usual for me, its going to be OOTB (more or less)
Cheers!
Lawrence
As usual for me, its going to be OOTB (more or less)
Cheers!
Lawrence
iflytb20

#501

Joined: August 25, 2009
KitMaker: 292 posts
AeroScale: 194 posts

Posted: Tuesday, March 22, 2011 - 07:31 PM UTC
Progress Update : Thank goodness the sanding part is over. Now to see what more surprises spring up during the painting and final assembly stages 
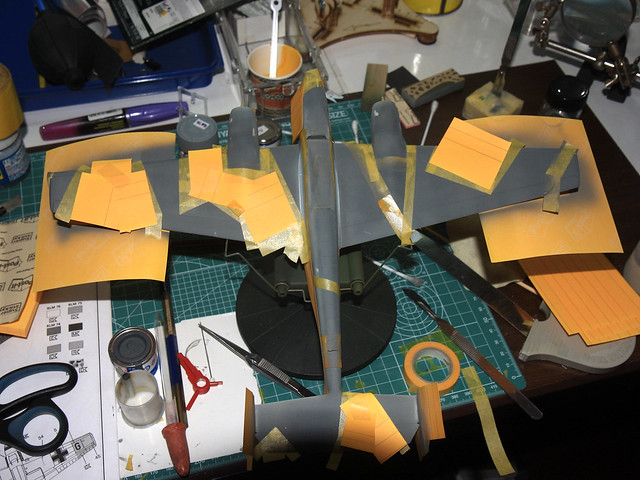
Masking in progress. Will be finished in a RLM74/75 splinter pattern.
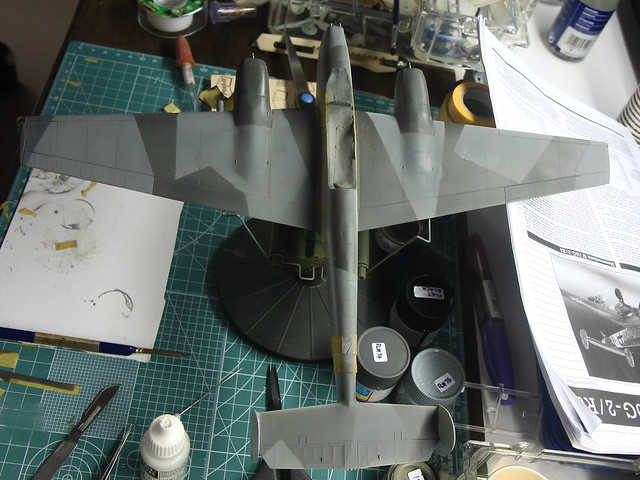
Finished with the paint job, but i am not too happy. The tape pulled up a bit of paint [i thought 24 hours was enough - apparently not] and my retouching efforts with the brush were not that well. So i plan to re-shoot the RLM75 areas.
Masking in progress. Will be finished in a RLM74/75 splinter pattern.
Finished with the paint job, but i am not too happy. The tape pulled up a bit of paint [i thought 24 hours was enough - apparently not] and my retouching efforts with the brush were not that well. So i plan to re-shoot the RLM75 areas.

emroglan

Joined: December 16, 2004
KitMaker: 1,163 posts
AeroScale: 255 posts

Posted: Tuesday, March 22, 2011 - 10:15 PM UTC
Quoted Text
D, does that thinner do anything to the plastic?
Bob
Bob, you can also use Gunze's Mr Dissolved Putty or Vallejo's Putty. Then wipe the excess of with a Q-tip dipped in alcohol or Tamiya's X-20 or Gunze's Aqueous Thinner. None of these react with the plastic in any way.
Another trick for those wing seams. First attach the upper half of the wings to the fuselage, so there's no seam. Then attach the lower wing part. You'll easily have seamless wings. Two difficulties here: One, some kits are designed in such a way that it's very difficult to attach upper halves to the fuselage as there's no connecting surface. The second is dihedral angles for the wings, you must be careful to keep the angle right or your wings can be distorted. Fortunately you can still push and pull until the glue cures.
Kiwi_Modeller
Joined: August 13, 2010
KitMaker: 188 posts
AeroScale: 62 posts
Posted: Tuesday, March 22, 2011 - 11:14 PM UTC
Quoted Text
Graham, beautiful job mate, and thanks for joining us with your build and sharing your work.
no prob mate always fun.
Quoted Text
I use Mr Surfacer 500 and 1000 applied with a brush, then use the Gunze Aqueous Thinner on a Q-tip to smooth it out. If you mask off the offending seam nice and close sometimes you don't need to sand at all.
hmm didnt think of that thinner, i use meths for thinning it drys faster :-) plus doesnt eat anything like some other thinners do might have to get some an try it out.
cheers,
Graham

KrisMax
Joined: January 23, 2010
KitMaker: 156 posts
AeroScale: 139 posts
Posted: Wednesday, March 23, 2011 - 12:53 AM UTC
Quoted Text
I know what it means to airbrush mottling for hours as I have build a Ki-45 in 2009 .....
Hello Torsten. What are you saying about the Ki-45? I will be building it for this campaign soon and am looking forward to a simple quick Tamigawa exercise. Was it worth the effort? Have you got a photo?
BTW - some great work on show here by Graham, Raj, Lawrence, Anthony. Well done guys!
Simon


611_sqd
Joined: January 24, 2011
KitMaker: 470 posts
AeroScale: 99 posts
Posted: Wednesday, March 23, 2011 - 11:58 AM UTC
Small update. Tail assembly is on. Wheels are now together and started on the gear assembly.
Bigrip74
Joined: February 22, 2008
KitMaker: 5,026 posts
AeroScale: 2,811 posts
Posted: Wednesday, March 23, 2011 - 01:11 PM UTC
Emre, I will try that upper wing trick to see if it works for me thanks.
Bob
Bob
iflytb20
#501
Joined: August 25, 2009
KitMaker: 292 posts
AeroScale: 194 posts
Posted: Thursday, March 24, 2011 - 07:36 AM UTC
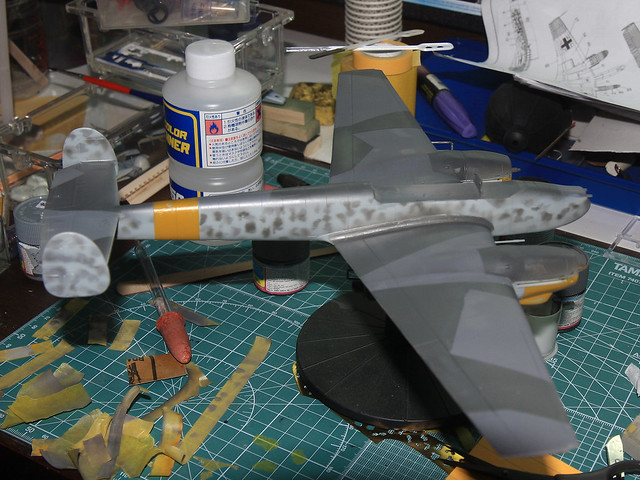
Tried my hand at mottling. As i am still learning how to use the Airbrush, i cheated a bit and used a mask for the mottling  . Next step would be the final assembly and the dreaded canopy masking
. Next step would be the final assembly and the dreaded canopy masking 611_sqd
Joined: January 24, 2011
KitMaker: 470 posts
AeroScale: 99 posts
Posted: Thursday, March 24, 2011 - 07:49 AM UTC
@Raj I have a Me-410 that arrived today which I might also do in this Campaign (time permitting) It has two camos to chose from in the box and both are versions of Mottling. I am thinking of masking it like you did. I'm to afraid of doing a airbrush slip and a mottle turns into a blotting.

BlackWidow

Joined: August 09, 2009
KitMaker: 1,732 posts
AeroScale: 1,336 posts
Posted: Thursday, March 24, 2011 - 09:03 AM UTC
Quoted Text
Quoted TextI know what it means to airbrush mottling for hours as I have build a Ki-45 in 2009 .....
Hello Torsten. What are you saying about the Ki-45? I will be building it for this campaign soon and am looking forward to a simple quick Tamigawa exercise. Was it worth the effort? Have you got a photo?
BTW - some great work on show here by Graham, Raj, Lawrence, Anthony. Well done guys!
Simon
Hi Simon!
Do you want to build that 1/48 or that 1/72 Hasegawa kit of the "Toryu"? Mine is the bigger model and it's a great kit! Really perfect craftsmen work from the guys in Shizuoka! The kit needs no filler at all, just the ordinary sanding of the seams. Falls together easy! But the camo can become painfull! But in the end it`s worth all the swearing, believe me. If you like, have a look in the Features, where Jean-Luc Formery (tedmamere) describes, how he painted his Ki-45 (same scale as mine). My way was nearly the same.
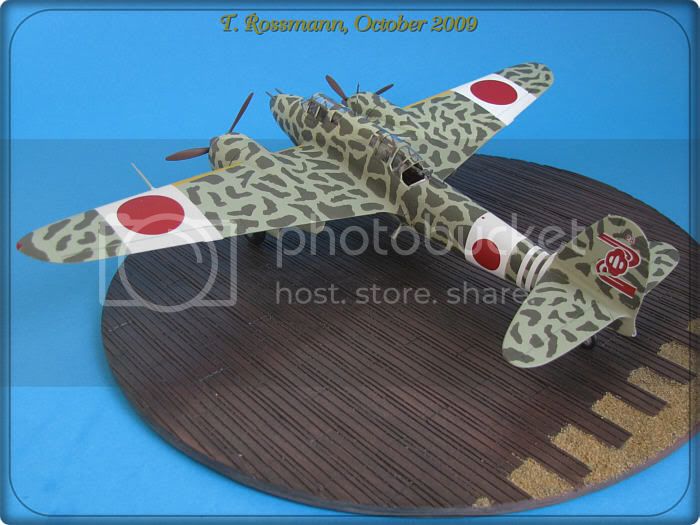
Here is a pic of my Dragonkiller. It's painted as the ship flown by Lt. Isamu Kashiide (1915-2003) of the 4. Sentai from Ozuki AB in June 1944.
@Graham
Your "262" looks really stunning! Congrats on your build!

@Raj
Your "110" also looks great! But there's no need to use masks for the mottling. Just thin the paint more than usual (3:1 or more) and go down with the pressure of your compy. Just like Graham mentioned it. That works!
After finishing the main assemly on my "110" it waits for some paint now. At the moment I'm working on the Me 410 which goes together easier, it seems. Hope to show some progress pics by the end of next week, as it's again expo time for me this weekend.
@Lawrence
Your Ki-45 comes along very well, my friend! Will you close the canopy or leave it open? Closed is better for painting the camo. And the birds were usually left with closed canopies on the ground. Haven't found a photo with an open canopy yet.
Happy modelling!
Torsten


warreni
Joined: August 14, 2007
KitMaker: 5,926 posts
AeroScale: 2,201 posts

Posted: Thursday, March 24, 2011 - 01:35 PM UTC
Hello fellow Zestorererers....
Dear Mr Campaign Leader, would it be at all possible to diverge from the campaign rules slightly, in order to expand the range of kits that may be built, and build a heavy fighter from dubbyaa dubbaya one? That's WW1 to everyone who doesn't get my humour and the aircraft involved is the Bristol Fighter, definitely a heavy fighter in its day..
Is OK if not, just thought I would enquire... (crosses fingers and hopes)
Bigrip74
Joined: February 22, 2008
KitMaker: 5,026 posts
AeroScale: 2,811 posts
Posted: Thursday, March 24, 2011 - 03:20 PM UTC
@ Torsten: you Graham, Anthony, & Raj are just showing off now But Hey they look goooood!
@ Warren: dubbyaa dubbaya one was the name of some oil in an old type oil can that my grandpa had Are you really wanting to build a stringbag with all of that finger tiing eye popping hot glue fumming rigging?
Bob
But Hey they look goooood!@ Warren: dubbyaa dubbaya one was the name of some oil in an old type oil can that my grandpa had
Are you really wanting to build a stringbag with all of that finger tiing eye popping hot glue fumming rigging?Bob
iflytb20
#501
Joined: August 25, 2009
KitMaker: 292 posts
AeroScale: 194 posts
Posted: Thursday, March 24, 2011 - 05:35 PM UTC
Quoted Text
@Raj
Your "110" also looks great! But there's no need to use masks for the mottling. Just thin the paint more than usual (3:1 or more) and go down with the pressure of your compy. Just like Graham mentioned it. That works!
After finishing the main assemly on my "110" it waits for some paint now. At the moment I'm working on the Me 410 which goes together easier, it seems. Hope to show some progress pics by the end of next week, as it's again expo time for me this weekend.
Happy modelling!
Torsten
The problem is that mine is a basic Diaphragm compressor with no pressure control. I am trying to get hold of a pressure regulator but till then looks like masks it is

Kiwi_Modeller
Joined: August 13, 2010
KitMaker: 188 posts
AeroScale: 62 posts
Posted: Friday, March 25, 2011 - 02:50 PM UTC
thanks Torsten glad you like her, im pritty happy with it.
LOL Bob na its trying to improve techniques is the thing we all strive for i guess but the other guys aircraft look great too , i kinda have always like those mottle schemes since they test you more than the plain old battle of britain type camo schemes.
altho i starting to play with NMF too now that this alcad stuff is out it makes it so easy it isnt funny
keep up the good work guys i'll keep checkin in.
cheers,
Graham
KrisMax
Joined: January 23, 2010
KitMaker: 156 posts
AeroScale: 139 posts
Posted: Saturday, March 26, 2011 - 01:24 AM UTC
Torsten, It's the 1/48 version, with the same markings as yours. Thanks for the photo - I will try to emulate it - and thanks for the pointer to Jean-Luc's article. I think I will need the help....
Simon
Simon
warreni
Joined: August 14, 2007
KitMaker: 5,926 posts
AeroScale: 2,201 posts
Posted: Sunday, March 27, 2011 - 01:37 PM UTC
Quoted Text
@ Warren: dubbyaa dubbaya one was the name of some oil in an old type oil can that my grandpa had
Bob
I was just trying to build somefing a little different, but it is OK as I have two Bf-110s in the stash that need building. So I suppose Bf-110 it is,,,

JackFlash
Joined: January 25, 2004
KitMaker: 11,669 posts
AeroScale: 11,011 posts
Posted: Sunday, March 27, 2011 - 05:11 PM UTC
Anyone interested in a set of the Aber 1:32 gun detail sets for a bf 110 C/D? Contact me by PM.
Removed by original poster on 03/28/11 - 05:54:14 (GMT).
 |

WEB HOSTING BY


Copyright ©2021 AeroScale and Kitmaker Network, a subsidiary of Silver Star Enterprises
All Rights Reserved. Please read our Conditions of Use and Privacy Policy.
All Rights Reserved. Please read our Conditions of Use and Privacy Policy.