Welcome to the Official Russell Anderson Memorial Campaign
The campaign runs from March 1, 2014 through August 31, 2014.
If you haven't enlisted yet but want to, you can sign up here.
Please post your in progress photos and comments in this thread. Post your pictures of finished models in the campaign gallery here.
Looking forward to some great builds in memory of Russell. Have a good time everyone!
Allen
Air Campaigns
Want to start or join a group build? This is where to start.
Want to start or join a group build? This is where to start.
Hosted by Frederick Boucher, Michael Satin
Official: Russell Anderson Memorial Campaign
Posted: Tuesday, March 04, 2014 - 10:51 PM UTC
MichaelSatin


Joined: January 19, 2008
KitMaker: 3,909 posts
AeroScale: 2,904 posts

Posted: Wednesday, March 05, 2014 - 03:15 AM UTC
Quoted Text
Welcome to the Official Russell Anderson Memorial Campaign
The campaign runs from March 1, 2014 through August 31, 2014.
If you haven't enlisted yet but want to, you can sign up here.
Please post your in progress photos and comments in this thread. Post your pictures of finished models in the campaign gallery here.
Looking forward to some great builds in memory of Russell. Have a good time everyone!
Allen
Allen,
Nuts, sorry about that! I should have done this. Thanks for picking up the slack, things just got away from me for a couple of days.
Michael

Posted: Wednesday, March 05, 2014 - 03:26 AM UTC
ljames0874

Joined: August 15, 2012
KitMaker: 408 posts
AeroScale: 365 posts

Posted: Wednesday, March 05, 2014 - 04:26 AM UTC
...and we're off! To start with, I will finish this Gloster Javelin. Russell bought this kit off Evil Bay, so I'm not sure if he started it, or it was like this when he got it. Either way, this is how I received the kit:

Looking back at Russell's forum postings, I saw that he had asked a few questions about this kit, and the fact that there is only one pilot and one seat, when the Javelin was a 2 seater. I have done a little research, and have found that this Testors boxing is a re-pop of a Hawk moulding from 1955, that was based on the 4th Javelin Prototype. At that time, there was a theory that Observer/Radar Operators did not need to see where they were going, and that their job would be easier in a darkened cockpit (as in the Sea Vixen, which shares the same Fighter All Weather designation). The Prototype Javelins, therefore, had no glazing, just a couple of tiny portholes, but all the standard production Javelins did. Here are the only two pics of the actual airframe I could find:


As the kit is partially assembled, with some filling done, I am not going to be taking the fuselage apart just to get the pilot in. I have crammed as much lead shot into the nose and cockpit area as possible, as there is an awful lot of weight towards the tail. I will be painting the inside of the canopy
sky blue, and scratchbuilding some FOD covers, as there is a complete lack of interior detail, or structure of any kind.
Cheers everyone!

Looking back at Russell's forum postings, I saw that he had asked a few questions about this kit, and the fact that there is only one pilot and one seat, when the Javelin was a 2 seater. I have done a little research, and have found that this Testors boxing is a re-pop of a Hawk moulding from 1955, that was based on the 4th Javelin Prototype. At that time, there was a theory that Observer/Radar Operators did not need to see where they were going, and that their job would be easier in a darkened cockpit (as in the Sea Vixen, which shares the same Fighter All Weather designation). The Prototype Javelins, therefore, had no glazing, just a couple of tiny portholes, but all the standard production Javelins did. Here are the only two pics of the actual airframe I could find:


As the kit is partially assembled, with some filling done, I am not going to be taking the fuselage apart just to get the pilot in. I have crammed as much lead shot into the nose and cockpit area as possible, as there is an awful lot of weight towards the tail. I will be painting the inside of the canopy
sky blue, and scratchbuilding some FOD covers, as there is a complete lack of interior detail, or structure of any kind.
Cheers everyone!

Posted: Wednesday, March 05, 2014 - 04:41 AM UTC
Good catch! It wasn't (still isn't) uncommon for molders to build tools based on early prototype airframes and sell them as production airplanes. I've come across a few other examples.
Thanks for the idea about the sky blue canopy blanking. I've used gloss black before but the blue could give it less of a toy like look.
Thanks for the idea about the sky blue canopy blanking. I've used gloss black before but the blue could give it less of a toy like look.


Jessie_C


Joined: September 03, 2009
KitMaker: 6,965 posts
AeroScale: 6,247 posts

Posted: Wednesday, March 05, 2014 - 08:29 AM UTC
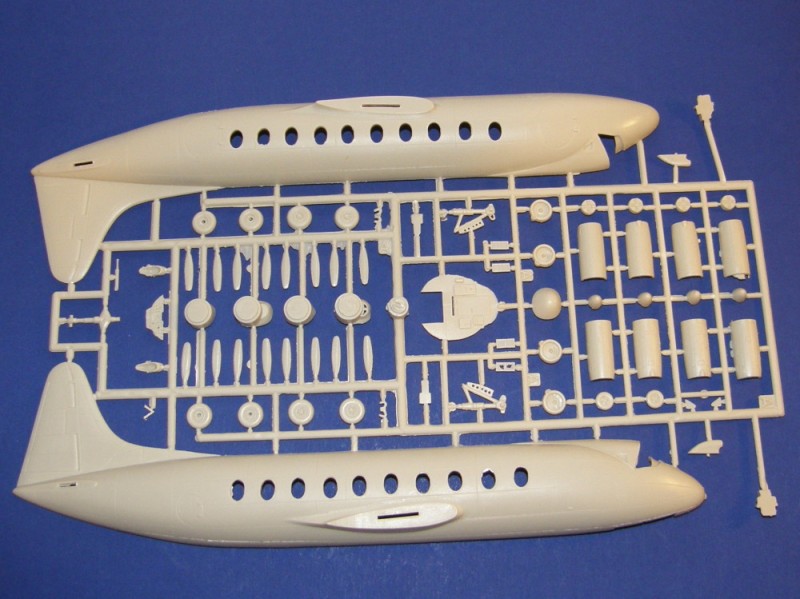
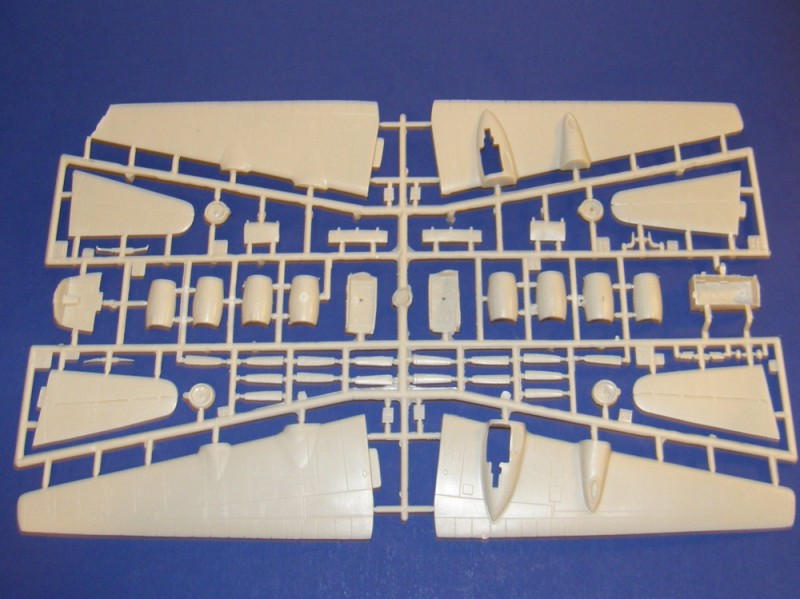
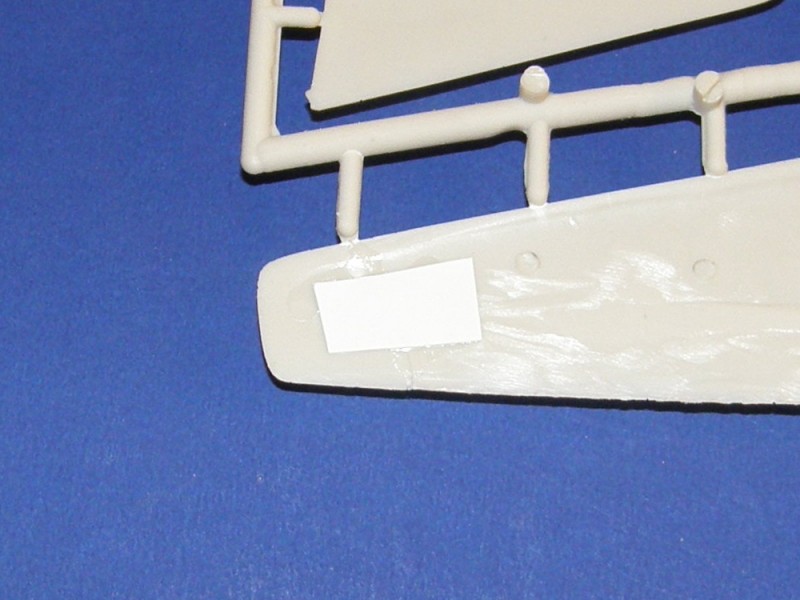
A rather large box landed on my doorstep this morning, and inside it was

Typical Mach 2 parts
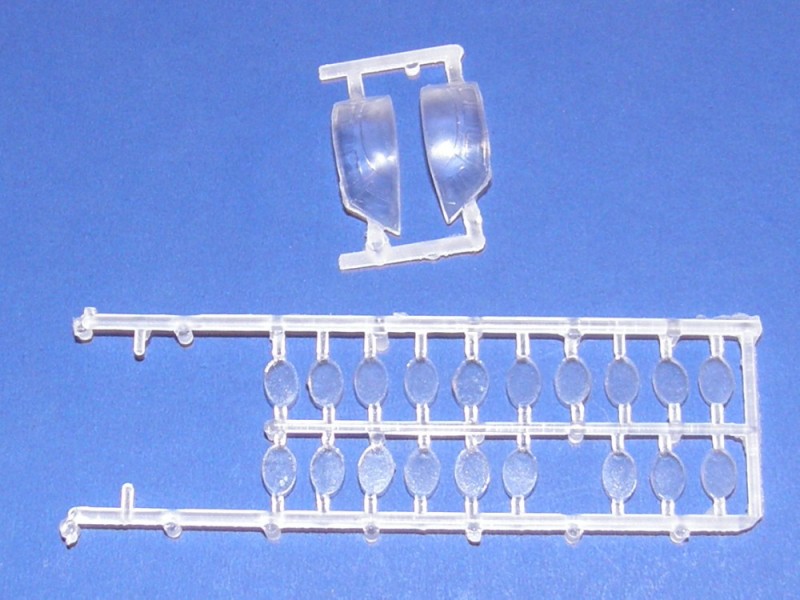
Including the infamous "clear" parts which don't look all that bad, really
And it wouldn't be a Mach 2 kit without a broken part, would it?
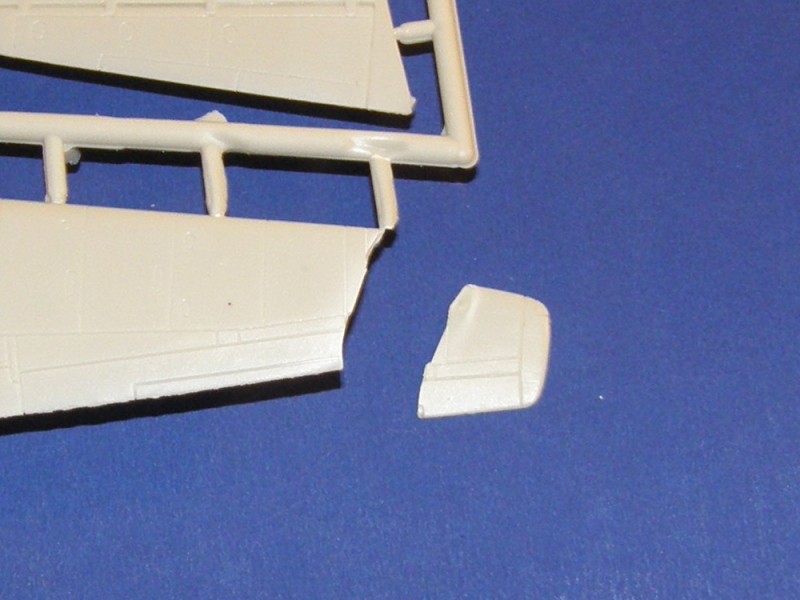
Happily the fix is relatively simple

Typical Mach 2 parts


Including the infamous "clear" parts which don't look all that bad, really

And it wouldn't be a Mach 2 kit without a broken part, would it?

Happily the fix is relatively simple


North4003

Joined: August 01, 2012
KitMaker: 960 posts
AeroScale: 391 posts

Posted: Wednesday, March 05, 2014 - 08:50 AM UTC
The first of Russel's kits I'll be working on is the Uri Gagarin (UFO) for this campaign. I'm building the Galileo for the Enterprise Campaign. The Klingon D7 will be waiting for now.

Nito74

Joined: March 04, 2008
KitMaker: 5,386 posts
AeroScale: 635 posts

Posted: Wednesday, March 05, 2014 - 11:03 AM UTC
Nice work everyone !
I'm working on the F-106 cockpit at this moment.
Photos soon.

I'm working on the F-106 cockpit at this moment.
Photos soon.

Nito74

Joined: March 04, 2008
KitMaker: 5,386 posts
AeroScale: 635 posts

Posted: Thursday, March 06, 2014 - 04:41 AM UTC
WIP


Bigrip74

Joined: February 22, 2008
KitMaker: 5,026 posts
AeroScale: 2,811 posts

Posted: Thursday, March 06, 2014 - 06:51 AM UTC
John, that was fast! It looks like everything is lining up nicely. Did you have any issue with the cockpit and fuselage?
Bob
Bob

Mcleod

Joined: April 07, 2010
KitMaker: 1,028 posts
AeroScale: 939 posts

Posted: Thursday, March 06, 2014 - 07:04 AM UTC
I'm so happy that we have an Official Campaign Thread and we have the Official Gallery site in place. Thankyou to both Alan and Micheal.
Here's who you are building for, and the friend you are remembering: Photo used with permission

I see there are close to 40 enlistments. It would be really nice to see at least that number of finished beauties in the gallery. And remember, even if were not perfect, its so long as we enjoyed ourself. Thats what Russell did.
Here's who you are building for, and the friend you are remembering: Photo used with permission

I see there are close to 40 enlistments. It would be really nice to see at least that number of finished beauties in the gallery. And remember, even if were not perfect, its so long as we enjoyed ourself. Thats what Russell did.
Nito74

Joined: March 04, 2008
KitMaker: 5,386 posts
AeroScale: 635 posts

Posted: Thursday, March 06, 2014 - 07:14 AM UTC
Quoted Text
John, that was fast! It looks like everything is lining up nicely. Did you have any issue with the cockpit and fuselage?
Bob
Bob,
The cockpit fitted in quite well, but I think it's a little bit too much to the left side not aligned perfectly..
The wings have a small gap next to the fuselage that I'm trying to correct without putty or Mr.Surfacer, let's see how that turns out..
The decals aren't 100% either, this age thing atacks everything... even decals

Posted: Thursday, March 06, 2014 - 07:39 AM UTC
Hey, I've got one of those marinating in the stash, tell us more. I assume that it's from that period of Hasegawa / Frog co-operation and has some poorly engineered joins. butt joints for the radome and the tail cones..

Bigrip74

Joined: February 22, 2008
KitMaker: 5,026 posts
AeroScale: 2,811 posts

Posted: Thursday, March 06, 2014 - 07:42 AM UTC
Quoted Text
this age thing atacks everything... even decals
Tell me it isnt so:-X
Bob
Nito74

Joined: March 04, 2008
KitMaker: 5,386 posts
AeroScale: 635 posts

Posted: Thursday, March 06, 2014 - 07:52 AM UTC

The white colour on the decals isn't white anymore.
mmhh.. I tried to take a photo but with the light it just isn't visible.


Bigrip74

Joined: February 22, 2008
KitMaker: 5,026 posts
AeroScale: 2,811 posts

Posted: Thursday, March 06, 2014 - 09:03 AM UTC
John, I could tell that the white is not white any more and those decals look like some from a 1950's Aurora kit.
Bob
Bob
Posted: Thursday, March 06, 2014 - 09:52 AM UTC
Hi again
I'll port my start-photo over from the enlistment thread:
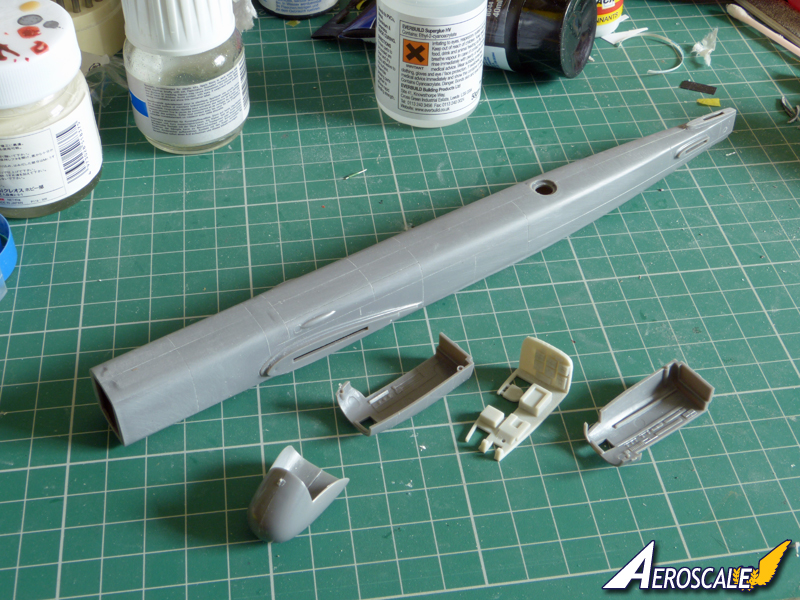
I've begun painting the cockpit:
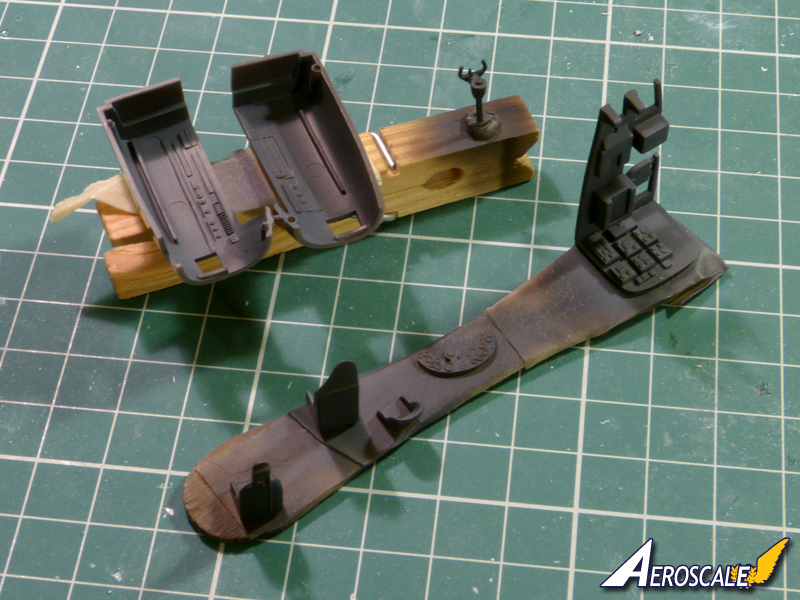
I won't go mad trying to detail it - just a little highlighting to bring it to life. The kit combines the cockpit parts from their standard Ju 88 with a new-tool extended fuselage for the 'H-4, and somewhere along the way AMTech forgot to include the instrument panel in the new version. It wouldn't get far without one, so I'll ignore the instructions and squeeze it in anyway.
All the best
Rowan
I'll port my start-photo over from the enlistment thread:

I've begun painting the cockpit:

I won't go mad trying to detail it - just a little highlighting to bring it to life. The kit combines the cockpit parts from their standard Ju 88 with a new-tool extended fuselage for the 'H-4, and somewhere along the way AMTech forgot to include the instrument panel in the new version. It wouldn't get far without one, so I'll ignore the instructions and squeeze it in anyway.

All the best
Rowan


Jessie_C


Joined: September 03, 2009
KitMaker: 6,965 posts
AeroScale: 6,247 posts

Posted: Thursday, March 06, 2014 - 11:49 AM UTC
Quoted Text
The white colour on the decals isn't white anymore
That's a Hasegawa decal; the 'white' never was white. Hasegawa is infamous for its ivory coloured white.
Quoted Text
...somewhere along the way AMTech forgot to include the instrument panel in the new version. It wouldn't get far without one, so I'll ignore the instructions and squeeze it in anyway
IIRC that version used the -188 cockpit so you may wish to visit Chuck's -388 thread given that it used the same cockpit because the instrument panel is radically different from the standard -88. Here's the relevant photo:

Nito74

Joined: March 04, 2008
KitMaker: 5,386 posts
AeroScale: 635 posts

Posted: Thursday, March 06, 2014 - 12:38 PM UTC
Thanks Jessica !
Ivory decals not old decals
Ivory decals not old decals

Posted: Thursday, March 06, 2014 - 01:52 PM UTC
Howdy Y'all 
Looks like everyone is off to a good start.
@Mark: I think I'll build a Pacific Mustang. No need to worry about repeating our efforts if you're using out of the box decals. I'm going to use Kagero decals but I'm not sure what I'll do about the antenna mast. The Pacific Mustang I want to build had two wood antenna "sticks" rather than one mast.
Take care,
Don "Lakota"

Jessie_C


Joined: September 03, 2009
KitMaker: 6,965 posts
AeroScale: 6,247 posts

Posted: Thursday, March 06, 2014 - 04:45 PM UTC
Quoted Text
... I'm not sure what I'll do about the antenna mast. The Pacific Mustang I want to build had two wood antenna "sticks" rather than one mast.
The solution to this is to carve (file and sand) a piece of sprue into an airfoil shape, and then stretch it until you get the thickness you want. Trim to length and Robert's your father's brother.
Posted: Thursday, March 06, 2014 - 05:11 PM UTC
Aero club used to sell airfoil shaped plastic rods, two different bags with different thicknesses. Try some of that and Robert's your father's nearest male relative. 


Naseby

Joined: October 15, 2010
KitMaker: 825 posts
AeroScale: 476 posts

Posted: Thursday, March 06, 2014 - 08:32 PM UTC
Its great to see so many participants and such interetsing kits so early in the campaign. Here are a few picturs of the Ju88A4 I chose based on the fact that Russell had a few LW bombers and Ju88-188 in his stash. The Kit from Revell is I believe the best Ju-88 in 1/72 out there at the moment and maybe also one of the finest 1/72 planes overal.


Posted: Thursday, March 06, 2014 - 08:37 PM UTC
Quoted Text
Quoted Text...somewhere along the way AMTech forgot to include the instrument panel in the new version. It wouldn't get far without one, so I'll ignore the instructions and squeeze it in anyway
IIRC that version used the -188 cockpit so you may wish to visit Chuck's -388 thread...
Cheers Jessie
I hadn't heard that. It's possible it had a conventional panel similar to the solid-nosed Ju 88G or Ju 388J (the latter introduced a standard blind-flying panel similar to a late Messerschmitt cockpits), but there'd be nowhere (or need) to mount the fully-glazed Ju 388L's arrangement.
AMTech's panel seems to be based on the Ju 88A series - indeed the new nose section still includes the lower windows, but they'll be hidden by the radome. To be honest, that'll do fine for this build, and at least it'll be better an empty hole.

All the best
Rowan


Mcleod

Joined: April 07, 2010
KitMaker: 1,028 posts
AeroScale: 939 posts

Posted: Friday, March 07, 2014 - 10:50 AM UTC
Well folks, I am thrilled there are so many who are started so early. I believe this will be a record campaign.
Looks like John and Rowan have a head-start on us, but in the coming days they'll see fire trails coming up behind them.
This is my start post, showing what I'll be building:


Remember people, no need to show a dated time stamp; the model can already be started. The most important rule is to follow Russell's main rule: Enjoy yourself. Happy modelling.

Looks like John and Rowan have a head-start on us, but in the coming days they'll see fire trails coming up behind them.
This is my start post, showing what I'll be building:


Remember people, no need to show a dated time stamp; the model can already be started. The most important rule is to follow Russell's main rule: Enjoy yourself. Happy modelling.

 |


