World War II
Discuss WWII and the era directly before and after the war from 1935-1949.
Hosted by Rowan Baylis
1/48 B-17F Build - 303rd BGs Luscious Lady
Redhand
#522
_VISITCOMMUNITY
New Jersey, United States
Joined: January 20, 2013
KitMaker: 1,460 posts
AeroScale: 1,443 posts
Posted: Saturday, December 27, 2014 - 07:24 AM UTC

Quoted Text

Brian,
The Bombay and bulkhead are just amazing. The amount of detailing is just unbelievable. Just one question. Why didn't you paint the ball screw transmission Green, or will you do that later before moving on from the Bombay sub assembly?
Joel


To answer your question, since my bomb bay is a combination of aluminum and grey, I wanted the ball screw transmissions to be painted in a consistent color. They were probably painted a metallic or industrial grey IMO.
Removed by original poster on 12/28/14 - 02:35:03 (GMT).
Redhand
#522
_VISITCOMMUNITY
New Jersey, United States
Joined: January 20, 2013
KitMaker: 1,460 posts
AeroScale: 1,443 posts
Posted: Saturday, December 27, 2014 - 08:19 AM UTC
CATWALK INSTALLED!!

If I could draw one of Chuck's Romanian chicks doing a bump and grind on the B-17 catwalk, I would. It's installed and ready for the show!

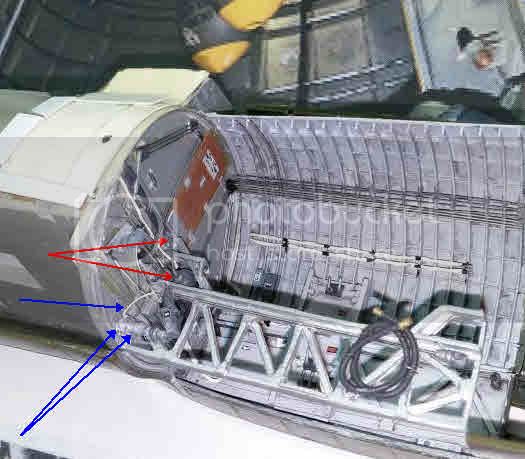
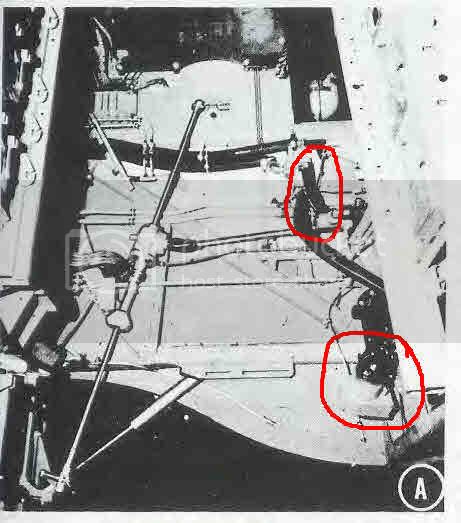
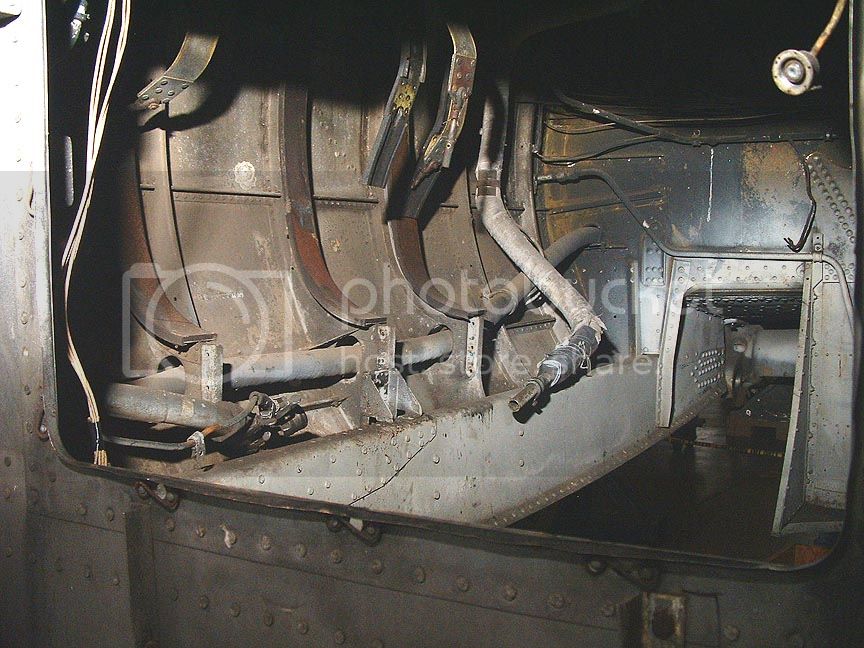
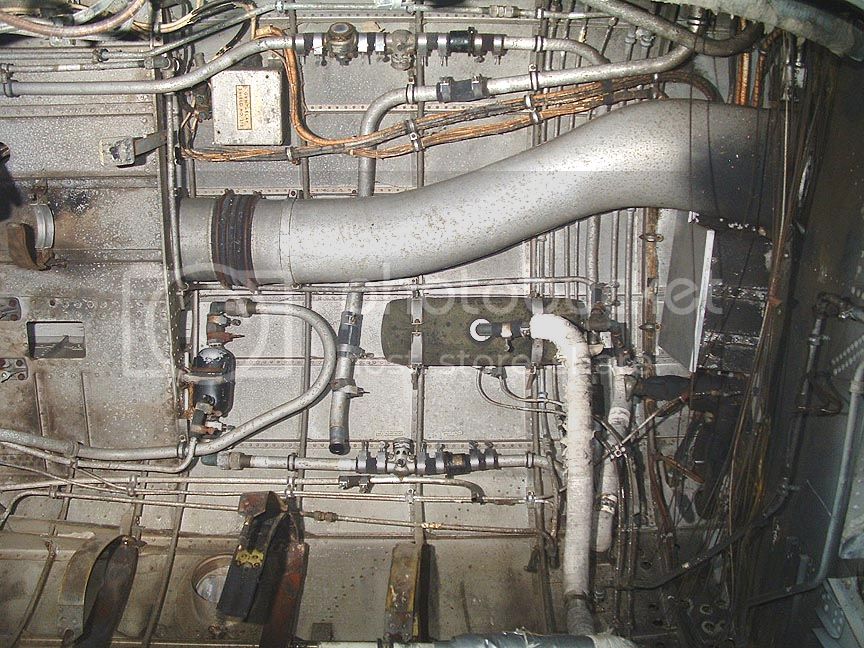
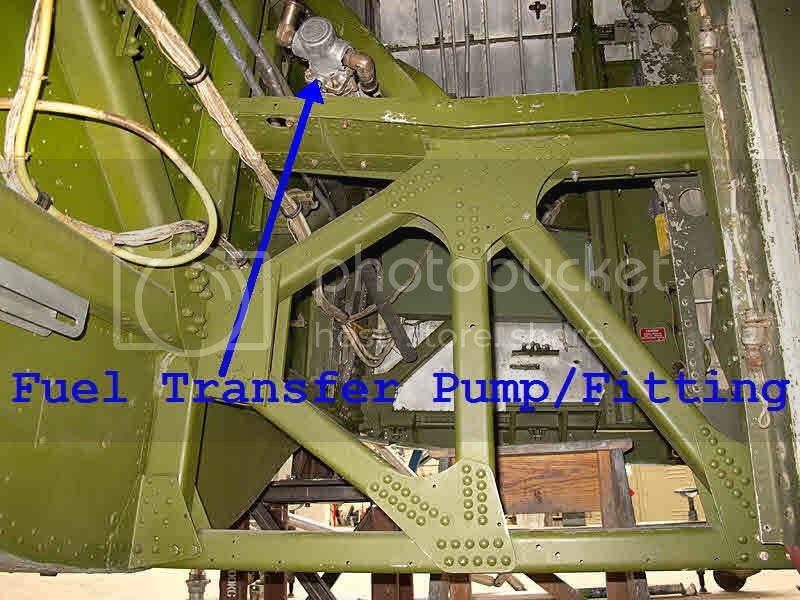
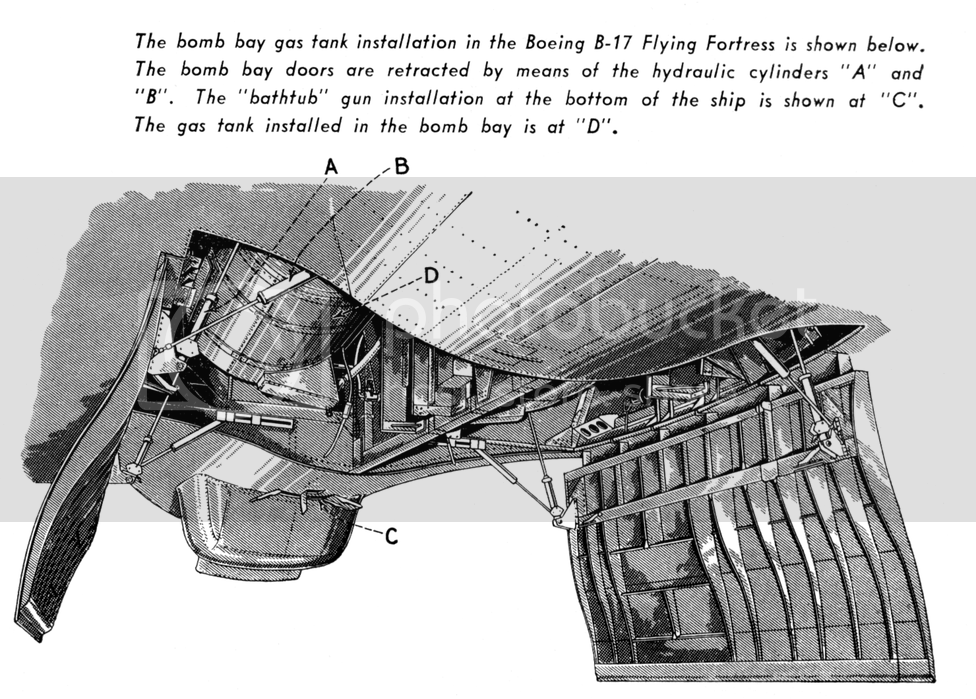
But before I show the catwalk I want to share some industrial pictures of it and related structures I found on the Internet. They REALLY give a sense of the metal fabrication and manufacturing work that went into building the bomb bay.


Neat, huh? I think so.

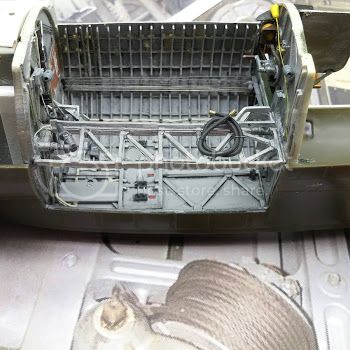
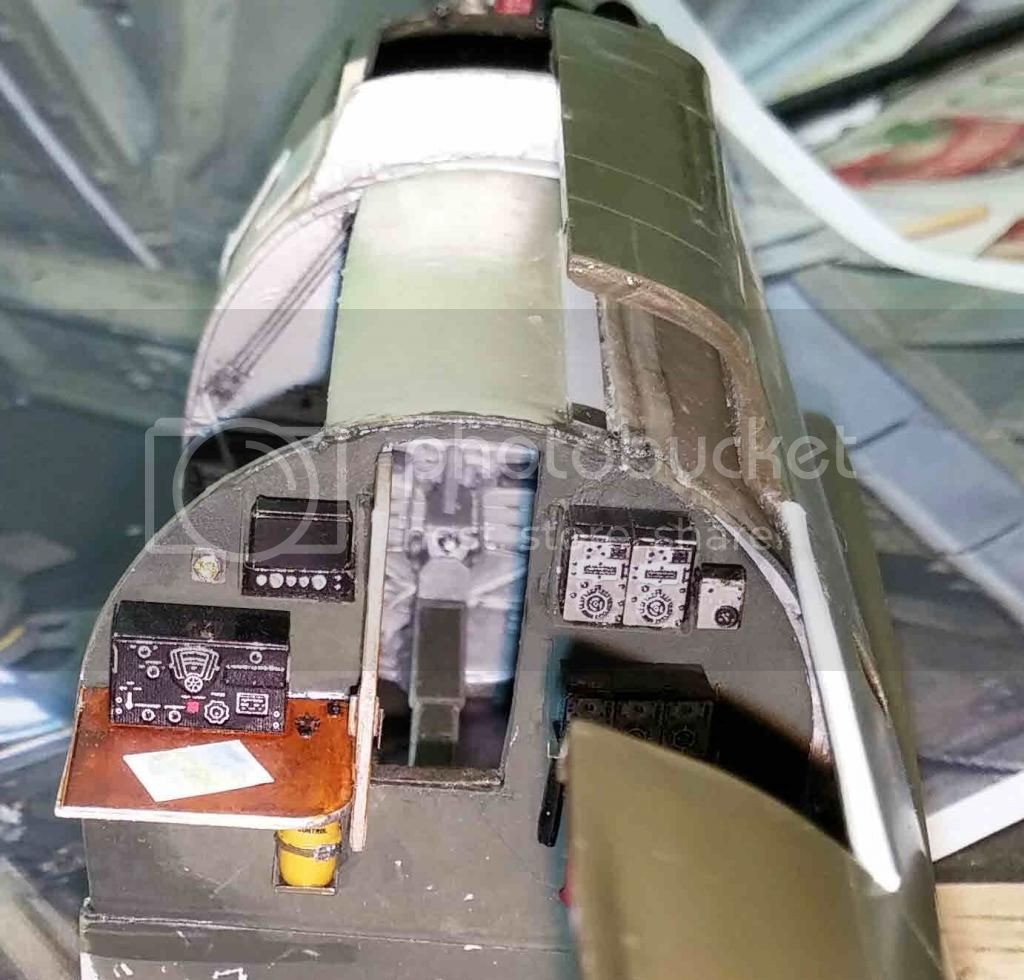
Now for the model installation:


You will see that the ball screw connection rod goes over the control cable pulley. That's the way is was on the real thing. Of course there is a parallel connecting rod on the other side. They lined up "pretty good" for "seaman's eye" IMHO, and I was VERY happy at how easy they actually were to install. All that "build it in my mind" planning paid off.

There will, of course, be two more connecting rods at the rear bulkhead when that is installed.

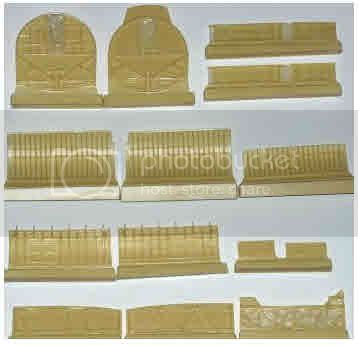
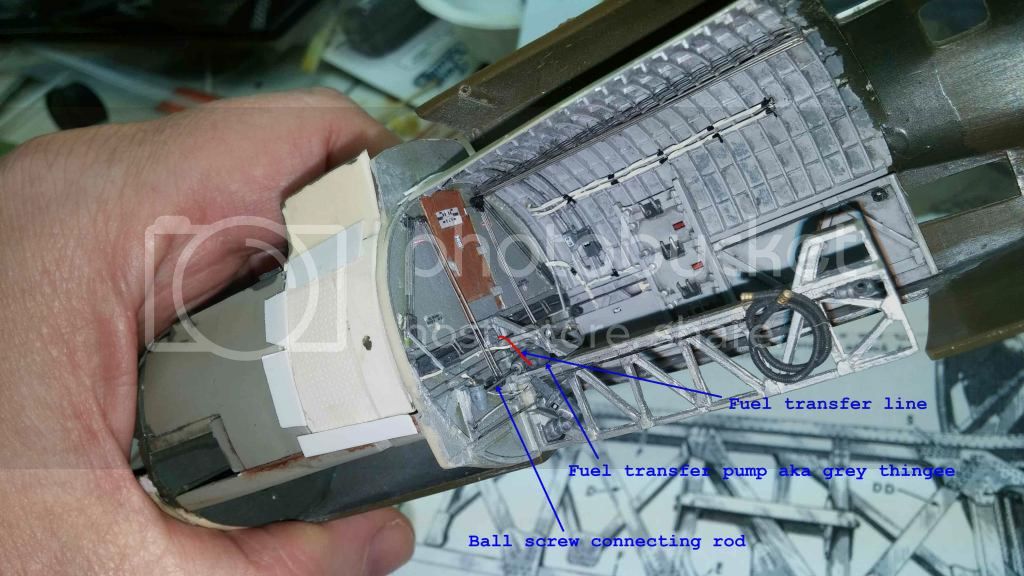
The fuel transfer pump aka grey thingee is behind the ball screw linkage connector under the catwalk top step. The red line I added is where brass painted wire will go to two manifolds that connect with the hoses along the top. It's true my "pump" bears no real resemblance to the real thing. See below.


But I don't really care. Having something that fools the eye is what's important here, I think.

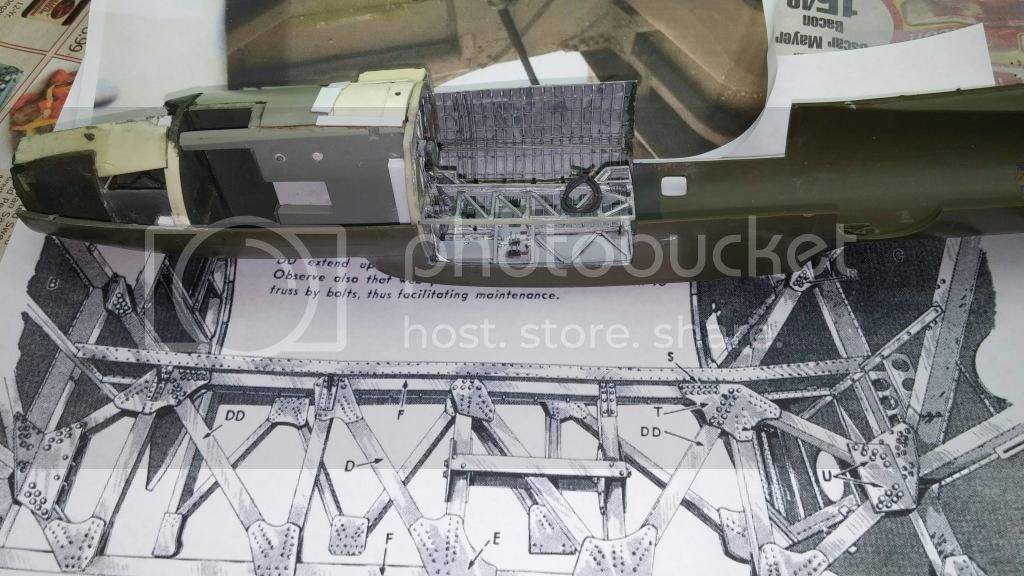
The below pics will give you some sense how this will look from below:


The above really shows off the ball screw linkages extending from both sides to good effect.


There is a fair amount of minor touch-up that still needs to be done. Bits of paint here and there. I appreciate all the praise I've gotten for getting down to this level of detail (which is a true first for me) but I always focus on what could be better, and here that remains very much the case.

Could I have weathered it more subtly? All all the darkened areas in the ceiling realistic? Is it crammed with so much detail that it looks like a sloppy mess? No matter what feedback I get I will still have those questions in my head.

I will tell you that I think it will look much better when the fuselage is buttoned up. The view from below will be into a darkened, semi-enclosed space, and many of the sharp distinctions one sees from flash photography will disappear. It should look like a very dirty, greasy place in a well-used warplane, and I kinda think it will. Also, I believe there will be a really nice view into the bomb bay from the open radio room hatch through the open door. That idea alone gives me the motivation to "build on."

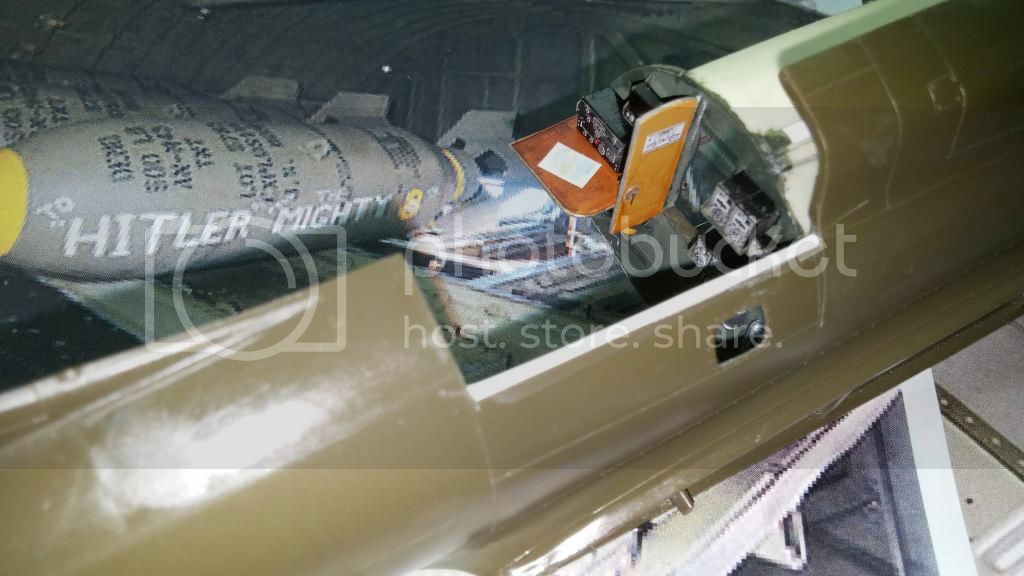
At a much, much later point in this build I will show you how the ball screws will integrate into the open bomb bay doors. You can get a hint from what's below.


Securely fastening the doors to the under fuselage and "tying it into" this work will be a separate challenge.

With any luck I will have the after bulkhead glued in tomorrow, then can complete the port side of the bomb bay so that it creates an interior shell that fits into the port fuselage just like the cockpit area. For now, that's the plan.
Dragon164
#226
_VISITCOMMUNITY
British Columbia, Canada
Joined: February 20, 2012
KitMaker: 1,909 posts
AeroScale: 508 posts
Posted: Saturday, December 27, 2014 - 11:46 AM UTC
Brian,
You are doing a fantastic job! it really looks great! I know how it is when all you can focus on are the bits that are not right I hope when I do mine I can come close to what you have achieved.

Cheers Rob.
Joel_W
Staff MemberAssociate Editor
AUTOMODELER
_VISITCOMMUNITY
New York, United States
Joined: December 04, 2010
KitMaker: 11,666 posts
AeroScale: 7,410 posts
Posted: Saturday, December 27, 2014 - 08:42 PM UTC
Brian,
OMG, you're attaining a level equal to the best of the best I've ever seen. Once the fuselage halves are joined, the Bombay will become a part of the whole, rather then the whole of our focus, which it's been, and rightfully so.

The enclosed shading from shadows created by real light will do much to blend in the details. That's one of the reasons why I also would have gone a little softer with the weathering.

Really looking forward to seeing how you fabricate the linkage for the Bombay doors.

Joel
Redhand
#522
_VISITCOMMUNITY
New Jersey, United States
Joined: January 20, 2013
KitMaker: 1,460 posts
AeroScale: 1,443 posts
Posted: Saturday, December 27, 2014 - 10:26 PM UTC

Quoted Text

Brian,
OMG, you're attaining a level equal to the best of the best I've ever seen. Once the fuselage halves are joined, the Bombay will become a part of the whole, rather then the whole of our focus, which it's been, and rightfully so.

The enclosed shading from shadows created by real light will do much to blend in the details. That's one of the reasons why I also would have gone a little softer with the weathering.

Really looking forward to seeing how you fabricate the linkage for the Bombay doors.

Joel


Thanks to both you and Rob for the kind words. I think I have mentioned it before but it bears repeating. The best build of a 1/48 inch bomber I have ever seen is this one from Greece: an RAF Halifax Mk. II for which the F.M. kit is more like a template than a build of the kit itself.

http://www.helmo.gr/index.php?option=com_deeppockets&task=catContShow&cat=24&id=1256&Itemid=35

I did lighten up the ceiling weathering by returning to the original color - spraying the grey rattle-can primer on some newspaper and dipping the brush into that. Looks much better IMO after some dry brushing to lighten the color while retaining a "worn" look.

There is a bit more that needs to be done on the forward bulkhead. Then I do expect to put the after bulkhead in.
Redhand
#522
_VISITCOMMUNITY
New Jersey, United States
Joined: January 20, 2013
KitMaker: 1,460 posts
AeroScale: 1,443 posts
Posted: Wednesday, December 31, 2014 - 06:15 AM UTC
FORWARD BOMB BAY BULKHEAD - FINISHED!!

What's left will be added when I finish the ceiling and the left bomb bay bulkhead. For now the forward one is DONE!

Here's what it looks like:


The red arrows show the fuel transfer line connection from the front bulkhead to the "pump/transfer point" below the catwalk first step. The blue arrows show the electrical control/transmission power unit attached to the ball screw transmission for the door actuators under the catwalk - that squashed, L-shaped thing, plus wiring tieing into the main wiring system.

Compare my work to the real thing below, where I have circled the pertinent details in red.


Here's a detail shot without the arrows.


You can also see from the overall shot how I lightened and subdued the weathering in the ceiling.

Tomorrow I definitely install the rear bomb bay bulkhead.
Joel_W
Staff MemberAssociate Editor
AUTOMODELER
_VISITCOMMUNITY
New York, United States
Joined: December 04, 2010
KitMaker: 11,666 posts
AeroScale: 7,410 posts
Posted: Thursday, January 01, 2015 - 08:42 PM UTC
Brian,
Great way to finish out the year with finishing the forward bulkhead. Looks simply outstanding. Everywhere one looks and focuses on, there is an abundance of detail.
Joel
Redhand
#522
_VISITCOMMUNITY
New Jersey, United States
Joined: January 20, 2013
KitMaker: 1,460 posts
AeroScale: 1,443 posts
Posted: Saturday, January 03, 2015 - 09:21 AM UTC
AFTER BOMB BAY BULKHEAD INSTALLED

Just a couple of quick pics to show that it is really in.


As you might imagine, there was a lot of messing around trying to get everything positioned and fitting properly. However, it IS solidly glued in at this point.

I will have to reinstall the stbd. forward ball screw actuator shaft, which popped out during the above-referenced "messing around trying to get everything positioned and fitting properly," and I also have to install the two ball screw actuator shafts aft. No big deal.

Tomorrow after that's done I'll take some more pics from different angles. There is a loading diagram decal affixed to the after bulkhead radio room door facing the bomb bay, and I also put some sandpaper "non-skid" on the door sill.

Then it will be on to the port bomb-bay bulkhead, which I think will go faster. I will "amuse myself" with a different wiring layout, three more bomb racks, and two ceiling bomb bay spotlights in the after part of the bomb bay.

Folks, I'm a little pensive this evening. It's the beginning of a new year, and I have put WELL OVER a year on this already. At age 65 "the actuarial factor" is never far from the back of one's mind, in a "So many models in the stash, so little time" kind of way. It's probably fairer to say that I see so many of you completing multiple models while I am stuck on this one. I ask myself, "Is a single kit worth it?" BUT, in this case the answer for me has to be "yes." It's a build I've always wanted to make, and there is no other time than the present.

I've really appreciated the many positive comments and words of encouragement from all of you. Despite what everyone's said, I really do still consider myself an "advanced journeyman," (OK, maybe a "very advanced journeyman," ) but the bottom line is that I am building this "for myself." That is to say, for the satisfaction of really stretching my skills and trying to complete something I would never have dreamed of attempting 12-plus years ago when I started building again: a detailed model of my favorite WWII A/C in the scale of my choice.

Regardless of how good or bad the damn thing looks when finished, just getting it done will be a major accomplishment so far as I'm concerned.

Happy New Year everyone!
Dragon164
#226
_VISITCOMMUNITY
British Columbia, Canada
Joined: February 20, 2012
KitMaker: 1,909 posts
AeroScale: 508 posts
Posted: Saturday, January 03, 2015 - 10:17 AM UTC
Brian,
It looks Great! and I plan on doing the same sort of thing on at least one of mine It does not matter how long it takes as long as you like it. We should all build for ourselves.

Cheers Rob.

P.S. some of my builds can be counted by Decades.
krow113
_VISITCOMMUNITY
British Columbia, Canada
Joined: March 16, 2010
KitMaker: 473 posts
AeroScale: 101 posts
Posted: Sunday, January 04, 2015 - 06:09 AM UTC
Nice job on the bomb bay. Without the Paragon and set you used it is possible to 'fake' the side walls and still allow wing attachment. I did make my own, and included an access hole to allow a screw to pull the wing onto the fuselage. I am worried about the wings opening up , away from the fuse , on the underside as the model settles.
Redhand
#522
_VISITCOMMUNITY
New Jersey, United States
Joined: January 20, 2013
KitMaker: 1,460 posts
AeroScale: 1,443 posts
Posted: Sunday, January 04, 2015 - 06:54 AM UTC

Quoted Text

Nice job on the bomb bay. Without the Paragon and set you used it is possible to 'fake' the side walls and still allow wing attachment. I did make my own, and included an access hole to allow a screw to pull the wing onto the fuselage. I am worried about the wings opening up , away from the fuse , on the underside as the model settles.


Thanks. Actually the bomb bay set is not Paragon. It's a product from a Czech outfit called "Detail Model." See https://www.hannants.co.uk/product/DET4016


Attaching the wings IS going to be an issue. There are vertical plastic ridges, two to each side, inside the exterior fuselage outline of the wings that can, I think, serve as braces for two spar stubs extending from the fuselage into the wings. If I use hard styrene plastic for spar stubs and pin them to the fuselage, that might work. The kit easily could have been designed with something like this from the get-go, but we are talking 1977 kit design philosophy with a closed bomb bay so I am not surprised by Revell and Monogram's choices.
krow113
_VISITCOMMUNITY
British Columbia, Canada
Joined: March 16, 2010
KitMaker: 473 posts
AeroScale: 101 posts
Posted: Sunday, January 04, 2015 - 07:02 AM UTC
Yes no worries I saw the AM set you used.
My idea was to imbed a nut or threaded item in the wing then use a screw to pull the wing/fuse together. I am doing a Visible, with all the AM P/E sets , the weight starts to add up and I dont want the undercarriage to splay.Was gonna put up a bbay pic , but cant figure it out. Good to see a full on attempt , finally, on this iconic kit.
Joel_W
Staff MemberAssociate Editor
AUTOMODELER
_VISITCOMMUNITY
New York, United States
Joined: December 04, 2010
KitMaker: 11,666 posts
AeroScale: 7,410 posts
Posted: Sunday, January 04, 2015 - 07:16 AM UTC
Brian,
I guess this time of the year makes all of us somewhat melancholy. Looking back over the last year, I've actually seen myself attain a somewhat higher level of modeling skills then I once sought was possible for an eternal hacker like myself. For once, the old saying that each model is just a little better then the last one, actually does reflect my small progress.

But the reality of it is that my modest skills are nowhere near what yours are. And I accept that for what it is. It makes it possible for someone like me to really appreciate what someone like you, and for that matter Chuck can accomplish. It lets me really enjoy and appreciate your build as something special. Something that you really care about, and are capable of bringing to fruition. Perhaps that's why I've so closely followed your build from day one.

I can assure you that your "0" completion rate for 2014 far out classes my four completed models, and is held in a much higher esteem by the membership of Aeroscale. Whether you complete your life's model quest this year, or next year, I can assure that I'll be there to congratulate on a spectacular build extremely well done.

Joel
Redhand
#522
_VISITCOMMUNITY
New Jersey, United States
Joined: January 20, 2013
KitMaker: 1,460 posts
AeroScale: 1,443 posts
Posted: Sunday, January 04, 2015 - 07:25 AM UTC

Quoted Text

Good to see a full on attempt , finally, on this iconic kit.


My friend from North Carolina who helped me with the radio room detail in the ceiling has said "it would be a shame after all the work you have done on the bomb bay to neglect the wheel wells."

I dunno. That's a worse nightmare. From the real "Memphis Belle" teardown at the Air Force Museum:


I'll think about THIS after the fuselage is glued together and I'm planning the wings. This also could impact stability of the model's landing gear.
krow113
_VISITCOMMUNITY
British Columbia, Canada
Joined: March 16, 2010
KitMaker: 473 posts
AeroScale: 101 posts
Posted: Sunday, January 04, 2015 - 07:32 AM UTC
I am going with the Verlinden resin wheel struts, prolly will enhance them somehow. I think it will be difficult to get into the detail too much in the wheel wells, I cant see how to get away from the kits shallow floor. Good luck with that!
Redhand
#522
_VISITCOMMUNITY
New Jersey, United States
Joined: January 20, 2013
KitMaker: 1,460 posts
AeroScale: 1,443 posts
Posted: Sunday, January 04, 2015 - 07:59 AM UTC

Quoted Text

I cant see how to get away from the kits shallow floor. Good luck with that!


Agreed!
Redhand
#522
_VISITCOMMUNITY
New Jersey, United States
Joined: January 20, 2013
KitMaker: 1,460 posts
AeroScale: 1,443 posts
Posted: Sunday, January 04, 2015 - 08:17 AM UTC
Thank you so much for the most kind words Joel!
Redhand
#522
_VISITCOMMUNITY
New Jersey, United States
Joined: January 20, 2013
KitMaker: 1,460 posts
AeroScale: 1,443 posts
Posted: Sunday, January 04, 2015 - 08:32 AM UTC
A FEW MORE "COMPLETED" BOMB BAY PICS

As promised here are the clean-up items from the last post.

The radio room side of the after bulkhead, showing open door with bomb load diagram and "nonskid" on door step.


What may be my favorite view of the build to date, a rear shot through the open radio room door letting you see clear up to the front of the catwalk and the lens on the top step.


I really like this because it will make some of the PTA (Pain, Torture and Agony) of doing the bomb bay worthwhile. When people will look through the open radio room hatch where the deployed gun is they WILL be able to see beyond it and most of this detail will be visible in the background. It really will give a sense of depth and completeness to the model, and make people buy into the illusion that it is an accurate miniature (generically speaking, of course) of the real thing. (Of course they will think I'm crazed, too, but I don't care about that! )

Finally, here is a from-below shot of the after bomb bay showing ball screw connectors installed. I think it gives a sense of what will be seen if one views the open bomb bay from below in the to-be-completed build.


This week I will continue with the upper port side wall and ceiling. Stay tuned.
Redhand
#522
_VISITCOMMUNITY
New Jersey, United States
Joined: January 20, 2013
KitMaker: 1,460 posts
AeroScale: 1,443 posts
Posted: Sunday, January 04, 2015 - 06:24 PM UTC

Quoted Text

I am going with the Verlinden resin wheel struts, prolly will enhance them somehow.


You might want to consider SAC's white metal set.

http://www.scaleaircraftconversions.com/moreinfo.cfm?KIT=123


That's what I plan to use.
Joel_W
Staff MemberAssociate Editor
AUTOMODELER
_VISITCOMMUNITY
New York, United States
Joined: December 04, 2010
KitMaker: 11,666 posts
AeroScale: 7,410 posts
Posted: Sunday, January 04, 2015 - 08:15 PM UTC
Brian,
The completed bomb bay in the last two pictures really puts the sub assembly into the proper perspective, especially when viewed from the radio room door. I do prefer the view up from the bomb bay open doors as one can see that much more, but it's a view that won't always be available to the viewer.

As for the wheel wells, I never gave it any thought other then naturally considering that every area of your B-17F would receive the same attention to minut detail as fuselage has. The metal landing gear looks quite well detailed, and certainly strong enough to handle the extra weight from all the added details.

I don't understand the reference to "too Shallow", as the wheel well should proportionally be as deep as the top to bottom of the wing. Or is there a well insert that shallows it up?

Joel
Redhand
#522
_VISITCOMMUNITY
New Jersey, United States
Joined: January 20, 2013
KitMaker: 1,460 posts
AeroScale: 1,443 posts
Posted: Sunday, January 04, 2015 - 08:29 PM UTC
There's an insert that secures the landing gear. Later I'll post some pics from another build of this area that I think sets the standard.

As for my build and all these "details," remember this just grew like topsy once I started. I said NFW to myself about this area when I first looked at what the above-referenced builder did.
KPHB17FE
_VISITCOMMUNITY
Illinois, United States
Joined: January 12, 2015
KitMaker: 292 posts
AeroScale: 292 posts
Posted: Sunday, January 11, 2015 - 04:27 PM UTC
Hi there, I just found this page. Superb work! I am Karl Hauffe, the guy who took the photos inside the real "Memphis Belle" that you are using. Also the one of the oxygen bottles in the "Strawberry lady". Glad to see they are being put to good use ! Your attention to detail is fantastic. I always wanted to do that kind of work on the Monogram B-17, but have neither the patience or the ability. I know I am late to the game and don't know if you are interested but there are a couple little details that might interest you. On the cockpit aft sidewall, there are only five oxygen bottles, not the six you have. Also, the unit you have installed on the bulkhead over the radio operators table: That is the dynamotor and modulator for the command radio transmitters. It was originally on the right floor and not moved to the upper left bulkhead until late in the G production. The Eduard detail set would actually have you put one of these in each position, but that is not the case. Not a slam at your work! With your attention to detail, I thought you might be interested.


Here is the complete early F system:


Redhand
#522
_VISITCOMMUNITY
New Jersey, United States
Joined: January 20, 2013
KitMaker: 1,460 posts
AeroScale: 1,443 posts
Posted: Sunday, January 11, 2015 - 05:16 PM UTC
Thank you Karl. Your pics have been very helpful indeed. And I always appreciate feedback on the build. I agree it doesn't make sense to correct anything already done at this point. I accept that after 70+ years, there's always going to be ambiguity in certain interior details, particularly given the curious neglect the F model gets relative to the G (with that sexy chin turret and all).

Right now I have to re-install the pilot's seat, which popped out (a VERY frustrating occurrence, BTW) and then take some steps to make the bomb bay interior fit more snugly against the right bulkhead, so that the fuselage fits together better. The build, shall we say, is not without its frustrations.

Do you think that the F model radio room had three chairs, one port, two starboard? That's my inclination at this point. Also, what do you think about the radio room gun ammo feed? I'm inclined to go with a smallish ammo container with no belt attached feeding directly to the right side of the gun. But this is another one of those F model obscurities, especially with different configurations for the gun bracket (circular vs. U-shaped).

Thanks again for your input!!
KPHB17FE
_VISITCOMMUNITY
Illinois, United States
Joined: January 12, 2015
KitMaker: 292 posts
AeroScale: 292 posts
Posted: Sunday, January 11, 2015 - 05:50 PM UTC
The right seats were taken out according to numerous vets I have spoken to over the years (I used to tour with "Sentimental Journey" years back). And the few period photos that can bee found back this up. Makes sense, no one was concerned with comfort

As for the radio gun ammo, they started out using the small cans that only held thirty or so rounds. EDIT: I forgot to mention that from the factory, Boeing provided a metal ammo box for the radio gun. They were stored in the waist and show up as item J in the accompanying illustration. At some point in production, the F models got the wooden ammo box mounted on the upper right as in the Monogram G kit. I will try to post some photos a little later. I love this stuff and have been very fortunate to collect a lot Of B-17 information over the years including the engineering drawings. And I enjoy sharing the information.

The gun mount changed from the rectangular unit to the round one sometime later in the F production. Your airplane is early enough I think It had the rectangular one that you are building.

This illustration from the F field Service manual shows where the larger cans for the radio were stored. I can get you the dimensions if you want I think they are only a little bigger than the O-1 cans.


Here is the O-1 ammo can