

World War II
Discuss WWII and the era directly before and after the war from 1935-1949.
Discuss WWII and the era directly before and after the war from 1935-1949.
Hosted by Rowan Baylis
1/48 B-17F Build - 303rd BGs Luscious Lady
KPHB17FE

Joined: January 12, 2015
KitMaker: 292 posts
AeroScale: 292 posts
Posted: Sunday, January 11, 2015 - 06:56 PM UTC
And I know what your are saying about those seats. Trying to get them securely mounted is a challenge. I wish someone would do some aftermarket seats that actually LOOK like B-17 seats. I have asked the folks at Ultracast to do them but I guess they don't think the market is there. All of the 1/48th bombers need good seats. Anyway, beautiful work, that bomb bay is amazing. And yes, at least in the Belle, it was Neutral Gray. As was the "Strawberry lady" EDIT:(I see this website does not like the name of the B-24D at the Air Force Museum) originally and "Flak Bait", another of those details that has escaped notice.

Redhand

#522
Joined: January 20, 2013
KitMaker: 1,460 posts
AeroScale: 1,443 posts
Posted: Sunday, January 11, 2015 - 07:36 PM UTC
Quoted Text
And I know what your are saying about those seats. * * * I wish someone would do some aftermarket seats that actually LOOK like B-17 seats. I have asked the folks at Ultracast to do them but I guess they don't think the market is there.
The True Details Cockpit set for the B-17?

Joel_W
Joined: December 04, 2010
KitMaker: 11,666 posts
AeroScale: 7,410 posts
Posted: Sunday, January 11, 2015 - 07:49 PM UTC
Karl,
It's a pleasure to "meet you" here on Aeroscale, and in Brian's incrediable build. Your insight and 1st hand knowledge can only help to fine tune any ambiguous details as they pop up.
Joel
It's a pleasure to "meet you" here on Aeroscale, and in Brian's incrediable build. Your insight and 1st hand knowledge can only help to fine tune any ambiguous details as they pop up.
Joel

KPHB17FE
Joined: January 12, 2015
KitMaker: 292 posts
AeroScale: 292 posts
Posted: Sunday, January 11, 2015 - 08:09 PM UTC
The True Details Cockpit set for the B-17?[/quote]
This will come across as a bit harsh but the TD set is a total waste in my opinion. This is not the time or place to go into the faults of that thing, but suffice to say I was VERY disappointed when it came out. The seats are not even close. I saved the inverters and the hydraulic panel along with the reservoir and accumulator as usable. Also kept the oxygen bottles but they are mediocre at best. Sorry, this has been a pet peeve of mine since it came out. Here is what the seats should look like:
This will come across as a bit harsh but the TD set is a total waste in my opinion. This is not the time or place to go into the faults of that thing, but suffice to say I was VERY disappointed when it came out. The seats are not even close. I saved the inverters and the hydraulic panel along with the reservoir and accumulator as usable. Also kept the oxygen bottles but they are mediocre at best. Sorry, this has been a pet peeve of mine since it came out. Here is what the seats should look like:

Redhand
#522
Joined: January 20, 2013
KitMaker: 1,460 posts
AeroScale: 1,443 posts
Posted: Sunday, January 11, 2015 - 08:14 PM UTC
Quoted Text
The True Details Cockpit set for the B-17?
This will come across as a bit harsh but the TD set is a total waste in my opinion. This is not the time or place to go into the faults of that thing, but suffice to say I was VERY disappointed when it came out. The seats are not even close. [/quote]
Duly noted.
Redhand
#522
Joined: January 20, 2013
KitMaker: 1,460 posts
AeroScale: 1,443 posts
Posted: Monday, January 12, 2015 - 07:16 AM UTC
Quoted Text
As for the radio gun ammo, they started out using the small cans that only held thirty or so rounds. EDIT: I forgot to mention that from the factory, Boeing provided a metal ammo box for the radio gun. They were stored in the waist and show up as item J in the accompanying illustration. At some point in production, the F models got the wooden ammo box mounted on the upper right as in the Monogram G kit. * * *
The gun mount changed from the rectangular unit to the round one sometime later in the F production. Your airplane is early enough I think It had the rectangular one that you are building.
This illustration from the F field Service manual shows where the larger cans for the radio were stored. I can get you the dimensions if you want I think they are only a little bigger than the O-1 cans.
Here is the O-1 ammo can
Just saw this. Not sure which route I'll go, through probably the O-1 Can. Many thanks.
Last question for now. Were the brackets on the floor to hold the radio room Plexiglas when it was removed and the gun deployed? Ane where was it typically stored? The radioman in "Luscious Lady" told me he took it out and laid it on the floor.
KPHB17FE
Joined: January 12, 2015
KitMaker: 292 posts
AeroScale: 292 posts
Posted: Monday, January 12, 2015 - 04:41 PM UTC
I have heard the same thing from vets, just set it on the floor. As far as I know, there were no storage provisions for it. By the way, I looked up the dimensions for the Boeing ammo can (P/N 15-6999, item J in the earlier illustration) and it is 17 inches tall, 5.2 inches deep, and just under 6 inches wide (the side that is parallel to the gun). That is probably big enough to hold 100 rounds. I have an O-1 with 30 blank rounds in it and is fairly heavy. I would think wrestling one with a hundred live rounds would be a pain, might be why you see the O-1 cans being used.


Redhand
#522
Joined: January 20, 2013
KitMaker: 1,460 posts
AeroScale: 1,443 posts
Posted: Monday, January 12, 2015 - 06:50 PM UTC
Quoted Text
I have heard the same thing from vets, just set it on the floor. As far as I know, there were no storage provisions for it. By the way, I looked up the dimensions for the Boeing ammo can (P/N 15-6999, item J in the earlier illustration) and it is 17 inches tall, 5.2 inches deep, and just under 6 inches wide (the side that is parallel to the gun). That is probably big enough to hold 100 rounds. I have an O-1 with 30 blank rounds in it and is fairly heavy. I would think wrestling one with a hundred live rounds would be a pain, might be why you see the O-1 cans being used.
Heavens, you could easily write your own book on the B-17F with what you know! Seriously.
KPHB17FE
Joined: January 12, 2015
KitMaker: 292 posts
AeroScale: 292 posts
Posted: Monday, January 12, 2015 - 07:56 PM UTC
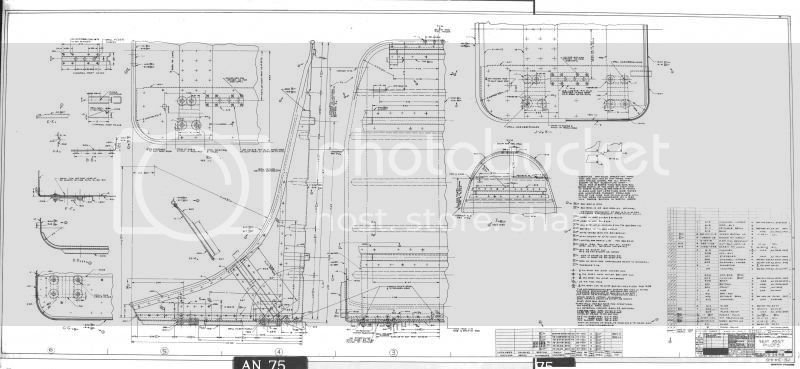
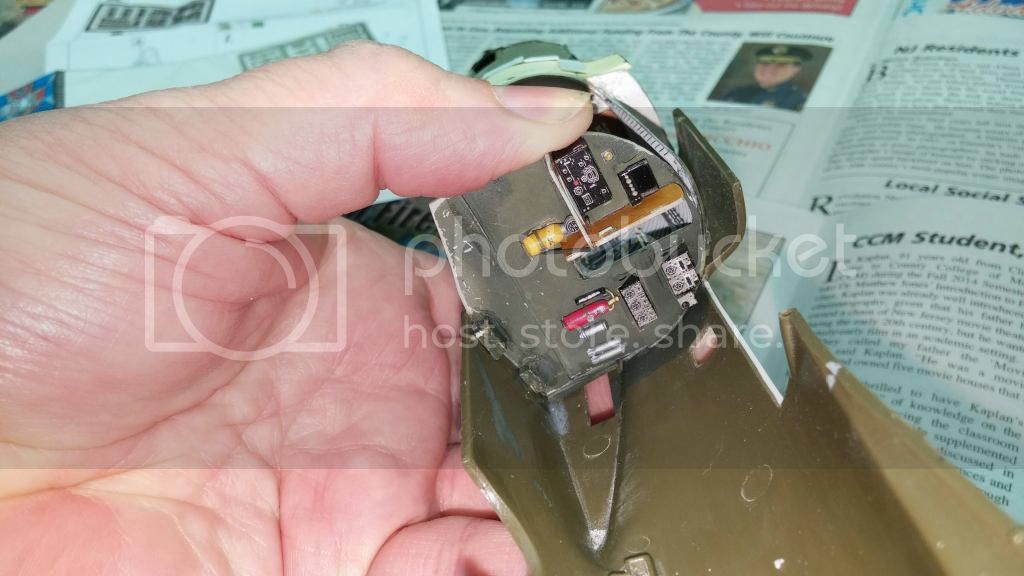
I have been looking through this thread and am blown away by the attention to detail. If you don't mind me answering a question from early on: You asked what the tube was protruding from the lower navigators compartment. That was part of an item known as a driftmeter. The position in your photos is where it was positioned in the E model. The early F's rolled out of the factory with it in the center of the airplane. In some cases the B-3 Drift Meter was replaced with the B-5 Drift Recorder but at least two mod centers (Presque and Bangor) relocated the B-3 as on the airplanes you have photos of. It was a gyroscopic instrument and the navigator could determine exactly how much the airplane was drifting off course. While all of the early F's had one of these mounted from the factory, they were usually removed.
I know this is too late to be of any use to you, but it might be of interest to others down the road. The first picture shows it installed in an E. The second shows the unit itself. There was then a tube that reached the outside of the aircraft.
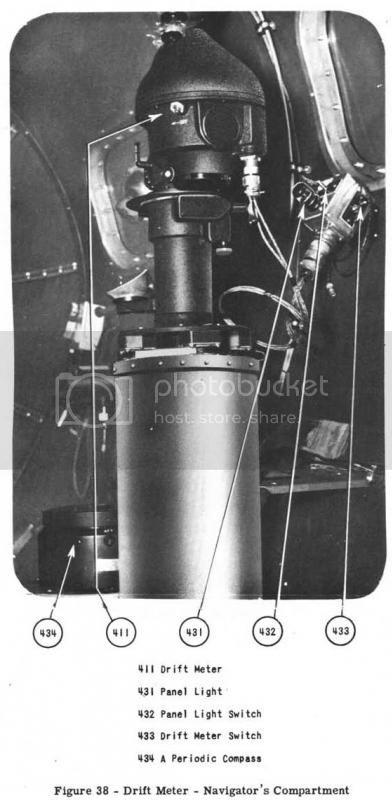

I know this is too late to be of any use to you, but it might be of interest to others down the road. The first picture shows it installed in an E. The second shows the unit itself. There was then a tube that reached the outside of the aircraft.


Redhand
#522
Joined: January 20, 2013
KitMaker: 1,460 posts
AeroScale: 1,443 posts
Posted: Monday, January 12, 2015 - 08:37 PM UTC
As I said, you could write a book * * * .
Redhand
#522
Joined: January 20, 2013
KitMaker: 1,460 posts
AeroScale: 1,443 posts
Posted: Monday, January 12, 2015 - 08:59 PM UTC
Karl:
I also think I may be able to back-fit that drift-meter.
Brian
I also think I may be able to back-fit that drift-meter.
Brian
KPHB17FE
Joined: January 12, 2015
KitMaker: 292 posts
AeroScale: 292 posts
Posted: Monday, January 12, 2015 - 09:06 PM UTC
That would be a cool little detail!
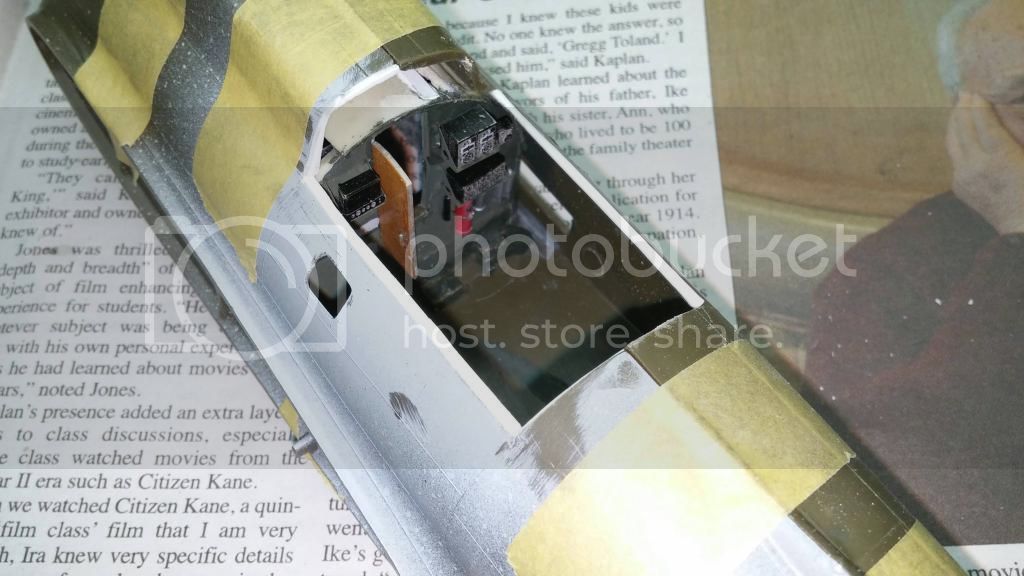
Couple of photos that might help. Notice the interior was covered with fabric. This applied to the F as well. Pieces of it show in some of the Memphis Belle photos you used earlier. I know, too late ! By the way, both of these photos are inside an E, so the bombardiers seat and floor are different. Pay no attention...
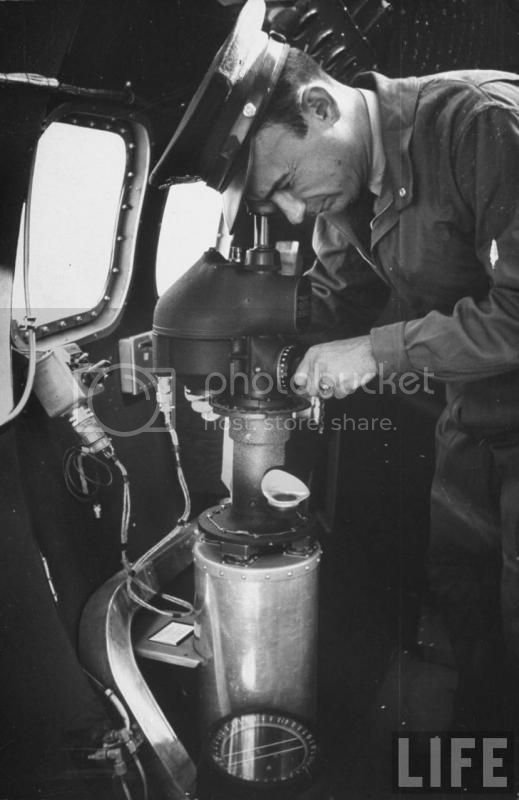

Couple of photos that might help. Notice the interior was covered with fabric. This applied to the F as well. Pieces of it show in some of the Memphis Belle photos you used earlier. I know, too late
! By the way, both of these photos are inside an E, so the bombardiers seat and floor are different. Pay no attention...

Redhand
#522
Joined: January 20, 2013
KitMaker: 1,460 posts
AeroScale: 1,443 posts
Posted: Monday, January 12, 2015 - 09:23 PM UTC
It's do-able, I think. As for the fabric sides, well, I'll chalk it up to "ambiguity" in various A/C lots.
Redhand
#522
Joined: January 20, 2013
KitMaker: 1,460 posts
AeroScale: 1,443 posts
Posted: Tuesday, January 13, 2015 - 06:04 AM UTC
WHAT'S AHEAD
Karl Hauffe's appearance on the scene adds a new dimension to this build blog IMHO. For the first time we have somebody who is a real expert on the B-17 interior (and exterior, I daresay) not only of the well-known G but of the more-famous F model I'm building and of the E's. That's a great thing for me and other builders, and will, I think, enhance this blog as a resource for other modelers.
"That's a good thing," as they say. I really look forward to his future contributions. Many of my educated guesses will now be fact checked, which I am very happy indeed about. From here on out I will signal my intentions for each space more clearly at the outset. We'll then see if my instincts are correct.
There's been a brief "work stoppage" because of some contractor repairs to the basement area where my work table is, and especially because of my day job. But I should be back at it soon. First priority is reinstalling the pilot seat, then making the starboard bomb bay bulkhead fit more snugly against the starboard fuselage. The fix there will definitely be crude, but should be effective. Then I will seek to finish the bomb bay, and go to the radio room, which presents its own challenges.
"The Plan" is to get the interior done by late Spring (say early June) and to take both fuselage halves and wings down to my friend in NC. He and I have exchanged ideas about putting two really hard plastic or metal spars under the pilots' compartment and under the radio room floor, where there really is space fore and aft to insert structural members across the fuselage that will intersect with the interior wing surface. We'll do this in conjunction with gluing the fuselage together, and if I'm really lucky, we'll have time to attach the radio room and pilots' compartment roofs and feather them in.
I am going to try and stick by the rule that if there is no chance of seeing a part of the interior, there is no point in detailing it. This will probably mean that there won't be much in the radio room ceiling, in the areas to the left and right of the ball turret, and aft of the waist gun positions. (If I was going a G with glassed in waist guns * * *). I'm not going to go crazy by opening up the crew access doors fore and aft, seeing as there is enough work as it is.
I continue to think it's a shame I don't have a better base kit to work with, but I just wasn't up for cutting the nose off a G kit and reshaping the waist windows. Those interested in such an endeavor should Google "Building a Better B-17F".
Needless to say, I wonder how all this will look when it's done. My exterior weathering skills are not very developed. (I will be asking your advice at that point). But for now i have other concerns, obviously.
Next time I post it will be to show some build progress.
KPHB17FE
Joined: January 12, 2015
KitMaker: 292 posts
AeroScale: 292 posts
Posted: Tuesday, January 13, 2015 - 06:57 AM UTC
Now, don't hang the dreaded "real expert" tag on me ! I am just an aficionado who has had the good fortune to be in the right place at the right time a couple of times, and have picked up a lot of good reference material. I am also a modeler (though not in Brian's category) so I enjoy helping out. I will do my best to assist and if I don't know, I will let you know that as well!
! I am just an aficionado who has had the good fortune to be in the right place at the right time a couple of times, and have picked up a lot of good reference material. I am also a modeler (though not in Brian's category) so I enjoy helping out. I will do my best to assist and if I don't know, I will let you know that as well!Redhand
#522
Joined: January 20, 2013
KitMaker: 1,460 posts
AeroScale: 1,443 posts
Posted: Tuesday, January 13, 2015 - 07:04 AM UTC
Quoted Text
Now, don't hang the dreaded "real expert" tag on me
Bawhawhaw!

Joel_W
Joined: December 04, 2010
KitMaker: 11,666 posts
AeroScale: 7,410 posts
Posted: Tuesday, January 13, 2015 - 08:36 PM UTC
Karle,
I'm right with Brian as labeling you a certified expert on B-17s, at least from E's through G's. I'm quite sure that you've forgotten more then I'll ever know.
I'm really not a aircraft historian, but rather a modeler with a interest in "wingy things", and cars (although I never seem to build one sine the 1970s).
So I tend to look at, and evaluate builds and detail from the modelers point of view, not so much from the historical accuracy of every detail. That's what makes following a build like Brian's so special. His unique combination of modeling skills and his knowledge of the B-17F is a special journey that I'm really enjoying.
Joel
Redhand
#522
Joined: January 20, 2013
KitMaker: 1,460 posts
AeroScale: 1,443 posts
Posted: Sunday, January 25, 2015 - 09:48 AM UTC
BACK AT IT
After some basement repairs and clutter chaos before and after a steam pipe was replaced, my worktable is finally clear and clean for a change.
I'm ready to return.
I honestly don't know how many times I have glued the pilot's seat in. It popped out and wound up slightly broken on the floor, and I have to repair and install it (again!).

I'm securing it with a large plastic cylinder glued to the floor bottom, which is virtually invisible when the seat is in. You can see I also have a broken leg to glue back on.
I will pin the bottom cylinder to the upper pilot's compartment floor lip and secure with crazy glue. I hope the blasted thing remains fixed. I simply cannot wait until the fuselage is together and the pilots' roof is on so that this is largely out of sight/out of mind. (Unless the seat detaches at that point yet again!)
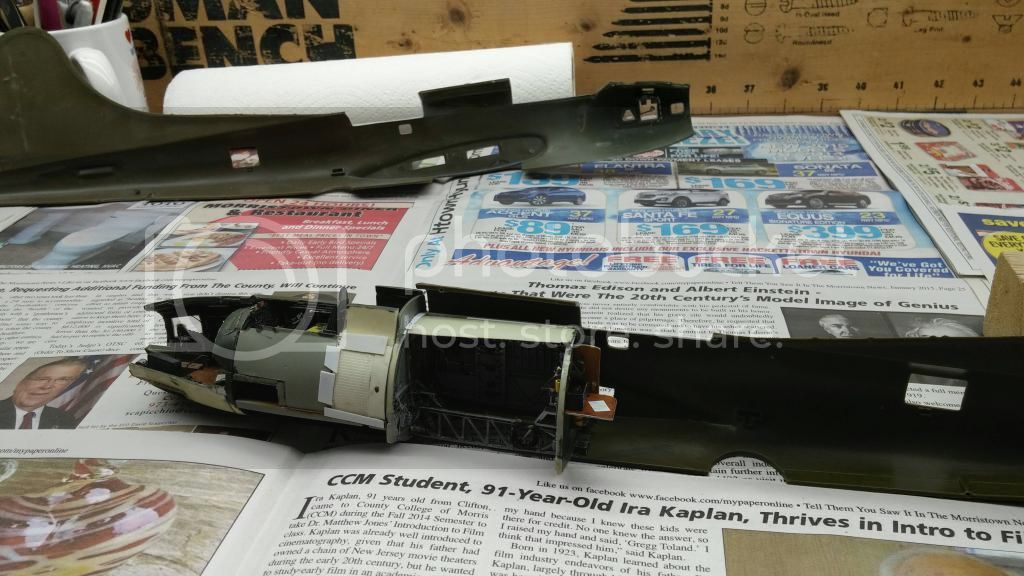
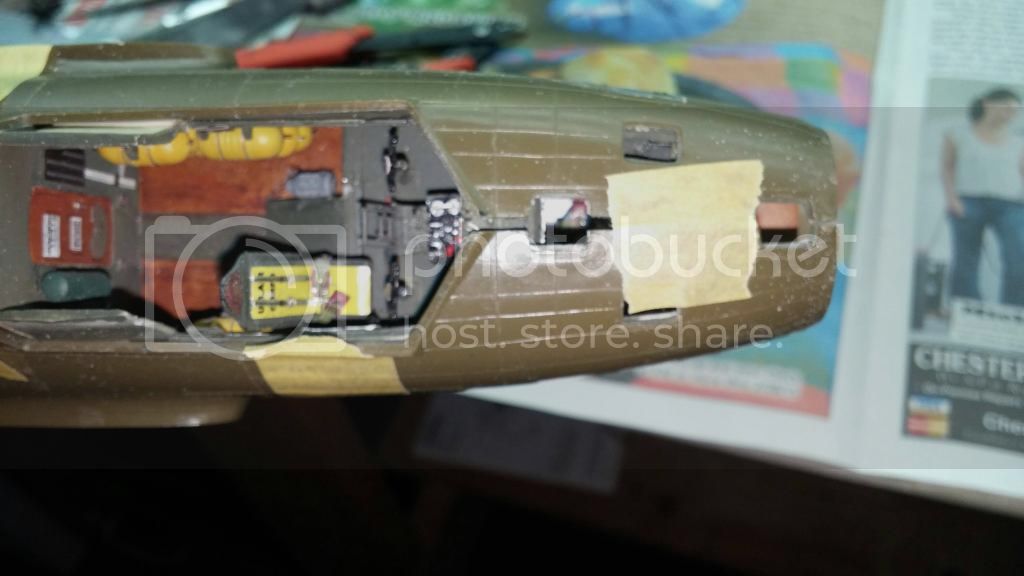
The other challenge I face is getting the starboard bomb bay wall flush with the fuselage. The first picture shows it with a gap at the top right of the forward radio room compartment.

With it this way, the fuselage doesn't fit together!
The second picture shows some finger pressure as a fix.
That's what I have to secure (with crazy glue) so that the fuselage fits together.
I can't fret about how trashy the bulkhead looks here. The stuff at the bottom will be hidden by the radio room floor. My default excuse is, "Hey, I said I was looking for a 'worn look.' This is part of the plan, of course!" But the truth is that very, very little of this will be visible through the radio room hatch, so to hell with it.
Of course, the bomb bay ceiling also has to be re-glued to the radio room bulkhead after the stbd. fuselage attachment is firm.
I think what these pictures show is just what a pain in the rear doing all these mods for a "super build" is.
Once the seat is back in and the wall is secured, I think the port bomb bay bulkhead will go fairly smoothly. (Honest!) The next challenge will then be dealing with that naked radio room bulkhead, and figuring out how many chairs I'm going to put in, how much detail to add, and where, etc. I'll be back to building a doll house again rather than a model airplane. Whatever.
After some basement repairs and clutter chaos before and after a steam pipe was replaced, my worktable is finally clear and clean for a change.
I'm ready to return.
I honestly don't know how many times I have glued the pilot's seat in. It popped out and wound up slightly broken on the floor, and I have to repair and install it (again!).
I'm securing it with a large plastic cylinder glued to the floor bottom, which is virtually invisible when the seat is in. You can see I also have a broken leg to glue back on.
I will pin the bottom cylinder to the upper pilot's compartment floor lip and secure with crazy glue. I hope the blasted thing remains fixed. I simply cannot wait until the fuselage is together and the pilots' roof is on so that this is largely out of sight/out of mind. (Unless the seat detaches at that point yet again!)
The other challenge I face is getting the starboard bomb bay wall flush with the fuselage. The first picture shows it with a gap at the top right of the forward radio room compartment.
With it this way, the fuselage doesn't fit together!
The second picture shows some finger pressure as a fix.
That's what I have to secure (with crazy glue) so that the fuselage fits together.
I can't fret about how trashy the bulkhead looks here. The stuff at the bottom will be hidden by the radio room floor. My default excuse is, "Hey, I said I was looking for a 'worn look.' This is part of the plan, of course!" But the truth is that very, very little of this will be visible through the radio room hatch, so to hell with it.
Of course, the bomb bay ceiling also has to be re-glued to the radio room bulkhead after the stbd. fuselage attachment is firm.
I think what these pictures show is just what a pain in the rear doing all these mods for a "super build" is.
Once the seat is back in and the wall is secured, I think the port bomb bay bulkhead will go fairly smoothly. (Honest!) The next challenge will then be dealing with that naked radio room bulkhead, and figuring out how many chairs I'm going to put in, how much detail to add, and where, etc. I'll be back to building a doll house again rather than a model airplane. Whatever.
Joel_W
Joined: December 04, 2010
KitMaker: 11,666 posts
AeroScale: 7,410 posts
Posted: Sunday, January 25, 2015 - 08:53 PM UTC
I rather do like your "Doll House" building. Not many modelers including yours truly can build a Doll House anywhere near the detail level of yours.
Joel
Joel
Redhand
#522
Joined: January 20, 2013
KitMaker: 1,460 posts
AeroScale: 1,443 posts
Posted: Friday, January 30, 2015 - 09:27 AM UTC
TEST FITTING
Here are some quick shots of the fuselage taped together after dealing with a number of interference issues involving the bomb bay and radio compartment:


The overall fit of the fuselage remains atrocious, even without all the innards that have been added. To get to it fit together at all tape had to be used.
The nose in particular will pose problems. This isn't due to interference, but strictly due to a crappy mold and poor fit out of the box. Egad!
I have some loose parts to glue back in and then will "build on." Can't worry about this now: "I'll go crazy if I do, and * * *

Here are some quick shots of the fuselage taped together after dealing with a number of interference issues involving the bomb bay and radio compartment:
The overall fit of the fuselage remains atrocious, even without all the innards that have been added. To get to it fit together at all tape had to be used.
The nose in particular will pose problems. This isn't due to interference, but strictly due to a crappy mold and poor fit out of the box. Egad!
I have some loose parts to glue back in and then will "build on." Can't worry about this now: "I'll go crazy if I do, and * * *
Joel_W
Joined: December 04, 2010
KitMaker: 11,666 posts
AeroScale: 7,410 posts
Posted: Friday, January 30, 2015 - 07:56 PM UTC
I sure wasn't prepared for that overall poor fit. The worst seems to be right in front of the cockpit.
Joel
Joel
Redhand
#522
Joined: January 20, 2013
KitMaker: 1,460 posts
AeroScale: 1,443 posts
Posted: Friday, January 30, 2015 - 10:18 PM UTC
Yes, will require a lot of pressure in front and maybe a styrene strip filler. "Do-able."
Joel_W
Joined: December 04, 2010
KitMaker: 11,666 posts
AeroScale: 7,410 posts
Posted: Saturday, January 31, 2015 - 09:02 PM UTC
Brian,
Certainly doable, but one would think that they would have gotten he fit a lot better to start with.
Joel
Certainly doable, but one would think that they would have gotten he fit a lot better to start with.
Joel
Redhand
#522
Joined: January 20, 2013
KitMaker: 1,460 posts
AeroScale: 1,443 posts
Posted: Saturday, January 31, 2015 - 09:13 PM UTC
It's a question of whether you want to fill in the top or the bottom with a styrene strip. If ones does a little bit of both it should look better. The gap in the fuselage above the bomb bay is equally bad.

krow113

Joined: March 16, 2010
KitMaker: 473 posts
AeroScale: 101 posts
Posted: Wednesday, February 04, 2015 - 12:14 AM UTC
That does look like an excess of gappage. Will the 'turtledeck' still fit if the fuse is widened?
Keep going!
Keep going!
 |

WEB HOSTING BY


Copyright ©2021 AeroScale and Kitmaker Network, a subsidiary of Silver Star Enterprises
All Rights Reserved. Please read our Conditions of Use and Privacy Policy.
All Rights Reserved. Please read our Conditions of Use and Privacy Policy.