World War II
Discuss WWII and the era directly before and after the war from 1935-1949.
Hosted by Rowan Baylis
1/48 B-17F Build - 303rd BGs Luscious Lady
Redhand
#522
_VISITCOMMUNITY
New Jersey, United States
Joined: January 20, 2013
KitMaker: 1,460 posts
AeroScale: 1,443 posts
Posted: Wednesday, February 04, 2015 - 12:56 AM UTC
I think so. I first built this kit (without an interior) in the 1980s. If you use a lot of external pressure after glue is applied you can "close the gaps." If I decide to insert styrene strips I will do so only after making sure the radio room and pilots' roofs fit, ditto the front windshield.

Right now I'm still, slowly messing around with re-insertion of the pilot's seat and gluing loose parts back in. Hope to start the last bomb bay sections this weekend.
AbramJ
_VISITCOMMUNITY
Arizona, United States
Joined: February 07, 2015
KitMaker: 45 posts
AeroScale: 44 posts
Posted: Saturday, February 07, 2015 - 05:03 AM UTC
This is my first post here, and I joined because of this build. Absolutely amazing work. The B-17 has been my favorite airplane since I was a child. Your build inspired me to start building airplane models again. I am currently building planes from the 303BG and have "Luscious Lady" on the list to build. I will be following your continuing build with great interest and respect. Can I contact you if I have questions or need references on my builds of 303BG aircraft?
Redhand
#522
_VISITCOMMUNITY
New Jersey, United States
Joined: January 20, 2013
KitMaker: 1,460 posts
AeroScale: 1,443 posts
Posted: Saturday, February 07, 2015 - 05:13 AM UTC
Of course. Thanks for the compliments. I am humbled by them.
Joel_W
Staff MemberAssociate Editor
AUTOMODELER
_VISITCOMMUNITY
New York, United States
Joined: December 04, 2010
KitMaker: 11,666 posts
AeroScale: 7,410 posts
Posted: Saturday, February 07, 2015 - 08:07 PM UTC

Quoted Text

This is my first post here, and I joined because of this build. Absolutely amazing work. The B-17 has been my favorite airplane since I was a child. Your build inspired me to start building airplane models again. I am currently building planes from the 303BG and have "Luscious Lady" on the list to build. I will be following your continuing build with great interest and respect. Can I contact you if I have questions or need references on my builds of 303BG aircraft?


Abram,
Welcome to Aeroscale. You're going to really like it here. Why not start a build blog of your current build, it's the best way to get advice and or suggestions.
Joel
Redhand
#522
_VISITCOMMUNITY
New Jersey, United States
Joined: January 20, 2013
KitMaker: 1,460 posts
AeroScale: 1,443 posts
Posted: Sunday, February 08, 2015 - 07:46 AM UTC
GOING BACKWARDS

Much as I have sought to avoid it, I must return to the cockpit and re-install new pilots' seats. The slanted outside "basement doors" assembly popped out so both seats were out of the cockpit, and in looking the whole sub assembly over I decided it just looked too trashy with the accumulated re-gluings, etc. So I am going to scratch build a new one with due regard for all the problems I have had here, and then carefully cut, position and pin the legs on the sides of the doors so that I will have rock solid seats.

The last thing in the world I want is to get this damn thing done (in my dreams) and then have a loose seat jiggling around in the cockpit of a completed model with an enclosed cockpit and roof.

I also think that with all the fuselage holding and shaking as the work continues it's inevitable the seat will pop out again if loosely glued in. It's already happened twice while working on the bomb bay.

As Ripley puts it:


Maybe the re-do with "how-to" pics be a cautionary tale for those crazy enough to "follow in my footsteps."

I'm going to start with the basement doors. That, I think, will be straightforward.

Thearmorer
_VISITCOMMUNITY
Alabama, United States
Joined: June 17, 2014
KitMaker: 121 posts
AeroScale: 118 posts
Posted: Sunday, February 08, 2015 - 07:57 AM UTC
Brian,
I feel your pain. More than one project of mine has succumbed to one tweak to many. Press on my friend.
KPHB17FE
_VISITCOMMUNITY
Illinois, United States
Joined: January 12, 2015
KitMaker: 292 posts
AeroScale: 292 posts
Posted: Sunday, February 08, 2015 - 06:48 PM UTC
While we know the inboard seat legs are mounted to the top of the hatch side walls, perhaps you could make the legs long enough to glue to the side of those. I think it would make them a little more secure. And it would be out of sight so no one would know but your friends here !
Redhand
#522
_VISITCOMMUNITY
New Jersey, United States
Joined: January 20, 2013
KitMaker: 1,460 posts
AeroScale: 1,443 posts
Posted: Sunday, February 08, 2015 - 07:30 PM UTC
Yes, that is the plan. I came to the same conclusion on a start-over basis. I will also add a strip of styrene to each inner leg ending on the top edge of the doors so it looks like the leg ends there. The width of the "basement doors" will also have to be adjusted so the seats center behind the control columns.

At some point soon I will also insert something in the nose intended to represent a drift meter.

BTW, where was this gear in the G model?

Thx.

Brian
Joel_W
Staff MemberAssociate Editor
AUTOMODELER
_VISITCOMMUNITY
New York, United States
Joined: December 04, 2010
KitMaker: 11,666 posts
AeroScale: 7,410 posts
Posted: Sunday, February 08, 2015 - 08:32 PM UTC
Brian,
Often I've run into situations where parts I left off till later or last in the build, just never securely attach, and eventually come off. I've opted for a simple method of drilling a hole both the mating surfaces to snuggly accept a steel pin. The pin is CA glued to in this case the seat leg, then glued into the hole. When dry it's never coming loose.

The thought of having a seat or some piece in your interior come loose and ruin the entire effect of the build in that area must be a nightmare.

Joel
Thearmorer
_VISITCOMMUNITY
Alabama, United States
Joined: June 17, 2014
KitMaker: 121 posts
AeroScale: 118 posts
Posted: Sunday, February 08, 2015 - 08:57 PM UTC
Brian,
I found these photos online, they may provide a clue to the driftmeter question. The item on the bracket aft of the .50 looks a lot like the ocular optics and calculator portion of the meter.


The tubular item in the canvas covering is approximately the right size and diameter for the tube portion of the meter.


Circumstantial evidence makes sense, their in the right location for navigator use, and are out of the way when not in use. Of course this is all guess work and supposition, but it might put you on the right track. As always, I'll defer to the B-17 experts.
DR
KPHB17FE
_VISITCOMMUNITY
Illinois, United States
Joined: January 12, 2015
KitMaker: 292 posts
AeroScale: 292 posts
Posted: Monday, February 09, 2015 - 08:25 AM UTC
The B-3 driftmeter was replaced by the B-5 drift recorder (as shown in your color interior photo of the G). Two very different instruments but essentially doing the same job. You will find a mix of drift meters and drift recorders during the change over. It seems to have been affected by the particular modification center they went through. The Memphis Belle and a number of other early F's had a drift recorder on the left side. The drift meter was installed in the center of the airplane from the factory but you will not find many photos showing that installation. It was either moved to the right as on your bird or replaced.

Both of the pictures from dmiller are of a G so the driftmeter was not (USUALLY! I have seen a few exceptions) installed in the G's. The canvas covered items in the second picture look to be the late war walk
around oxygen bottles. Kind of a strange look in that one.

B-5 Drift Recorder:

Redhand
#522
_VISITCOMMUNITY
New Jersey, United States
Joined: January 20, 2013
KitMaker: 1,460 posts
AeroScale: 1,443 posts
Posted: Wednesday, February 11, 2015 - 09:36 PM UTC
"BASEMENT DOORS" REDUX

Work is proceeding at a snail's pace (due to the infuriating need to earn a living) but I would rather you see that something is being done than wonder if I went on to greener pastures.

The unpainted hatch was a snap to fabricate out of styrene sheet and stock.


As for seat placement, I think I will try doing this the "right way" by pinning the inner seat legs to the top of the door coamings. Off to the right in the above pic the old copilot seat is rock solid pinned to the old basement doors, as you can see. This should be do-able with the new sub-assembly, with careful measuring and drilling.

This time I think I'll try these seatbelts in the cockpit.


You'll get a mini product review when I do.

More soon I hope.
KPHB17FE
_VISITCOMMUNITY
Illinois, United States
Joined: January 12, 2015
KitMaker: 292 posts
AeroScale: 292 posts
Posted: Thursday, February 12, 2015 - 06:15 AM UTC
Interesting detail: Boeing did not put shoulder harnesses in the B-17. Have no idea why. The IPC only shows the lap belts and the pilots manual never mentions them. Consolidated did put them in the B-24.

B-17 seat photo Seat.jpg
Redhand
#522
_VISITCOMMUNITY
New Jersey, United States
Joined: January 20, 2013
KitMaker: 1,460 posts
AeroScale: 1,443 posts
Posted: Thursday, February 12, 2015 - 06:29 AM UTC
Hummmm. You may be right. Check out this training film.

https://www.youtube.com/watch?v=vOl5YpFVGYU

Looks like the over-the-shoulder straps are part of the pilots' parachute harnesses. I think they wore clip on-chest packs for the chutes.

Makes me wonder if I should substitute some different resin seats that are closer to the diagram you posted.
Redhand
#522
_VISITCOMMUNITY
New Jersey, United States
Joined: January 20, 2013
KitMaker: 1,460 posts
AeroScale: 1,443 posts
Posted: Thursday, February 12, 2015 - 07:05 AM UTC
Karl:

How does that old saying go: be careful what you wish for?

Your post convinces me that for the F version I'm better off going with the despised "True Details" pilots' seats and the kit plastic legs, plus aftermarket lap-belts. I am pretty sure that early F models did not have that extra armor plate behind the pilots' heads visible in many G photos.

The short seats will also make more of the top turret visible inside.

BTW, my "source" for the four oxygen bottles in the pilots' side of the cockpit is this Boeing drawing.


It sure does look to me like the bottles are stacked pretty high up on the left: hence my decision to go with four: if I'm wrong, call it artistic license.

Finally, this re-think of the seats shows me there is a silver lining in a redo of this sub-assembly.
KPHB17FE
_VISITCOMMUNITY
Illinois, United States
Joined: January 12, 2015
KitMaker: 292 posts
AeroScale: 292 posts
Posted: Thursday, February 12, 2015 - 07:56 PM UTC
That Boeing drawing is an artists interpretation, that whole set of drawings has errors. Some of it is right, some of it is wrong. All B-17F's had the armor plate... As did the E's. And I have to retract the statement about the shoulder harness. While it does not show in the IPC, I did find them in Boeing Field Service Manual. Does not give a part number or an installation number, just the government number for the harness. Apparently added on at some point. Just shows one can not completely rely on the IPC. It never fails, as soon as I am convinced of something I prove myself wrong. Ah well, keep on learning!

Here is the profile of part of the cockpit showing the forward oxygen bottle installation among other things.


Fwd O2 Profile photo FwdO2Profile_zps44d8e450.jpg
Redhand
#522
_VISITCOMMUNITY
New Jersey, United States
Joined: January 20, 2013
KitMaker: 1,460 posts
AeroScale: 1,443 posts
Posted: Friday, February 13, 2015 - 09:05 AM UTC
PUTTING YOU IN THE PILOT SEAT (FIGURATIVELY SPEAKING)

This is more minutiae, I admit, but I do want you to see that I'ze workin' on it.

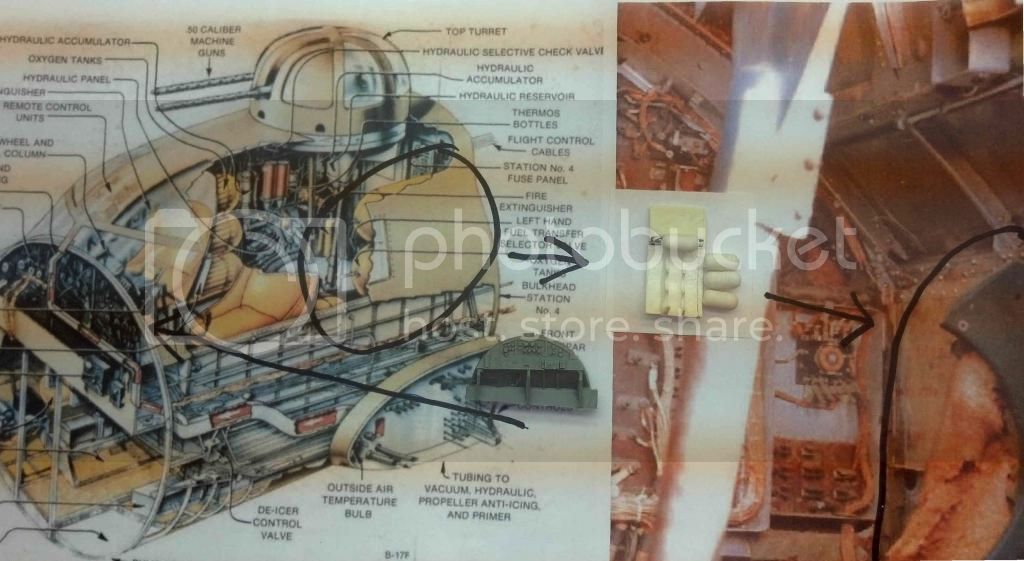
The first shot shows you how I have tackled fixing the seat legs to the hatch top. The drill holes and pins are noticeable on both legs, extending into the hatch body. THAT should fix this sucker!


The biggest question I have now is what seats to use. MAYBE the kit parts are appropriate for a late model B-17G - I read something in an interesting online article, http://ancientlights.org/fifteenth.html, where in late 1944 B-24 pilots' seats were pulled out and replaced with heavily armored "coffin seats," and there's this on a WWII discussion board:

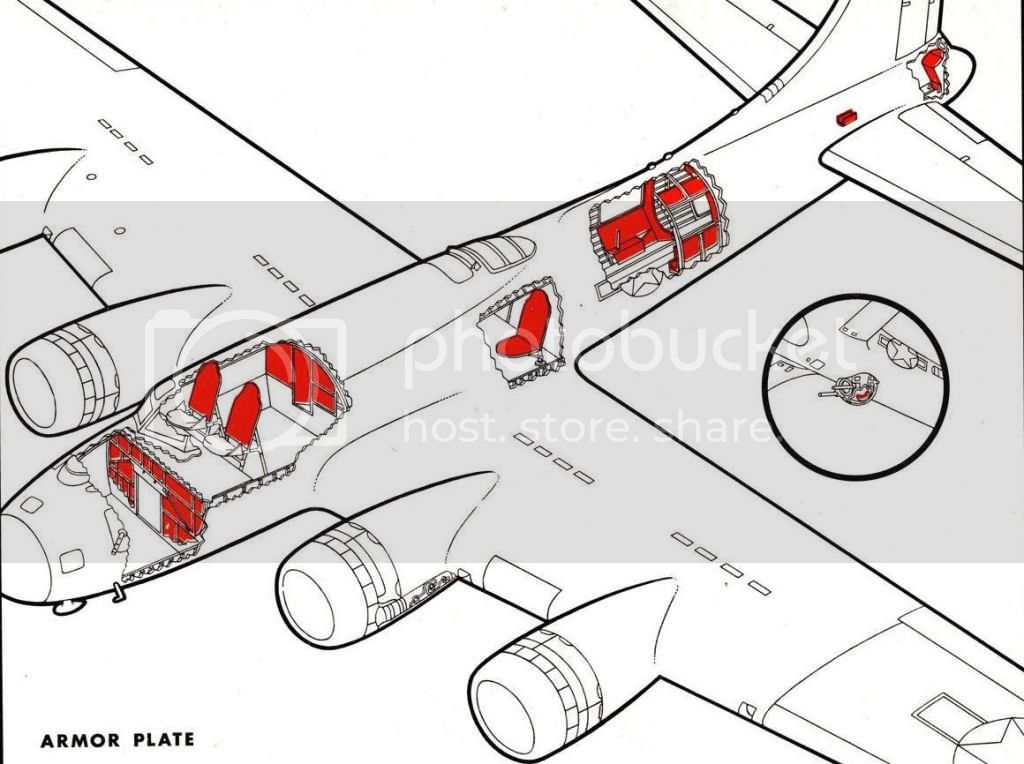
Armor for pilots of American heavy bombers: http://www.ww2aircraft.net/forum/aviation/armor-pilots-american-heavy-bombers-37151.html, "yes, certainly on the B-17G and later blocks of the B-24, the whole seat back and head are was covered by armour plate, along with applique external armour in some cases."

See also below diagram:


But I've seen enough pictures of B-17s without the back armor to think that it's possible in 1943 (the time of my build) there was just the aluminum seat still.

So, what to use? In my view the chief defect in the True Details seats is that the back is too damn short. See below, and of course Karl's more definitive diagram posted earlier).


BTW, there is no such "kit part" per that diagram, at least in 1/48 scale. If there was, I wouldn't be talking about this: since I've accumulated a number of the True Details sets (hang the expense for this one!) I think it might be possible to make the seat back higher by cutting part of the back off of one and grafting it into the middle of another to get better height.


I'm going to sacrifice two really sub-par white resin ones I have to see if it works. Tiny styrene bars can be added to the seat back to give it a more realistic appearance.

I'll decide later whether to add an armored head rest. Haven't thought that through yet.
Joel_W
Staff MemberAssociate Editor
AUTOMODELER
_VISITCOMMUNITY
New York, United States
Joined: December 04, 2010
KitMaker: 11,666 posts
AeroScale: 7,410 posts
Posted: Friday, February 13, 2015 - 07:58 PM UTC
Brian,
Looking at those three seats, the 1st two resin ones both have backs that look too short and too wide. Heck, the one on the left looks more like the old style of movie theater seats we sat in as kids in the late 60's, while the one on the right looks like those metal fold up chairs. The 3rd seat looks bout right in height and shape.

Joel
Redhand
#522
_VISITCOMMUNITY
New Jersey, United States
Joined: January 20, 2013
KitMaker: 1,460 posts
AeroScale: 1,443 posts
Posted: Friday, February 13, 2015 - 08:08 PM UTC

Quoted Text

Brian,
Looking at those three seats, the 1st two resin ones both have backs that look too short and too wide. Heck, the one on the left looks more like the old style of movie theater seats we sat in as kids in the late 60's, while the one on the right looks like those metal fold up chairs. The 3rd seat looks bout right in height and shape.

Joel


I think I can work with them. I'm going to install the other set of inner legs on the "basement doors" today and clean those parts up a bit, then experiment with the seats.
KPHB17FE
_VISITCOMMUNITY
Illinois, United States
Joined: January 12, 2015
KitMaker: 292 posts
AeroScale: 292 posts
Posted: Saturday, February 14, 2015 - 09:19 PM UTC
In the "for what it's worth department" the part number for the pilot's seat remained the same through the E, F, and G. This is from the engineering drawings. The B-17 never had (at least from the factory) an armored seat like the late B-25's.
Redhand
#522
_VISITCOMMUNITY
New Jersey, United States
Joined: January 20, 2013
KitMaker: 1,460 posts
AeroScale: 1,443 posts
Posted: Saturday, February 14, 2015 - 09:29 PM UTC

Quoted Text

In the "for what it's worth department" the part number for the pilot's seat remained the same through the E, F, and G. This is from the engineering drawings. The B-17 never had (at least from the factory) an armored seat like the late B-25's.


I see this 1945 photo


illustrating what you say. The edges of the seats extend past the armor plate. The question for me is whether I add the armor plate to this build after I modify the TD seats to get a better height.
KPHB17FE
_VISITCOMMUNITY
Illinois, United States
Joined: January 12, 2015
KitMaker: 292 posts
AeroScale: 292 posts
Posted: Saturday, February 14, 2015 - 09:39 PM UTC
Here is the drawing for the seat armor. I know it says for the G (mid Block 20) but the early G and F was essentially the same.

Pilots seat armor photo 611597ArmorAssySeatBackcropped_zps721547af.jpg
KPHB17FE
_VISITCOMMUNITY
Illinois, United States
Joined: January 12, 2015
KitMaker: 292 posts
AeroScale: 292 posts
Posted: Saturday, February 14, 2015 - 10:05 PM UTC
This is the F seat armor. Library is closed today so I just took a photo of it off my reader. There are some differences including the lack of that little side piece (which I don't see a lot to be gained by!) and a little more symmetrical.

F seat armor photo Fseatarmor_zps0c7391d7.jpg
Redhand
#522
_VISITCOMMUNITY
New Jersey, United States
Joined: January 20, 2013
KitMaker: 1,460 posts
AeroScale: 1,443 posts
Posted: Saturday, February 14, 2015 - 10:54 PM UTC
Thanks! Provides a pretty decent template.
Joel_W
Staff MemberAssociate Editor
AUTOMODELER
_VISITCOMMUNITY
New York, United States
Joined: December 04, 2010
KitMaker: 11,666 posts
AeroScale: 7,410 posts
Posted: Sunday, February 15, 2015 - 08:04 PM UTC
Karl,
The extent of your reference material is simply amazing.
Joel