World War II
Discuss WWII and the era directly before and after the war from 1935-1949.
Hosted by Rowan Baylis
1/48 B-17F Build - 303rd BGs Luscious Lady
Redhand
#522
_VISITCOMMUNITY
New Jersey, United States
Joined: January 20, 2013
KitMaker: 1,460 posts
AeroScale: 1,443 posts
Posted: Sunday, February 15, 2015 - 08:14 PM UTC

Quoted Text

Karl,
The extent of your reference material is simply amazing.
Joel


Yes it is. Truly great stuff Karl. I think I know enough now so that doing the seats right won't be trying to hit a moving target. Thanks again, Karl.
Redhand
#522
_VISITCOMMUNITY
New Jersey, United States
Joined: January 20, 2013
KitMaker: 1,460 posts
AeroScale: 1,443 posts
Posted: Wednesday, February 18, 2015 - 08:52 AM UTC
SEAT MODIFICATIONS

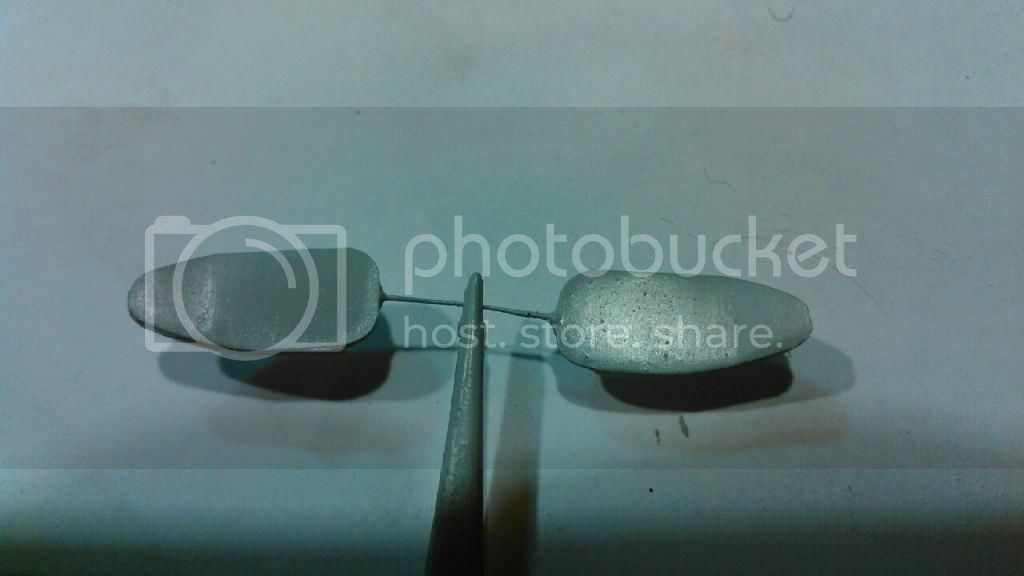
I found a bit of time to start modifying the True Details pilots' seats. It has proved fairly easy, since the main thing necessary to achieve a better look is lengthening the seat backs.


As you can see, all I did was cut the top off with a razor saw, and insert a piece of styrene sheet in between. I may or may not add ribs to the seat back at this point. This is because I will be adding a seat cushion on the seat back -- just a piece of sheet styrene with rounded edges, and the ribs would be all but invisible.

I expect to paint both the back and seat cushons yellow chromate green to match the Eduard brass. You can get a sense how this will look below, using the brass pried off the old seats.

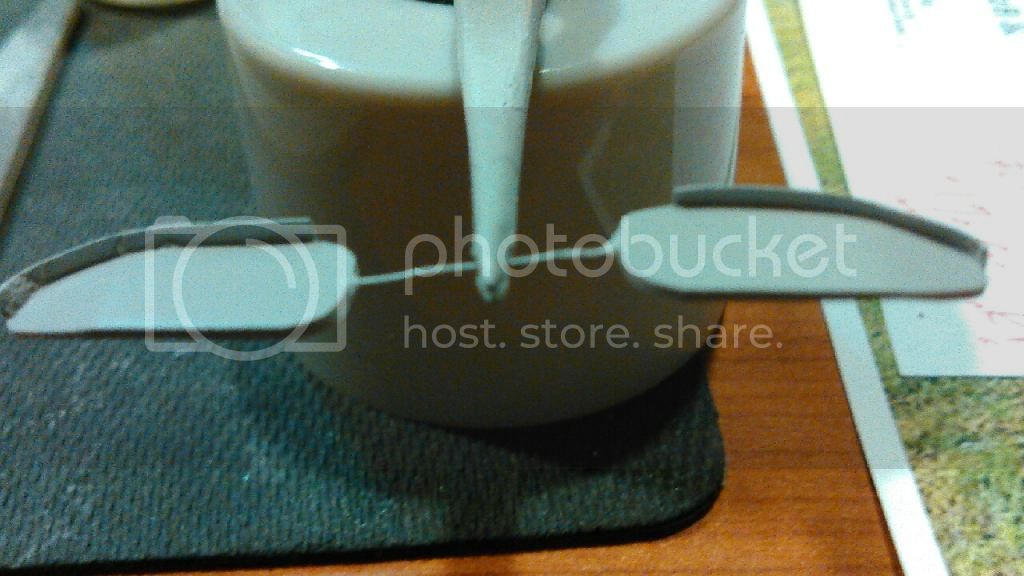
I haven't decided yet whether I will add shoulder belts. Depends on whether I see photographic evidence of their installation in an F model.


I do plan to make armor plate out of styrene sheet, using Karl's posted drawing as a pattern. I'm going to take a guess that there were no head rests above the seats, just bare metal.

Although my day job is slowing me to a crawl, I'm pleased with how the seats are coming along. I think it will be a significant improvement over what was there before. From the first photo you can compare the kit seat off to the right, and see the secured, inner chair legs on the "basement doors" off to the left.

Later Folks.


KPHB17FE
_VISITCOMMUNITY
Illinois, United States
Joined: January 12, 2015
KitMaker: 292 posts
AeroScale: 292 posts
Posted: Thursday, February 19, 2015 - 04:18 AM UTC
That simple mod improved the looks quite a bit! Just another note to confuse the shoulder harness question: I asked Bob Shoens, a 100th BG pilot (flew "Our Gal Sal", it was his crew that named her) about them and he has no recollection of shoulder harnesses. He is darn sharp and remembers a lot... FWIW
Redhand
#522
_VISITCOMMUNITY
New Jersey, United States
Joined: January 20, 2013
KitMaker: 1,460 posts
AeroScale: 1,443 posts
Posted: Thursday, February 19, 2015 - 04:35 AM UTC

Quoted Text

That simple mod improved the looks quite a bit! Just another note to confuse the shoulder harness question: I asked Bob Shoens, a 100th BG pilot (flew "Our Gal Sal", it was his crew that named her) about them and he has no recollection of shoulder harnesses. He is darn sharp and remembers a lot... FWIW


That kind of settles it for me. No shoulder harnesses.

Now that I've figured out where I'm going with this, I look forward to getting it done. I agree that this mod will make the seats look much more like they should. They are at least "in the ballpark."
Redhand
#522
_VISITCOMMUNITY
New Jersey, United States
Joined: January 20, 2013
KitMaker: 1,460 posts
AeroScale: 1,443 posts
Posted: Sunday, February 22, 2015 - 12:56 AM UTC
CLOSE ENOUGH FOR GOVERNMENT WORK

By no means 100% accurate, but the seat cushons say "U.S. Air Corps" so it's "close enough for government work" and works for me. Better than the TD seats and the kit seats, and sufficient for views into a closed cockpit. I do think it's an adequate "representation" of the real thing.


I need to touch up the seat fronts and sides with bronze green, and add the lap belts, then make the armor plate for the backs, and carefully glue everything back together for insertion back into the cockpit.

Then, "back to the future," i.e. a return to the bomb bay before I was so rudely interrupted.
Joel_W
Staff MemberAssociate Editor
AUTOMODELER
_VISITCOMMUNITY
New York, United States
Joined: December 04, 2010
KitMaker: 11,666 posts
AeroScale: 7,410 posts
Posted: Sunday, February 22, 2015 - 01:40 AM UTC
Brian,
Excellent especially for gov't work. Don't forget to add a wash or two as those cushions are on the bright side.
Joel
Redhand
#522
_VISITCOMMUNITY
New Jersey, United States
Joined: January 20, 2013
KitMaker: 1,460 posts
AeroScale: 1,443 posts
Posted: Sunday, February 22, 2015 - 03:36 AM UTC

Quoted Text

Brian,
Excellent especially for gov't work. Don't forget to add a wash or two as those cushions are on the bright side.
Joel


That thought crossed my mind. Burnt umber?
Joel_W
Staff MemberAssociate Editor
AUTOMODELER
_VISITCOMMUNITY
New York, United States
Joined: December 04, 2010
KitMaker: 11,666 posts
AeroScale: 7,410 posts
Posted: Sunday, February 22, 2015 - 03:48 AM UTC

Quoted Text


Quoted Text

Brian,
Excellent especially for gov't work. Don't forget to add a wash or two as those cushions are on the bright side.
Joel


That thought crossed my mind. Burnt umber?


Brian,
Either Burnt or Raw Umber, Even Raw Sienna, but not black.
Joel
Redhand
#522
_VISITCOMMUNITY
New Jersey, United States
Joined: January 20, 2013
KitMaker: 1,460 posts
AeroScale: 1,443 posts
Posted: Friday, February 27, 2015 - 11:48 AM UTC
HAVE A SEAT, OR TWO

My day job is taking up way too much of my time lately, but I did get the seats done. Here are two views.


I'm happy with how they came out, even if the weathering is a bit spotty. They are definitely better than the first effort; hell they really look like B-17 seats!! That's pretty rare in any scale, as we now know.

I should have some time over the weekend to start measuring and cutting armor plate using Karl's excellent resource material. It will be soooooooooo cool to have the cockpit looking this much better when everything is done and glued back in.

One small step at a time, folks.
Joel_W
Staff MemberAssociate Editor
AUTOMODELER
_VISITCOMMUNITY
New York, United States
Joined: December 04, 2010
KitMaker: 11,666 posts
AeroScale: 7,410 posts
Posted: Friday, February 27, 2015 - 07:15 PM UTC
Brian,
Nicely done on those two seats. Actually, the staining effect of the weathering really looks quite good.

Day jobs certainly have a real nasty way of interfering with one's personal life. One reason I semi retired, and work still manages to do that on a rather consistent basis. 1 year 7 months to go for full retirement. Gee, I wonder why my wife isn't looking forward to that

Joel
Redhand
#522
_VISITCOMMUNITY
New Jersey, United States
Joined: January 20, 2013
KitMaker: 1,460 posts
AeroScale: 1,443 posts
Posted: Friday, February 27, 2015 - 07:55 PM UTC

Quoted Text

Brian,
Nicely done on those two seats. Actually, the staining effect of the weathering really looks quite good.


Thanks. What would have been better would be decent resin seats and separate cushions with little decals. But I came close enough I think.

At 65 I have never worked harder in my life, I think. Seven, count em, seven immigration clients to see in one capacity or another today. And I'll expire in the saddle one day: mon destin as others here would say.

I sprang for Mike West's A-17A and SOC-3 kits in a great sale he has going on now. Would love to do the latter in a blue-grey/light grey scheme. Also ran across this obscure A-17A derivative gem:


http://www.aviationmegastore.com/douglas-db8a-3n-g48-004-geromy-g48-004-netherlands-military/product/?shopid=LH354f004c7c8e279ba2facdd4aa&action=prodinfo&parent_id=212&art=94812

But the Price, and Shipping Cost from that place!! I dunno.

A shame I have such a soft spot for doomed air forces and lost causes, but the Dutch are irresistible ever since I first saw Tamiya's Buffalo way back when.
AbramJ
_VISITCOMMUNITY
Arizona, United States
Joined: February 07, 2015
KitMaker: 45 posts
AeroScale: 44 posts
Posted: Friday, February 27, 2015 - 08:02 PM UTC
Excellent work Brian, the seats look great!
Joel_W
Staff MemberAssociate Editor
AUTOMODELER
_VISITCOMMUNITY
New York, United States
Joined: December 04, 2010
KitMaker: 11,666 posts
AeroScale: 7,410 posts
Posted: Friday, February 27, 2015 - 09:40 PM UTC
Brian,
Well, your work load today should effectively kill any hopes of modeling by the time you drag yourself home. I'm doing the closing shift and won't get home till close to midnight. Lucky me.

Sure seems to me that as we get older, the work load get proportionally heavier.

Nice finds. Doesn't look seem so expensive considering todays 1/48 scale jets kits are going for $75-100 plus these days. Good thing their only molded pieces of plastic.

Stop worrying about the seats, they look great up close and personal. Besides, they'll only be viewed from 1/48 scale cockpit windows.

Joel
Redhand
#522
_VISITCOMMUNITY
New Jersey, United States
Joined: January 20, 2013
KitMaker: 1,460 posts
AeroScale: 1,443 posts
Posted: Saturday, March 07, 2015 - 07:59 AM UTC
SEAT ARMOR (FROM A FRIEND)

My modeling friend from North Carolina -- the same who helped me with the radio room hatch detail -- kindly offered to scale down Karl's pilot seat armor drawings to 1/48 using a modeling tool known as a "Murphy's Ruler" (See http://www.ebay.com/itm/Scale-Ruler-For-Modelers-in-O-Scale-1-48-/140546421865). That way I'd have a scale template to work off of. THEN he offered to make the parts himself and send them to me "for the cause!"

I jumped at the offer since, to tell you the truth, I wasn't looking forward to "rolling my own": just another task in this endless build. The parts are in the mail to me now, and here are some advance shots:


I'm looking forward to "what the postman brought today," doing a light cleanup, and getting the blasted seats back in.

While waiting I am returning to the bomb bay and should have some progress shots ready to post after the weekend.
KPHB17FE
_VISITCOMMUNITY
Illinois, United States
Joined: January 12, 2015
KitMaker: 292 posts
AeroScale: 292 posts
Posted: Saturday, March 07, 2015 - 04:52 PM UTC
Those look great! Very nice addition to your amazing build.
Redhand
#522
_VISITCOMMUNITY
New Jersey, United States
Joined: January 20, 2013
KitMaker: 1,460 posts
AeroScale: 1,443 posts
Posted: Saturday, March 07, 2015 - 05:20 PM UTC

Quoted Text

Those look great! Very nice addition to your amazing build.


The friend, who is a great modeler, hand casts his own resin kits, many of which find their way into the market through a Czech company. I'm lucky to have his help on this project.
Redhand
#522
_VISITCOMMUNITY
New Jersey, United States
Joined: January 20, 2013
KitMaker: 1,460 posts
AeroScale: 1,443 posts
Posted: Sunday, March 08, 2015 - 05:38 AM UTC
BACK TO THE BOMB BAY

The pace will be slow, but to break down just how easy most of this "exotic scratchbuilding" is, and how easily it falls within the reach of those with basic modeling skills, I'm going to document step-by-step detailing of the port side curved bulkhead pictured below, beginning with the wiring and piping, and the two bulkhead boxes at the forward end of the bulkhead.

Hint: The two styrene strips will become the boxes.

Joel_W
Staff MemberAssociate Editor
AUTOMODELER
_VISITCOMMUNITY
New York, United States
Joined: December 04, 2010
KitMaker: 11,666 posts
AeroScale: 7,410 posts
Posted: Sunday, March 08, 2015 - 06:29 AM UTC
Brian,
The link item has been removed.

Your friend's work is outstanding as usual. Those armor seat backs really look the part.

You know that I'll be following your detailing 101 short course for sure.

Joel
Redhand
#522
_VISITCOMMUNITY
New Jersey, United States
Joined: January 20, 2013
KitMaker: 1,460 posts
AeroScale: 1,443 posts
Posted: Sunday, March 08, 2015 - 07:17 AM UTC

Quoted Text

Brian,
The link item has been removed.

Joel


I am not sure what this refers to, Joel.
Thearmorer
_VISITCOMMUNITY
Alabama, United States
Joined: June 17, 2014
KitMaker: 121 posts
AeroScale: 118 posts
Posted: Sunday, March 08, 2015 - 07:27 AM UTC
Brian,
I think Joel is referring to the ebay link from the 7th. I gave it a shot yesterday and it said it was closed, or something to that effect.
DR
Redhand
#522
_VISITCOMMUNITY
New Jersey, United States
Joined: January 20, 2013
KitMaker: 1,460 posts
AeroScale: 1,443 posts
Posted: Sunday, March 08, 2015 - 07:39 AM UTC
Oh, OK. I've only recently learned about these items. I also learned that 1/48 is "O" scale in model railroads. I saw that Tamiya makes them, but I think one has to order overseas. They come in a variety of materials -- metal, plastic, laminated paper.
Thearmorer
_VISITCOMMUNITY
Alabama, United States
Joined: June 17, 2014
KitMaker: 121 posts
AeroScale: 118 posts
Posted: Sunday, March 08, 2015 - 08:05 AM UTC
Brian,
Yeah, I stumbled across that little tidbit several years ago, but was never able to put it to practical use. "O" gauge isn't common on this side of the pond so I never pursued it, though in this day and age of internet shopping it might warrant a second look, food for thought. I have found that "HO" scale RR brake kits are a good source of misc. pieces to represent hydraulic pumps, valves and other assorted aircraft goodies in 1/48 scale.
DR
Redhand
#522
_VISITCOMMUNITY
New Jersey, United States
Joined: January 20, 2013
KitMaker: 1,460 posts
AeroScale: 1,443 posts
Posted: Saturday, March 14, 2015 - 06:20 AM UTC
BELATED PROGRESS REPORT - AND NOT MUCH BY ME

Another tough week at my day job, leaving me too burned out for plastic at night.

In any event, my friend's pilot seat armor came yesterday, and here are some shots of these great pieces with and without seats.

In the raw:


With Seat:


Now back to the basement to start putting it all together!
Redhand
#522
_VISITCOMMUNITY
New Jersey, United States
Joined: January 20, 2013
KitMaker: 1,460 posts
AeroScale: 1,443 posts
Posted: Saturday, March 14, 2015 - 08:33 AM UTC
A QUESTION FOR KARL


Hey Karl, "expert" or not, I'd like your opinion on what the cable at the rear of the seat frame, pictured below, was for. Also, while we at it, what actually was the job of the "dynamotors?" Did the cable connect to them? Where did the cable connect topside? Do you have any photos/prints of this?

I'm going to be installing the motors to the sides of the "basement doors" rather then the floor so I can drop the whole assembly back into the cockpit, rather than mess around with clearances trying to glue them back to the floor itself. I'd like to know about the cable because I might add it to the rear of the seat frame.

Thanks in advance.
Thearmorer
_VISITCOMMUNITY
Alabama, United States
Joined: June 17, 2014
KitMaker: 121 posts
AeroScale: 118 posts
Posted: Saturday, March 14, 2015 - 09:04 AM UTC
Brian,
I was just cruising some of your early posts (like page 1) and notices a couple of interesting items. 1. on that hose behind the co-pilot's seat, there's one just like it on the navigator's table. My money would be on an oxygen mask connection, it sure looks like a pressure host fitting. 2. just below that is a picture of another "F" model in the right nose area. There is a pipe sticking down behind the ground crewman. It's in the right area to be the external portion of your infamous driftmeter. Just a thought.
DR