

World War II
Discuss WWII and the era directly before and after the war from 1935-1949.
Discuss WWII and the era directly before and after the war from 1935-1949.
Hosted by Rowan Baylis
1/48 B-17F Build - 303rd BGs Luscious Lady

Redhand

#522

Joined: January 20, 2013
KitMaker: 1,460 posts
AeroScale: 1,443 posts
Posted: Saturday, March 14, 2015 - 09:18 AM UTC
I agree on both your observations. I did add some hose forward -- retrofit -- and Kark answered the question about the pipe and the "driftmeter." At a much later point in the build, I am going to try to retrofit something to "represent" that.

Redhand
#522
Joined: January 20, 2013
KitMaker: 1,460 posts
AeroScale: 1,443 posts
Posted: Sunday, March 15, 2015 - 05:29 PM UTC
STEP BY STEP
Putting the seats back in, preliminary steps starting with dynamotors:


I have decided to pin the outer seat legs to the inner using two long stainless steel pins at a couple of points and then glue a square "seat bottom" in place on which the armor plate and the actual seat bottom will rest. That's for each side of course.
Some reference diagrams follow.


Note the gap between seat back and armor plate and absence of shoulder harnesses.
Putting the seats back in, preliminary steps starting with dynamotors:
I have decided to pin the outer seat legs to the inner using two long stainless steel pins at a couple of points and then glue a square "seat bottom" in place on which the armor plate and the actual seat bottom will rest. That's for each side of course.
Some reference diagrams follow.
Note the gap between seat back and armor plate and absence of shoulder harnesses.
Joel_W
Joined: December 04, 2010
KitMaker: 11,666 posts
AeroScale: 7,410 posts
Posted: Monday, March 16, 2015 - 06:17 AM UTC
Brian,
That seat frame looks fantastic. Lets hope that this time they stay wear you glue them.
Joel
That seat frame looks fantastic. Lets hope that this time they stay wear you glue them.
Joel

KPHB17FE
Joined: January 12, 2015
KitMaker: 292 posts
AeroScale: 292 posts
Posted: Monday, March 16, 2015 - 10:38 PM UTC
Hi Brian, been away for awhile but I like your progress. The line hanging on the back of the copilots seat is for recharging portable oxygen bottles. On models where the top turret had its own O2 bottle, the recharging line was long enough to reach the turret bottle. There was a similar one for the ball. I have never seen a good photo of one of those, I will have to browse through my drawings and see if I can come up with anything better.
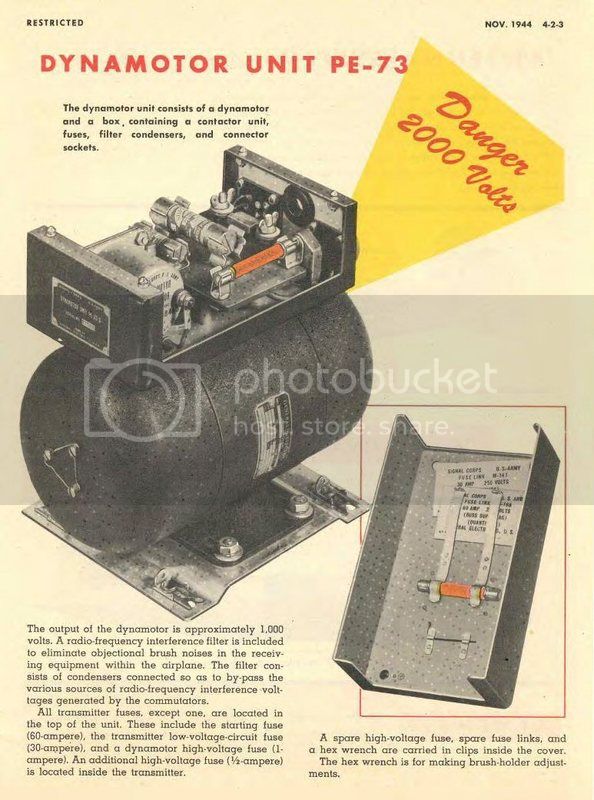
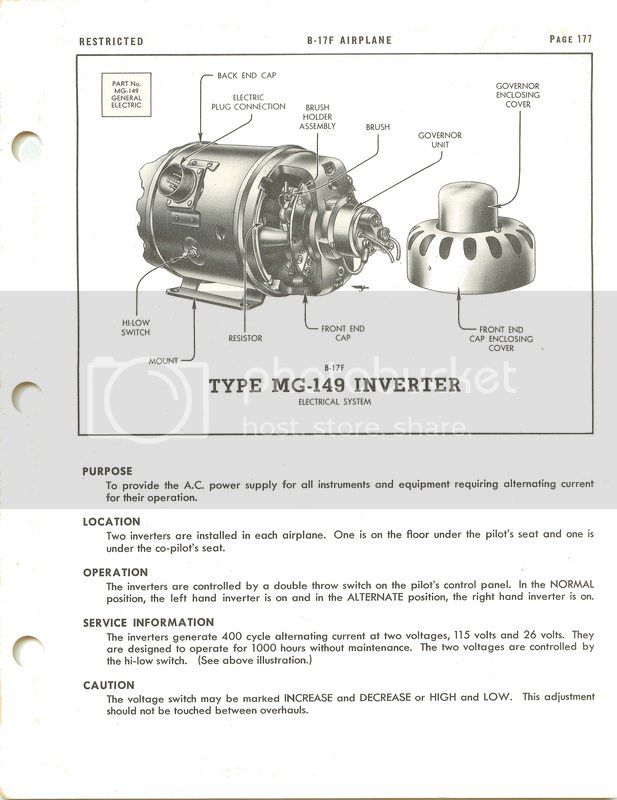
The items you are referring to as dynamotors are in fact inverters. They take 24 volt DC and put out AC current (115 volts IIRC). There are a few items run by AC but I can't recall which off the top of my head. Dynamotors are usually associated with radio gear. They change the 28 volt DC current to (usually) higher current. The dynamotors for the command and liaison equipment put out 1000 (yes, that is one THOUSAND)volts.
The items you are referring to as dynamotors are in fact inverters. They take 24 volt DC and put out AC current (115 volts IIRC). There are a few items run by AC but I can't recall which off the top of my head. Dynamotors are usually associated with radio gear. They change the 28 volt DC current to (usually) higher current. The dynamotors for the command and liaison equipment put out 1000 (yes, that is one THOUSAND)volts.
KPHB17FE
Joined: January 12, 2015
KitMaker: 292 posts
AeroScale: 292 posts
Posted: Monday, March 16, 2015 - 10:56 PM UTC
Here is the description of the Liaison dynamotor. I admit to being somewhat confused as in the description it says 1000 volts while the picture has a warning about 2000 volts. Whichever, not something you want to screw around with!

KPHB17FE
Joined: January 12, 2015
KitMaker: 292 posts
AeroScale: 292 posts
Posted: Monday, March 16, 2015 - 11:06 PM UTC
In this drawing you can almost make out the filler lines in the forward section. The one on the back of the copilots seat is not well shown.


KPHB17FE
Joined: January 12, 2015
KitMaker: 292 posts
AeroScale: 292 posts
Posted: Monday, March 16, 2015 - 11:14 PM UTC
And here is some information about the inverters:


AbramJ
Joined: February 07, 2015
KitMaker: 45 posts
AeroScale: 44 posts
Posted: Monday, March 16, 2015 - 11:19 PM UTC
Great progress so far Brian, can't wait to see more. And excellent reference material Karl! Thank you both fur such a wealth of information.
Redhand
#522
Joined: January 20, 2013
KitMaker: 1,460 posts
AeroScale: 1,443 posts
Posted: Wednesday, March 18, 2015 - 05:20 AM UTC
SEAT CONSTRUCTION
These few shots show how I'm fixing the outer seat legs to the main basement door/inner leg assembly.

The metal pins are flexible, and will stand twisting the outer legs to match the inner ones in positioning.
The thin sheet styrene adds stiffening and provides a firm surface for the seat bottoms.

Next step is to paint the seat bottoms and armor plate bronze green, then position the armor plate; and finally glue the seats to the legs.

Goes without saying that I made sure it would all fit where it is supposed to, though it's tight!! I'm pleased to report that the height with armor positioned exactly matches that of the kit parts on the old assembly.
More soon.
These few shots show how I'm fixing the outer seat legs to the main basement door/inner leg assembly.
The metal pins are flexible, and will stand twisting the outer legs to match the inner ones in positioning.
The thin sheet styrene adds stiffening and provides a firm surface for the seat bottoms.
Next step is to paint the seat bottoms and armor plate bronze green, then position the armor plate; and finally glue the seats to the legs.
Goes without saying that I made sure it would all fit where it is supposed to, though it's tight!! I'm pleased to report that the height with armor positioned exactly matches that of the kit parts on the old assembly.
More soon.
AbramJ
Joined: February 07, 2015
KitMaker: 45 posts
AeroScale: 44 posts
Posted: Wednesday, March 18, 2015 - 07:25 AM UTC
Looks great Brian. It definitely is a tight fit up in the cockpit, just went through the "Sentimental Journey" today. I forgot how tight it is in the forward half of a B-17.
Joel_W
Joined: December 04, 2010
KitMaker: 11,666 posts
AeroScale: 7,410 posts
Posted: Wednesday, March 18, 2015 - 10:24 PM UTC
Brian,
The new and much improved seats look great. What a relief knowing that they actually fit. If it was me doing all of this extra re-work, I can assure you that they wouldn't fit the allotted space.
Joel
The new and much improved seats look great. What a relief knowing that they actually fit. If it was me doing all of this extra re-work, I can assure you that they wouldn't fit the allotted space.
Joel
Redhand
#522
Joined: January 20, 2013
KitMaker: 1,460 posts
AeroScale: 1,443 posts
Posted: Thursday, March 19, 2015 - 06:38 AM UTC
SEATS INSTALLED!
Here are two pictures of the armor plate and seats installed. I am quite pleased with the "look" of the thing. The seats are not perfectly symmetrical to one another above the basement doors, but people aren't identical either, and there is no doubt that the seats were adjustable because of it. I think this conveys the sense nicely.


I remain tremendously grateful to my friend from NC for the armor plate. Boy does it look good IMHO!
Over the weekend I'll figure out what other seat bracing I'll add to the back, install the map cases on the backs and figure out what other gingerbread, if any, I'll add.
Then I will CAREFULLY position and glue the assembly back into the cockpit, where I pray I will NEVER have to touch it again.
Here are two pictures of the armor plate and seats installed. I am quite pleased with the "look" of the thing. The seats are not perfectly symmetrical to one another above the basement doors, but people aren't identical either, and there is no doubt that the seats were adjustable because of it. I think this conveys the sense nicely.
I remain tremendously grateful to my friend from NC for the armor plate. Boy does it look good IMHO!
Over the weekend I'll figure out what other seat bracing I'll add to the back, install the map cases on the backs and figure out what other gingerbread, if any, I'll add.
Then I will CAREFULLY position and glue the assembly back into the cockpit, where I pray I will NEVER have to touch it again.
KPHB17FE
Joined: January 12, 2015
KitMaker: 292 posts
AeroScale: 292 posts
Posted: Thursday, March 19, 2015 - 05:25 PM UTC
I get "This person moved or deleted this image"...
Redhand
#522
Joined: January 20, 2013
KitMaker: 1,460 posts
AeroScale: 1,443 posts
Posted: Thursday, March 19, 2015 - 05:58 PM UTC
Quoted Text
I get "This person moved or deleted this image"...
Photobucket is having some problems. I will have to repost a bit later.
Redhand
#522
Joined: January 20, 2013
KitMaker: 1,460 posts
AeroScale: 1,443 posts
Posted: Thursday, March 19, 2015 - 06:12 PM UTC
Quoted Text
Quoted TextI get "This person moved or deleted this image"...
Photobucket is having some problems. I will have to re-post a bit later.
Just fixed it. I believe. They were there when I posted but Photobucket said they were undergoing "maintenance" of the site.
KPHB17FE
Joined: January 12, 2015
KitMaker: 292 posts
AeroScale: 292 posts
Posted: Thursday, March 19, 2015 - 09:18 PM UTC
Now I just see little black boxes with "X" in the middle. I think it's haunted 
Redhand
#522
Joined: January 20, 2013
KitMaker: 1,460 posts
AeroScale: 1,443 posts
Posted: Thursday, March 19, 2015 - 09:48 PM UTC
Quoted Text
Now I just see little black boxes with "X" in the middle. I think it's haunted
Wow. It appears OK on my screen. Let me try again.
Redhand
#522
Joined: January 20, 2013
KitMaker: 1,460 posts
AeroScale: 1,443 posts
Posted: Thursday, March 19, 2015 - 09:54 PM UTC
Quoted Text
Quoted TextNow I just see little black boxes with "X" in the middle. I think it's haunted
Wow. It appears OK on my screen. Let me try again.
Just corrected the post with new Photobucket urls. Lemme know please.
AbramJ
Joined: February 07, 2015
KitMaker: 45 posts
AeroScale: 44 posts
Posted: Thursday, March 19, 2015 - 10:05 PM UTC
Looks good to me. Can't wait to see it in the cockpit.
Joel_W
Joined: December 04, 2010
KitMaker: 11,666 posts
AeroScale: 7,410 posts
Posted: Thursday, March 19, 2015 - 10:14 PM UTC
Brian,
Outstanding!!
Both seats look almost identical to me. Besides, they'll be in an enclosed cockpit, no one will ever notice any minor differences.
Joel
Outstanding!!
Both seats look almost identical to me. Besides, they'll be in an enclosed cockpit, no one will ever notice any minor differences.
Joel
Redhand
#522
Joined: January 20, 2013
KitMaker: 1,460 posts
AeroScale: 1,443 posts
Posted: Thursday, March 19, 2015 - 11:30 PM UTC
SEATING CHOICES
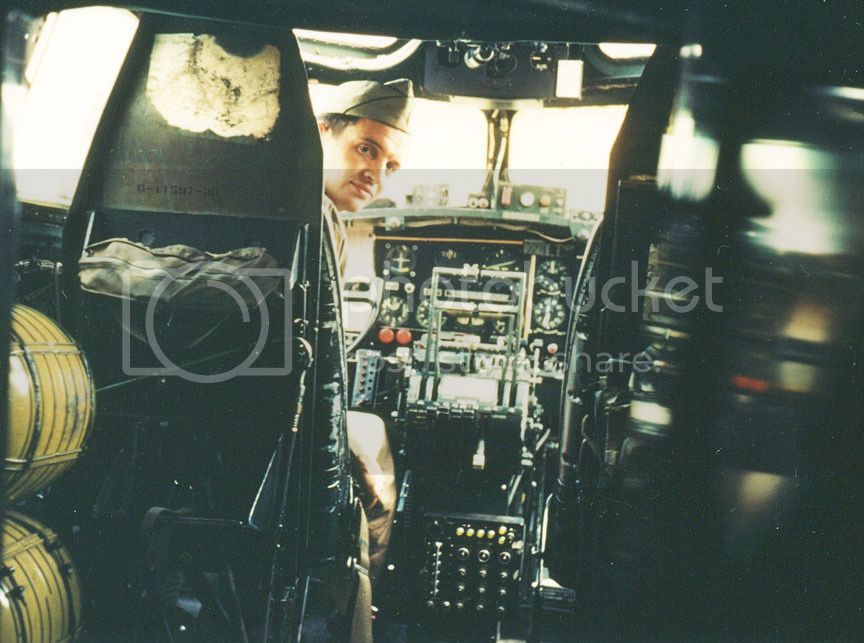
What I do with the seat backs will depend on how I interpret these photos:


More tonight.
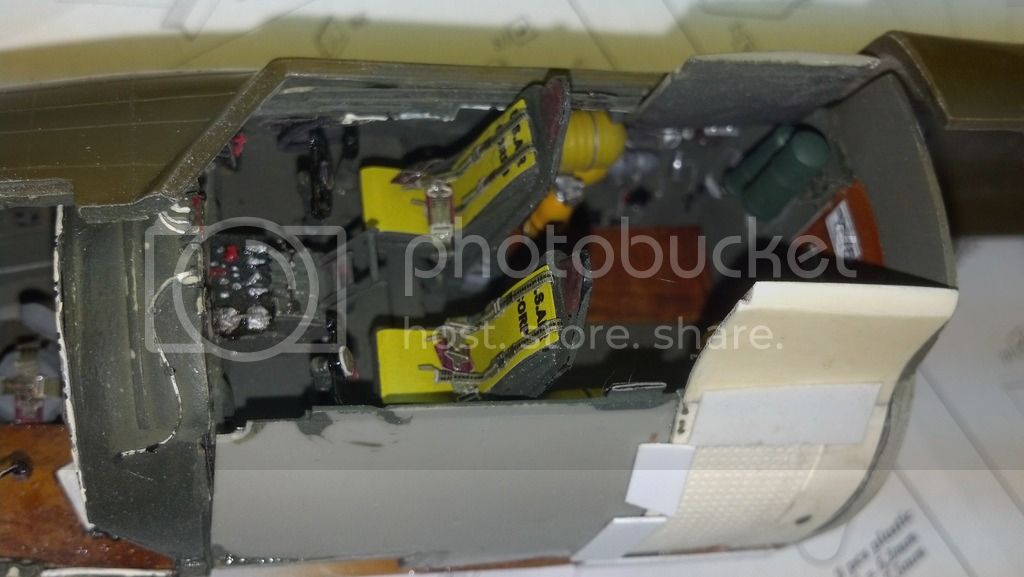
SMALL SEAT BACK DETAILS BEFORE INSTALLATION OF MAP CASES

To be painted bronze green, of course. Map cases will go on after some paint dries.

Painted, a bit crudely, but "no one will ever see." The map cases will go on tomorrow, and then this B-17 will have pilots' seats in the cockpit again. Stay tuned tomorrow evening.
What I do with the seat backs will depend on how I interpret these photos:
More tonight.
SMALL SEAT BACK DETAILS BEFORE INSTALLATION OF MAP CASES
To be painted bronze green, of course. Map cases will go on after some paint dries.
Painted, a bit crudely, but "no one will ever see." The map cases will go on tomorrow, and then this B-17 will have pilots' seats in the cockpit again. Stay tuned tomorrow evening.
KPHB17FE
Joined: January 12, 2015
KitMaker: 292 posts
AeroScale: 292 posts
Posted: Friday, March 20, 2015 - 10:55 PM UTC
Hey, I can see the photos! Look very nice. In the wartime photo, there is a shelf on the back of the pilots seat and that canvas bag was for the flare gun. That was fairly common but those things got moved around both from the factory and I would imagine in the field as well. It appears the restored bird has it attached to the wiring diagram box although I can't make out the stenciling. Neat details. Like you say, they won't be seen but still very cool.
Joel_W
Joined: December 04, 2010
KitMaker: 11,666 posts
AeroScale: 7,410 posts
Posted: Saturday, March 21, 2015 - 05:35 AM UTC
Brian,
The details just keep on coming. Just way better the 2nd time around.
Joel
The details just keep on coming. Just way better the 2nd time around.
Joel
Redhand
#522
Joined: January 20, 2013
KitMaker: 1,460 posts
AeroScale: 1,443 posts
Posted: Saturday, March 21, 2015 - 08:00 AM UTC
SEATS BACK IN THE COCKPIT
First, a shot of the rear with the map cases attached:

A shot from "12 O'Clock High":

One from the 10 O'Clock:

One from 7 O'Clock:

From 9 O'Clock Before:
To 9 O'Clock After:

An idea of what one will actually see:

I should add that I am DEFINITELY positioning the pilot's and co-pilot's side cockpit windows open so one can see some of this directly. That won't be too hard to do with aftermarket parts.
Surveying all of this I'm OK with it, but ever mindful of the little imperfections, and very conscious that for me at least, "there is no perfect model."
Why do I do this hobby? What am I trying to reproduce in miniature? WHY am I doing this?
I suppose it's the same reason I wrote Half A Wing: trying to capture a bit of history that's important to me. [There is also another reason I'll mention briefly, but only when it's actually done!!]
The other thing I will say about an effort like this in this scale is that I agree with the master modeler who wrote that a build like this is never finished. The builder just stops work at a very advanced state of construction.
I have no clue how this is going to look when it's done. The exterior will present its own challenges. Basically I need to take it one small detail at a time and try not to think about that.
One thing I know for sure: Before closing this fuselage up, there's going to be a helluva review of what's inside and what needs to be repaired before it's closed up.
That'll be the day.
First, a shot of the rear with the map cases attached:
A shot from "12 O'Clock High":
One from the 10 O'Clock:
One from 7 O'Clock:
From 9 O'Clock Before:
To 9 O'Clock After:
An idea of what one will actually see:
I should add that I am DEFINITELY positioning the pilot's and co-pilot's side cockpit windows open so one can see some of this directly. That won't be too hard to do with aftermarket parts.
Surveying all of this I'm OK with it, but ever mindful of the little imperfections, and very conscious that for me at least, "there is no perfect model."
Why do I do this hobby? What am I trying to reproduce in miniature? WHY am I doing this?
I suppose it's the same reason I wrote Half A Wing: trying to capture a bit of history that's important to me. [There is also another reason I'll mention briefly, but only when it's actually done!!]
The other thing I will say about an effort like this in this scale is that I agree with the master modeler who wrote that a build like this is never finished. The builder just stops work at a very advanced state of construction.
I have no clue how this is going to look when it's done. The exterior will present its own challenges. Basically I need to take it one small detail at a time and try not to think about that.
One thing I know for sure: Before closing this fuselage up, there's going to be a helluva review of what's inside and what needs to be repaired before it's closed up.
That'll be the day.

krow113

Joined: March 16, 2010
KitMaker: 473 posts
AeroScale: 101 posts
Posted: Saturday, March 21, 2015 - 10:20 PM UTC
Wicked! Get a clear half!
 |

WEB HOSTING BY


Copyright ©2021 AeroScale and Kitmaker Network, a subsidiary of Silver Star Enterprises
All Rights Reserved. Please read our Conditions of Use and Privacy Policy.
All Rights Reserved. Please read our Conditions of Use and Privacy Policy.