World War II
Discuss WWII and the era directly before and after the war from 1935-1949.
Hosted by Rowan Baylis
1/48 B-17F Build - 303rd BGs Luscious Lady
Dragon164
#226
_VISITCOMMUNITY
British Columbia, Canada
Joined: February 20, 2012
KitMaker: 1,909 posts
AeroScale: 508 posts
Posted: Sunday, March 22, 2015 - 10:37 AM UTC

Quoted Text


One thing I know for sure: Before closing this fuselage up, there's going to be a helluva review of what's inside and what needs to be repaired before it's closed up.


Brian,
Again it is looking fantastic!

I would also say that before closing it up you take a bunch more pics.

Cheers Rob.
Redhand
#522
_VISITCOMMUNITY
New Jersey, United States
Joined: January 20, 2013
KitMaker: 1,460 posts
AeroScale: 1,443 posts
Posted: Sunday, March 22, 2015 - 06:32 PM UTC

Quoted Text


Brian,
Again it is looking fantastic!

I would also say that before closing it up you take a bunch more pics.

Cheers Rob.


Thanks for the comments Rob!
Joel_W
Staff MemberAssociate Editor
AUTOMODELER
_VISITCOMMUNITY
New York, United States
Joined: December 04, 2010
KitMaker: 11,666 posts
AeroScale: 7,410 posts
Posted: Sunday, March 22, 2015 - 07:03 PM UTC
Brian,
The reworked seats look unbelievable once installed. The cockpit is the equal or better of anything done in 1/32 scale.

As Rob said, take a million pictures now.

Joel
Redhand
#522
_VISITCOMMUNITY
New Jersey, United States
Joined: January 20, 2013
KitMaker: 1,460 posts
AeroScale: 1,443 posts
Posted: Sunday, March 22, 2015 - 08:26 PM UTC
Thank heavens I don't take myself too seriously. Otherwise, youse guys 'ud gimme a swelled head.

Many thanks for all the "props" on this four-engine effort. It certainly provides me with encouragement to continue, and try even harder. And, yeah, I do think the new seats match the rest of the cockpit now, giving it a uniform look.

I have already re-started on the port bomb-bay bulkheads, top and bottom. I think the rest of the bomb bay will go relatively quickly, but I also have ceiling lights aft to install and the inner bomb racks.
KPHB17FE
_VISITCOMMUNITY
Illinois, United States
Joined: January 12, 2015
KitMaker: 292 posts
AeroScale: 292 posts
Posted: Monday, March 23, 2015 - 07:40 PM UTC
Great photos Brian, that cockpit turned out very nice! You have much to be proud of. Keep 'em coming.
fightnjoe
_VISITCOMMUNITY
Washington, United States
Joined: August 16, 2004
KitMaker: 603 posts
AeroScale: 565 posts
Posted: Tuesday, March 24, 2015 - 06:03 AM UTC
Stunning. Absolutely stunning.

Thinking I may be better off just leaving mine as a closed build and darken the windows. You have shown how to do this up right.


Joe
Redhand
#522
_VISITCOMMUNITY
New Jersey, United States
Joined: January 20, 2013
KitMaker: 1,460 posts
AeroScale: 1,443 posts
Posted: Tuesday, March 24, 2015 - 06:47 AM UTC

Quoted Text

Stunning. Absolutely stunning.

Thinking I may be better off just leaving mine as a closed build and darken the windows. You have shown how to do this up right.


Joe


I dunno Joe. I think you can get away with far less interior detail doing a G model, without needing to darken the windows. Consider this:

Nothing wrong with a closed bomb bay. Period. That's how I did my Monogram B-29.

Both the radio room and the waist guns are Plexiglas enclosed positions, drastically limiting visibility. Just a small amount of extra detailing should suffice there, and surgery getting rid of alignment pins, etc.

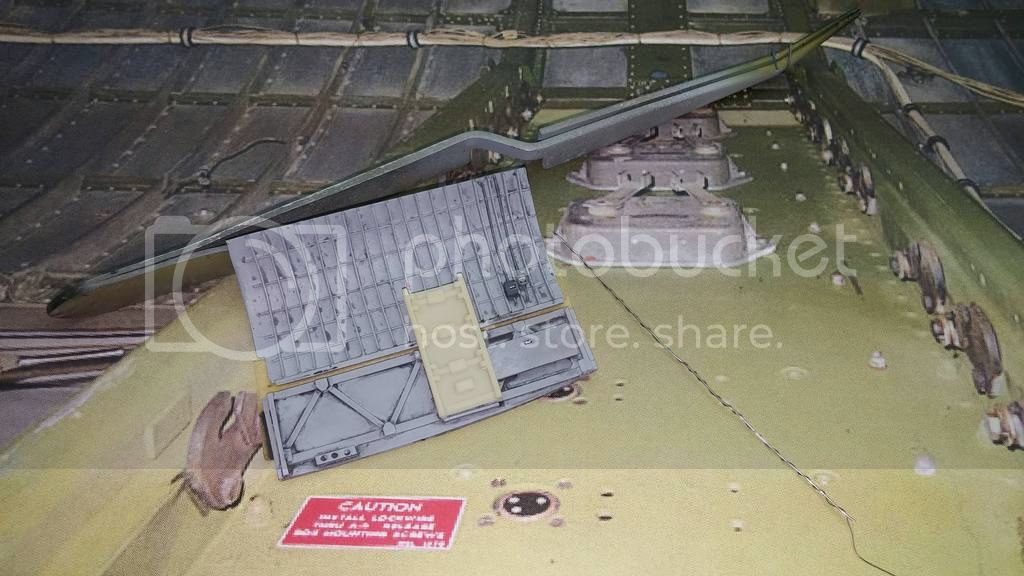
You could easily get away with minimal detail in the G model ball. Maybe just a seat and a couple of do-dads added to the sight area. It's very hard to see anything in there, really.

One can see almost nothing in the tail gun position.

I actually think the the G model cockpit and nose are pretty good in this kit.

An investment in the Eduard brass sets for the nose, cockpit and radio room would result in an extremely attractive model, with some further details from the True Details set for the cockpit. The seats aren't that hard, and I'm going to ask my friend if he can provide me with a scale template for the seat armor, so I can post it.

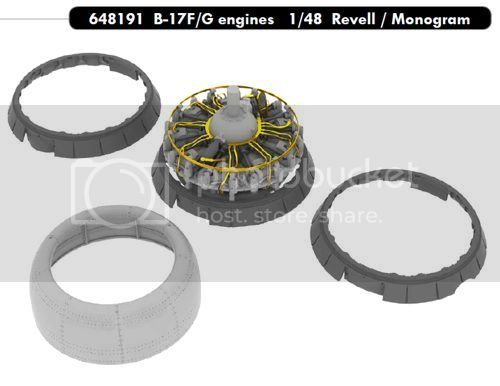
Outside, I think the Eduard set for the engines is important, because of the ignition harnesses, but the kit engines are really pretty fair representations of the real thing. Even the molded in turbos are acceptable. The only other things I would add would be Scale Aircraft Conversions landing gear and aftermarket wheels.

FWIW if I were to do a G after this, that's pretty much how I would approach it.


Redhand
#522
_VISITCOMMUNITY
New Jersey, United States
Joined: January 20, 2013
KitMaker: 1,460 posts
AeroScale: 1,443 posts
Posted: Tuesday, March 24, 2015 - 08:38 AM UTC
PORT BOMB BAY BULKHEAD - A START


It's dirtier than I would like, especially under the flashbulb, so I will probably wash out some of the "wash" with H2O and touch up bits with dry brushed grey, but it's a start. The "over and under" interplay between pipes and wires (see above right in background pic) will be fun to replicate. The pipe and wire connections into the forward bulkhead will have to wait until the port bulkhead gets glued in, naturally.

A question for Karl: What is the thing circled in red in the below picture?


One small step at a time, folks.
KPHB17FE
_VISITCOMMUNITY
Illinois, United States
Joined: January 12, 2015
KitMaker: 292 posts
AeroScale: 292 posts
Posted: Tuesday, March 24, 2015 - 05:36 PM UTC
I don't know what it is, but I do know it is not original B-17. The Revell 1/72 kit copied the panel on the outside and is just further evidence of their lack of research. Seems to be unique to that bird at Hendon.
Redhand
#522
_VISITCOMMUNITY
New Jersey, United States
Joined: January 20, 2013
KitMaker: 1,460 posts
AeroScale: 1,443 posts
Posted: Tuesday, March 24, 2015 - 06:03 PM UTC

Quoted Text

but I do know it is not original B-17.


Problem solved. Thanks.
AbramJ
_VISITCOMMUNITY
Arizona, United States
Joined: February 07, 2015
KitMaker: 45 posts
AeroScale: 44 posts
Posted: Tuesday, March 24, 2015 - 07:49 PM UTC
Looking great so far Brian. I don't know if these will be much help to you, but here's a link to pictures I took of the "Sentimental Journey" several years ago:

http://s214.photobucket.com/user/AbramJ/library/B-17G

I took them in order of walking through the plane from front to back, but photobucket jumbled them all up.
Redhand
#522
_VISITCOMMUNITY
New Jersey, United States
Joined: January 20, 2013
KitMaker: 1,460 posts
AeroScale: 1,443 posts
Posted: Wednesday, March 25, 2015 - 12:38 AM UTC

Quoted Text

Looking great so far Brian. I don't know if these will be much help to you, but here's a link to pictures I took of the "Sentimental Journey" several years ago:

http://s214.photobucket.com/user/AbramJ/library/B-17G

I took them in order of walking through the plane from front to back, but photobucket jumbled them all up.


Those are some pretty nice pictures. Thanks for sharing!
Joel_W
Staff MemberAssociate Editor
AUTOMODELER
_VISITCOMMUNITY
New York, United States
Joined: December 04, 2010
KitMaker: 11,666 posts
AeroScale: 7,410 posts
Posted: Wednesday, March 25, 2015 - 01:25 AM UTC
Joe,
Still sticking to my premise that you're going to be doing a massive cut-a-way B-16G, which will allow you do show details that Brian really isn't concerned with, plus details that he's showing from the inside point of view. Your point of view will be from the outside looking in. Should make for a fantastic comparison.

Like Brian said, there is no need for you to detail to the level he's working out. Your build really focuses on the over all structure of the aircraft.

Joel
Redhand
#522
_VISITCOMMUNITY
New Jersey, United States
Joined: January 20, 2013
KitMaker: 1,460 posts
AeroScale: 1,443 posts
Posted: Thursday, March 26, 2015 - 05:54 AM UTC
Braiding Wire

A nice trick I learned while doing the wiring in the bomb bay is creating the impression that a strand of wire is actually a series of wires banded together in a wire bundle. Look at the white wire runs above the outer bomb bay rack in this picture:


All it takes to achieve this is to wrap a thin wire around a larger diameter strand as pictured below.


It's obvious here what I've done, but this is background detail, and a far different impression is created when you paint the strand white and attach it to the bulkhead. Stay tuned.
krow113
_VISITCOMMUNITY
British Columbia, Canada
Joined: March 16, 2010
KitMaker: 473 posts
AeroScale: 101 posts
Posted: Thursday, March 26, 2015 - 07:44 PM UTC
If you use model railroad p/e eyelets or make some a la WW 1 rigging , you can bundle the wire together in a more realistic manner.This method also supplies a mounting post.
Having experience in custom wiring all kinds of vehicles, we never twist the wire!
I did a thread on LSP called 'Getting Wired' , shows how I will do my '17's wiring.
Good work & Keep going!
Redhand
#522
_VISITCOMMUNITY
New Jersey, United States
Joined: January 20, 2013
KitMaker: 1,460 posts
AeroScale: 1,443 posts
Posted: Thursday, March 26, 2015 - 08:10 PM UTC

Quoted Text

If you use model railroad p/e eyelets or make some a la WW 1 rigging , you can bundle the wire together in a more realistic manner.This method also supplies a mounting post.
Having experience in custom wiring all kinds of vehicles, we never twist the wire!
I did a thread on LSP called 'Getting Wired' , shows how I will do my '17's wiring.
Good work & Keep going!


Thanks! Will "press on regardless" with this method since part of the bomb bay is already done that way. But I am very interested in using your suggested method for the catwalk ropes! Can you provide some links for vendors of the products you mention?

Will definitely "keep going."
krow113
_VISITCOMMUNITY
British Columbia, Canada
Joined: March 16, 2010
KitMaker: 473 posts
AeroScale: 101 posts
Posted: Friday, March 27, 2015 - 09:46 AM UTC
Eyelets are pretty easy to make.The p/e ones I have are from Athabaska Scale Models , regular model R/R stuff.Model Shipways is a good name for a supply of rope for the walkway handrail.
Redhand
#522
_VISITCOMMUNITY
New Jersey, United States
Joined: January 20, 2013
KitMaker: 1,460 posts
AeroScale: 1,443 posts
Posted: Saturday, March 28, 2015 - 09:44 PM UTC
JUST A SMALL PROGRESS SHOT

that shows wiring continuing and ceiling spotlights under construction.


More to follow, obviously.
Redhand
#522
_VISITCOMMUNITY
New Jersey, United States
Joined: January 20, 2013
KitMaker: 1,460 posts
AeroScale: 1,443 posts
Posted: Friday, April 03, 2015 - 06:44 AM UTC
STILL PLUGGING AWAY

Happy Passover to my Jewish mates online (the senior religion, so it comes first) and Easter to my Christian ones!

Just a brief progress shot to show some additional wiring and installation of the ceiling spotlight aft on the port side.


The picture is a bit in the shadows, but folks, the ceiling light "isn't real." Putting in functional lights would be a bit much, even for me.

All that's left to do on this part is adding control cables fore and aft along the ceiling. Then this bulkhead will be glued into the existing bomb bay shell, and I'll finish the lower bulkhead. The port outer bomb rack will be installed after that.
PeeJay74
#363
_VISITCOMMUNITY
Pennsylvania, United States
Joined: January 08, 2014
KitMaker: 425 posts
AeroScale: 401 posts
Posted: Friday, April 03, 2015 - 04:32 PM UTC
Brian,

this just continues to impress! I can't wait to see it finished. I have a G I am thinking of starting eventually, and I will probably go the route you were describing earlier. Nothing as involved as this for sure.

Keep up the great work, I am filing away little mental notes for my own use some day.
Redhand
#522
_VISITCOMMUNITY
New Jersey, United States
Joined: January 20, 2013
KitMaker: 1,460 posts
AeroScale: 1,443 posts
Posted: Monday, April 06, 2015 - 01:24 AM UTC

Quoted Text

Brian,

this just continues to impress! I can't wait to see it finished. I have a G I am thinking of starting eventually, and I will probably go the route you were describing earlier. Nothing as involved as this for sure.

Keep up the great work, I am filing away little mental notes for my own use some day.


Thank you Paul! I am humbled (again) by the comments I get on this. More stuff for "mental notes" coming up.
Redhand
#522
_VISITCOMMUNITY
New Jersey, United States
Joined: January 20, 2013
KitMaker: 1,460 posts
AeroScale: 1,443 posts
Posted: Monday, April 06, 2015 - 01:46 AM UTC
THE DEVIL IS IN THE DETAILS

This will just show you some approaches I've learned in bomb bay.

It is madness to glue the overhead cables directly to the bulkhead ribs. For better control and positioning, glue them to little bits of styrene stock at a 90 degree angle.


Below is the same wire bundle assembly placed, not glued, near the upper left bulkhead roof.


There was a really ugly gap at the bottom right rear stbd. bulkhead where it meets the after bulkhead. I covered it with a sheet styrene strip that will be painted silver. "No one will ever know." Picture also has a nice shot of the crude but "close enough" stbd. ceiling light.


Fitting all these parts together is a challenge. My touchstone is that whatever else happens, the bulkhead ribs must align. Here's a dry fit of the upper port bulkhead in place. It's getting there!!


Temporarily OT. As a former Curtiss-Wright employee, I have a real soft spot for the B-17's C-W designed/Wright Aero & Studebaker built R-1820 engines, specifically the R-1820-97. So I "lost it" when I discovered that Eduard has a four engine set for this build! A significant investment, but "not to be missed." That part of this project is something I'm REALLY looking forward to.

Joel_W
Staff MemberAssociate Editor
AUTOMODELER
_VISITCOMMUNITY
New York, United States
Joined: December 04, 2010
KitMaker: 11,666 posts
AeroScale: 7,410 posts
Posted: Monday, April 06, 2015 - 02:22 AM UTC
Brian,
Your wiring tip will really come in handy as I've struggled at times getting them into the proper position, then gluing them in place.

I'm really looking forward to your super detailed set of 4 engines. Knowing your high standards, they're going to be something very special.

Joel
KPHB17FE
_VISITCOMMUNITY
Illinois, United States
Joined: January 12, 2015
KitMaker: 292 posts
AeroScale: 292 posts
Posted: Monday, April 06, 2015 - 03:40 PM UTC
Continuing to look great, really like the wire bundles. I just received a set of those Brassin engines and they are sharp. Only thing you will want to do is replace most of the photo etch as they use flat pieces to represent round items like the ignition harness and leads as well as the oil line to the sump. First time I have ever seen engines with the inter-cylinder baffles. Also the cowl flaps have the correct bulge for the outboard exhausts and the cutout for the inboard exhausts. Also has a decent prop governor. They will make a nice addition to your project.
chukw1
_VISITCOMMUNITY
California, United States
Joined: November 28, 2007
KitMaker: 817 posts
AeroScale: 729 posts
Posted: Monday, April 06, 2015 - 07:31 PM UTC
Simply amazing, Brian- cheers! Best bomb bay I've seen yet- you've raised that bar!