World War II
Discuss WWII and the era directly before and after the war from 1935-1949.
Hosted by Rowan Baylis
1/48 B-17F Build - 303rd BGs Luscious Lady
Redhand
#522
_VISITCOMMUNITY
New Jersey, United States
Joined: January 20, 2013
KitMaker: 1,460 posts
AeroScale: 1,443 posts
Posted: Friday, May 22, 2015 - 09:16 AM UTC
BOMB BAY DONE

“Okay, and it’s just that simple, just that quick.”

I stole the line from my favorite AN-2 radial engine start video. Fits if ya ask me.

I just finished tonight:


A comparison shot, taken 10 months ago, 07/22/2014:


A final shot, for now.


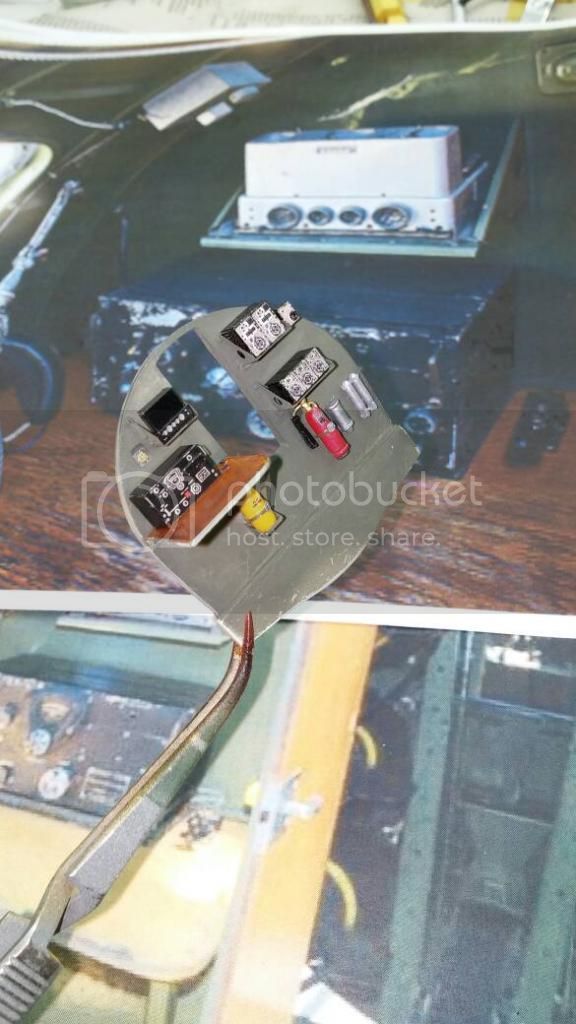
Note the sheet styrene strips added to the bottom of the catwalk and inner racks.

And, for the observant eye, yes, there is going to be some "nudging" to get the lower bulkhead on the right of the pic to fit more snugly and further in against the wing root to create the appearance of greater depth. But that's a job for when the fuselage comes together, with glue.

I'm happy that it looks as symmetrical as it does now. Cf. "Something of an Achievement" by Gwyn Griffin. Ah, the title reference has something to do with an old man managing to become a complete idiot through his actions. [Good read if hard to find].

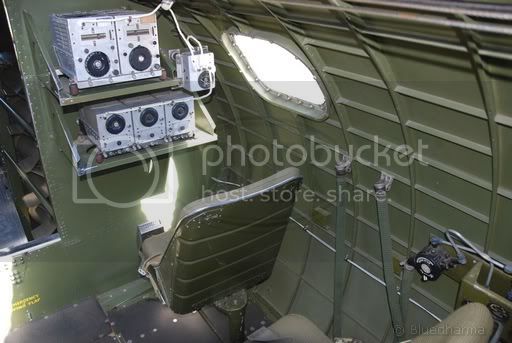
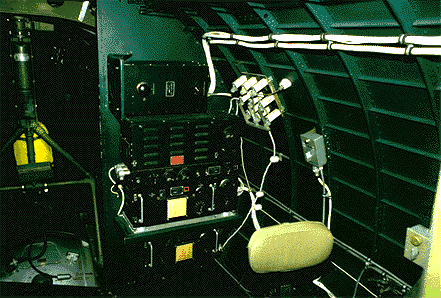
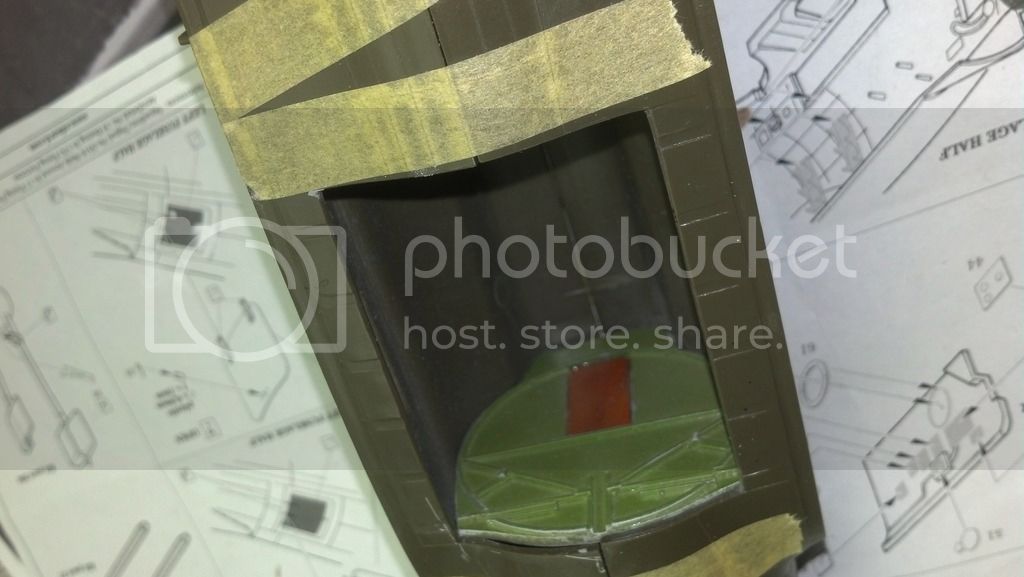
Finally, a shot of the radio room, whose forward bulkhead needs some refurbishment after the rigors of completing the bomb bay.


Over the weekend I will also discuss my plans for completing the radio room, adding bulkheads, what detail will go in, what won't, etc.

I don't expect to spend ten months of my life detailing an interior compartment of a model kit of any kind, ever again. Life's too short.

Later, folks.
Joel_W
Staff MemberAssociate Editor
AUTOMODELER
_VISITCOMMUNITY
New York, United States
Joined: December 04, 2010
KitMaker: 11,666 posts
AeroScale: 7,410 posts
Posted: Friday, May 22, 2015 - 06:31 PM UTC
Brian,
Wow!! what a difference between the before and now pics, and it only took you 10 months. The last two pictures are a no show.

Never again spending 10 months in any model compartment again, all depends on the scope and goals of the modeling project. The B-17F from day one was a once in a life time build for you, so time spent to achieve that goal doesn't count.

Joel
Redhand
#522
_VISITCOMMUNITY
New Jersey, United States
Joined: January 20, 2013
KitMaker: 1,460 posts
AeroScale: 1,443 posts
Posted: Friday, May 22, 2015 - 06:49 PM UTC
Thanks Joel. The last two pics appear on my computers. Will check the links, and may substitute better pics later. These taken in haste last night.

Once in a lifetime. Yeah. "Where does that Highway go to?"
Joel_W
Staff MemberAssociate Editor
AUTOMODELER
_VISITCOMMUNITY
New York, United States
Joined: December 04, 2010
KitMaker: 11,666 posts
AeroScale: 7,410 posts
Posted: Friday, May 22, 2015 - 07:01 PM UTC

Quoted Text

Thanks Joel. The last two pics appear on my computers. Will check the links, and may substitute better pics later. These taken in haste last night.

Once in a lifetime. Yeah. "Where does that Highway go to?"


Brian,
I just watched that video. For me, as I'm now approaching the last few miles on my personal highway, the answer of where that highway goes is starting to get clearer. It goes right back to where it originally started.
Joel
Redhand
#522
_VISITCOMMUNITY
New Jersey, United States
Joined: January 20, 2013
KitMaker: 1,460 posts
AeroScale: 1,443 posts
Posted: Friday, May 22, 2015 - 07:30 PM UTC

Quoted Text

as I'm now approaching the last few miles on my personal highway, the answer of where that highway goes is starting to get clearer. It goes right back to where it originally started.
Joel


To me fair to myself, it was my private theme song in the 80s, when my life circumstances were, shall we say, totally different professionally and otherwise.
fightnjoe
_VISITCOMMUNITY
Washington, United States
Joined: August 16, 2004
KitMaker: 603 posts
AeroScale: 565 posts
Posted: Friday, May 22, 2015 - 10:30 PM UTC
Brian your work on the bomb bay is impressive to say the least. I hope mine will come out a fraction as good.


Joe
Redhand
#522
_VISITCOMMUNITY
New Jersey, United States
Joined: January 20, 2013
KitMaker: 1,460 posts
AeroScale: 1,443 posts
Posted: Saturday, May 23, 2015 - 07:59 PM UTC

Quoted Text

Brian your work on the bomb bay is impressive to say the least. I hope mine will come out a fraction as good.

Joe


Thank you Joe.
Redhand
#522
_VISITCOMMUNITY
New Jersey, United States
Joined: January 20, 2013
KitMaker: 1,460 posts
AeroScale: 1,443 posts
Posted: Saturday, May 23, 2015 - 09:08 PM UTC
SOME THOUGHTS ON THE RADIO ROOM

This is more a picture essay on my plans for the radio room than build update per se.

I have to return the forward bulkhead to its prior state.


But not immediately, because of basic construction needed on the side bulkheads.

Karl's prior input on the interior of the bombardier/navigator compartment for this block of B-17 indicated the bulkheads were/were probably insulated with smooth canvas/cloth surfaces like this:


Having gone for the bare, stringer look forward I am doing that for this space too. Who's ever really gonna know and there is room for some "artistic licence" in our hobby.


I will be omitting the two port seats per the 8AF theater instructions Karl posted, but this shot shows the bulkhead. To achieve this I will glue an extra "wall" of sheet styrene in, and add the stringers with styrene bar strips. This is necessary because I already have lower wall sheet styrene sections to cover the unsightly wing root openings in the kit parts.

Instead of the starboard seats I will place the open radio room hatch cover against the bulkhead, exterior side facing the viewer. I will probably add a modest holder bracket at the bottom to anchor it.

The interior will be bronze green, ou quelque chose comme ça. [or something like this]:


I am not sure how much stomach I have for all this wiring and gingerbread, though doubtless some of it will find its way inside. [D'oh, consider the bomb bay].

I'll discuss after radio room later. For now let me say I can't wait to get the fuselage buttoned up, though I simply can't "rush it." I think I will opt for completing the exterior fuselage, including paint, to about an 85% level before tackling the wings.
Redhand
#522
_VISITCOMMUNITY
New Jersey, United States
Joined: January 20, 2013
KitMaker: 1,460 posts
AeroScale: 1,443 posts
Posted: Saturday, May 23, 2015 - 09:55 PM UTC
ANOTHER QUESTION FOR KARL: EXTERIOR RADIO ANTENNA

There are many depictions of B-17Fs with two antenna wires leading down from the tail to the radio room and wing. Why, here's one featured in this very build:


Although I helped Artist Mark Styling with the research for this pic, I think not. Look at this Brian-annotated drawing.


There is a port-side radio connector in the radio room so I think the third wire, what I call the "primary liaison antenna" has to exist. See pic of connector below.


Karl, enquiring minds want to know!!
Joel_W
Staff MemberAssociate Editor
AUTOMODELER
_VISITCOMMUNITY
New York, United States
Joined: December 04, 2010
KitMaker: 11,666 posts
AeroScale: 7,410 posts
Posted: Sunday, May 24, 2015 - 03:31 AM UTC
Brian,
Sorry I can't add anything to help you with the details, but seeing that Bronze Green was a real shocker. why was the radio room painted in that color?
Joel
KPHB17FE
_VISITCOMMUNITY
Illinois, United States
Joined: January 12, 2015
KitMaker: 292 posts
AeroScale: 292 posts
Posted: Sunday, May 24, 2015 - 04:06 AM UTC
That drawing is a bit confusing. Antenna #1 was for the command radio system. Didn't quite run like that, I will see if I can post a better drawing. Antenna #2 was for the early IFF system, there was one on each side. Just about every B-17 had the early type replaced and changed to one which used a short mast antenna under the radio compartment. Antenna #3 was the factory position for the liaison fixed antenna but this was changed to run to the vertical fin, same place as the command antenna on the F's and most G's. Let me see what I can come up with for you.

Here are the details for the command radio antenna installation:


Here is where the IFF antenna was located:


Redhand
#522
_VISITCOMMUNITY
New Jersey, United States
Joined: January 20, 2013
KitMaker: 1,460 posts
AeroScale: 1,443 posts
Posted: Sunday, May 24, 2015 - 04:21 AM UTC
Karl:

This is enormously helpful, to say the least. The command line connection to the aerial is something I have never seen before. That will be cool to replicate. I will also have to experiment with insulator and spring materials for this build, something I have not tried before.

Glad to see that the profile drawing of Luscious Lady is correct on this detail.

To be continued.

Brian


Redhand
#522
_VISITCOMMUNITY
New Jersey, United States
Joined: January 20, 2013
KitMaker: 1,460 posts
AeroScale: 1,443 posts
Posted: Sunday, May 24, 2015 - 04:31 AM UTC

Quoted Text

Brian,
Sorry I can't add anything to help you with the details, but seeing that Bronze Green was a real shocker. why was the radio room painted in that color?
Joel


Joel, I'm going with this quote from the IPMS Stockholm site:

For F and G model B-17s, the general rule for "control cabins" is Bronze Green. Instructions identify the "control cabin" as the nose section containing the bombardier and navigator, the cockpit including the pilots and top gunner/engineer, and the radio room. Later official specifications for the B-17F revised in August 1944 called for Dull Dark Green in the same areas. Some Douglas-produced B-17Fs possibly had Interior Green control cabins. [My emphasis].

Of course, there is plenty of photographic evidence to the contrary, especially aluminum finish radio rooms.
Redhand
#522
_VISITCOMMUNITY
New Jersey, United States
Joined: January 20, 2013
KitMaker: 1,460 posts
AeroScale: 1,443 posts
Posted: Sunday, May 24, 2015 - 05:32 AM UTC
RADIO ROOM STBD BULKHEAD: A START


The sheet styrene will go up to the top, with a cut out for the window, of course. Then I will install stringers.
Redhand
#522
_VISITCOMMUNITY
New Jersey, United States
Joined: January 20, 2013
KitMaker: 1,460 posts
AeroScale: 1,443 posts
Posted: Sunday, May 24, 2015 - 09:05 PM UTC
HAPPY MEMORIAL DAY

With some thoughts about the dead of the 8th Air Force, and from all American Wars.

Here is a wonderful B&W 303rd Formation shot of the Hell's Angels taken by the late David Shelhamer, September 1943 on a mission to Norway.


Of special note is unique photographic proof that the 303rd carried oversize, out of spec. Triangle C's on the right wings during this time. The are clearly larger than the ones on the tails.
KPHB17FE
_VISITCOMMUNITY
Illinois, United States
Joined: January 12, 2015
KitMaker: 292 posts
AeroScale: 292 posts
Posted: Monday, May 25, 2015 - 12:36 AM UTC
Hate to be a naysayer but I put zero stock in the IPMS Stockholm site. Your airplane would have come from the factory with the fabric lining in the radio compartment (as well as the nose and cockpit). The fabric in the B-17E restoration (My Gal Sal) is correct for coloring. Bronze Green was used on exposed metal parts early on but by the time the F's were rolling out of the factory, Dull Dark Green was more the order of the day. There were likely stocks of BG to be used up so it probably appeared on various components for a while. And it was not used to paint the inside of the fuselage. The way the AFM did the interior of Shoo Shoo Shoo Baby is dead wrong and actually a crime to me because it will confuse researchers for years to come. I think you have seen this photo before but here is the fabric in the cockpit of the "Memphis Belle". You can also see the remains of the insulation. The Radio compartment got the same treatment.

Joel_W
Staff MemberAssociate Editor
AUTOMODELER
_VISITCOMMUNITY
New York, United States
Joined: December 04, 2010
KitMaker: 11,666 posts
AeroScale: 7,410 posts
Posted: Monday, May 25, 2015 - 02:32 AM UTC
Brian,
I've used the Swedish IPMS site as my color bible for quite some time. But as I've accumulated more research material, they do make some major mistakes. A perfect example is the call out of colors for the F2A-3:" The later F2A-3s were produced with Zinc Chromate Green cockpits, similar to Interior Green". Jim Maas, who is a leading expert on the Buffalo, and has written a few books on the subject, states that the correct color should be Dark Dull Green.

From what Karl said, you should really consider using that color as well.

Joel
Redhand
#522
_VISITCOMMUNITY
New Jersey, United States
Joined: January 20, 2013
KitMaker: 1,460 posts
AeroScale: 1,443 posts
Posted: Monday, May 25, 2015 - 04:43 AM UTC

Quoted Text

Brian,
I've used the Swedish IPMS site as my color bible for quite some time. But as I've accumulated more research material, they do make some major mistakes. A perfect example is the call out of colors for the F2A-3:" The later F2A-3s were produced with Zinc Chromate Green cockpits, similar to Interior Green". Jim Maas, who is a leading expert on the Buffalo, and has written a few books on the subject, states that the correct color should be Dark Dull Green.

From what Karl said, you should really consider using that color as well.

Joel


I suppose at this point what's done is done, including not using fabric covering vs. stringers. I'm reasonably comfortable with the Humbrol 75 "bronze green" color because it isn't that shiny, blinding green that one sees in some aircraft, which really looks to me like an Aussie "foliage green." The way I see it, very little of the interior is going to be seen in this build anyway, especially through cockpit glass.

The color is sufficiently dull that it will get the job done, though if one were going for the fabric look I think a light olive on the fabric parts would do nicely, and that's what I'd opt for "if I had to do it all over again."

I do plan to paint the interior aft of the radio room aluminum, except for the tail gunner's position.

Part of the problem here is using G-model upgrades for the Monogram kit, where stringers and different colors were the rule.

That said, I DO appreciate Karl's input!
Joel_W
Staff MemberAssociate Editor
AUTOMODELER
_VISITCOMMUNITY
New York, United States
Joined: December 04, 2010
KitMaker: 11,666 posts
AeroScale: 7,410 posts
Posted: Monday, May 25, 2015 - 06:22 AM UTC
Brian,
I did forget that once you close up the fuselage halves, that it will get a lot darker in those compartments.

You can always make these changes in your next super B-17 build.

Joel
Redhand
#522
_VISITCOMMUNITY
New Jersey, United States
Joined: January 20, 2013
KitMaker: 1,460 posts
AeroScale: 1,443 posts
Posted: Monday, May 25, 2015 - 07:15 AM UTC
I take solace from the fact that we cannot know exactly what the original looked like, even though we can get pretty close. The colors in the bomb bay are an example. It IS pretty remarkable to me how much interior finish variation there was, even in the ones coming solely out of the Boeing Plant in Seattle.

At this point, while I'm not going to rush it, I do want very much to get the fuselage together, so I can start on the "real build." [Yes, that's a joke.] In the foreseeable future I would love to be able to set the fuselage aside in a very advanced state of construction, including decals, so that aside from very easily breakable parts, finishing this might be largely a matter of "just gluing the wings on."

We'll see.
Joel_W
Staff MemberAssociate Editor
AUTOMODELER
_VISITCOMMUNITY
New York, United States
Joined: December 04, 2010
KitMaker: 11,666 posts
AeroScale: 7,410 posts
Posted: Monday, May 25, 2015 - 07:34 PM UTC
Brian,
You're going to paint, decal, and weather the fuselage and wings separately? From what I've seen of the parts fit so far, that just might not be feasible.
Joel
Redhand
#522
_VISITCOMMUNITY
New Jersey, United States
Joined: January 20, 2013
KitMaker: 1,460 posts
AeroScale: 1,443 posts
Posted: Monday, May 25, 2015 - 07:39 PM UTC

Quoted Text

Brian,
You're going to paint, decal, and weather the fuselage and wings separately? From what I've seen of the parts fit so far, that just might not be feasible.
Joel


You could be right. Not even seriously thinking of it till I see how good/bad the wing fit is. Wouldn't weather the fuselage separately in any event.
Redhand
#522
_VISITCOMMUNITY
New Jersey, United States
Joined: January 20, 2013
KitMaker: 1,460 posts
AeroScale: 1,443 posts
Posted: Monday, May 25, 2015 - 07:42 PM UTC
RADIO ROOM BULKHEAD BUILD - THE HARD WAY

Not much else to say at this point. I shudder at how ugly it looks in this light. But no going back from his step. "Press on regardless!"

Merlin
Staff MemberSenior Editor
AEROSCALE
#017
_VISITCOMMUNITY
United Kingdom
Joined: June 11, 2003
KitMaker: 17,582 posts
AeroScale: 12,795 posts
Posted: Tuesday, May 26, 2015 - 01:41 AM UTC

Quoted Text

I shudder at how ugly it looks in this light. But no going back from his step. "Press on regardless!"


Hi Brian

Press on indeed! I have no doubt that it will emerge amazing, matching the rest of your superb build.

I've had a Koster early-B-17 conversion waiting to be tackled for a couple of years and, while I know I'll never match the kind of detail you've put in here, if I ever get round to it, your build will be a huge source of inspiration.

All the best

Rowan
Redhand
#522
_VISITCOMMUNITY
New Jersey, United States
Joined: January 20, 2013
KitMaker: 1,460 posts
AeroScale: 1,443 posts
Posted: Saturday, May 30, 2015 - 08:19 AM UTC
PRESSING ON.

Thanks Rowan, for the very kind words of encouragement. I guess my discouragement was pretty easy to see looking at the radio room bulkhead.

Let me add that the phrase "press on regardless" is one I consider quintessentially British. But, I actually learned of it from one of the Eighth Air Force veteran contributors to Half a Wing. So, it really fits here.

The pace of the build has slowed because of my day job but there is no turning back. I also expect to find some additional time in future.

Anyway, the solution to the ugly bulkhead is to mask off the radio gear, see below, though there still is some masking that needs to be done:


I will be installing ribbing on the starboard bulkhead very soon and then will spray and unmask this. After that I will be working on the floor, including dealing with a sizable gap between the Monogram B-17G radio room floor part I am using and the sides of the fuselage. More on that later.

An indication of my confidence that this will get done one day is below. I'm actually going to place the kit on a hard stand made by Noy's Miniatures.


I will dress the hardstand up with a few aftermarket items such as a fuel truck, some work tables, a bomb cart with a couple of 500 pound bombs on it, people of course, and last but not least a putt putt, which was the auxiliary power unit to start the engines. See below.


But, yeah, that's in the pretty distant future.