World War II
Discuss WWII and the era directly before and after the war from 1935-1949.
Hosted by Rowan Baylis
1/48 B-17F Build - 303rd BGs Luscious Lady
magnusf
_VISITCOMMUNITY
Stockholm, Sweden
Joined: May 02, 2006
KitMaker: 1,953 posts
AeroScale: 1,902 posts
Posted: Saturday, May 30, 2015 - 11:33 AM UTC
Brian! I'm dropping by every now and then to enjoy the latest progress! You're really doing a fantastic job on this. What's sad is that my usual description of the old Monogram kits as "well detailed" doesn't seem to hold in comparison any longer !

Regarding the IPMS Stockholm site: all the stuff there was written in good faith and is never better than the knowledge of the person who wrote it, whom you at least can trust has done his best ! It is nowadays also 10+ years old so see it as a starting point! What's so nice in the age of Internet is that you can always find someone who knows more so it always pays off to ask once again!


Magnus
Redhand
#522
_VISITCOMMUNITY
New Jersey, United States
Joined: January 20, 2013
KitMaker: 1,460 posts
AeroScale: 1,443 posts
Posted: Saturday, May 30, 2015 - 07:06 PM UTC

Quoted Text


Regarding the IPMS Stockholm site: all the stuff there was written in good faith and is never better than the knowledge of the person who wrote it, whom you at least can trust has done his best ! It is nowadays also 10+ years old so see it as a starting point! What's so nice in the age of Internet is that you can always find someone who knows more so it always pays off to ask once again!


Magnus


Thanks for the kind words Magnus. I fully agree that the Stockholm site is an ideal starting point. 10 years ago it was cutting edge research, but the funny thing about our hobby is that the farther back the era recedes in time, the more we seem to learn!

It reminds me of the debates that academics and reconstructors have about uniforms in the Roman army, when what style of gladius went out of favor, when mail armor was displaced by lorica segmentata, etc. etc. (obviously another favorite subject of mine, and a clue why I have an angry centurion avatar).

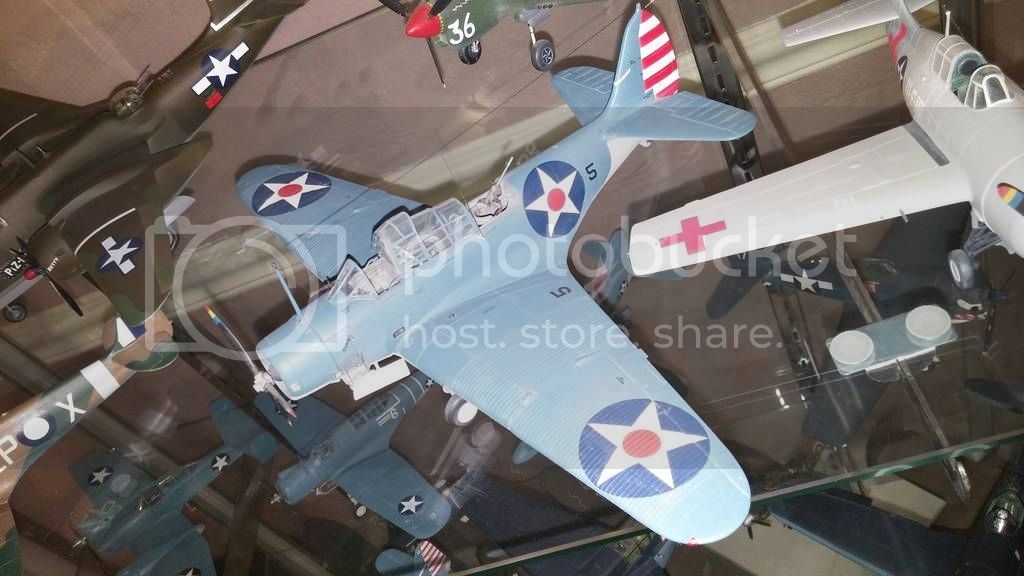
I remain philosophical about getting the details of models correct in this day and age. A number of years ago, before the Great Wall Hobby Devastator kits came out, I put a major effort into fully detailing one of the Monogram TBD-1s in VT-6 livery at the time of the Wake Island raid in February 1942. There was a site that swore that these aircraft retained their interior aluminum lacquer finishes into the war years. It sure made sense to me, especially when you look at the factory photos. Who would rip out all of this stuff just to paint it green? So that’s how I finished the kit, and I admit I was a bit smug about having gotten this important detail right when all my modeling colleagues erred by putting these cockpits in various shades of “interior green.”

Then, lo and behold, pictures started emerging showing wartime TBD’s with green cockpits! * * * . I now take the position that "my" A/C somehow slipped through repainting in the overhaul cycle. Hey, "it's possible."

I just can't get worked up about this that much anymore. However, I may experiment with a light olive interior for the side bulkheads of this baby, so long as I can figure out a way to simulate fabric with tissue paper or something. We'll see!

Thanks again for your comments and interest in this Don Quixote project. Much appreciated!
Joel_W
Staff MemberAssociate Editor
AUTOMODELER
_VISITCOMMUNITY
New York, United States
Joined: December 04, 2010
KitMaker: 11,666 posts
AeroScale: 7,410 posts
Posted: Saturday, May 30, 2015 - 08:01 PM UTC
Brian,
Just the fact that you were able to detail and finish that old Monogram kit is a major accomplishment. I remember buying it, and never getting it finished back in the early 70s. I've since built the GWH Devastator early in my aircraft comeback after several years trying to get into armor (which never really happened). Great kit, and yes, I did the interior in Interior Green. I really need to build that kit again in Midway markings.

Joel
Redhand
#522
_VISITCOMMUNITY
New Jersey, United States
Joined: January 20, 2013
KitMaker: 1,460 posts
AeroScale: 1,443 posts
Posted: Saturday, May 30, 2015 - 08:39 PM UTC

Quoted Text

Brian,
Just the fact that you were able to detail and finish that old Monogram kit is a major accomplishment. I remember buying it, and never getting it finished back in the early 70s. I've since built the GWH Devastator early in my aircraft comeback after several years trying to get into armor (which never really happened). Great kit, and yes, I did the interior in Interior Green. I really need to build that kit again in Midway markings.

Joel


Yeah, the GWH kit is a beauty.

I may post some pics of the old Monogram build in a separate post soon. It was a "challenge" shall we say.

I have the twin float TBD-1D GWH kit, among others. I like sea planes and "had" to get this when I saw it at a decent price. Back in a prior lifetime I was an officer candidate at "NAVOCS" (Naval Officer Candidate School (ah, summers of 1970 and 1971) at Newport RI. One weekend I took a trip to the Quonset Point NAB. Real faded glory stuff. So when I read that the TBD-1D spent its entire service life test dropping test torpedoes out of that facility (lotta good that did!) it became a must buy.

My wife has "plans" for me today, but I did manage to respray the RR front bulkhead successfully and decide on 600 grit sandpaper to simulate the side RR walls. Easier than doing that ribbing!
Joel_W
Staff MemberAssociate Editor
AUTOMODELER
_VISITCOMMUNITY
New York, United States
Joined: December 04, 2010
KitMaker: 11,666 posts
AeroScale: 7,410 posts
Posted: Saturday, May 30, 2015 - 08:49 PM UTC

Quoted Text


Quoted Text

Brian,
Just the fact that you were able to detail and finish that old Monogram kit is a major accomplishment. I remember buying it, and never getting it finished back in the early 70s. I've since built the GWH Devastator early in my aircraft comeback after several years trying to get into armor (which never really happened). Great kit, and yes, I did the interior in Interior Green. I really need to build that kit again in Midway markings.

Joel


Yeah, the GWH kit is a beauty.

I may post some pics of the old Monogram build in a separate post soon. It was a "challenge" shall we say.

I have the twin float TBD-1D GWH kit, among others. I like sea planes and "had" to get this when I saw it at a decent price. Back in a prior lifetime I was an officer candidate at "NAVOCS" (Naval Officer Candidate School (ah, summers of 1970 and 1971) at Newport RI. One weekend I took a trip to the Quonset Point NAB. Real faded glory stuff. So when I read that the TBD-1D spent its entire service life test dropping test torpedoes out of that facility (lotta good that did!) it became a must buy.

My wife has "plans" for me today, but I did manage to respray the RR front bulkhead successfully and decide on 600 grit sandpaper to simulate the side RR walls. Easier than doing that ribbing!


Brian,
So now you're addicted to float planes too. Looking forward to that build, and your posting pictures of that ancient Monogram Devastator.

Took care of my family business very early this morning. So I have the rest of the day to spend some quality time with my Hyundai Coupe, do some modeling, and then watch the Yankees try to actually win two in a row. Ok, so I can dream can't I.

Joel

Joel
Dragon164
#226
_VISITCOMMUNITY
British Columbia, Canada
Joined: February 20, 2012
KitMaker: 1,909 posts
AeroScale: 508 posts
Posted: Sunday, May 31, 2015 - 12:39 PM UTC
Brian,
Looking good so far!

All the talk of the Monogram Devastator I have to share my experience, I did what I recall as a good job on that kit in my teens. I did the pre war scheme in a crash landing scene ala the Shep Paine pamphlet that came with the B-17. If memories serve right I won an award with that one, sadly I do not know what happened to it.

Cheers Rob.
Redhand
#522
_VISITCOMMUNITY
New Jersey, United States
Joined: January 20, 2013
KitMaker: 1,460 posts
AeroScale: 1,443 posts
Posted: Tuesday, June 02, 2015 - 05:49 AM UTC

Quoted Text


All the talk of the Monogram Devastator * * * *

Rob.


Speaking of Devastators, here's a quick snap of my Monogram build with that "distinctive" aluminum cockpit.


PS: Here is an interesting thread about TBD-1 interior colors. http://www.network54.com/Forum/149674/thread/1327561686/TBD-1+Interior+Colors
Redhand
#522
_VISITCOMMUNITY
New Jersey, United States
Joined: January 20, 2013
KitMaker: 1,460 posts
AeroScale: 1,443 posts
Posted: Tuesday, June 02, 2015 - 06:05 AM UTC
LOOKING BETTER

I decided on the "fabric look" for the RR side bulkheads and ceiling. What you see below on the stbd bulkhead is 600 grit sandpaper primed with tamiya grey primer and sprayed with Model Master OD acrylic.


I like the way the forward bulkhead came out resprayed, and on the stbd. bulkhead I like the texture that to me suggests fabric. I am happy with the color contrast, though it probably coulda been "greener." See below restoration of what I believe is a B-17E ("My Gal Sal"?):


But I am just not going to worry about it. I've seen so many RR schemes and configurations that, while this A/C was (as Karl H. suggests) fabric covered here on the sides, exactly what color a weathered space would look like is not a debate I am interested in having. "No one will ever know for sure."

Eduard provides a lot of stuff to dress up the side bulkheads, especially on the port side. I'm looking forward to getting the floor in, and then the after bulkhead, which will be "bronze green" with a wooden door.

But before that an interesting challenge will be doing the wiring on that radio gear to the right of the radio room door.

Later.
Joel_W
Staff MemberAssociate Editor
AUTOMODELER
_VISITCOMMUNITY
New York, United States
Joined: December 04, 2010
KitMaker: 11,666 posts
AeroScale: 7,410 posts
Posted: Tuesday, June 02, 2015 - 06:05 AM UTC
Brian,
I'm really impressed with just the small number of aircraft I can see of your WW11 collection.

The Monogram Devastator Aluminum interior really reflects the flash. One can imagine what it must have been like in a cockpit like that on a sunny day. Still for such a old kit, it looks perfectly built.

Joel
KPHB17FE
_VISITCOMMUNITY
Illinois, United States
Joined: January 12, 2015
KitMaker: 292 posts
AeroScale: 292 posts
Posted: Tuesday, June 02, 2015 - 08:07 PM UTC
Hi Brian: If you want to do the wiring for the command radios, this photo should help. The modulator and dynamotor unit was installed on the floor for the F and early G models. The unit you have installed above the radio table is the same one but that is the position for the late G models. IIRC the Eduard set gives you both of them does it not? So, if you want to be correct you should remove the one on the bulkhead above the one on the table. Also visible in the photo is one of the controllers for the electronic tubos. Not needed for your bird. And the filler next to it was for the prop ant-ice tank, located under the floor. This airplane is an early G, thus the unpainted and uninsulated interior as well as the carbon tet extinguisher which replaced the CO2 unit.

Redhand
#522
_VISITCOMMUNITY
New Jersey, United States
Joined: January 20, 2013
KitMaker: 1,460 posts
AeroScale: 1,443 posts
Posted: Tuesday, June 02, 2015 - 08:20 PM UTC
You read my mind Karl. Was about to reach out to you for some help.

Yes, I will be wiring the radios and will remove that item from above the RR table to be relocated where you suggest. If you can clarify that again I would appreciate it.

And yes, the Eduard kit does have parts for that "dynamotor" above in the pic at the right front floor. What exactly is the relationship between that and the item above the table, please?

Is there an electrical wire run fore and aft on the stbd bulkhead? I know there is one to port.

Incidentally, I remain a glutton for punishment -- control cables will go in the ceiling.

Lastly, do you think the aft RR door in this bird was plywood or sheet-metal?

Best, Brian

KPHB17FE
_VISITCOMMUNITY
Illinois, United States
Joined: January 12, 2015
KitMaker: 292 posts
AeroScale: 292 posts
Posted: Wednesday, June 03, 2015 - 02:23 AM UTC
Eduard Part 32 and Eduard parts 40/54/59 both represent the modulator/dynamotor for the command set. It was just moved to the position above the radio operators table in later airplanes. Probably the folks at Eduard saw photos of it in the different positions and assumed they were both in place simultaneously. Just one of those things, equipment got moved around as the airplanes evolved.

If you look at the stringer just below the word "receiver" you can see that there is a wire bundle there. Is that what you are asking about? A little lower is the oxygen line and you can see that is has a flexible line that was for recharging walk-around bottles. On the right side of the photo you can just see the edge of an oxygen panel. The other end of that line runs under the floor to the O2 bottles located there.

All internal doors on the B-17 were plywood. The ones in the "Memphis Belle" appear to have been painted DDG. In other photos, the doors appear to be unpainted. Six of one, half a dozen of another...

I'm too lazy to go back and read, what have you used for the control cables in the bomb bay? Could you use fine music wire? True, it wouldn't look exactly like cable, but since they will be virtually impossible to see ... Might be easier to install anyway.

Here is the little bit of information the Radio Operators Information File provides for the command transmitter dynamotor modulator:

Joel_W
Staff MemberAssociate Editor
AUTOMODELER
_VISITCOMMUNITY
New York, United States
Joined: December 04, 2010
KitMaker: 11,666 posts
AeroScale: 7,410 posts
Posted: Wednesday, June 03, 2015 - 03:17 AM UTC
Brian & Karl,
The technical side of this build is so far beyond me or my scope of modeling, that I'm finding it hard to follow your build with all these nuances.

Joel
Redhand
#522
_VISITCOMMUNITY
New Jersey, United States
Joined: January 20, 2013
KitMaker: 1,460 posts
AeroScale: 1,443 posts
Posted: Wednesday, June 03, 2015 - 03:35 AM UTC

Quoted Text


If you look at the stringer just below the word "receiver" you can see that there is a wire bundle there. Is that what you are asking about? A little lower is the oxygen line and you can see that is has a flexible line that was for recharging walk-around bottles. On the right side of the photo you can just see the edge of an oxygen panel. The other end of that line runs under the floor to the O2 bottles located there.


Karl:

Picture below shows what I was referring to re the electrical wires:


I think the "How far back" line in the middle of the stbd bulkhead runs all the way to the aft bulkhead. See below:


I am also going to assume that the oxygen and intercom fittings near the chairs were taken out the same time as the chairs were, to save weight.

What do you think was above the radio table in the F models? This shot is intriguing.


With the overhead control cables I'm betting they just might be partially visible from certain angles. I used rigid stainless steel rod for the larger diameter cables and some stretched softer wire for the smaller diameter ones. I am surprised at how loose some of these wires are in photos.

Redhand
#522
_VISITCOMMUNITY
New Jersey, United States
Joined: January 20, 2013
KitMaker: 1,460 posts
AeroScale: 1,443 posts
Posted: Wednesday, June 03, 2015 - 03:46 AM UTC

Quoted Text

Brian & Karl,
The technical side of this build is so far beyond me or my scope of modeling, that I'm finding it hard to follow your build with all these nuances.

Joel


I only half know what I'm talking about. The dynamotor on the floor is some kind of power source/regulator for the radio gear, and on the stbd. bulkhead we're talking about oxygen supply lines and flow regulators, plus some wiring and controls for the intercom headsets the two crew sitting in the removed right seats might have used. Why keep this stuff if the crew seats are gone? I think the white cable running down the middle of the stbd bulkhead is just electrical system wire running aft to the space behind the radio room.
KPHB17FE
_VISITCOMMUNITY
Illinois, United States
Joined: January 12, 2015
KitMaker: 292 posts
AeroScale: 292 posts
Posted: Wednesday, June 03, 2015 - 04:23 AM UTC
They would leave the O2 regulators and jack boxes in place - best place for a wounded crewman would be on the floor there.

The wire bundle probably ran on aft in the waist. Could be interphone wiring, lights, hard to say. Can research that some more if you would like. I seem to remember some drawings showing wire runs.

That rack above the radio table interested me as well a while back. Found the drawing and it was only supposed to be in late E's. When I visited the Belle in February, the restoration director and I looked that bulkhead over and we could see no holes where that would have been mounted. It was for some auxiliary liaison radio, but I have found no more information on it.

Dynamotors took the 28 volt DC ships power and converted it to the high voltage the radios used. For instance, the black round object on the unit on the floor was the dynamotor for the command transmitters (the two units on the top rack) and it put out 600 volts DC. The receivers (the three units below the transmitters) each had their own dynamotor on the back of the unit which put out 250 volts DC. The manuals stress not messing with these things...
Redhand
#522
_VISITCOMMUNITY
New Jersey, United States
Joined: January 20, 2013
KitMaker: 1,460 posts
AeroScale: 1,443 posts
Posted: Wednesday, June 03, 2015 - 07:38 AM UTC

Quoted Text

They would leave the O2 regulators and jack boxes in place - best place for a wounded crewman would be on the floor there.


Yes, I think you're right. I suppose I was looking for a way to avoid at least some work!

I expect to do the rear door in the wood finish that the other doors have. Creates a good color contrast.

I suppose we have no pictorial evidence what the space above the radio room table looks like in the F-Model. Any brackets for holding books, charts, etc.? I see in the E model reconstruction that I posted above that is an open bin above the radio gear for "radio operators manual." I have to figure out if I want to do anything in that area after I take the Dynamotor off the top wall.
KPHB17FE
_VISITCOMMUNITY
Illinois, United States
Joined: January 12, 2015
KitMaker: 292 posts
AeroScale: 292 posts
Posted: Wednesday, June 03, 2015 - 05:00 PM UTC
There were a few items mounted on the bulkhead above the RO's table as this photo shows:


The only difference is the IFF control. In the photos above, it has the unit for the SCR 535. These were replaced with the SCR 695 which had a slightly different control:


This shows the 695 installation in a G, so ignore the fire extinguisher in the lower right. The item to the left on the control box was an inertial destruct switch. The black square below the controller was the main power plug. And below and to the left of the inertial switch is a manual destruct switch. This was a mod and was requested early on so was most likely on your bird.


Here is the manual destruct switch. These were also mounted on top of the pilots glareshield.


An here is the inertial switch, not a great picture. Can't seem to find a good one.

KPHB17FE
_VISITCOMMUNITY
Illinois, United States
Joined: January 12, 2015
KitMaker: 292 posts
AeroScale: 292 posts
Posted: Wednesday, June 03, 2015 - 05:11 PM UTC
And one more detail Brian, in one of your posts you mentioned the loose cables in some of your photos. That is because they are not attached to anything (as in "My Gal Sal"). In a flying airplane those are always under tension.
Redhand
#522
_VISITCOMMUNITY
New Jersey, United States
Joined: January 20, 2013
KitMaker: 1,460 posts
AeroScale: 1,443 posts
Posted: Wednesday, June 03, 2015 - 05:26 PM UTC
Hummm. Looks like it's time for some "fool the eye" additions. No way will I get all of this accurately. But I do like the red "destroy" switch.

I am doing some work on the floor now to make it flush with the side bulkheads. Will be starting on the forward bulkhead over the weekend. Dynamotor came off fwd bulkhead without tears.
KPHB17FE
_VISITCOMMUNITY
Illinois, United States
Joined: January 12, 2015
KitMaker: 292 posts
AeroScale: 292 posts
Posted: Wednesday, June 03, 2015 - 07:00 PM UTC
I thought you might like that bright red destruct switch . A spot of color never hurts! Plus you can add more wiring...
Redhand
#522
_VISITCOMMUNITY
New Jersey, United States
Joined: January 20, 2013
KitMaker: 1,460 posts
AeroScale: 1,443 posts
Posted: Wednesday, June 03, 2015 - 08:19 PM UTC

Quoted Text

I thought you might like that bright red destruct switch . A spot of color never hurts! Plus you can add more wiring...


Yep, I do have some spares in all areas. I REALLY appreciate the help you've been giving on this project!
Thearmorer
_VISITCOMMUNITY
Alabama, United States
Joined: June 17, 2014
KitMaker: 121 posts
AeroScale: 118 posts
Posted: Wednesday, June 03, 2015 - 09:34 PM UTC
Brian,
As always an excellent and informative post. The following photo (if I can get the copy process to work) shows the carbon tetra-chloride fire extinguisher mounted to the bulkhead.

Well that didn't seem to work, in any event, I'm referencing the above shot of the right forward bulkhead in the radio room below the radio rack. This is one of those tempest-in-a-teapot issues that I've been ruminating over the last few months, namely the depiction of the fire extinguisher in most WW 2 era kits. One almost always see's these depicted as the horn type CO2 extinguisher. My suspicion is that the carbon tet. type would be much more common if not ubiquitous on US manufactured aircraft in the 1940's and 50's.


Carbon tet. is effective on electrical and petroleum fires, just a little hard on the breathing. These are the hand-pump squirt type extinguisher which gets around the problem of having pressurized bottles susceptible to damage at altitude. These were replaced, by the airlines anyway, in the early 1960's. This sticks in my mind because 3 or 4 of these things showed up at the house (my dad worked for a regional airline at the time) as they were replaced by the pressurized CO2/dry chemical type, and I don't remember seeing any on military aircraft in the early 1970's. My suspicion is the CO2 type represented in most kits are a result of getting references from restored aircraft which have been updated. Basically a lot about very little, but it's a thought.
DR
Redhand
#522
_VISITCOMMUNITY
New Jersey, United States
Joined: January 20, 2013
KitMaker: 1,460 posts
AeroScale: 1,443 posts
Posted: Wednesday, June 03, 2015 - 09:59 PM UTC
Interesting. I will have to look again and see if I can find any CO2 extinguishers in period photos.
KPHB17FE
_VISITCOMMUNITY
Illinois, United States
Joined: January 12, 2015
KitMaker: 292 posts
AeroScale: 292 posts
Posted: Thursday, June 04, 2015 - 12:11 AM UTC
The B-17F had three CO2 extinguishers and two carbon tet. The CO2's were mounted on the forward side of Bulkhead 3, forward side of Bulkhead 4, and aft side of Bulkhead 5. The carbon tet units were mounted under the copilot's seat and just aft of the crew entry door. Later on, two of the CO2 units were deleted and replaced with the carbon tet. The Carbon Tet units were no longer under the CP seat or on Bulkhead 7.