World War II
Discuss WWII and the era directly before and after the war from 1935-1949.
Hosted by Rowan Baylis
1/48 B-17F Build - 303rd BGs Luscious Lady
KPHB17FE
_VISITCOMMUNITY
Illinois, United States
Joined: January 12, 2015
KitMaker: 292 posts
AeroScale: 292 posts
Posted: Thursday, June 04, 2015 - 12:28 AM UTC
Bulkhead 3 CO2:


Bulkhead 3 Carbon Tet:


Carbon Tet under Copilot's seat thru late F:


CO2 Bulkhead 4, right of door, through most F models:


CO2 Bulkhead 4, left of doorway, late F and all G's:


CO2 Bulkhead 5, through late F:


Carbon Tet, Bulkhead 5, right of door, very late F and through mid G:


Bulkhead 5, carbon tet. left of doorway, late G:


Carbon Tet, aft of waist crew entry, thru late F, Bulkhead 7:

Redhand
#522
_VISITCOMMUNITY
New Jersey, United States
Joined: January 20, 2013
KitMaker: 1,460 posts
AeroScale: 1,443 posts
Posted: Thursday, June 04, 2015 - 12:41 AM UTC
Fantastic update. Karl, you could easily write THE definitive book (or books!) about the B-17 from a technical standpoint. It would make the old "Detail & Scale" books on the 17 look like the antiques they presently are. And I think your books could sell well, given the right publisher.

Think about it.
Thearmorer
_VISITCOMMUNITY
Alabama, United States
Joined: June 17, 2014
KitMaker: 121 posts
AeroScale: 118 posts
Posted: Thursday, June 04, 2015 - 01:09 AM UTC
Karl, Brian,
Great info on a rather obscure topic, I know it's obscure because I've spent some fruitless evenings searching in vain for WW 2 period extinguishers. I was always flummoxed by model kits always showing CO2 type extinguishers which I had never seen in the wild, as opposed to the carbon tet. units which I was familiar with. Based on your shots Karl I'm guessing the CO2 units were left in bare aluminum? At least that's how they appear in the reference photos. And talk about books, Brian, if this blog doesn't get etched in stone for future generations, your doing a great disservice to the modelers who come after us.
DR
Joel_W
Staff MemberAssociate Editor
AUTOMODELER
_VISITCOMMUNITY
New York, United States
Joined: December 04, 2010
KitMaker: 11,666 posts
AeroScale: 7,410 posts
Posted: Thursday, June 04, 2015 - 01:46 AM UTC
For that matter Karl & Brian could co-write the definitive book on modeling a B-17, With that focus I would certainly buy the book.

Joel
KPHB17FE
_VISITCOMMUNITY
Illinois, United States
Joined: January 12, 2015
KitMaker: 292 posts
AeroScale: 292 posts
Posted: Thursday, June 04, 2015 - 01:54 AM UTC
DR, I am pretty sure the CO2 extinguishers were red. I think the light color in the photos comes from the film that was used. From what I have read, there were two different types of black and white film used in that era and one of them did strange things with red. Others will undoubtedly know more on this subject! Another bit of evidence is an English friend of mine, who is heavily into the reenacting scene, recently purchased a fire extinguisher. It is a CO2 unit, supposedly for mounting inside an aircraft and it is red. Not definitive, but it is another indicator.

A book would be fun, but the older I get, the more I realize how totally disorganized I am! I have all kinds of information that I can't find ...
phantom_phanatic309
#372
_VISITCOMMUNITY
United Kingdom
Joined: March 10, 2010
KitMaker: 2,568 posts
AeroScale: 1,619 posts
Posted: Friday, June 05, 2015 - 10:02 PM UTC
Fantastic build Brian. I love all the extra detail your packing in to it.
I have a couple of Fortress's planned in the near future so I'll be taking some inspiration for improvements from your build.
Redhand
#522
_VISITCOMMUNITY
New Jersey, United States
Joined: January 20, 2013
KitMaker: 1,460 posts
AeroScale: 1,443 posts
Posted: Saturday, June 06, 2015 - 02:23 AM UTC
Thanks Stephen. Hard not to draw inspiration from comments like yours! Heading to the basement in a bit to resume work.
Redhand
#522
_VISITCOMMUNITY
New Jersey, United States
Joined: January 20, 2013
KitMaker: 1,460 posts
AeroScale: 1,443 posts
Posted: Saturday, June 06, 2015 - 09:59 PM UTC
FIXING THE RADIO ROOM FLOOR

First pic shows flush fit against stbd bulkhead:


I added a styrene strip to the bottom of the part to create a ledge for the floor extension, so that it isn't just a butt join. You can also see that at the nearest edge of the floor, port side.

The pic also provides a nice background hint of the chaos that is my work table.

Below shows the bottom of the floor part:


It really is remarkable how much the kit part has to be modified to show a basically correct floor arrangement.
KPHB17FE
_VISITCOMMUNITY
Illinois, United States
Joined: January 12, 2015
KitMaker: 292 posts
AeroScale: 292 posts
Posted: Saturday, June 06, 2015 - 11:15 PM UTC
Looking good Brian. And don't worry, chaos is a sign of a creative mind
Joel_W
Staff MemberAssociate Editor
AUTOMODELER
_VISITCOMMUNITY
New York, United States
Joined: December 04, 2010
KitMaker: 11,666 posts
AeroScale: 7,410 posts
Posted: Sunday, June 07, 2015 - 05:32 AM UTC

Quoted Text

Looking good Brian. And don't worry, chaos is a sign of a creative mind


Then I must be in major trouble as my workbench is spotless between sessions, and pretty well organized during one.

Joel
Redhand
#522
_VISITCOMMUNITY
New Jersey, United States
Joined: January 20, 2013
KitMaker: 1,460 posts
AeroScale: 1,443 posts
Posted: Sunday, June 07, 2015 - 04:32 PM UTC
AN OBSERVATION

The background to the part here in the photo (thanks again, Karl) does explain why Monogram chose to mold the RR front left bulkhead as it did. I suspect they got it right for an early G model, which is what their kit is.


I am back to a snail's pace due to day job pressures, but am starting to piece together Eduard brass consistent with the Karl's photos. I think this will come out nicely.
Redhand
#522
_VISITCOMMUNITY
New Jersey, United States
Joined: January 20, 2013
KitMaker: 1,460 posts
AeroScale: 1,443 posts
Posted: Wednesday, June 17, 2015 - 05:38 PM UTC
RADIO ROOM TABLE, AND "EXTRA DETAIL" ABOVE

Herewith the reinstalled radio room table and my effort (oversize I'm afraid, but, oh, ta hell with it, it's only a model) on the various bits above the table. At least it looks "busy." Compare to real thing below (at least in the pictured 17):


Another, clearer view:


Well, this different G configuration also looks "busy." Ahhhhhh, "close enough":


I will next wire up radio gear on the stbd side of the forward bulkhead, and then start on stbd. bulkhead detail.
Joel_W
Staff MemberAssociate Editor
AUTOMODELER
_VISITCOMMUNITY
New York, United States
Joined: December 04, 2010
KitMaker: 11,666 posts
AeroScale: 7,410 posts
Posted: Wednesday, June 17, 2015 - 09:12 PM UTC
Brian,
The Radio Room Bulkhead and table really looks exceptional. Although my eye keeps on trying to get a better look through the door with all that detail contained in that compartment.

One thought has periodically crossed my mind since my venture into 1/32 scale, just how much of a more detailed build could you have accomplished in 1/32 scale rather then 1/48 scale? You have to admit, it's an interesting concept.
Joel
Redhand
#522
_VISITCOMMUNITY
New Jersey, United States
Joined: January 20, 2013
KitMaker: 1,460 posts
AeroScale: 1,443 posts
Posted: Wednesday, June 17, 2015 - 09:40 PM UTC

Quoted Text

just how much of a more detailed build could you have accomplished in 1/32 scale rather then 1/48 scale? You have to admit, it's an interesting concept.


Which is why I stick with 1/48!! There is a self-limiting aspect to 1/4 inch that I am comfortable with. It's the Goldilocks scale to me: "Just right."
KPHB17FE
_VISITCOMMUNITY
Illinois, United States
Joined: January 12, 2015
KitMaker: 292 posts
AeroScale: 292 posts
Posted: Friday, June 19, 2015 - 12:29 AM UTC
Brian, that looks great! Don't let the G config throw you off your game. What you have done so far is correct for an F. And if (and only IF) you want to busy it up a touch more: where that G photo has a portable oxygen bottle, you CAN (but don't have to) put that very thing just below the table. They were not always there in the F so consider it an option. Those things got installed in all kinds of places. They were after all, portable...

This is from the 95th BG IIRC. They took a bear overseas with them...who thought THAT was a good idea... Anyway, there is the portable oxygen bottle location. The fabric covering shows up nicely. And as an added bonus, below the doorway is a leather patch to protect the fabric. They were still thinking airliner mode when they originally designed this bird. There was a similar patch below the doorway aft of the top turret. Which Monogram represents on their kit...Forty years ago, those guys did some fine and detailed research.

Joel_W
Staff MemberAssociate Editor
AUTOMODELER
_VISITCOMMUNITY
New York, United States
Joined: December 04, 2010
KitMaker: 11,666 posts
AeroScale: 7,410 posts
Posted: Friday, June 19, 2015 - 12:51 AM UTC
A bear cub of all things. And just what did they do with the cub once it grew up, or at least to the size where it was no longer a cute little cub. I guess anything that the bear wanted to do, it got to do.

Joel
Redhand
#522
_VISITCOMMUNITY
New Jersey, United States
Joined: January 20, 2013
KitMaker: 1,460 posts
AeroScale: 1,443 posts
Posted: Friday, June 19, 2015 - 03:43 AM UTC
Thanks Karl. I'll be doing the right front side wiring over the w/e. Will do a leather patch below the door too.

I do have some plans for below the table. More on that later.

Quick question. In the below photo, it is the bulkhead insulator closest to the window that serves as the attachment point for the outside antenna, correct?


Thanks. Should definitely have a post up over the w/e. Construction at this point is proving almost to be fun.

KPHB17FE
_VISITCOMMUNITY
Illinois, United States
Joined: January 12, 2015
KitMaker: 292 posts
AeroScale: 292 posts
Posted: Friday, June 19, 2015 - 04:35 AM UTC
You are correct about the insulator.

I would imagine the cub had to be put down. Bet the Brits got a bit spooled up when they saw THAT!
Merlin
Staff MemberSenior Editor
AEROSCALE
#017
_VISITCOMMUNITY
United Kingdom
Joined: June 11, 2003
KitMaker: 17,582 posts
AeroScale: 12,795 posts
Posted: Saturday, June 20, 2015 - 09:51 PM UTC
Hi Brian

Wonderful work! I'm following every stage, even though I have little or anything to add.

I'm still plucking up the courage to butcher (probably) Revell's B-17F to go with the Koster early Fortress vacuform conversion. I expect so much will go to the wall, it hardly seems worth wasting the Monogram version. That, along with the Privateer is my big "one day..." project.

All the best

Rowan
Redhand
#522
_VISITCOMMUNITY
New Jersey, United States
Joined: January 20, 2013
KitMaker: 1,460 posts
AeroScale: 1,443 posts
Posted: Sunday, June 21, 2015 - 12:29 AM UTC
Thank you Merlin! I also know that “against the wall” feeling. Been there done that. “You defeated me, but you will die for it!”

I also remember years ago a local model club meeting where a guy brought in the remnants of a quarter inch Monogram B-24 that had gotten the wall treatmebnt. He displayed it like it was a crash scene in a diorama. He had done really fantastic hand-painted nose art on it.
Redhand
#522
_VISITCOMMUNITY
New Jersey, United States
Joined: January 20, 2013
KitMaker: 1,460 posts
AeroScale: 1,443 posts
Posted: Sunday, June 21, 2015 - 12:40 AM UTC
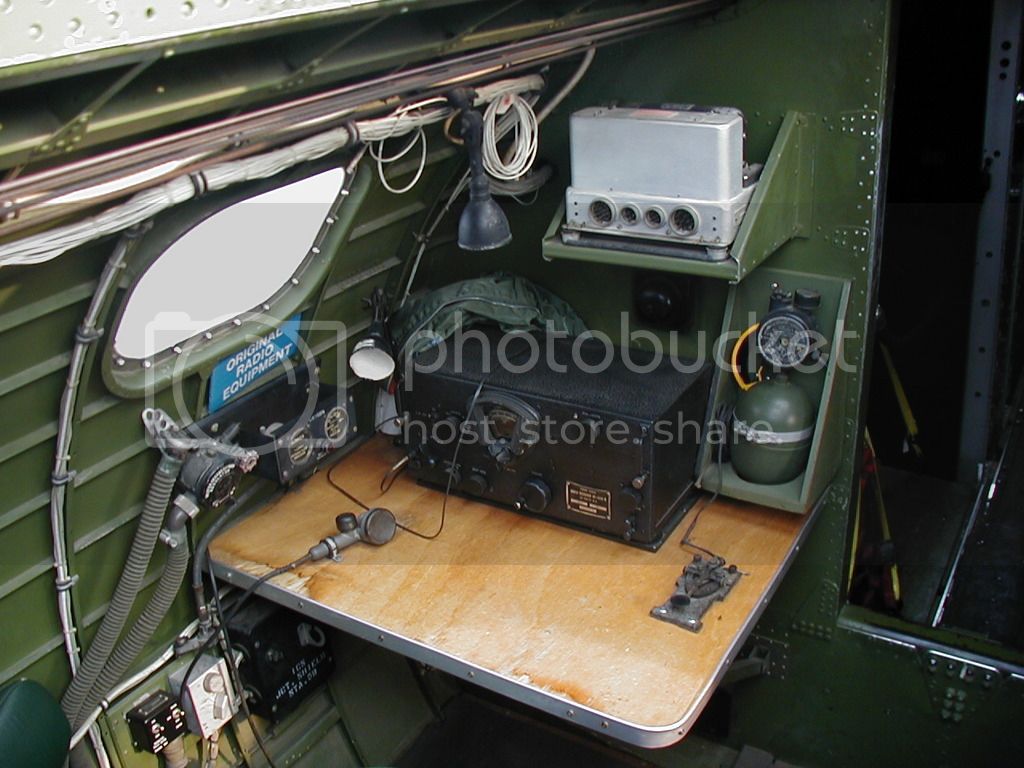
RADIO ROOM FORWARD BULKHEAD ALMOST DONE

There is a little bit of touchup painting I have to do, and also a run of electrical wiring in the right front of the forward bulkhead, but this part of the build is basically done.

This provides the best overall view:


You will note that I followed Karl's suggestion and added a leather cushion below the bottom of the door.

This one gives a better view of the detailing on the right side:


Here is one that shows off some of the open door detail. I’m glad that the real thing has many pictures that show heavily worn interior because, intended or not, this surely has that “look”:


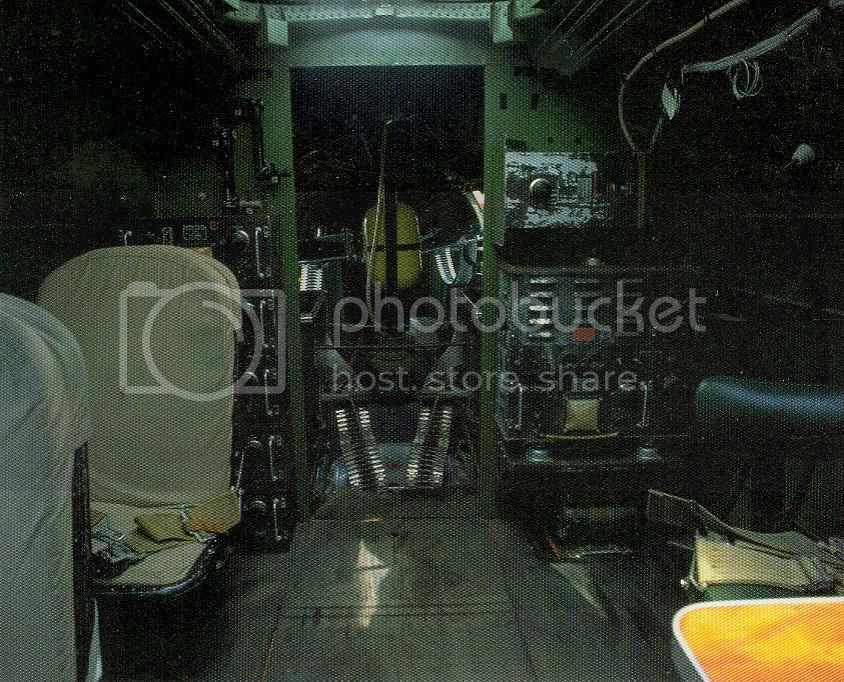
Finally, this one gives some sense for how this space will appear through the open radio room hatch:


After I finish adding the last run of wire on the forward bulkhead, I think I will be moving to the floor before I tackle the right bulkhead. The plan is to have it with an aluminum finish, but covered with nonskid between the forward and aft doors, and have plywood floor sections glued to the top of the aluminum floor to either side of that long central door in the middle of the floor. When that is done I feel the room will really start to come together.
KPHB17FE
_VISITCOMMUNITY
Illinois, United States
Joined: January 12, 2015
KitMaker: 292 posts
AeroScale: 292 posts
Posted: Sunday, June 21, 2015 - 03:53 AM UTC
Looking really nice Brian. One little heads up: The radio room floor was all plywood, no aluminum in sight. The drawings call for anti-skid on the whole thing, but there are numerous photos of just bare plywood although the door to the camera well seems to have retained it better. It was originally rubber matting so I suppose it may have had issues as to how well it held up. Later they went to a coating which I am guessing is much like the wing walk you see on some small airplanes today.
Redhand
#522
_VISITCOMMUNITY
New Jersey, United States
Joined: January 20, 2013
KitMaker: 1,460 posts
AeroScale: 1,443 posts
Posted: Sunday, June 21, 2015 - 04:03 AM UTC

Quoted Text

Looking really nice Brian. One little heads up: The radio room floor was all plywood, no aluminum in sight. The drawings call for anti-skid on the whole thing, but there are numerous photos of just bare plywood although the door to the camera well seems to have retained it better. It was originally rubber matting so I suppose it may have had issues as to how well it held up. Later they went to a coating which I am guessing is much like the wing walk you see on some small airplanes today.


This is very useful Karl! What I am probably going to do, then, is cover the whole floor (except for the door frame in the middle) with sheet styrene and weather it as heavily worn plywood. I will keep the floor door frame aluminum as well as the door handle, and put non-skid over the door and the "plywood" leading to the fore and aft doors. That is, unless you have a spec showing the the floor door frame was plywood too.

First, I have to finish the forward bulkhead!
KPHB17FE
_VISITCOMMUNITY
Illinois, United States
Joined: January 12, 2015
KitMaker: 292 posts
AeroScale: 292 posts
Posted: Sunday, June 21, 2015 - 06:42 AM UTC
I don't recall where I found this photo. It appears to show the aftermath of someone being wounded. Sorry for the gruesome image. But as you can see, there is no exposed frame on the camera well door.

Redhand
#522
_VISITCOMMUNITY
New Jersey, United States
Joined: January 20, 2013
KitMaker: 1,460 posts
AeroScale: 1,443 posts
Posted: Sunday, June 21, 2015 - 07:17 AM UTC

Quoted Text

I don't recall where I found this photo. It appears to show the aftermath of someone being wounded. Sorry for the gruesome image. But as you can see, there is no exposed frame on the camera well door.


Gruesome is certainly the word! I suppose this is where the wounded were taken for the ride back to England.

I'll experiment a bit with the floor outlines we can see on the below picture.