World War II
Discuss WWII and the era directly before and after the war from 1935-1949.
Hosted by Rowan Baylis
1/48 B-17F Build - 303rd BGs Luscious Lady
Redhand
#522
_VISITCOMMUNITY
New Jersey, United States
Joined: January 20, 2013
KitMaker: 1,460 posts
AeroScale: 1,443 posts
Posted: Thursday, June 25, 2015 - 12:10 AM UTC

Quoted Text

Further aft you can see the chutes going to the waist guns. Since the cover for the internal cans was on top of the turret, then yes, somebody could refill his supply.

Do you know which airplane that is? Radio gear is looking kind of rough !


Yes I see those waist gun ammo feeds. It almost looked they stretched past the ball turret.

I don't recall which 17 this is. We could always Google "B-17 Radio Room" and track it down, I guess. Agree the radio gear looks "rough."

For its time, that Sperry ball turret really was a marvel. If I'm not mistaken, it's virtually unique for the period.
Removed by original poster on 06/25/15 - 19:13:53 (GMT).
Thearmorer
_VISITCOMMUNITY
Alabama, United States
Joined: June 17, 2014
KitMaker: 121 posts
AeroScale: 118 posts
Posted: Thursday, June 25, 2015 - 01:42 AM UTC
Brian,
Progress looking exceptionally good, as is usual, and as usual, Karl has hit the nail on the head with his observations on the waist .50's. Looking at the .50 feed chutes, both sides are feeding from bins aft of the waist openings. I think Krow113's post on the previous page sheds some light on the problem, apparently this restoration was one of the references, if not the one, HK used to base their positioning of the ammo boxes for the ball turret. I've seen ammo boxes like these, but only used for "fixed" .50's (think nose gun armed B-25s) with that elaborate feed tray to mechanism to change the direction of the ammo belt. This highlights the inherent problem with using restoration aircraft as references, over time changes get made to the changes to the changes, somebody probably thought it looked cool! Look at the bright side, you've already got a great looking ball turret, and now you don't need to add some funky convoluted ammo feed mechanism to it.
Carry on.
Redhand
#522
_VISITCOMMUNITY
New Jersey, United States
Joined: January 20, 2013
KitMaker: 1,460 posts
AeroScale: 1,443 posts
Posted: Thursday, June 25, 2015 - 04:45 AM UTC

Quoted Text


Progress looking exceptionally good, as is usual, and as usual, Karl has hit the nail on the head with his observations on the waist .50's.


Well, I really view this build as something of a collective effort. Karl's technical contributions have enhanced the work immeasurably, and I have benefited tangibly from my modeling friend's scratch-build creativity and expertise in the radio room and the ball turret, among other places (like the pilot seat armor plate!). It's also absolutely true that many blog comments have encouraged my to try stuff I would not have imagined doing on my own.

This might be the time to outline a bit where I think this is heading.

First, I will try to do a fairly complete job on the ball turret surroundings inside the fuselage now that the aft radio room door is open.

Second, with my friend's help I'm going to take a shot at doing a reasonably complete interior for the ball turret. I plan to place the turret at a 45 deg. angle off center, and to show the entry hatch open on the outside as appears in some photos. The A/C will be displayed with a mechanic crouching and peering inside from the side of the open ball door. [I do think there will have to be some "fool the eye stuff here!]

Third, I expect the waist positions to be fairly complete, including control cables.

Fourth, I'll use the Eduard exterior P/E sets selectively for the fuselage and wings. I do want to try and have the cockpit with open pilots' windows on either side so some of the detail there can be seen better.

Fifth, with my friend's help I am probably going to install fairly complete wheel well interiors. Someone else out there in the intertoobz has a "how to" breakdown of this for his build -- and I expect to follow that recipe.

Sixth, the build will also have those way kewl Brassin R-1820s and accurate cowlings.

I am NOT going for movable control surfaces, or open flaps. Not necessary.

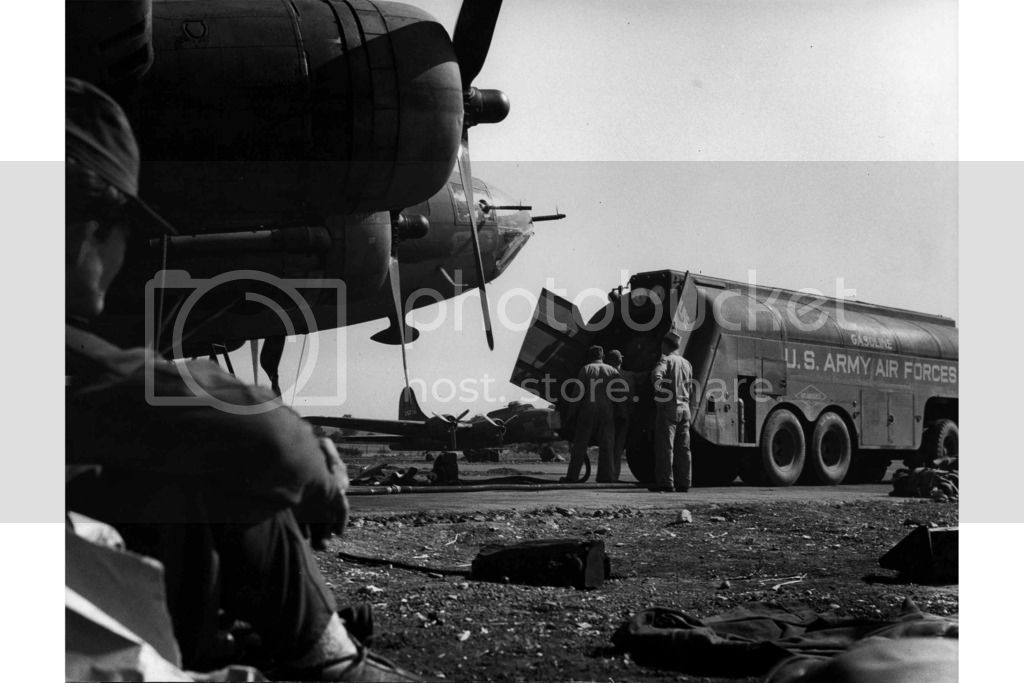
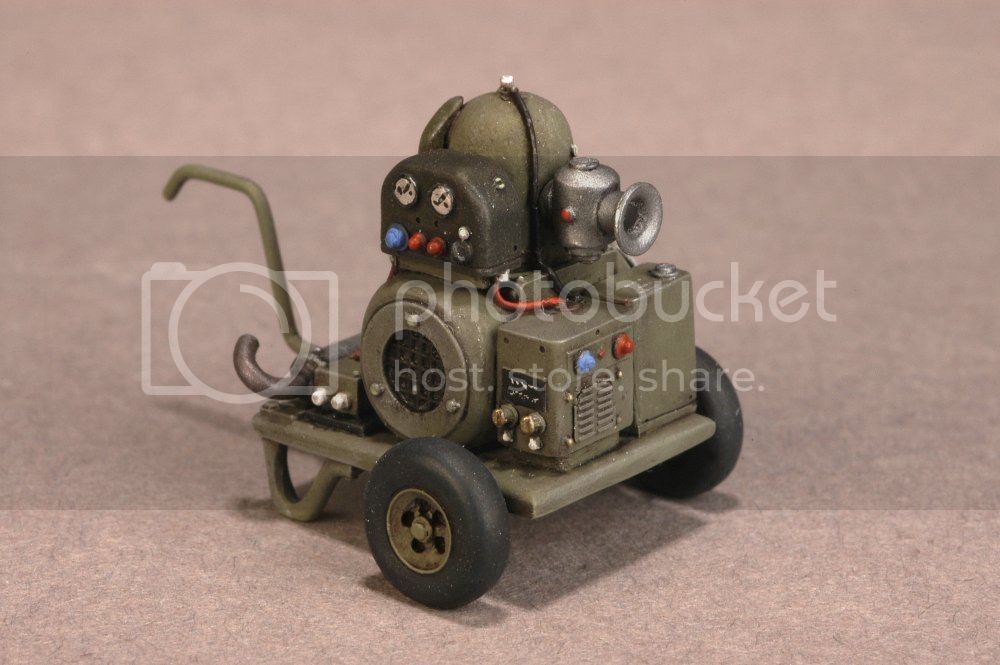
Lastly, the A/C WILL be part of a diorama. In a [much] later post I'll discuss this, but let me make more progress on the actual A/C! What I can say now, because I bought the stuff, is that the diorama will include Tamiya's Fuel Truck and Staff Car. It will also have a putt-putt starter engine (Signifer) and an RAF style bomb cart with 4 x 500 lb. bombs. (Flightpath and Brassin).

The Diorama base will be the Noy's Miniatures RAF/USAAF WWII Bomber hardstand.

In my dreams, but I'm gonna try.
KPHB17FE
_VISITCOMMUNITY
Illinois, United States
Joined: January 12, 2015
KitMaker: 292 posts
AeroScale: 292 posts
Posted: Thursday, June 25, 2015 - 04:05 PM UTC
Awesome "Mission Statement" Brian, really looking forward to the end result. I built one of those fuel trucks, it is a sweet build. You might want to put that together as a change of pace, maybe help with your sanity ! A possibility for that truck: The same truck was used for oil servicing. It was actually too small to be of much use on a bomber base (though they did have them) whereas 37 gallons of oil per engine times four engines times 50 airplanes or so means you need to pump a LOT of heavy oil. You could have your guys servicing the engine oil, be a different look. And if you, or your friend need any details of the ball, I have copies of most of the manuals for it.

Some info on the truck:


And here is mine (I hadn't added the Pioneer tool rack yet, that is why those two holes are there).


KPHB17FE
_VISITCOMMUNITY
Illinois, United States
Joined: January 12, 2015
KitMaker: 292 posts
AeroScale: 292 posts
Posted: Thursday, June 25, 2015 - 04:13 PM UTC
Oh and one comment about control surfaces: you are right about not needing to do anything with them as the rudder and ailerons are normally locked in the faired position and the flaps are up (normally raised during roll out to prevent damage from debris thrown up by the wheels). The elevators however, with the control locks on, are full down. A minor mod for someone of your immense talent! Which would put the control column full forward... hmmm, maybe you don't want to get into that again ...
Redhand
#522
_VISITCOMMUNITY
New Jersey, United States
Joined: January 20, 2013
KitMaker: 1,460 posts
AeroScale: 1,443 posts
Posted: Thursday, June 25, 2015 - 05:37 PM UTC

Quoted Text

The elevators however, with the control locks on, are full down. A minor mod for someone of your immense talent! Which would put the control column full forward... hmmm, maybe you don't want to get into that again ...


Intriguing but I demur on the "immense talent" stuff!

Have any pics of the elevators this way? You know that cockpit is the bane of my build. It is partially disassembled now (again, because of fit issues and seats coming loose) but I'll be getting back to it. Anyway, the control columns now do have something of a forward cant.

Here are three 303rd/Molesworth pics that serve as inspiration for a diorama:


Huge extra points if you can see what's unique about the 17 in the background below!

KPHB17FE
_VISITCOMMUNITY
Illinois, United States
Joined: January 12, 2015
KitMaker: 292 posts
AeroScale: 292 posts
Posted: Thursday, June 25, 2015 - 06:26 PM UTC
The one in the background appears to be a YB-40. This YB-40 most likely (42-5736):


And here is what the elevators look like full down. Of course, then you need the control lock "up" in the cockpit floor ;D ...


Redhand
#522
_VISITCOMMUNITY
New Jersey, United States
Joined: January 20, 2013
KitMaker: 1,460 posts
AeroScale: 1,443 posts
Posted: Thursday, June 25, 2015 - 08:44 PM UTC

Quoted Text

The one in the background appears to be a YB-40. This YB-40 most likely (42-5736):

And here is what the elevators look like full down. Of course, then you need the control lock "up" in the cockpit floor ;D ...


Yes, it's a YB-40. Tampa Tornado.

I LIKE the rudders down pic. THAT I'm doing.
KPHB17FE
_VISITCOMMUNITY
Illinois, United States
Joined: January 12, 2015
KitMaker: 292 posts
AeroScale: 292 posts
Posted: Thursday, June 25, 2015 - 08:50 PM UTC
ELEVATORS, ELEVATORS down
Redhand
#522
_VISITCOMMUNITY
New Jersey, United States
Joined: January 20, 2013
KitMaker: 1,460 posts
AeroScale: 1,443 posts
Posted: Thursday, June 25, 2015 - 09:06 PM UTC

Quoted Text

ELEVATORS, ELEVATORS down


Oops.
Joel_W
Staff MemberAssociate Editor
AUTOMODELER
_VISITCOMMUNITY
New York, United States
Joined: December 04, 2010
KitMaker: 11,666 posts
AeroScale: 7,410 posts
Posted: Thursday, June 25, 2015 - 09:07 PM UTC
Brian,
The idea of a diorama for your build sounds like a fantastic idea.
Joel
KPHB17FE
_VISITCOMMUNITY
Illinois, United States
Joined: January 12, 2015
KitMaker: 292 posts
AeroScale: 292 posts
Posted: Friday, June 26, 2015 - 03:37 PM UTC
Can you share any more information on that putt putt you have? Is that something that is still available?
Redhand
#522
_VISITCOMMUNITY
New Jersey, United States
Joined: January 20, 2013
KitMaker: 1,460 posts
AeroScale: 1,443 posts
Posted: Friday, June 26, 2015 - 03:42 PM UTC

Quoted Text

Can you share any more information on that putt putt you have? Is that something that is still available?


Yes, it's still available. I am working day job today but will post info late this afternoon/early evening, with pics. It is not exactly the one shown in the photo, but "close enough."
Redhand
#522
_VISITCOMMUNITY
New Jersey, United States
Joined: January 20, 2013
KitMaker: 1,460 posts
AeroScale: 1,443 posts
Posted: Saturday, June 27, 2015 - 07:06 AM UTC

Quoted Text

Brian,
The idea of a diorama for your build sounds like a fantastic idea.
Joel


It's an idea that goes back to 1999, and will be suitable for any built 303rd B-17 I may be fortunate enough to acquire, or build. I would love to see Vicious Virgin as the centerpiece, or perhaps a G model. One somewhat off-the-beaten-path G I am considering is the 358th Sqdn.'s Mercy's Madhouse, which should be much a easier build with enclosed gun stations throughout, closed bomb-bay, and an H2X "Mickey" radar where the ball turret is.
Redhand
#522
_VISITCOMMUNITY
New Jersey, United States
Joined: January 20, 2013
KitMaker: 1,460 posts
AeroScale: 1,443 posts
Posted: Saturday, June 27, 2015 - 07:14 AM UTC

Quoted Text

Can you share any more information on that putt putt you have? Is that something that is still available?


Here's a picture of it:


Cool, huh? It's made by the French company SIGNIFER and appears in their online catalog under "1/48 Accessories." Paid by Paypal and shipment service was excellent.
Redhand
#522
_VISITCOMMUNITY
New Jersey, United States
Joined: January 20, 2013
KitMaker: 1,460 posts
AeroScale: 1,443 posts
Posted: Sunday, June 28, 2015 - 07:31 AM UTC
RADIO ROOM FLOOR

It's basically done, using the same combo of Mr. Color wood color, Tamiya translucent orange, and burnt umber craft acrylic wash to create the effect of worn, dirty plywood. Here you can see it against the backdrop of Karl's blood-stained floor pic on the real thing:


Here is a close-up showing off application of the sandpaper "nonskid" in the center:


It was fun (honest!) cutting the center section out covering the actual door, and notching out places for the door hinges to the right and the door handle to the left.

For the sake of variety I painted the hinges brass, the door handle base aluminum, and the door handle itself steel.

I am happy with it.

At the top right I will mount that "dynamotor" assembly that comes with the Eduard brass set, and in the center left I will install a radio room seat. That will be similar to the pilots' seats, except shorter, and with symmetrical armor on the back, per the plans that Karl kindly provided.
Joel_W
Staff MemberAssociate Editor
AUTOMODELER
_VISITCOMMUNITY
New York, United States
Joined: December 04, 2010
KitMaker: 11,666 posts
AeroScale: 7,410 posts
Posted: Sunday, June 28, 2015 - 05:42 PM UTC
Brian,
That floor is really most impressive. Nice job on the hinges and handle.
Joel
Redhand
#522
_VISITCOMMUNITY
New Jersey, United States
Joined: January 20, 2013
KitMaker: 1,460 posts
AeroScale: 1,443 posts
Posted: Sunday, June 28, 2015 - 07:21 PM UTC

Quoted Text


Nice job on the hinges and handle.
Joel


I do think it's amusing that they are the only things visible from the original kit part.
thegirl
_VISITCOMMUNITY
Alberta, Canada
Joined: January 19, 2008
KitMaker: 6,743 posts
AeroScale: 6,151 posts
Posted: Sunday, June 28, 2015 - 09:11 PM UTC
Very enjoyable thread with a cup of coffee or two ...


Terri
Joel_W
Staff MemberAssociate Editor
AUTOMODELER
_VISITCOMMUNITY
New York, United States
Joined: December 04, 2010
KitMaker: 11,666 posts
AeroScale: 7,410 posts
Posted: Sunday, June 28, 2015 - 10:35 PM UTC

Quoted Text

Very enjoyable thread with a cup of coffee or two ...

:-H

Terri


Terri,
Until you get to the blood picture Naw, just kidding.
Joel
Redhand
#522
_VISITCOMMUNITY
New Jersey, United States
Joined: January 20, 2013
KitMaker: 1,460 posts
AeroScale: 1,443 posts
Posted: Sunday, June 28, 2015 - 11:38 PM UTC

Quoted Text


Until you get to the blood picture Naw, just kidding.
Joel


I don't think I'm going to add any puddles and streaks of clear Tamiya red to simulate THAT detail, for sure. There is such as thing as going too far with "extra details."
Joel_W
Staff MemberAssociate Editor
AUTOMODELER
_VISITCOMMUNITY
New York, United States
Joined: December 04, 2010
KitMaker: 11,666 posts
AeroScale: 7,410 posts
Posted: Monday, June 29, 2015 - 12:17 AM UTC

Quoted Text


Quoted Text


Until you get to the blood picture Naw, just kidding.
Joel


I don't think I'm going to add any puddles and streaks of clear Tamiya red to simulate THAT detail, for sure. There is such as thing as going too far with "extra details."


Brian,
Glad to hear that, but then again, no one will be able to see it once you close up the fuselage.
Joel
Redhand
#522
_VISITCOMMUNITY
New Jersey, United States
Joined: January 20, 2013
KitMaker: 1,460 posts
AeroScale: 1,443 posts
Posted: Monday, June 29, 2015 - 12:23 AM UTC
Actually they would, through the open RR hatch.
mrockhill
_VISITCOMMUNITY
Pennsylvania, United States
Joined: June 17, 2009
KitMaker: 566 posts
AeroScale: 507 posts
Posted: Monday, June 29, 2015 - 06:17 AM UTC
Truly impressive Brian, I dred to think how long it would take me to build any bomber bigger than 1/72..... im still not sure that would be a good idea either