Air Campaigns
Want to start or join a group build? This is where to start.
OFFICIAL: Schwalbe - Me 262 Campaign
goodn8
_VISITCOMMUNITY
Berlin, Germany
Joined: October 12, 2008
KitMaker: 709 posts
AeroScale: 651 posts
Posted: Friday, August 07, 2015 - 03:39 PM UTC
Wow Jesper!
What a quick progress and a really nice paintjob on this unusual but interesting camo - this build so far is very well done!

Damian: Thanks for your work on updating the progresses of all the participants and the additional time you will give us to finish.

Mike: Congrats for finishing your very nice model!

I'm back soon with (hopefully) more of my 262.
Thomas
SGTJKJ
#041
_VISITCOMMUNITY
Kobenhavn, Denmark
Joined: July 20, 2006
KitMaker: 10,069 posts
AeroScale: 3,788 posts
Posted: Friday, August 07, 2015 - 07:11 PM UTC
Thanks, Thomas. Appreciate it.

Looking forward to see more of your build soon
AussieReg
Staff MemberAssociate Editor
AUTOMODELER
#007
_VISITCOMMUNITY
Victoria, Australia
Joined: June 09, 2009
KitMaker: 8,156 posts
AeroScale: 3,756 posts
Posted: Friday, August 07, 2015 - 07:55 PM UTC
Very neat result on that camo scheme Jesper, well worth the time invested!

Cheers, D
woltersk
_VISITCOMMUNITY
Utah, United States
Joined: May 27, 2003
KitMaker: 1,026 posts
AeroScale: 215 posts
Posted: Friday, August 07, 2015 - 11:54 PM UTC
@Jesper--that is one 'sharp' paint job!!
With my lack of imagination I had a difficult time picturing where your masking job was going, but now that I see the end result, it is really impressive!

Keith
alpha_tango
_VISITCOMMUNITY
Germany
Joined: September 07, 2005
KitMaker: 5,609 posts
AeroScale: 5,231 posts
Posted: Saturday, August 08, 2015 - 12:53 PM UTC
Hi all,

nice progress on your builds!

Sadly my cockpitset did not arrive, so a weekend lost for my late entry...

all the best

Steffen
SGTJKJ
#041
_VISITCOMMUNITY
Kobenhavn, Denmark
Joined: July 20, 2006
KitMaker: 10,069 posts
AeroScale: 3,788 posts
Posted: Saturday, August 08, 2015 - 02:44 PM UTC
Thanks For the comments, guys. Much appreciated.

More to follow soon

Steffen, hope your stuff arrives soon. Hopefully you have some other sub assemblies to work on while waiting.
iflytb20
#501
_VISITCOMMUNITY
Kerala, India / भारत
Joined: August 25, 2009
KitMaker: 292 posts
AeroScale: 194 posts
Posted: Saturday, August 08, 2015 - 09:05 PM UTC
My entry for the build. I just hope I can finish it in time

goodn8
_VISITCOMMUNITY
Berlin, Germany
Joined: October 12, 2008
KitMaker: 709 posts
AeroScale: 651 posts
Posted: Sunday, August 09, 2015 - 12:52 AM UTC
Hi there!
Just a small update. Not much, only done some basic paint to the fuselage and the upper wings. Canopy is masked with Revell's Liquid Mask (used it for the first time,hope it works...)


Thomas
SGTJKJ
#041
_VISITCOMMUNITY
Kobenhavn, Denmark
Joined: July 20, 2006
KitMaker: 10,069 posts
AeroScale: 3,788 posts
Posted: Sunday, August 09, 2015 - 01:58 AM UTC
Nice camo, Thomas. Well done.
Antilles
_VISITCOMMUNITY
Nordrhein-Westfalen, Germany
Joined: March 22, 2015
KitMaker: 671 posts
AeroScale: 614 posts
Posted: Sunday, August 09, 2015 - 02:32 AM UTC
Jesper and Thomas: Great work on the camo! Seems that this campaign leads to a better sale of masking tape this year!

Raj: Welcome to the campaign. I like Your swallow of the first generations campaign very much!

Oliver
bomber14
_VISITCOMMUNITY
New Jersey, United States
Joined: February 02, 2015
KitMaker: 330 posts
AeroScale: 286 posts
Posted: Monday, August 10, 2015 - 08:41 AM UTC
thanks Damian. I can now say I am officially done as I have posted my finished 262 in the campaign gallery. what started out as a out of box build turned out to be a detail build (at least for me) I ended up adding photo etched cockpit detail and while I was at it I decided to give the brake lines and wheel well lines that came with the photo etched kit a try. I also scratch built some wing slats and replaced the kit pitot tube with brass tube and wire. here is a preview-

[imghttp://i262.photobucket.com/albums/ii93/joe_b_album/WWII%20fighters/_MG_7286.jpg][/img]

I used gunze and model master paints, kit decals and pro modeler/flory wash

this was a fun build- although the wing to fuselage could been better- joe
AussieReg
Staff MemberAssociate Editor
AUTOMODELER
#007
_VISITCOMMUNITY
Victoria, Australia
Joined: June 09, 2009
KitMaker: 8,156 posts
AeroScale: 3,756 posts
Posted: Monday, August 10, 2015 - 09:50 AM UTC
Lovely build Joe, it has been great following your journey. Thanks for sharing so much detail with us, and congratulations on getting finished!

Roll Call/Build Status post duly amended.

Cheers, D
SGTJKJ
#041
_VISITCOMMUNITY
Kobenhavn, Denmark
Joined: July 20, 2006
KitMaker: 10,069 posts
AeroScale: 3,788 posts
Posted: Monday, August 10, 2015 - 11:29 AM UTC
Beautiful build, Joe! The finish is superb.
MLD
_VISITCOMMUNITY
Vermont, United States
Joined: July 21, 2002
KitMaker: 3,569 posts
AeroScale: 419 posts
Posted: Monday, August 10, 2015 - 05:51 PM UTC
Fantastic finish Joe. The fading looks great to my eye.

Which Gunze and Model Masterpaint numbers did you use for the topside colors, and did you mix colors to get those shades?
Did you fade them with oils?

The reason I ask is that my results with that scheme usually ends up looking too stark.
Antilles
_VISITCOMMUNITY
Nordrhein-Westfalen, Germany
Joined: March 22, 2015
KitMaker: 671 posts
AeroScale: 614 posts
Posted: Monday, August 10, 2015 - 07:16 PM UTC
Outstanding build Joe. The camo looks very smooth and the subtle weathering, too. It is a real gem!

Oliver
JoeOsborne
_VISITCOMMUNITY
California, United States
Joined: October 08, 2013
KitMaker: 111 posts
AeroScale: 28 posts
Posted: Monday, August 10, 2015 - 10:22 PM UTC

Quoted Text

Outstanding build Joe. The camo looks very smooth and the subtle weathering, too. It is a real gem!

Oliver


Completely agree! Really like the camo and weathering... nicely done!
JoeOsborne
_VISITCOMMUNITY
California, United States
Joined: October 08, 2013
KitMaker: 111 posts
AeroScale: 28 posts
Posted: Monday, August 10, 2015 - 10:28 PM UTC
Folks,

An update and some interesting info.... This is the typical goods news/bad news post.

The bad news is I won't be finishing the 1/32 Schwalbe in time for this GB finish. Still another couple of months work there. Lesson learned: for these GB's stick to 48th scale!

The good news ... with my 48th Scale U3 entry in this GB, I just took first place in a local county fair contest in 48th scale jets!

Lots of good work in this GB, and it has been fun!


Joe
bomber14
_VISITCOMMUNITY
New Jersey, United States
Joined: February 02, 2015
KitMaker: 330 posts
AeroScale: 286 posts
Posted: Tuesday, August 11, 2015 - 10:28 PM UTC

Quoted Text

Fantastic finish Joe. The fading looks great to my eye.

Which Gunze and Model Masterpaint numbers did you use for the topside colors, and did you mix colors to get those shades?
Did you fade them with oils?

The reason I ask is that my results with that scheme usually ends up looking too stark.


mike i used gunze rlm 81 brown violet acrylic and MM rlm 82 green enamel. i added 3-4 drops of white when thinning them down and after shooting each color i added a few more drops of white to fade the colors and sprayed a light coat in the middle of all the patches. then glosscoat and decals followed by the flory wash. the flory wash is water based and real easy to use. finally a dullcoat to seal and dull the finish. i also used tamiya weathering powders set with the soot in it to add some powder marks to the gun ports and ejectors and a few hatches. the underside was first sprayed with tamiya light blue from the can then after panel hilighting another coat of MM rlm 76. unfortunatly it covered up all the panel lines so i used the flory wash which turned out pretty good.
joe
MLD
_VISITCOMMUNITY
Vermont, United States
Joined: July 21, 2002
KitMaker: 3,569 posts
AeroScale: 419 posts
Posted: Wednesday, August 12, 2015 - 06:26 AM UTC

Quoted Text


Quoted Text

Fantastic finish Joe. The fading looks great to my eye.

Which Gunze and Model Masterpaint numbers did you use for the topside colors, and did you mix colors to get those shades?
Did you fade them with oils?

The reason I ask is that my results with that scheme usually ends up looking too stark.


mike i used gunze rlm 81 brown violet acrylic and MM rlm 82 green enamel. i added 3-4 drops of white when thinning them down and after shooting each color i added a few more drops of white to fade the colors and sprayed a light coat in the middle of all the patches. then glosscoat and decals followed by the flory wash. the flory wash is water based and real easy to use. finally a dullcoat to seal and dull the finish. i also used tamiya weathering powders set with the soot in it to add some powder marks to the gun ports and ejectors and a few hatches. the underside was first sprayed with tamiya light blue from the can then after panel hilighting another coat of MM rlm 76. unfortunatly it covered up all the panel lines so i used the flory wash which turned out pretty good.
joe


Joe,
Thanks for the detailed description.
My Gunze 81 (acrylic) is much darker, I will have to try your lightening ratio. The MM (acrylic) 84 I have is nowhere close to that color. I am not much of an enamel airbrusher.
I certainly cannot argue with your results. They are fantastic.

Mike
AussieReg
Staff MemberAssociate Editor
AUTOMODELER
#007
_VISITCOMMUNITY
Victoria, Australia
Joined: June 09, 2009
KitMaker: 8,156 posts
AeroScale: 3,756 posts
Posted: Wednesday, August 12, 2015 - 01:13 PM UTC
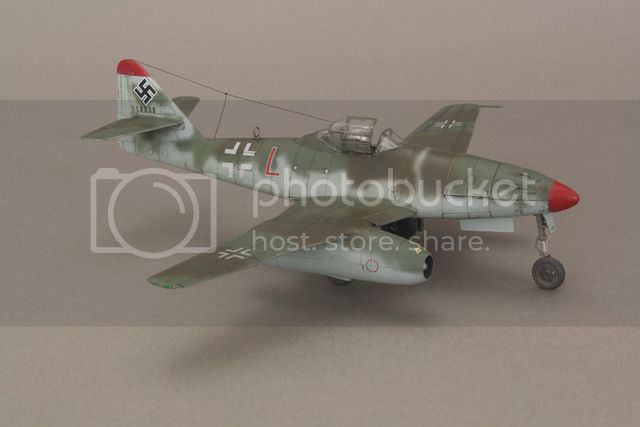
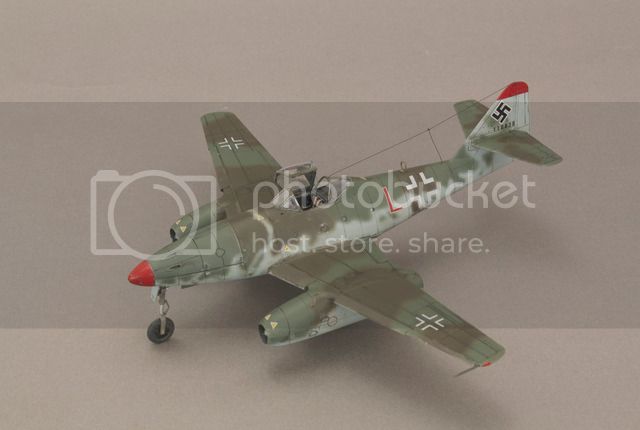
Hi folks. I have FINALLY got a chance to throw some paint at my build. Nothing special just yet, some RLM in the office and front wheel well and NMF in the pods and main gear wells. I will post some pics once I get the detail painting and PE belts added in so it actually looks interesting !

In the meantime, how about a quick in-Campaign tutorial???

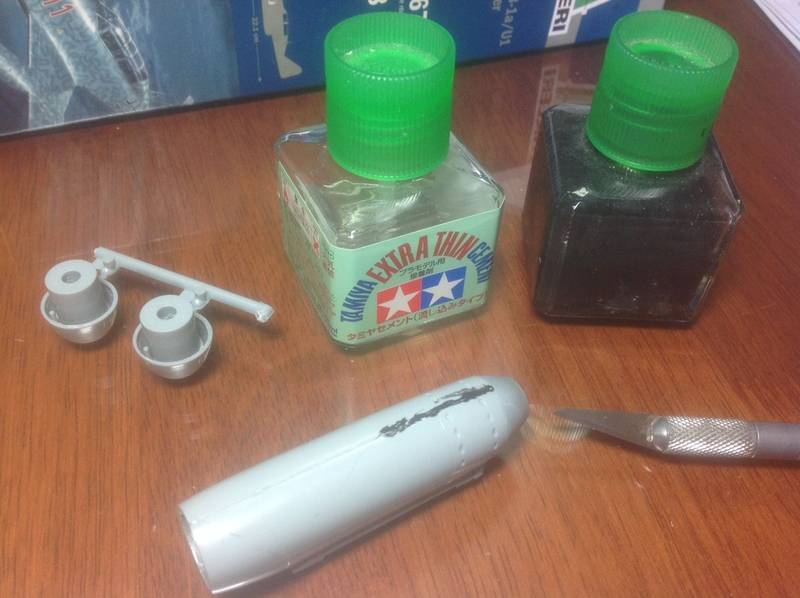
I use Tamiya Extra-Thin Cement pretty much exclusively on my builds. I read in a couple of forums about folks making their own cement/putty/gap-filler using this product and old sprue material, so I gave it a try and have been using it for a while now with good results. In this first pic you can see the bottle of Cement, and beside it an old bottle which I threw a pile of old black sprue pieces in (from my 1/48 Monogram P-61 build if I remember correctly) and left for a few hours to dissolve. The good thing about this product, if you can call it that, is that if you find it too thin just throw some more sprue in, and if you find it too thick to apply just add some more cement! I chose to use black sprue so that it would stand out against the grey styrene of my current builds. I will make some grey in my next batch to use on a few dark green and black kits that I have in the stash. You can use the brush attached to the bottle lid to apply the filler, or I use a toothpick sometimes for small spots like ejector pin marks or ham-fisted knife divots (I'm good at making those!)

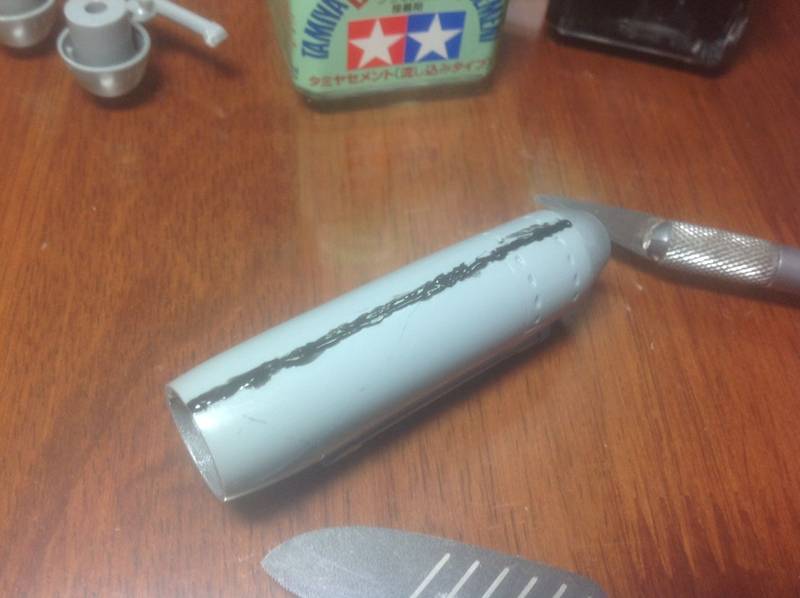
In this second and third pic I have dabbed a line right along the bottom join of the engine pods, enough so that it is slightly raised above the join. The join was not too bad on this pod, but on the second it was quite gappy. Using this type of product you can build up layers and fill quite a gap because it actually dissolves and bonds with the kit parts rather than just adhering to the surface.


When I got back from work tonight it was quite literally 5 minutes sanding with my weapons of choice (Sanding Sticks, Flexible Sanding Pads and my favourite Flex-I-File) while the kettle boiled, and the joins are smoothed out flush with the pod halves.

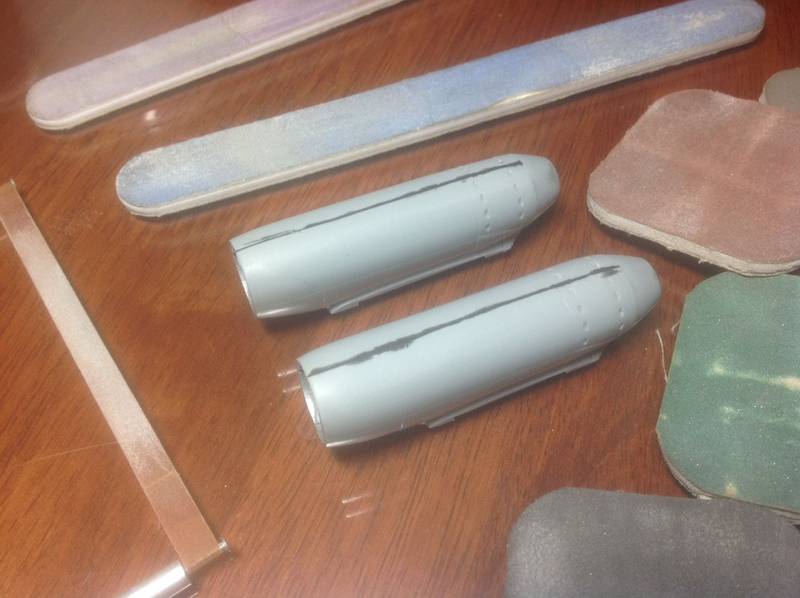
I love the Flex-I-File because it can be used very accurately and not remove part details.

Sorry for the long-winded post, I just thought this would be of interest to a few of you who hadn't seen it done before.

Cheers, D
GazzaS
#424
_VISITCOMMUNITY
Queensland, Australia
Joined: April 23, 2015
KitMaker: 4,648 posts
AeroScale: 1,938 posts
Posted: Wednesday, August 12, 2015 - 01:40 PM UTC
That is brilliant Damian! Having never seen it before, I'm wondering how much money I've wasted on putty! I just chucked the leftover spruce from a kit into the bin, to boot!

Thanks for that!

Gary
AussieReg
Staff MemberAssociate Editor
AUTOMODELER
#007
_VISITCOMMUNITY
Victoria, Australia
Joined: June 09, 2009
KitMaker: 8,156 posts
AeroScale: 3,756 posts
Posted: Wednesday, August 12, 2015 - 02:01 PM UTC
No worries Gary! If I've only helped one fellow modeller, mission accomplished!

I was amazed at how much sprue that I could dissolve in about half a bottle of cement, and it took a while to get it to a consistency that I was happy with, but I have used this batch for several years now and just keep adding a bit more cement if it dries out. I use a small metal spatula to give it a good stir before I use it and it has never let me down as a fine filler. Another good thing about it is that once it is sanded it has the same surface characteristics as the styrene kit parts so there is no variation in the paint finish that you sometimes get with other products.

Cheers, D
Antilles
_VISITCOMMUNITY
Nordrhein-Westfalen, Germany
Joined: March 22, 2015
KitMaker: 671 posts
AeroScale: 614 posts
Posted: Wednesday, August 12, 2015 - 03:26 PM UTC
Hi Damian,

thank You very much for this tutorial. Like Gary, I never heard of this before.

Is it useful to use the plastic-sprue of the same kit You are filling. The plastic of some manufacturers is rather different, I believe. Probably there are different chemical compositions.

Oliver
AussieReg
Staff MemberAssociate Editor
AUTOMODELER
#007
_VISITCOMMUNITY
Victoria, Australia
Joined: June 09, 2009
KitMaker: 8,156 posts
AeroScale: 3,756 posts
Posted: Wednesday, August 12, 2015 - 07:34 PM UTC

Quoted Text

Is it useful to use the plastic-sprue of the same kit You are filling. The plastic of some manufacturers is rather different, I believe. Probably there are different chemical compositions.


Hi Oliver. I have noticed the plastic from various manufacturers can respond very differently to the Tamiya Extra Thin cement. I am currently building an MPC car kit which is not responding well. The plastic is glossy and almost brittle, so I am scuffing the join surfaces to give a bit more bite area for the adhesive. It cures much more slowly than my normal Revell/Tamiya/Hasegawa builds, but seems to be quite strong once it is fully cured. I haven't tried this filler product on it yet, but I am sure I will at some stage.

Cheers, D
shorty53
#330
_VISITCOMMUNITY
Queensland, Australia
Joined: July 15, 2011
KitMaker: 175 posts
AeroScale: 103 posts
Posted: Thursday, August 13, 2015 - 05:15 PM UTC
Camo done.