Air Campaigns
Want to start or join a group build? This is where to start.
Want to start or join a group build? This is where to start.
Hosted by Frederick Boucher, Michael Satin
OFFICIAL: Schwalbe - Me 262 Campaign

Beauslx

Joined: August 28, 2013
KitMaker: 159 posts
AeroScale: 116 posts

Posted: Wednesday, March 04, 2015 - 06:16 AM UTC
Posted: Wednesday, March 04, 2015 - 10:02 AM UTC
Quoted Text
Somehow I've amassed 4 Me-262s over the past few months, as well as a 1/48 Nakajima Kikka to serve as a companion piece to a Schwalbe.
Nice little haul there Martyn. How about you do the Kikka in Luftwaffe livery as a sort of "reverse lend-lease" theme?
Whichever way you go, it will be interesting to watch your build take shape.
Hoping to make a start on some parts preparation tonight, it's been months since I had any sort of styrene fix!
Cheers, D
MLD

Joined: July 21, 2002
KitMaker: 3,569 posts
AeroScale: 419 posts

Posted: Wednesday, March 04, 2015 - 07:15 PM UTC
Quoted Text
Hoping to make a start on some parts preparation tonight, it's been months since I had any sort of styrene fix!
Cheers, D
You're telling me! This work week/gainfully employed/family life thing is REALLY getting in the way of my builds...

Hoping to spray some wheel well/landing gear color this weekend. And if all goes incredibly well, build a 1/72 cockpit!
Mike
Posted: Thursday, March 05, 2015 - 02:43 AM UTC
Quoted Text
You're telling me! This work week/gainfully employed/family life thing is REALLY getting in the way of my builds...
Mike, I am currently thoroughly reviewing the Geneva Convention and the full compilation of the International Human Rights Commission papers as I am SURE I remember reading something about Scale Modeling taking precedence over all other activities whilst being fully supported by one's employer and spouse.
Well, maybe not so much SURE, as REASONABLY CONFIDENT . . .
OK, perhaps it is some VAGUE RECOLLECTION . . . .
Ummm, let's just put it down to WISHFUL THINKING and move on.

JoeOsborne

Joined: October 08, 2013
KitMaker: 111 posts
AeroScale: 28 posts

Posted: Friday, March 06, 2015 - 08:59 AM UTC
Hi Folks,
Here's my entry the Hobby Boss 262 A-1A/U3. Just OOB.

Here's my entry the Hobby Boss 262 A-1A/U3. Just OOB.

Posted: Friday, March 06, 2015 - 11:18 AM UTC
Isn't it the 11th commandment???
Thou shalt not dump on a mans right to build model kitsets????
Thou shalt not dump on a mans right to build model kitsets????
Posted: Friday, March 06, 2015 - 04:45 PM UTC
Joe, thanks for joining in! I'm looking forward to watching your build, I have that kit in the stash as well.
Chris, Amen!
Cheers, D
Chris, Amen!
Cheers, D

magnusf

Joined: May 02, 2006
KitMaker: 1,953 posts
AeroScale: 1,902 posts

Posted: Friday, March 06, 2015 - 07:38 PM UTC
Still not up to speed on this project but doing a little bit every now and then...
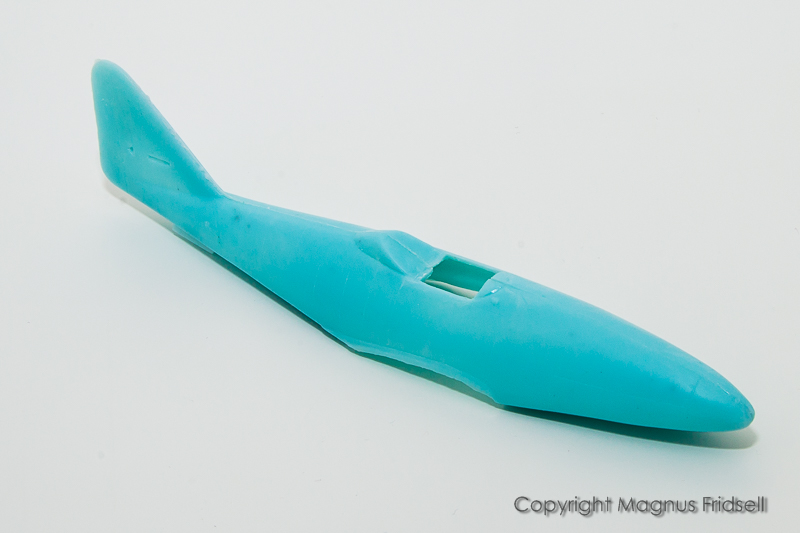
Fuselage glued! One advantage of doing other stuff in parallel is that the seams really get the time they do need to harden, hopefully avoiding sink marks later on !
!
It really needs some paint, it is rather feature-less in light blue!

Magnus

Fuselage glued! One advantage of doing other stuff in parallel is that the seams really get the time they do need to harden, hopefully avoiding sink marks later on
 !
!It really needs some paint, it is rather feature-less in light blue!

Magnus

WildeSau

Joined: July 01, 2006
KitMaker: 20 posts
AeroScale: 19 posts

Posted: Saturday, March 07, 2015 - 12:20 AM UTC
Quoted Text
Hi Folks,
Here's my entry the Hobby Boss 262 A-1A/U3. Just OOB.
Nice to see another reconnaissance plane...
Quoted Text
Fuselage glued! One advantage of doing other stuff in parallel is that the seams really get the time they do need to harden, hopefully avoiding sink marks later on!
It really needs some paint, it is rather feature-less in light blue!

Magnus
Magnus, you've forgotten to put in a nose weight.
It might be a tail-sitter.


magnusf

Joined: May 02, 2006
KitMaker: 1,953 posts
AeroScale: 1,902 posts

Posted: Saturday, March 07, 2015 - 01:55 AM UTC
Jan! Thanks for the heads-up regarding tail-sitting - I'll think it over carefully  !
!

I've come up with an avatar for my coming build blog in suitable WWII B&W. I'm a CAD-rat by profession, not a graphical designer...

Magnus
 !
!I've come up with an avatar for my coming build blog in suitable WWII B&W. I'm a CAD-rat by profession, not a graphical designer...

Magnus
Posted: Saturday, March 07, 2015 - 02:57 AM UTC
Great work with the banner Magnus! Well I'm further along with my build. I must say it is so much quicker when you build in 1/72 virtually no cockpit detail and very low parts count! Mostly together now and the cockpit decals don't look to bad. The build instructions would have you put 3 grams of weight in the nose but I went a different route and put a total of 6 grams in the drop tanks. I put in the extra wight because the tanks are not as far forward as the nose so will not provide the same counter balance. Here are some pics of my progress


magnusf

Joined: May 02, 2006
KitMaker: 1,953 posts
AeroScale: 1,902 posts

Posted: Saturday, March 07, 2015 - 03:05 AM UTC
Chris! Thanks!
I've still got fond memories of that kit of your's. I read about it in a hobby magazine as a teenager when it was new on the market in around 1985, then I finally got to build one in 1994 that I'm still happy with. If I hadn't gone with the prototype I would have done the same kit as you, I have it in my stash!
Fit the engines with care, if I remember correctly they snap in place beautifully if carefully trimmed to fit, requiring just a drop of liquid glue to keep them in place!

Magnus
I've still got fond memories of that kit of your's. I read about it in a hobby magazine as a teenager when it was new on the market in around 1985, then I finally got to build one in 1994 that I'm still happy with. If I hadn't gone with the prototype I would have done the same kit as you, I have it in my stash!
Fit the engines with care, if I remember correctly they snap in place beautifully if carefully trimmed to fit, requiring just a drop of liquid glue to keep them in place!

Magnus
Posted: Saturday, March 07, 2015 - 01:21 PM UTC
I have started on some of the subassemblies of the Cyber-Hobby Me262A-1/U4.


Posted: Saturday, March 07, 2015 - 06:21 PM UTC
Great to see some good progress already guys ! I have updated the Roll Call/Build Status post on page 1.
I got a start on my build last night, just some sub-assembly work on the cockpit and parts prep on some further stages. Nothing worthy of camera-time just yet !
Cheers, D
I got a start on my build last night, just some sub-assembly work on the cockpit and parts prep on some further stages. Nothing worthy of camera-time just yet !
Cheers, D

magnusf

Joined: May 02, 2006
KitMaker: 1,953 posts
AeroScale: 1,902 posts

Posted: Tuesday, March 10, 2015 - 02:46 AM UTC
Some more progress... Fit is better than expected, one part of the explanation could be that the master is probably based on a Hasegawa kit.
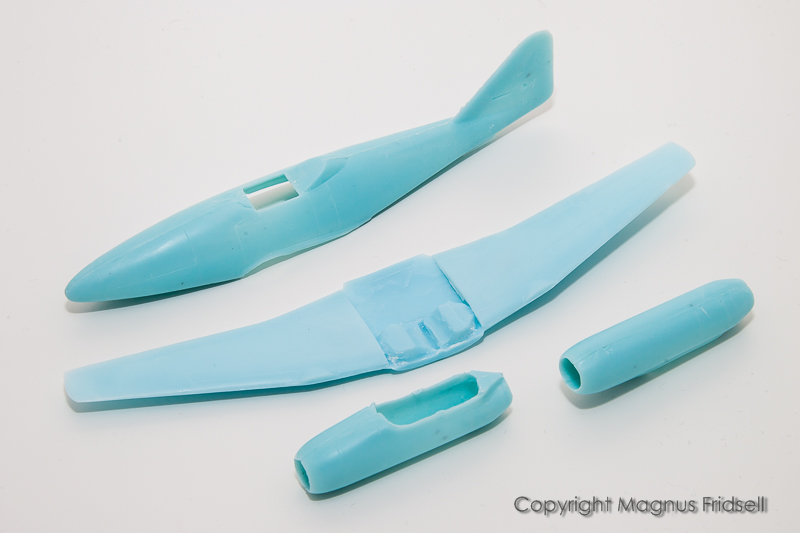
Wings and underwing pods glued!

Magnus

Wings and underwing pods glued!

Magnus
Bushioka

Joined: January 13, 2014
KitMaker: 107 posts
AeroScale: 105 posts

Posted: Tuesday, March 10, 2015 - 06:09 PM UTC
Quoted Text
Nice little haul there Martyn. How about you do the Kikka in Luftwaffe livery as a sort of "reverse lend-lease" theme?
Whichever way you go, it will be interesting to watch your build take shape.
I suppose it's the inevitable result of the 262 being my favorite plane to build. I've already finished a What If one for the Airfix III campaign in hypothetical Ukrainian Liberation Army dressing. Lend-lease Kikka sounds quite tempting since I'm certainly in no shortage of German markings.
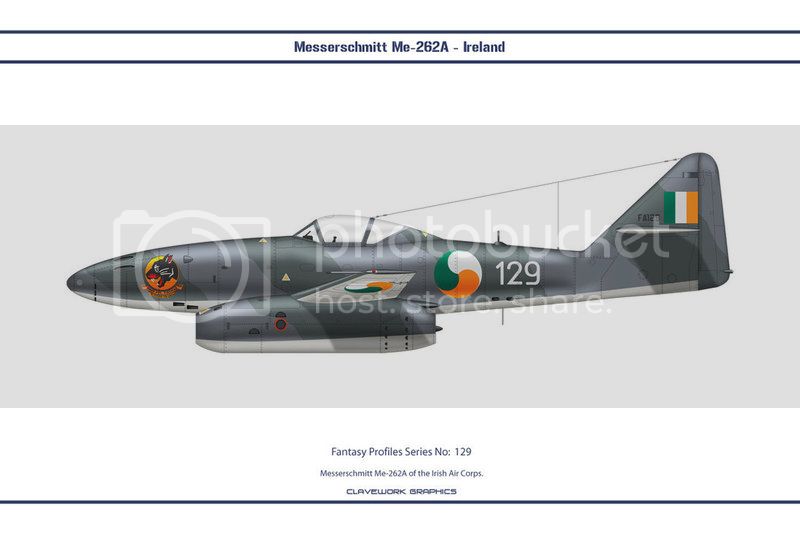
However I think my first build for this campaign might be a 1/72 Irish Air Corps 262 A-1A, inspired on this wonderful idea done up by ClaveWorks:

Jessie_C


Joined: September 03, 2009
KitMaker: 6,965 posts
AeroScale: 6,247 posts

Posted: Tuesday, March 10, 2015 - 09:51 PM UTC
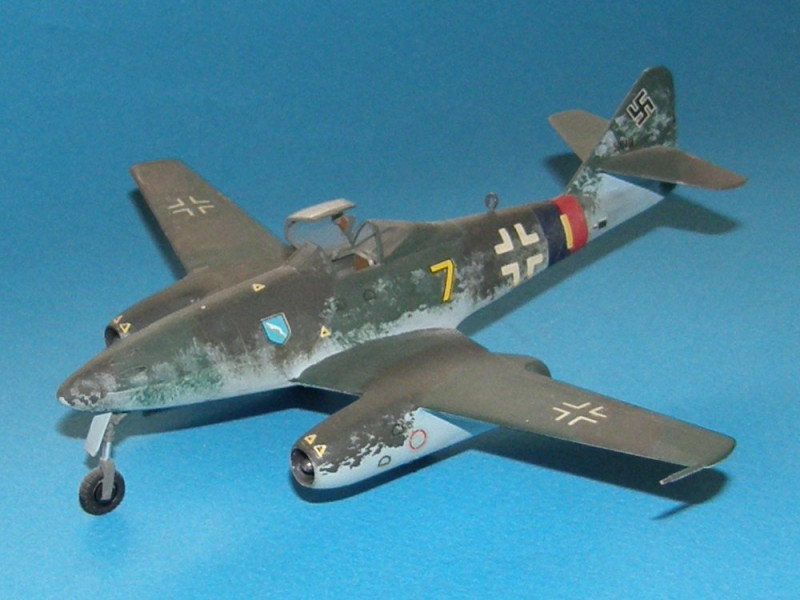
The Hasegawa kit is a wonderful little beast. Here's my single seater I built back in the '90s, finished with the Cooper Details cockpit set, Humbrol Authentic colours and a hairy stick


magnusf

Joined: May 02, 2006
KitMaker: 1,953 posts
AeroScale: 1,902 posts

Posted: Tuesday, March 10, 2015 - 11:22 PM UTC
OK, 262s past and present, here we go  !
!
Here's my take on the Hase kit.
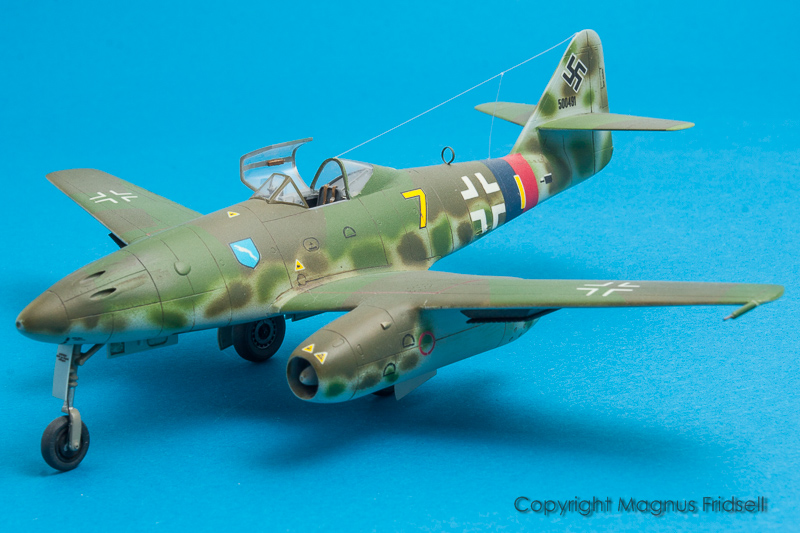
Almost the same setup as your's Jessica, or rather, Cooper Details interior (didn't that set include the mainwheels as well?) but Gunze paints (my first model using these) and no hairy stick but a Badger 200 single-action airbrush. I'm still fond of this one!
Regarding the hairy stick: I got rid of it around 1985 (without ever having been especially good at brush painting) when my dad helped me to build my own airbrush. No, it wasn't an Iwata, it was based on the pistol grip from our garage compressor. Dad cut a thread around the nozzle where I could trap a piece of thick wire (think it was for arc welding) between two nuts, this in turn held a small plastic bottle and a thin plastic tube perpendicular to the airflow: much like the simplest Badger airbrush (the 250?). Not very useful for freehanding but with a suitable set of home-cut tape masks it was possible to do surprisingly advanced paint jobs with it! Not on the 262 however, I had bought a real airbrush from Discount Hobby Center (Ithaca, NY; anyone remember that place?) by that time!
Sorry for this rather lengthy swim in the nostalgia pond...

Magnus
 !
!Here's my take on the Hase kit.

Almost the same setup as your's Jessica, or rather, Cooper Details interior (didn't that set include the mainwheels as well?) but Gunze paints (my first model using these) and no hairy stick but a Badger 200 single-action airbrush. I'm still fond of this one!
Regarding the hairy stick: I got rid of it around 1985 (without ever having been especially good at brush painting) when my dad helped me to build my own airbrush. No, it wasn't an Iwata, it was based on the pistol grip from our garage compressor. Dad cut a thread around the nozzle where I could trap a piece of thick wire (think it was for arc welding) between two nuts, this in turn held a small plastic bottle and a thin plastic tube perpendicular to the airflow: much like the simplest Badger airbrush (the 250?). Not very useful for freehanding but with a suitable set of home-cut tape masks it was possible to do surprisingly advanced paint jobs with it! Not on the 262 however, I had bought a real airbrush from Discount Hobby Center (Ithaca, NY; anyone remember that place?) by that time!
Sorry for this rather lengthy swim in the nostalgia pond...


Magnus
Posted: Wednesday, March 11, 2015 - 01:55 AM UTC
Magnus nostalgia is a major motivating force in this hobby. For bygone eras, for models we made when younger to building aircraft our dads flew or worked on. (my dad was in the fleet air arm he worked on a Corsair) Wallow away I say!!!!
MLD

Joined: July 21, 2002
KitMaker: 3,569 posts
AeroScale: 419 posts

Posted: Wednesday, March 11, 2015 - 02:08 AM UTC
I am not sure if I can even count this one. It's the terrible ancient Revell (maybe RoG boxing?) in 1/72. Pilot bust molded into the left fuselage half, raised panel lines, thick cockpit, minimalist decals.
I think I airbrushed this one w Tamiya colors, but nothing too accurate. Lt blue, Dk Green and Lt Green topside, hard edged on the wings and freehand on the fuselage sides.
But it is recognizable as a 262 in the timeline of powered flight/planes Mr D thinks look cool hanging from my classroom ceiling.


woltersk

Joined: May 27, 2003
KitMaker: 1,026 posts
AeroScale: 215 posts

Posted: Wednesday, March 11, 2015 - 06:39 PM UTC
As long as we're doin' a 'Throwback Thursday'...
The -262 is one of my favorite aircraft also. But at the moment there is none in my collection, hence this build. My last one was donated to the display case in 'Watson Hall' at Wright-Patterson AFB. I figured any facility named after the famed leader of "Watson's Whizzer's" needed a -262 to go with the other models of the other aircraft types he and his FTD crew 'evaluated' after the war.
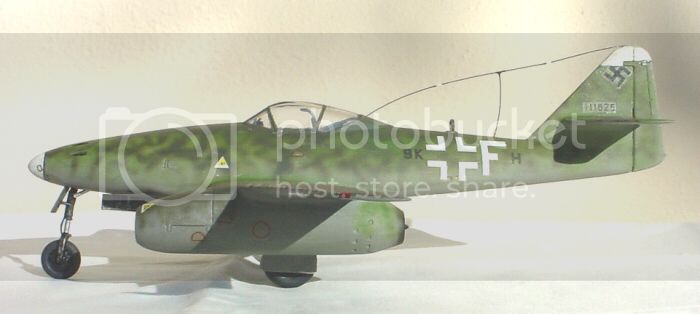
This was a now 20 year old build of the 1/48th Revell(?) kit:

Can't wait to get started on my entry. Looking forward to seeing everyone else's progress.
Keith
The -262 is one of my favorite aircraft also. But at the moment there is none in my collection, hence this build. My last one was donated to the display case in 'Watson Hall' at Wright-Patterson AFB. I figured any facility named after the famed leader of "Watson's Whizzer's" needed a -262 to go with the other models of the other aircraft types he and his FTD crew 'evaluated' after the war.
This was a now 20 year old build of the 1/48th Revell(?) kit:


Can't wait to get started on my entry. Looking forward to seeing everyone else's progress.
Keith

goodn8

Joined: October 12, 2008
KitMaker: 709 posts
AeroScale: 651 posts

Posted: Thursday, March 12, 2015 - 10:06 PM UTC
Nice to see some progress in new work and also in a nostalgic way. Had myself a 1:32 262 from Revell in the early 70th - pushed into the trash bin when leaving parents home (sorry no photos).
Actual only some cutting and cleaning parts, nothing to show. Canopy is very poor... don't now what to do. So the office would not be very visible.
Thomas
Actual only some cutting and cleaning parts, nothing to show. Canopy is very poor... don't now what to do. So the office would not be very visible.
Thomas

Posted: Friday, March 13, 2015 - 07:56 PM UTC
JoeOsborne

Joined: October 08, 2013
KitMaker: 111 posts
AeroScale: 28 posts

Posted: Friday, March 13, 2015 - 08:09 PM UTC
Quoted Text
Nice to see some progress in new work and also in a nostalgic way. Had myself a 1:32 262 from Revell in the early 70th - pushed into the trash bin when leaving parents home (sorry no photos).
Actual only some cutting and cleaning parts, nothing to show. Canopy is very poor... don't now what to do. So the office would not be very visible.
Thomas
Completely agree! Some nice older work being displayed. I built the Tamiya kit several years back. The fit was excellent, but I daresay my modelling skills weren't where they are today :-).
These Hobbyboss kits are surprisingly very good as well. I hadn't bult HB before, and did not expect Tamiya like quality.
Will post pictures of modular progress later today.
JoeOsborne

Joined: October 08, 2013
KitMaker: 111 posts
AeroScale: 28 posts

Posted: Saturday, March 14, 2015 - 04:07 AM UTC
Here's the cockpit parts and the front wheel housing.
The IP decal is pretty good with this kit and I tried something a bit different. Put the decal on, painted it dead matt then picked out the glass. Think it came out pretty well. Had to separate the left arm of the decal.


Need to fix the tan paint on the seat.....
onwards and upwards!
The IP decal is pretty good with this kit and I tried something a bit different. Put the decal on, painted it dead matt then picked out the glass. Think it came out pretty well. Had to separate the left arm of the decal.


Need to fix the tan paint on the seat.....
onwards and upwards!
 |


