OFFICIAL: Schwalbe - Me 262 Campaign
Utah, United States
Joined: May 27, 2003
KitMaker: 1,026 posts
AeroScale: 215 posts
Posted: Saturday, March 14, 2015 - 08:17 AM UTC
Quoted Text
Nice to see some progress in new work and also in a nostalgic way. Had myself a 1:32 262 from Revell in the early 70th - pushed into the trash bin when leaving parents home (sorry no photos).
Actual only some cutting and cleaning parts, nothing to show. Canopy is very poor... don't now what to do. So the office would not be very visible.
Thomas 
Thomas--have you tried dipping the canopy in Future Floor Wax (or an acrylic equivalent)? It often makes foggy & thick canopies look crystal clear and thin.
Keith
Build 'em better than the box art!
Berlin, Germany
Joined: October 12, 2008
KitMaker: 709 posts
AeroScale: 651 posts
Posted: Saturday, March 14, 2015 - 12:10 PM UTC
KEITH: Not only the canopy seems to be a common problem with this kit...
http://www.aircraftresourcecenter.com/Rev2/1801-1900/rev1855-Revell-72-Me-262/00.shtmFound exactly all of the shown minor facts (and more sink marks at the engine pods) on my kit. Future alone will not solve the canopy mistake. Rear and base frame is completely missing.

Thomas
Sometimes you need to distance yourself to see things clearly - Lao Tzu -
... in scale and in real life -T.
California, United States
Joined: October 08, 2013
KitMaker: 111 posts
AeroScale: 28 posts
Posted: Saturday, March 14, 2015 - 01:11 PM UTC
Wow, that canopy does look bad. How about polishing it and just paint the frame lines in that are missing?
Regards,
Joe Osborne
On the bench:
1/35 Tamiya Tiger I early Production
1/35 Tamiya Mid Production Tiger I
Berlin, Germany
Joined: October 12, 2008
KitMaker: 709 posts
AeroScale: 651 posts
Posted: Saturday, March 14, 2015 - 01:49 PM UTC
Joe: Thinking about this - or I cover it all up with a sheet when the model is finished just leaving the front visble.

Thomas
Sometimes you need to distance yourself to see things clearly - Lao Tzu -
... in scale and in real life -T.
Berlin, Germany
Joined: February 20, 2005
KitMaker: 204 posts
AeroScale: 99 posts
Posted: Saturday, March 14, 2015 - 04:09 PM UTC
Hi my friend,
well the kit one looks really useless, what about a vacform replacement from Squadron or maybe from Rob Taurus, they do a lot of replacement canopys.
greetings ro
California, United States
Joined: October 08, 2013
KitMaker: 111 posts
AeroScale: 28 posts
Posted: Saturday, March 14, 2015 - 06:03 PM UTC
Heres the link to Falcon who makes them for Squadton.
http://www.falconmodels.co.nz/squadron72.htmlLooks like it's $4.95 US plus shipping fom Squadron.
Your thought about covering made me think of an option. Cut the canopy behind the front windscreen, and maybe the rear canopy section. Finish those parts off and attach to aircraft.
Then make a tarp (several different methods. Milliput, parchment paper, the armor guys do this alot). Just drape it over the open cockpit area. Looks like the plane is being worked on.
Regards,
Joe Osborne
On the bench:
1/35 Tamiya Tiger I early Production
1/35 Tamiya Mid Production Tiger I
Lisboa, Portugal
Joined: August 27, 2010
KitMaker: 679 posts
AeroScale: 669 posts
Posted: Sunday, March 15, 2015 - 12:40 AM UTC
Hi
I've been missing deadlines on my workbench due to increased work pressure, but no way I'm gonna skip this campaign.
Like I mention at the unofficial campaign thread, I'm planning to build a Jabo version based on the Tamiya 1/48 kit.
Going through my stash earlier today I found both the Tamiya kits plus a Dragon Nachtjager and Revell re-release of that same kit.
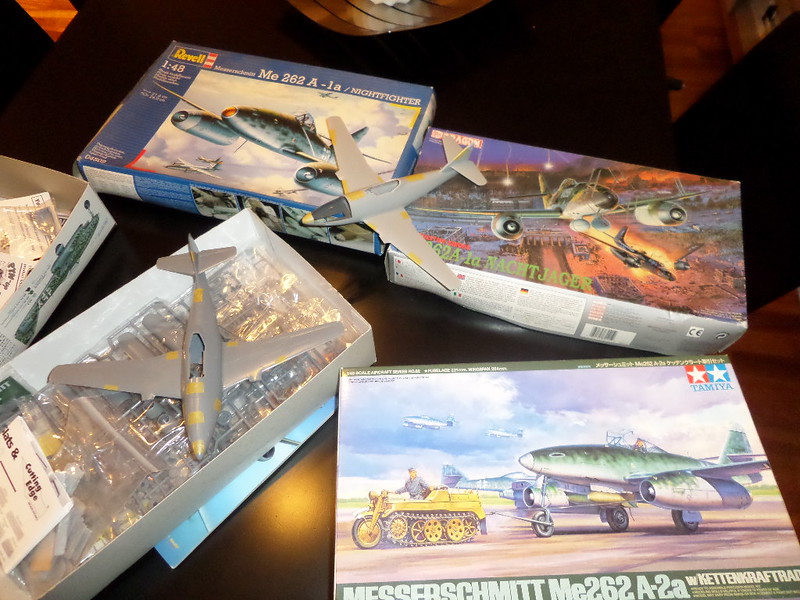
So my idea is now to plunge first at the initial chosen bird but time allowing I may try to build the A-1 Revell version on fight, using a stand, and as such saving time on details plus getting those elegant lines in their full glory.
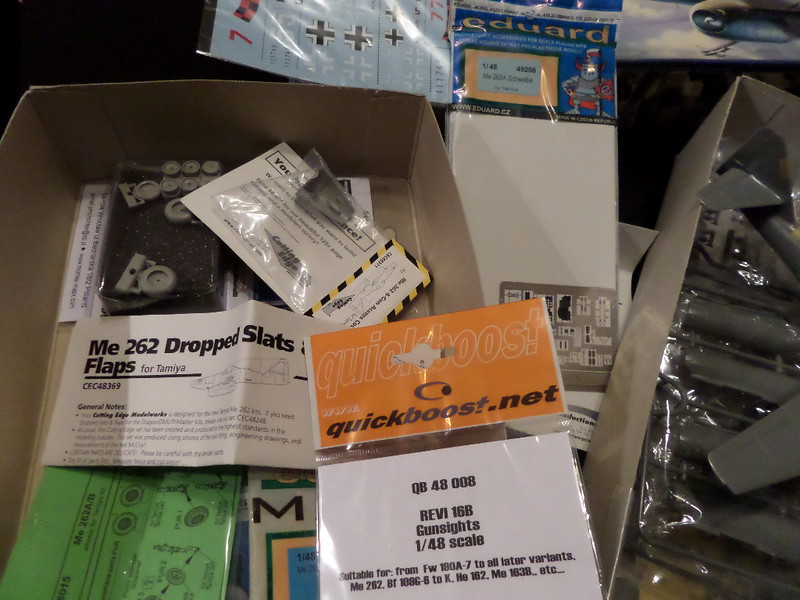
The Tamiya kit will have all the extras needed to achieve the usual "on the ground" look of the 262, like dropped flaps and slats and an open canopy.
Cheers
Pedro

#305
Christchurch, New Zealand
Joined: February 01, 2006
KitMaker: 1,673 posts
AeroScale: 1,517 posts
Posted: Sunday, March 15, 2015 - 01:37 AM UTC
Welcome Pedro looking forward to seeing them built! Here's hoping that you get the chance to build both!
Vermont, United States
Joined: July 21, 2002
KitMaker: 3,569 posts
AeroScale: 419 posts
Posted: Sunday, March 15, 2015 - 07:24 AM UTC
Magnus,
The conversion nose and cannon arrived safe and sound here in this weekend. Well packed and packaged. Many thanks!
Now if I can just manage to cut a straight line.. -grin-
Hoping to get some bench time here this upcoming week.
If you can keep your head when all about you are losing theirs,
perhaps you've misunderstood the situation.
Stockholm, Sweden
Joined: May 02, 2006
KitMaker: 1,953 posts
AeroScale: 1,902 posts
Posted: Sunday, March 15, 2015 - 11:14 AM UTC
Quoted Text
Magnus,
The conversion nose and cannon arrived safe and sound here in this weekend. Well packed and packaged. Many thanks!
Now if I can just manage to cut a straight line.. -grin-
Hoping to get some bench time here this upcoming week.
I'm happy to hear that it arrived safely!
Magnus
Press banner to the right to follow my trail to the new forums!
AussieReg
 Associate Editor
#007
Victoria, Australia
Joined: June 09, 2009
KitMaker: 8,156 posts
AeroScale: 3,756 posts
Posted: Sunday, March 15, 2015 - 05:43 PM UTC
Well it certainly is great to see some activity in this thread! Those "nostalgia" photos are great, keep them coming if you have them. The only 262 I have ever built was the 1/72 RoG kit waaaaaay back (not saying how many years ago).
Raj and Pedro, welcome aboard and thanks for joining in. I am looking forward to watching your builds progress.
Martyn, that Irish Air Corps livery is a What-If from way out in left-field! The markings look really good, certainly a conversation piece in the display cabinet.
Mike D, your flightline display photo shows some great and unmistakeable silhouettes, so of course your old 1/72 build counts !
Keep up the great work folks, and keep posting as many pics as you can.
Cheers, D
ON the bench
Revell 1/24 '53 Corvette (building as '54)
Revell 1/24 BMW 507 Coupe and Cabrio
Italeri 1/48 Me262 B-1a/U1 Nightfighter
Monogram 1/24 '57 Chevy Nomad
Dragon 1/350 USS Frank Knox DD-742
Texas, United States
Joined: November 22, 2010
KitMaker: 33 posts
AeroScale: 12 posts
Posted: Wednesday, March 18, 2015 - 02:35 AM UTC
Hey all. Ive been on an armor kick after getting back into the hobby a few years ago w a plane or 2 mixed in. I mostly prefer 1/48 for a/c. I am wanting to start my first official build campaign with the Me-262. The last one I tackled was when I was in high school. It was an old 1/48 Revell kit I think. My first real project with an airbrush. I remember the surface finish was like a fine layer of moss had grown on it. Not my finest.
Just curious why more people aren't going w the Tamiya kits. Last year I finished the 1/48 Tamiya Do-335 and it was an amazing kit. Seems like alot here are going for the Hobbyboss. Is that just because there are more variants available? When assembled will there be more fidgeting and sanding w the HB than the Tamiya or are they apples to apples in quality? Just want to do a little recon before making my purchase. Looking forward to a fun build w everyone!
Steve
AussieReg
Associate Editor #007
Victoria, Australia
Joined: June 09, 2009
KitMaker: 8,156 posts
AeroScale: 3,756 posts
Posted: Wednesday, March 18, 2015 - 05:04 PM UTC
Quoted Text
Hey all. Ive been on an armor kick after getting back into the hobby a few years ago w a plane or 2 mixed in. I mostly prefer 1/48 for a/c. I am wanting to start my first official build campaign with the Me-262.
Hi Steve. Welcome aboard and thanks for choosing this as your first Campaign build. Please don't forget to enlist on the
CAMPAIGN PAGEQuoted Text
Just curious why more people aren't going w the Tamiya kits.
The HB kits are pretty good in terms of detail and fit, the range of variants is great, and they tend to be about half the price of Tamiya, so overall they represent great value.
Looking forward to following your build here.
Cheers, D
ON the bench
Revell 1/24 '53 Corvette (building as '54)
Revell 1/24 BMW 507 Coupe and Cabrio
Italeri 1/48 Me262 B-1a/U1 Nightfighter
Monogram 1/24 '57 Chevy Nomad
Dragon 1/350 USS Frank Knox DD-742
California, United States
Joined: October 08, 2013
KitMaker: 111 posts
AeroScale: 28 posts
Posted: Wednesday, March 18, 2015 - 06:16 PM UTC
Quoted Text
Quoted Text
Hey all. Ive been on an armor kick after getting back into the hobby a few years ago w a plane or 2 mixed in. I mostly prefer 1/48 for a/c. I am wanting to start my first official build campaign with the Me-262.
Hi Steve. Welcome aboard and thanks for choosing this as your first Campaign build. Please don't forget to enlist on the CAMPAIGN PAGE
Quoted Text
Just curious why more people aren't going w the Tamiya kits.
The HB kits are pretty good in terms of detail and fit, the range of variants is great, and they tend to be about half the price of Tamiya, so overall they represent great value.
Looking forward to following your build here.
Cheers, D
I would agree. I have already built the Tamiya kit and virtually no difference in fit or level of detail. Very pleased with the HB kit.
Regards,
Joe Osborne
On the bench:
1/35 Tamiya Tiger I early Production
1/35 Tamiya Mid Production Tiger I
#363
Pennsylvania, United States
Joined: January 08, 2014
KitMaker: 425 posts
AeroScale: 401 posts
Posted: Wednesday, March 18, 2015 - 06:40 PM UTC
Man all of these builds are making me jealous. I am not likely to get my A-1b started until summer, I am trying to be good and clear out all of my current projects. Maybe I'll sneak in some work after I get the P-80 out of the way.
I am happy to see such positive posts about the HB vs Tamiya kits, as HB is the route I chose for myself. I wasn't so much focused on the pricing differences as I was immediately sold when I saw it came with Ruhrstahl X-4 missiles to hang under the wings.
On the Bench:
The Big Three: Eduard 1:48 Bf 109G-2 Trop
Radial Fighters: Hasegawa 1:48 Ki84 Frank
The Mighty Eighth: Eduard 1:48 P-51D-10
#305
Christchurch, New Zealand
Joined: February 01, 2006
KitMaker: 1,673 posts
AeroScale: 1,517 posts
Posted: Thursday, March 19, 2015 - 02:22 PM UTC
#041
Kobenhavn, Denmark
Joined: July 20, 2006
KitMaker: 10,069 posts
AeroScale: 3,788 posts
Posted: Thursday, March 19, 2015 - 07:02 PM UTC
Looks good, Chris. Beautiful job on the camouflage!
Looking forward to see more

Campaign'oholic - 252+ campaigns completed
Berlin, Germany
Joined: October 12, 2008
KitMaker: 709 posts
AeroScale: 651 posts
Posted: Thursday, March 19, 2015 - 08:19 PM UTC
Good work, Chris! Are you satisfied with the kit?
Sometimes you need to distance yourself to see things clearly - Lao Tzu -
... in scale and in real life -T.
Stockholm, Sweden
Joined: May 02, 2006
KitMaker: 1,953 posts
AeroScale: 1,902 posts
Posted: Thursday, March 19, 2015 - 08:45 PM UTC
Chris! A 262 to suit my taste! Lovely!
Magnus
Press banner to the right to follow my trail to the new forums!
Vermont, United States
Joined: July 21, 2002
KitMaker: 3,569 posts
AeroScale: 419 posts
Posted: Thursday, March 19, 2015 - 09:18 PM UTC
Nice colors there Chris,
Whose paints did you use? The Gunze bottles there on the desk?
Any weathering/washes/pigments/beauty products in the future?
If you can keep your head when all about you are losing theirs,
perhaps you've misunderstood the situation.
#305
Christchurch, New Zealand
Joined: February 01, 2006
KitMaker: 1,673 posts
AeroScale: 1,517 posts
Posted: Friday, March 20, 2015 - 05:53 AM UTC
Gentlemen my thanks for you compliments!
@Magnus:- I'll consider that high praise coming from you Magnus!
@Thomas:- Very satisfied with the kit, given its age it's gone together very well. And the gap at the back of the canopy was my fault for not checking everything before adding it to the kit.
@Mike:- You are correct Mike! I used Gunze Mr Colour paints for the scheme, I really like the paints either Lacquer or Acrylic they spray well and are reasonably durable especially the lacquer paints. There will be a Tamiya panel line wash to go on and Tamiya weathering pigments to go on the tyres and airframe after I've got the decals on.
On the subject of decals I really like the Hasegawa offering in this kit there are a lot of stencils, walk ways and they seem nicely thin. How they apply however is another matter, I'll let you know of my progress as I'll be applying them after I've finished with the canopy.
Oregon, United States
Joined: January 13, 2014
KitMaker: 107 posts
AeroScale: 105 posts
Posted: Saturday, March 21, 2015 - 06:26 AM UTC
Quoted Text
Martyn, that Irish Air Corps livery is a What-If from way out in left-field! The markings look really good, certainly a conversation piece in the display cabinet.
It looks rather nice, but the Irish Air Corps markings I had just arrived and.. well, let's just say I don't think the roundel was white, green and
red. Oh well, I'll come up with something out of left field. I CAN make an accurate Central American Schwalbe of some sort with these markings.
On the WIF Workbench: 1/72 IL-2 Sturmovik (Cuban Air Force)
"I shall either find a way or I shall make one." - supposedly, Hannibal Barca
Nordrhein-Westfalen, Germany
Joined: March 22, 2015
KitMaker: 671 posts
AeroScale: 614 posts
Posted: Sunday, March 22, 2015 - 12:50 AM UTC
So, today I want to start my first campaign with another one of Revell's tiny Schwalben.
[img]
http://gallery3.kitmaker.net/showphoto.php/photo/427630/ppuser/70429Happy modelling, Oliver!
model will be the yellow three of KG (J) 54
On the desk: Probably a Panzer III.
Utah, United States
Joined: May 27, 2003
KitMaker: 1,026 posts
AeroScale: 215 posts
Posted: Wednesday, March 25, 2015 - 11:07 PM UTC
@Chris--Wow! Great paint job! And so quick. Your kit is an inspiration and motivation.
@Martyn--too bad about the Eire markings. There'd be no way to mask and paint that one section on each? Hmmm...come to think of it, isn't the Mexican flag green, white, and red?!
Now, if no one minds, I'm gonna vent and whine a little:
So I just finished a PE-laden Panzer PITA (I actually really enjoyed it) for the Panther Campaign. After messing with Dragon's miniscule, multi-part, tool clasps; spare track retainer rods (with chains!); tool rack cotter keys (with chains!); and other minutiae, I was looking forward to working on a nice, simple, aircraft kit.
Then I started looking at the Hobby Boss instructions and sprues. There are over 20 pieces to the cockpit alone! There is a whole compliment of oxygen bottles, radio equipment, and nav gear to go in the tail--to be visible through a tiny access panel opening?! The engine nacelles have about 8 pieces apiece--mind you, that is sans motor. The wheel wells are multi-piece monstrosities. Not that I mind the detail--it's a wonderful kit--but it's not going to be the 'weekend build' I was hoping for.
Now before I get a backlash of replies:
1) This was all in jest.
2) No, I didn't do much research into the kit (bad on me). I was simply looking for a 1/48th -262, and this was about all that was available when Great Models Webstore had their going out of business sale (lucky me!).
3) No, I'm not complaining about the current level of quality and detail which our hobby affords. I believe we are living in a boon time for modelers. I wish these kits were available when my eyes were better and my hands steadier 30 years ago.
Result: I just need to change my mindset & approach, and take this build more seriously than previously planned.
Progress thus far: flush cutters have hit sprue, and a few parts filed and sanded. No gluing yet. Nothing picture-worthy. But soon!
Looking forward to seeing all the other kits come together. And I'm gonna watch the other Hobby Boss builds closely to 'borrow' ideas.
Thanks,
Keith
Build 'em better than the box art!
Utah, United States
Joined: May 27, 2003
KitMaker: 1,026 posts
AeroScale: 215 posts
Posted: Monday, March 30, 2015 - 08:41 AM UTC
Its been a little quiet around here.
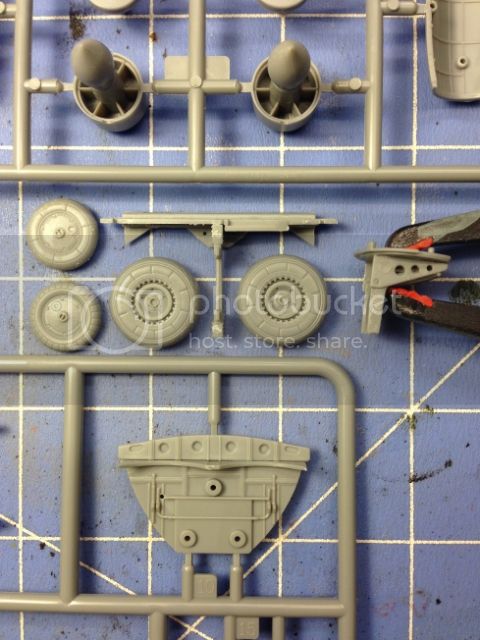
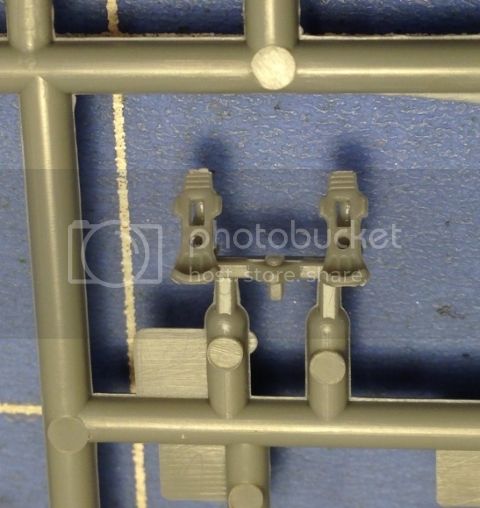
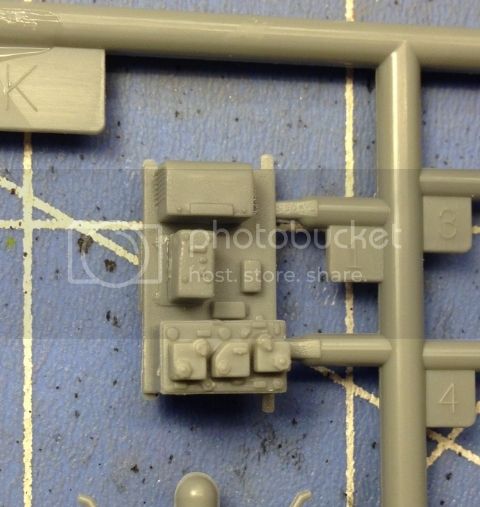
Here are some pics of a few minor assemblies of the Hobby Boss. I must say, the fit is wonderful--it could be a snap-together.
5 of the 20+ cockpit pieces

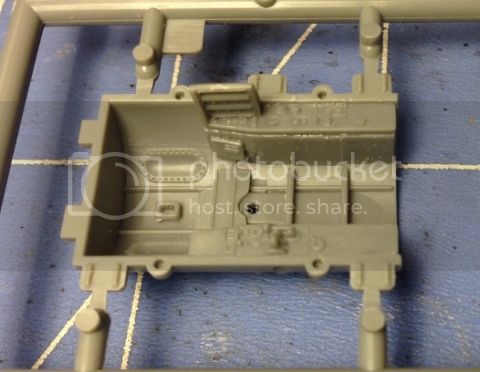
Wheels, wheel well details, seat, and engine exhaust
Rudder pedals. These, and the seat, will need PE belts
Fuselage interior details
Keith
Build 'em better than the box art!


