OFFICIAL: Schwalbe - Me 262 Campaign
Nordrhein-Westfalen, Germany
Joined: March 22, 2015
KitMaker: 671 posts
AeroScale: 614 posts
Posted: Saturday, April 25, 2015 - 03:35 AM UTC
Hallo Magnus,
thank You for Your help. The photograph helped me to create a similar color with tamiya paint. For the RLM83 I used XF26, slightly made brighter with a litte white and even a more little yellow. Pictures will follow.

Oliver
On the desk: Probably a Panzer III.
Nordrhein-Westfalen, Germany
Joined: March 22, 2015
KitMaker: 671 posts
AeroScale: 614 posts
Posted: Saturday, April 25, 2015 - 10:26 AM UTC
So, here are some new photos of the paint Job. The bottom was painted with Tamiya XF23, slightly mixed with a bit Tamiya XF2.

The top was painted RLM 83. Here, a mixture of XF26, white and yellow was used. The darker panels were painted with a black green.

Oliver
On the desk: Probably a Panzer III.
Stockholm, Sweden
Joined: May 02, 2006
KitMaker: 1,953 posts
AeroScale: 1,902 posts
Posted: Saturday, April 25, 2015 - 10:45 AM UTC
Oliver! That'll be a nice looking 262 when it gets finished! I've always liked the checkered reich defense bands!
Magnus
Press banner to the right to follow my trail to the new forums!
Berlin, Germany
Joined: October 12, 2008
KitMaker: 709 posts
AeroScale: 651 posts
Posted: Saturday, April 25, 2015 - 02:57 PM UTC
Oliver: Nice progress! Seems that you fixed the problems with the canopy and RLM-color. Don't worry, since the RLM and even the manufacturers don't have any reliable reference-chart especially for the late war colors ("take what is available"), just mix your own suitable camo that way.
 Magnus:
 Good start! I'm curious how this will turns out

Again on the desk I decided, after a short break ...

...to cut off the closed molded wheel wells...

...as there are a few details on the lower cockpit side and inside walls. No further scratch or additions will be there.


Thomas
Sometimes you need to distance yourself to see things clearly - Lao Tzu -
... in scale and in real life -T.
Stockholm, Sweden
Joined: May 02, 2006
KitMaker: 1,953 posts
AeroScale: 1,902 posts
Posted: Wednesday, April 29, 2015 - 12:55 PM UTC
Thomas! Some fine beer-and-262-work going on!
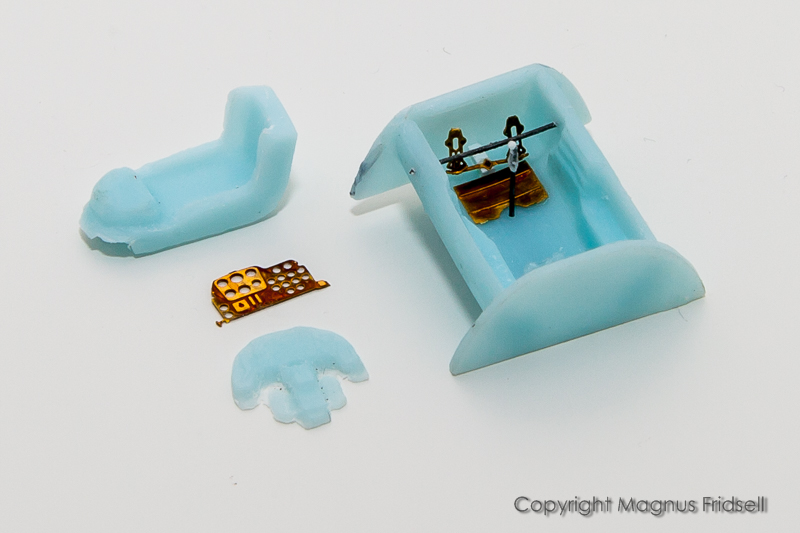
I've been restoring panel lines lately (not very amusing...) and I've also been able to do a bit of cockpit work (a lot more fun really!).
As usual, more detail in my
build thread!
Magnus
Press banner to the right to follow my trail to the new forums!
Texas, United States
Joined: February 22, 2008
KitMaker: 5,026 posts
AeroScale: 2,811 posts
Posted: Wednesday, April 29, 2015 - 06:55 PM UTC
Oliver: the silver panels on the undersurface are they paint?
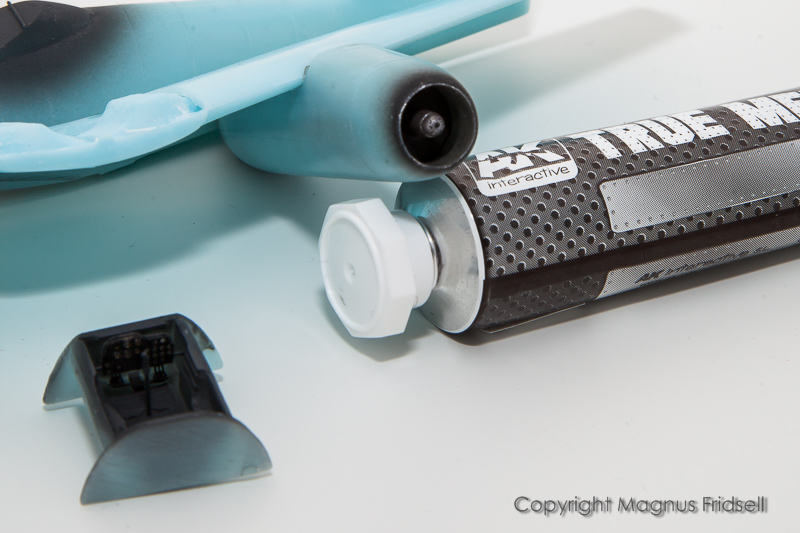
Thomas: did you build the can or just deplete it?

I like the stand.
Magnus: nice work on the office. I cannot see in 1/72 much less work on it.

I still have not taken my 262 out of the box yet, work is really taxing at this time.
Bob
If it aint broke dont fix it.
Nordrhein-Westfalen, Germany
Joined: March 22, 2015
KitMaker: 671 posts
AeroScale: 614 posts
Posted: Wednesday, April 29, 2015 - 07:41 PM UTC
Bob: Correct, the panels are sprayed with Alclad Aluminium and a slight pre-shading with black ink, hardly visible.
Magnus: Nice detail in the office!
Thomas: I see You left the glue point for the rod of the gear, while cutting the residual off. Probably the best way, cause I cut out the whole thing and now have to think, how to apply the rod

.
Oliver
On the desk: Probably a Panzer III.
Nordrhein-Westfalen, Germany
Joined: March 22, 2015
KitMaker: 671 posts
AeroScale: 614 posts
Posted: Wednesday, April 29, 2015 - 08:20 PM UTC
Now, decals are on. Ready for weathering!


Oliver
On the desk: Probably a Panzer III.
Vermont, United States
Joined: July 21, 2002
KitMaker: 3,569 posts
AeroScale: 419 posts
Posted: Wednesday, April 29, 2015 - 09:57 PM UTC
Does this model,

represent this photo?

I am hoping to do the bare metal and putty lines on my U4, but want to double check with the conventional wisdom here.
Thanks
Mike
If you can keep your head when all about you are losing theirs,
perhaps you've misunderstood the situation.

#305
Christchurch, New Zealand
Joined: February 01, 2006
KitMaker: 1,673 posts
AeroScale: 1,517 posts
Posted: Friday, May 01, 2015 - 03:47 AM UTC
Hi Mike looking at the pic and what references I can find, I believe the putty lines would have been an odd salmon colour??? In my Dragon Mistel kit they recommend a blended paint being a 50 50 mix of H61(35) and H44(51). But I've no idea if that's correct for your particular model. The first number being Gunze Mr Hobby acrylic paint and the second in brackets being the lacquer equivalent. I hope this helps in some way and for the record the kit looks fantastic!
Vermont, United States
Joined: July 21, 2002
KitMaker: 3,569 posts
AeroScale: 419 posts
Posted: Friday, May 01, 2015 - 03:53 AM UTC
Sorry Chris, I swiped that pic from Google. Mine is still in the box. Just looking for inspiration.
If you can keep your head when all about you are losing theirs,
perhaps you've misunderstood the situation.
#041
Kobenhavn, Denmark
Joined: July 20, 2006
KitMaker: 10,069 posts
AeroScale: 3,788 posts
Posted: Friday, May 01, 2015 - 11:38 AM UTC
Mike, looking at the b/w picture the putty used on the nose must be a very light color. So a salmon or cream color seems more appropriate than the dark green in the Google picture.
Campaign'oholic - 252+ campaigns completed
Nordrhein-Westfalen, Germany
Joined: March 22, 2015
KitMaker: 671 posts
AeroScale: 614 posts
Posted: Friday, May 01, 2015 - 03:28 PM UTC
Hallo Mike,
I found this profile in a french documentation. Hopefully it is correct and helpful!

I guess, the seam should be a lesser strong yellow. More a cream like one, as Jesper said.
Oliver
On the desk: Probably a Panzer III.
Stockholm, Sweden
Joined: May 02, 2006
KitMaker: 1,953 posts
AeroScale: 1,902 posts
Posted: Friday, May 01, 2015 - 07:36 PM UTC
I've been checking some references!
On the subject of the 262 with the enormous 50 mm MK 214 A gun: It was installed in two aircraft, W.Nr 111899 and W.Nr 170083, of which most probably only the former was ever flown with the gun installed. First flight was on 19 March 1945 and it was flown operational on two sorties on 16 April 1945 but the gun jammed on both occasions.
The model is probably done up to represent 111899. From the photos I have it seems as if the forward part of the fuselage was left in natural metal with puttied seams, the putty looks distinctly lighter than the surrounding metal areas (exactly the opposite to the model photo above). There is also a lot more seams than the model shows! I think Oliver's side views above sums it up rather well!
Magnus
Press banner to the right to follow my trail to the new forums!
Vermont, United States
Joined: July 21, 2002
KitMaker: 3,569 posts
AeroScale: 419 posts
Posted: Friday, May 01, 2015 - 08:25 PM UTC
Thanks gents,
My reference library is not too deep for 262's.
I guess now the choice is artistic license vs historic accuracy. I will go with pale sand/yellow panel lines. That pic will help me place them for sure.
Fiddling with the Hase 1/72 262 nightfighter now, not much to show, interior painting and decals and wheel wells. Engine nacelle fit only ok.
If you can keep your head when all about you are losing theirs,
perhaps you've misunderstood the situation.
California, United States
Joined: October 08, 2013
KitMaker: 111 posts
AeroScale: 28 posts
Posted: Saturday, May 02, 2015 - 08:34 PM UTC
Hello Folks,
Well, I'm finishing up my U3 48th scale and should be posting final pics this week.
In the meantime I've begun work on the Trumpeter 32nd scale Me262A-1A fighter. Official startup pic is here:
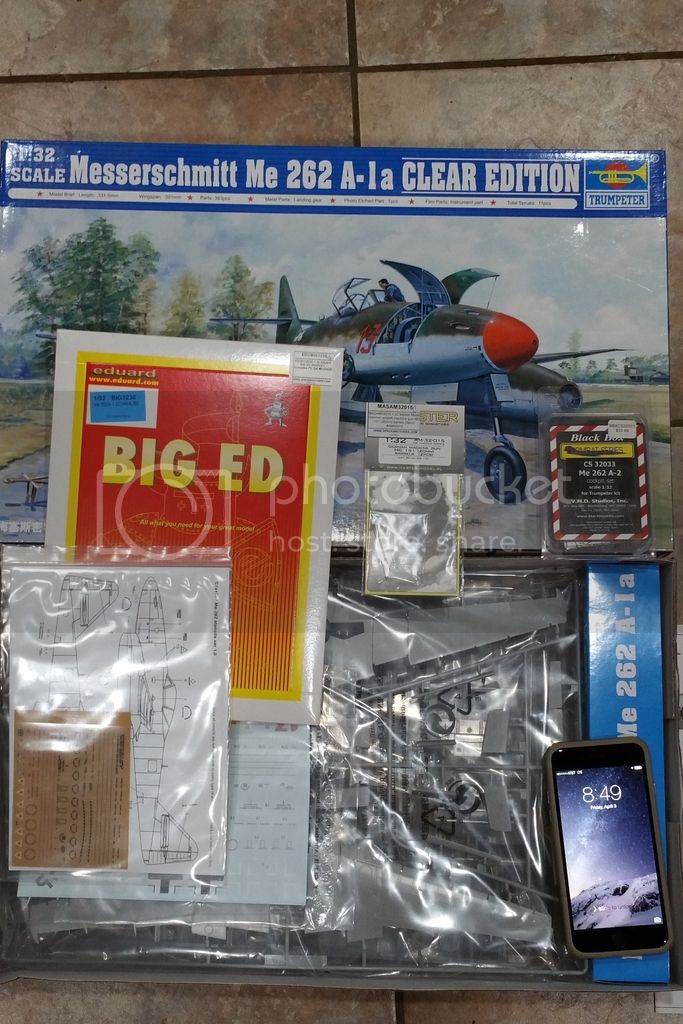
Not sure if I'll use the Eduard PE interior or the Black Box resin interior. Will probably build both and determine which I like best. Not sure of final decals and paint, but leaning towards Eagle Editions Heinz Bar red thirteen. These are the correct shape of the "13" and really like their decals.
I was thinking of doing a build blog on this one, but have never done one before so a bit reticent about starting one up!

Maybe I'll check out a few and get a feel for them before I decide.
One question for any of our Luftwaffe experten out there. What color was painted inside the flaps and especially the forward slats. Was it RLM 02 or did they use the camo paint?
Regards,
Joe Osborne
On the bench:
1/35 Tamiya Tiger I early Production
1/35 Tamiya Mid Production Tiger I
Berlin, Germany
Joined: October 12, 2008
KitMaker: 709 posts
AeroScale: 651 posts
Posted: Saturday, May 02, 2015 - 10:49 PM UTC
Joe: Wow, what a "big" project on this this huge bird
For the flaps:
"Flap Areas
For aircraft without separate flaps, the flap `well' and interior of the flap was painted with RLM 02. This is also true of the radiator flap and cowl flap areas."
Mike: Since the cowling is modified for the gun it's a kind of "repair":"Exceptions
Repaired areas were usually painted with whatever paint stocks were available, or left unpainted. Gun bays on late war aircraft were sometimes seen in natural metal"
Oliver Leaving the glue point was my aim,otherwise I'd faced the same problem you mentioned.I see you cut quite everything off.On the other hand it's a nice oxygen bottle.The overall paint job looks very good.
Sometimes you need to distance yourself to see things clearly - Lao Tzu -
... in scale and in real life -T.
AussieReg
 Associate Editor
#007
Victoria, Australia
Joined: June 09, 2009
KitMaker: 8,156 posts
AeroScale: 3,756 posts
Posted: Sunday, May 03, 2015 - 06:50 PM UTC
Awesome progress guys, makes me look like a totally inadequate campaign leader when some folks are unboxing their second builds and I haven't even posted my first progress pictures!
Unfortunately feeding the tribe take priority so my modeling gear is sitting forlornly in the garage until I can scrape together a couple of hours.
Keep up the great work, and keep those progress and "real thing" pictures coming, we are accumulating some great reference material.
Cheers, D
ON the bench
Revell 1/24 '53 Corvette (building as '54)
Revell 1/24 BMW 507 Coupe and Cabrio
Italeri 1/48 Me262 B-1a/U1 Nightfighter
Monogram 1/24 '57 Chevy Nomad
Dragon 1/350 USS Frank Knox DD-742
#305
Christchurch, New Zealand
Joined: February 01, 2006
KitMaker: 1,673 posts
AeroScale: 1,517 posts
Posted: Monday, May 04, 2015 - 05:55 AM UTC
Removed by original poster on 05/07/15 - 14:32:08 (GMT).
Nordrhein-Westfalen, Germany
Joined: March 22, 2015
KitMaker: 671 posts
AeroScale: 614 posts
Posted: Wednesday, May 06, 2015 - 07:50 PM UTC
Hallo Chris, sometimes it is not as good to have much time and work fast. As I looked onto a foto of the lower side of my swallow, I found, that I made a mistake with the panels (what I did not reckognized before onto the real model
).

As you can see, I filled a rivet line of the metal panel and, hence, painted this one too large into the other panel.

Instead of the final assemblies this weekend, I have to rivet, repaint and weather this litte area. So, that is modelling fate I guess.
Oliver
By the way, I tried to insert a foto with dropbox, but it did not work at all. Does anybody how to insert a foto with this?
On the desk: Probably a Panzer III.
#305
Christchurch, New Zealand
Joined: February 01, 2006
KitMaker: 1,673 posts
AeroScale: 1,517 posts
Posted: Thursday, May 07, 2015 - 08:07 AM UTC
Hi Oliver funny that to us the mistakes we make are glaringly obvious, but to the rest of us we rarely see the mistakes unless they're pointed out! I hear you though as I've just realised the parts I manufactured for the fork tailed devil campaign are 180 degrees out! But I've decided to leave them as is as the average guy or gal will not realise the mistake. I'm moving onto the decaling of the Schwalbe now and the kit decals are a little old and frail so care is required, but it's starting to look the business! LOL
#330
Queensland, Australia
Joined: July 15, 2011
KitMaker: 175 posts
AeroScale: 103 posts
Posted: Saturday, May 09, 2015 - 03:43 PM UTC
Utah, United States
Joined: May 27, 2003
KitMaker: 1,026 posts
AeroScale: 215 posts
Posted: Sunday, May 10, 2015 - 07:48 AM UTC
Build 'em better than the box art!
Stockholm, Sweden
Joined: May 02, 2006
KitMaker: 1,953 posts
AeroScale: 1,902 posts
Posted: Sunday, May 10, 2015 - 11:50 PM UTC
Engines are now mounted to the wings - a major milestone!
As usual, more photos and info in my
build thread!
Chris and Oliver! You've been fast! Look forward to see them finally finished!
John and Keith! Coming together nicely!
Magnus
Press banner to the right to follow my trail to the new forums!