OFFICIAL: Schwalbe - Me 262 Campaign
Nordrhein-Westfalen, Germany
Joined: March 22, 2015
KitMaker: 671 posts
AeroScale: 614 posts
Posted: Sunday, May 31, 2015 - 10:56 PM UTC
Thank You Joe,
I found some rubber cement... in a store for illusionists. This must be very useful for card tricks I heard. You never learn enough!
Oliver

On the desk: Probably a Panzer III.
Stockholm, Sweden
Joined: May 02, 2006
KitMaker: 1,953 posts
AeroScale: 1,902 posts
Posted: Sunday, May 31, 2015 - 11:15 PM UTC
My activity in this thread has been rather limited lately but I have been working steadily on my 262 anyway!
This is the current state of affairs...
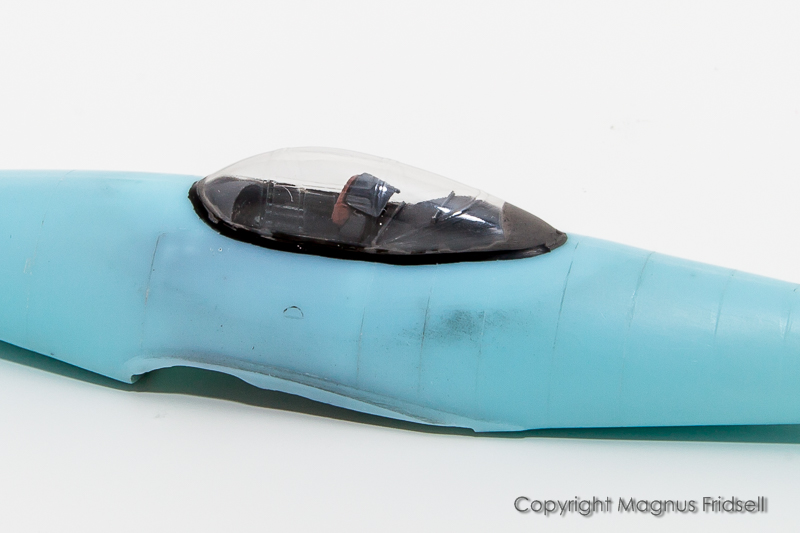
...canopy installed and faired-in (a rather tedious part of the project)...
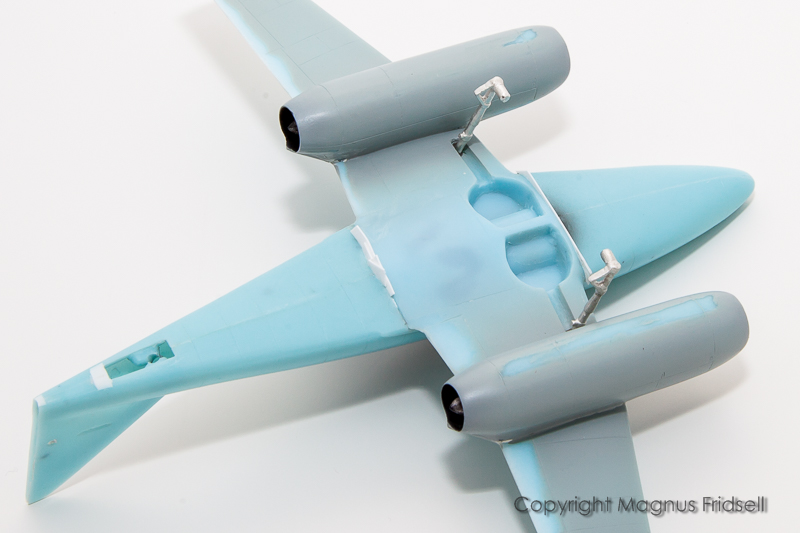
...landing gear is on...
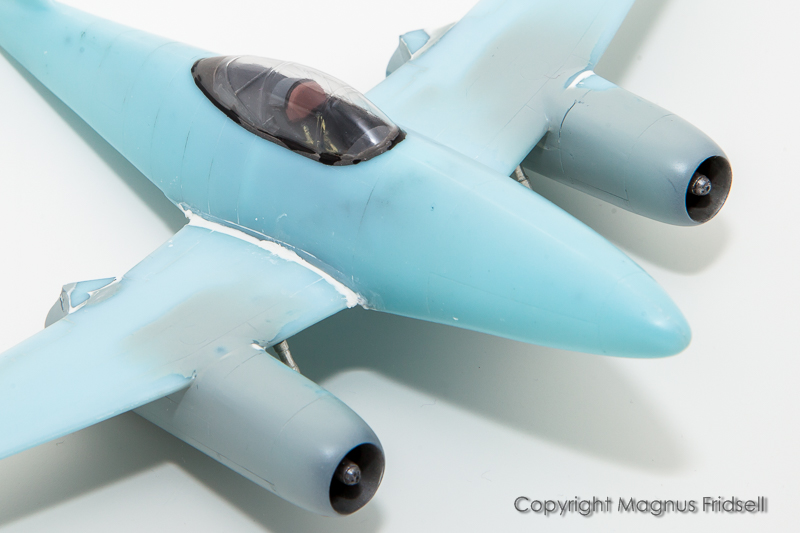
...and I've filled the rather substantial wing root canyon...
Everything moves on schedule and as usual there are more info in my
build thread!
Magnus
Press banner to the right to follow my trail to the new forums!
New Jersey, United States
Joined: February 02, 2015
KitMaker: 330 posts
AeroScale: 286 posts
Posted: Monday, June 01, 2015 - 01:32 AM UTC
bob, no it isn't you.i am doing the hobbyboss kit too and I have problems with the fuselage fit too. had to file down the the bulkheads and the locator tabs on the cockpit tub and metal gun bay. now it looks like the underside wing to fuselage fit is poor too. it won't snap flush to the fuselage. let me know if you have any problems there.
joe
Texas, United States
Joined: February 22, 2008
KitMaker: 5,026 posts
AeroScale: 2,811 posts
Posted: Monday, June 01, 2015 - 01:56 AM UTC
JOE, i trimmed the wing root at the fuse and a little on the wing and it fits fine so far after some trial fitting.
Bob
If it aint broke dont fix it.
Utah, United States
Joined: May 27, 2003
KitMaker: 1,026 posts
AeroScale: 215 posts
Posted: Monday, June 01, 2015 - 08:21 AM UTC
Thomas, thanks for that link, it was most helpful.
So, I'm thinking of redoing the fuselage interior in bare metal, and leaving the rest of the parts as-is.
One more stupid question: would the comm/nav equipment racks and oxygen bottle brackets inside the tail be bare metal also? Or would those be sub-assemblies from other manufacturers and come pr-painted?
Keith
Build 'em better than the box art!
New Jersey, United States
Joined: February 02, 2015
KitMaker: 330 posts
AeroScale: 286 posts
Posted: Monday, June 01, 2015 - 08:28 AM UTC
thanks bob. i'll see what I can do with it after trimming where you note. the rear underside panel directly behind the wheel wells is where I can't get it to fit flush to the fuselage. there are two locator pins inside the fuse I may have to trim off in order to get it to seat.i may have to trim it down a little too.
joe
Berlin, Germany
Joined: October 12, 2008
KitMaker: 709 posts
AeroScale: 651 posts
Posted: Monday, June 01, 2015 - 05:40 PM UTC
Keith, check again the link, it's there

The racks for the electric equipment are assembled and already pre-painted (black/dark grey) same as the oxygen parts are blue (exept the pipes - they are all bare matal outside the cockpit and also the brackets as they fix it quick as it comes to the fuselage after delivery).
Thomas
Sometimes you need to distance yourself to see things clearly - Lao Tzu -
... in scale and in real life -T.
California, United States
Joined: October 08, 2013
KitMaker: 111 posts
AeroScale: 28 posts
Posted: Tuesday, June 02, 2015 - 08:17 AM UTC
Folks,
Here's my 48th scale ME-262 A-1a/U3 completed! I cut off the ridiculous looking nose cannon as it's at an impossible anglefor a nose cannon. It's ok as some of the U3's did not have that weapon. Really enjoyed the Hobbyboss kit. Pretty good fit.


Was going to post in this the campaign album but couldn't find one.... figured it might not be started yet.
Well back to it's big brother!
Joe
Regards,
Joe Osborne
On the bench:
1/35 Tamiya Tiger I early Production
1/35 Tamiya Mid Production Tiger I
Texas, United States
Joined: February 22, 2008
KitMaker: 5,026 posts
AeroScale: 2,811 posts
Posted: Tuesday, June 02, 2015 - 08:23 AM UTC
Joe, nice job I love the paint job.
Bob
If it aint broke dont fix it.
Berlin, Germany
Joined: October 12, 2008
KitMaker: 709 posts
AeroScale: 651 posts
Posted: Tuesday, June 02, 2015 - 08:14 PM UTC
Joe, well done! Another nicely finished 262 while mine ist still in the hangar
Like the opened canopy an the interesting camo.
Album is here:
http://gallery3.kitmaker.net/showgallery.php/cat/29562Thomas
Sometimes you need to distance yourself to see things clearly - Lao Tzu -
... in scale and in real life -T.
Nordrhein-Westfalen, Germany
Joined: March 22, 2015
KitMaker: 671 posts
AeroScale: 614 posts
Posted: Tuesday, June 02, 2015 - 10:26 PM UTC
Joe, great! One more for the gallery! What about Your larger project.
Oliver
On the desk: Probably a Panzer III.
California, United States
Joined: October 08, 2013
KitMaker: 111 posts
AeroScale: 28 posts
Posted: Tuesday, June 02, 2015 - 11:33 PM UTC
Bob, Thomas, Oliver, thanks for the positive comments.Appreciated.
Oliver - work is progressing on the big bird. Building a wiring harness for the wheel well. Have attached the gunbays and cockpit to one side of the fuselage.... pics to come soon.
Thanks
Regards,
Joe Osborne
On the bench:
1/35 Tamiya Tiger I early Production
1/35 Tamiya Mid Production Tiger I
AussieReg
 Associate Editor
#007
Victoria, Australia
Joined: June 09, 2009
KitMaker: 8,156 posts
AeroScale: 3,756 posts
Posted: Wednesday, June 03, 2015 - 01:52 AM UTC
Beautiful build Joe, love the camo! I'm looking forward to the first pics of the big brother as well.
I'm really hoping to get a few hours work done on my build this coming weekend, it's been months since I picked up a blade and cement!
Keep up the great work all.
Cheers, D
ON the bench
Revell 1/24 '53 Corvette (building as '54)
Revell 1/24 BMW 507 Coupe and Cabrio
Italeri 1/48 Me262 B-1a/U1 Nightfighter
Monogram 1/24 '57 Chevy Nomad
Dragon 1/350 USS Frank Knox DD-742
New Jersey, United States
Joined: February 02, 2015
KitMaker: 330 posts
AeroScale: 286 posts
Posted: Thursday, June 04, 2015 - 06:26 PM UTC
I guess it is about time for me to update my build. I will give posting a photo another try this time from my photobucket account.
I got the cockpit and gun bay done and closed up the fuselage. I have to say I am not too impressed with the hobbyboss kit so far. I had to file down the bulkheads of the cockpit and gunbay along with the mounting tabs on those bays that insert into the fuselage just to get the halves to even meet!! the small tab just in front of the gunbay where the nose cone attaches still does not meet. even when I test fitted the fuselage halves together on their own there was many gaps and ill fit. partly due I think to the poor bulky sprue gates attached to the fuselage halves. now test fitting the lower one piece wing to the fuselage shows that it won't fit flush. I will have to do more sanding fitting to get that to seat right. can't wait to see what the fit is like at the top wing root.
anyway here it goes-
 [IMG]http://i262.photobucket.com/albums/ii93/joe_b_album/GEDC2260.jpg" BORDER="0">
[/img]
don't know why it put a link up. I will try a different way.
New Jersey, United States
Joined: February 02, 2015
KitMaker: 330 posts
AeroScale: 286 posts
Posted: Thursday, June 04, 2015 - 06:37 PM UTC
why when I click on edit I don't have the img button below?
anyway another try.
 [IMG]http://i262.photobucket.com/albums/ii93/joe_b_album/GEDC2260.jpg" BORDER="0">
.here/image.file[/img]
what am I doing wrong? I am a member of randy ayers nascar model forum and they have a similar method posting between the img icons but you click on the img button before you copy the image on photobucket then paste the image then click on the img button after you paste the photo in order to "bookend" the image between the img icons. there is no "put url here" type that appears between them either. it's just click img button, then paste photo, then click img button again and submit. also if you have to edit all the posting option buttons are still at the bottom of the box unlike here so you can go back and forth to check that each image is posting correctly. that is how I am attempting it here.
is this the way it is intended to work here too? it seems I am skipping a step or something.
Berlin, Germany
Joined: October 12, 2008
KitMaker: 709 posts
AeroScale: 651 posts
Posted: Thursday, June 04, 2015 - 06:50 PM UTC
Quoted Text
why when I click on edit I don't have the img button below?
anyway another try.
Joe, use "direct" or "img" in photobucket to copy the url (just left click to copy), then paste inbetween the two "img"..."img" while deleting what's already there.
You can't edit photos.
With your permission?:

Thomas
Sometimes you need to distance yourself to see things clearly - Lao Tzu -
... in scale and in real life -T.
New Jersey, United States
Joined: February 02, 2015
KitMaker: 330 posts
AeroScale: 286 posts
Posted: Thursday, June 04, 2015 - 06:53 PM UTC
thanks Thomas. do I have to delete the put url here type along with the htpp// and al the other stuff that comes up between the two img icons?
joe
Berlin, Germany
Joined: October 12, 2008
KitMaker: 709 posts
AeroScale: 651 posts
Posted: Thursday, June 04, 2015 - 06:55 PM UTC
Sometimes you need to distance yourself to see things clearly - Lao Tzu -
... in scale and in real life -T.
New Jersey, United States
Joined: February 02, 2015
KitMaker: 330 posts
AeroScale: 286 posts
Posted: Thursday, June 04, 2015 - 07:24 PM UTC
ok Thomas thanks, lets give this another try. this is cutting into my building time-lol.
HURRAY!!! WHOOHOOO!!! WISH I WAS ABLE TO POST A SMILEY FACE HERE!!
Berlin, Germany
Joined: October 12, 2008
KitMaker: 709 posts
AeroScale: 651 posts
Posted: Thursday, June 04, 2015 - 07:33 PM UTC
Sometimes you need to distance yourself to see things clearly - Lao Tzu -
... in scale and in real life -T.
New Jersey, United States
Joined: February 02, 2015
KitMaker: 330 posts
AeroScale: 286 posts
Posted: Thursday, June 04, 2015 - 07:45 PM UTC
Nordrhein-Westfalen, Germany
Joined: March 22, 2015
KitMaker: 671 posts
AeroScale: 614 posts
Posted: Thursday, June 04, 2015 - 09:21 PM UTC
Joe: Wow really nice progress, espescially the wiring. Looks superb. How did You separate them so parallel in the lower tub ?
Oliver
On the desk: Probably a Panzer III.
New Jersey, United States
Joined: February 02, 2015
KitMaker: 330 posts
AeroScale: 286 posts
Posted: Saturday, June 06, 2015 - 03:05 AM UTC
oliver, actually that is part of a photo etch kit from eduard except for the yellow wires which I added. I wanted to buy the weekend etch kit that had only the harness and control panels but couldn't find it so I ended up with the full kit which is actually for the fighter/bomber version kit.
I just made wing slats from brass sheet but I will have to wait to post the photos until the batteries charge for my camera.
joe b
Vermont, United States
Joined: July 21, 2002
KitMaker: 3,569 posts
AeroScale: 419 posts
Posted: Saturday, June 06, 2015 - 05:22 AM UTC
well, the situation was even worst than it looked from the picture.

Where I thought I had just mis-alligned the exhaust cone, putting it inside the locators, what I'd managed to do was , despite double checking the instructions, swap the engine inlet and exhaust front to back.
So the nacels are glued down REALLY well and because they are mounted to the wing, wont pop open along the seam.
Out comes the saw, flip flop, parts are back where they belong.


I've done enough damage here tonight.
If you can keep your head when all about you are losing theirs,
perhaps you've misunderstood the situation.
Texas, United States
Joined: February 22, 2008
KitMaker: 5,026 posts
AeroScale: 2,811 posts
Posted: Saturday, June 06, 2015 - 08:21 AM UTC
Everyone here has been doing a great work on there 262 builds albeit some of us have has some hiccups with the assembly. Mine has been the final fit on the upper nose section, which is taking more than just some putty.


If it aint broke dont fix it.