Air Campaigns
Want to start or join a group build? This is where to start.
Want to start or join a group build? This is where to start.
Hosted by Frederick Boucher, Michael Satin
OFFICIAL: Western Front/ETO Campaign
Posted: Thursday, June 22, 2017 - 02:01 PM UTC
Tamiya have released paints to replicate RAF day fighter scheme numbers are XF-81 RAF Dark Green XF-82 RAF Ocean Grey XF-83 RAF Medium Sea Gray I've go the paints and they spray well and look rather good.

Bigrip74

Joined: February 22, 2008
KitMaker: 5,026 posts
AeroScale: 2,811 posts

Posted: Thursday, June 22, 2017 - 07:29 PM UTC
Chris, thanks for the help. Ill check those colors out.
Bob
Bob

Bigrip74

Joined: February 22, 2008
KitMaker: 5,026 posts
AeroScale: 2,811 posts

Posted: Friday, June 23, 2017 - 08:04 PM UTC
Posted: Saturday, June 24, 2017 - 01:45 AM UTC
Looks good to me!

Bigrip74

Joined: February 22, 2008
KitMaker: 5,026 posts
AeroScale: 2,811 posts

Posted: Saturday, June 24, 2017 - 03:04 AM UTC
Clayton, thanks for the comment, but the photos do not show the pencil lines that I did not cover with paint 
Bob

Bob
Removed by original poster on 06/25/17 - 02:55:00 (GMT).

bomber14

Joined: February 02, 2015
KitMaker: 330 posts
AeroScale: 286 posts

Posted: Saturday, June 24, 2017 - 07:56 AM UTC
here's an update on my build. i thinned out the cowl and scribed the cowl flaps. i plan on making it an in flight and making my own prop blur. i still need to clip the wings before i start painting.
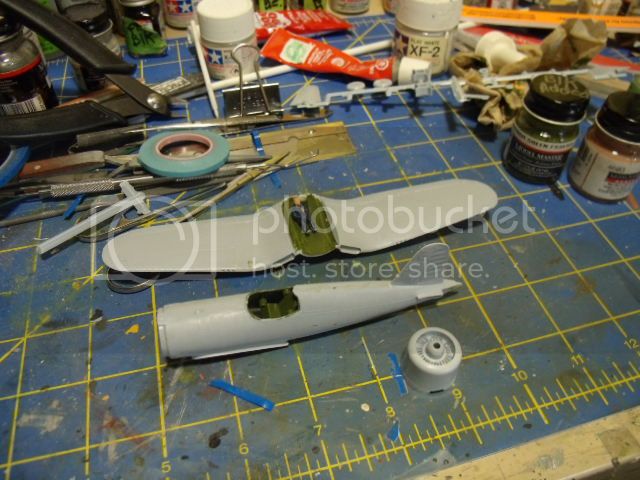
joe

joe

Bigrip74

Joined: February 22, 2008
KitMaker: 5,026 posts
AeroScale: 2,811 posts

Posted: Saturday, June 24, 2017 - 06:42 PM UTC
Joe, she is one of my favorite airplanes. What scheme will you be using.
Bon
Bon

Bigrip74

Joined: February 22, 2008
KitMaker: 5,026 posts
AeroScale: 2,811 posts

Posted: Monday, June 26, 2017 - 02:51 AM UTC
Only 12 days left and I will be cutting it close. These DDay Stripes are going to be trouble for me. 
Bob

Bob
Posted: Monday, June 26, 2017 - 03:18 AM UTC
Quoted Text
Only 12 days left and I will be cutting it close. These DDay Stripes are going to be trouble for me.
Bob
12? I count 35.....

Bigrip74

Joined: February 22, 2008
KitMaker: 5,026 posts
AeroScale: 2,811 posts

Posted: Monday, June 26, 2017 - 05:53 AM UTC
Quoted Text
Quoted TextOnly 12 days left and I will be cutting it close. These DDay Stripes are going to be trouble for me.
Bob
12? I count 35.....
OOPS!
 I see better when I put my glasses on to read the calander
  thanks Clayton, you've given me more time
  .
.Bob

bomber14

Joined: February 02, 2015
KitMaker: 330 posts
AeroScale: 286 posts

Posted: Monday, June 26, 2017 - 04:49 PM UTC
Quoted Text
Joe, she is one of my favorite airplanes. What scheme will you be using.
Bon
this is one of the worst kits i have made. i am just going to do the FAA camo that is on the box but i am not going to worry about how accurate the colors are. i just hope the decals work.

joe
Posted: Monday, June 26, 2017 - 08:53 PM UTC
Hi All,
I found myself going back to page one of this campaign and checking out all the builds to date. There is some impressive things that have happened and happening! Paul, I really like the Hurricane. It's gotten me rethinking the Airfix brand. Their new moldings look fabulous, and what you did looks great! Of course I need a new kit like a hole in the head.
Bob, I think it's great you got some new glasses. Please use them a bit more! You gave me scare, and had to reread everything and do a little math! Hahaha, I do like the paint job so far, the colors look right to my eyes.
Joe, hang in there! I've found that the worst kits have taught me the most of how to deal with working around or though challenges. Keep it up!
Speaking of challenges, I'm currently having a slug fest with this P-38.
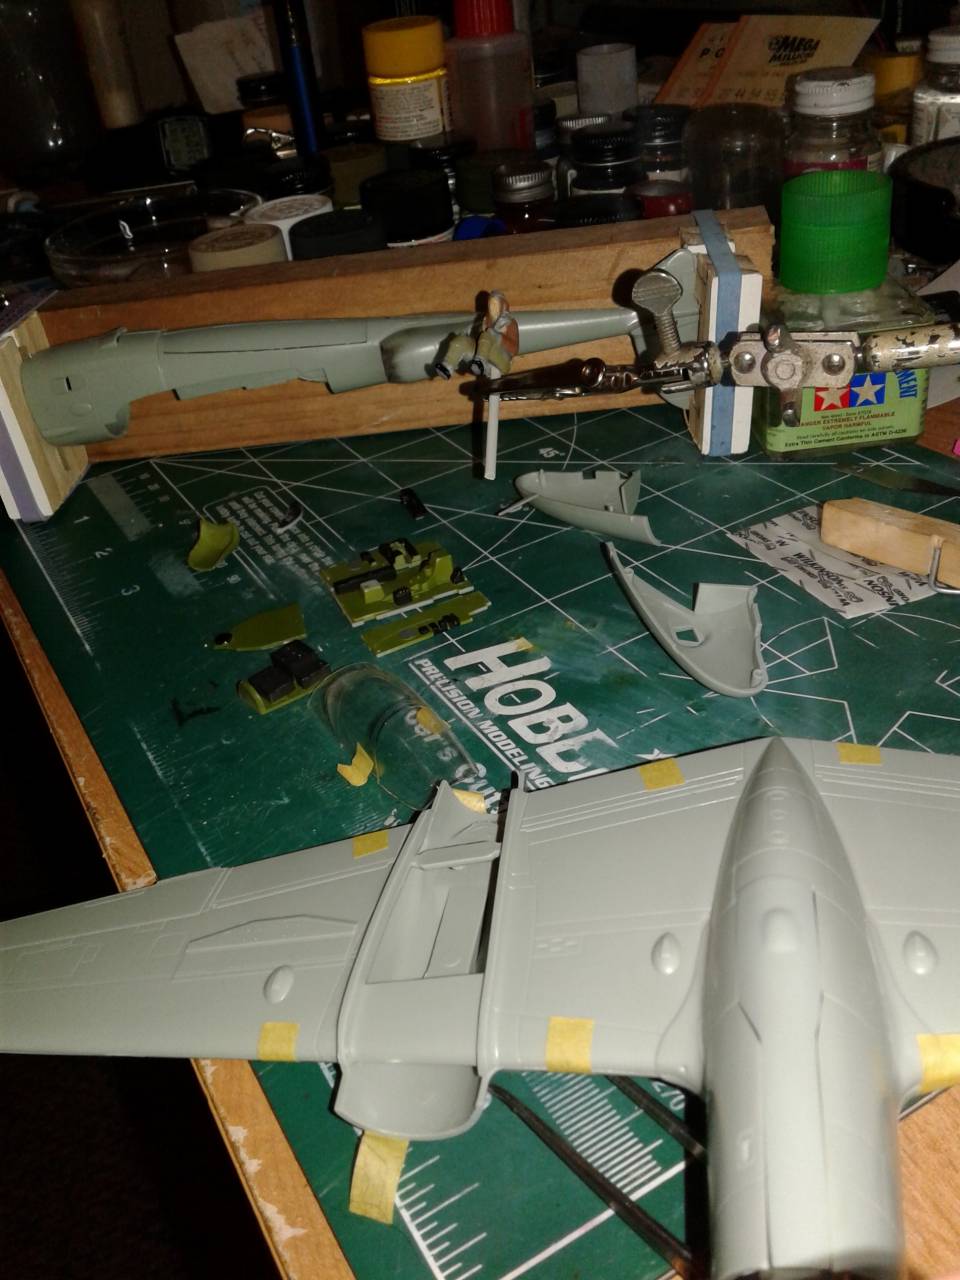
The fit is pretty good, but a few tabs would be nicer than butt joins. Oh well, clamps do wonders. Since the bath I've accomplished some progress. With this gem, I really didn't start at any one point, but three. painting up the cockpit, which is adequate for what I'm planning to do. Just need to give some color to the switches, and some washes and dry brushing to bring it all out. Included in the cockpit assembly is a pilot named Jim. Academy doesn't have a pilot, so I used lend lease on a P-47 Tamiya pilot. I'd forgotten all the different paints needed! He's looking believable and needs a wash. After that the office will be assembled. The kits canopy doesn't lend itself to being closed, so I got a vacuformed one, ah the joy. It's been cut loose and cleaned a bit, though test fitting requires a bit more work. I'll hold off until the cockpit is in the fuselage.
Finally, I made a "Boom Jig". I had seen this on Swanny's models (does anyone know what's happened to it? I keep getting "site suspended".). Fortunately, I found a link to the original article from the "Forked Tail Devils" campaign.
While the jury is still out on this, my comfort level isn't too high at the moment, it does seem to keep things lined up nicely.
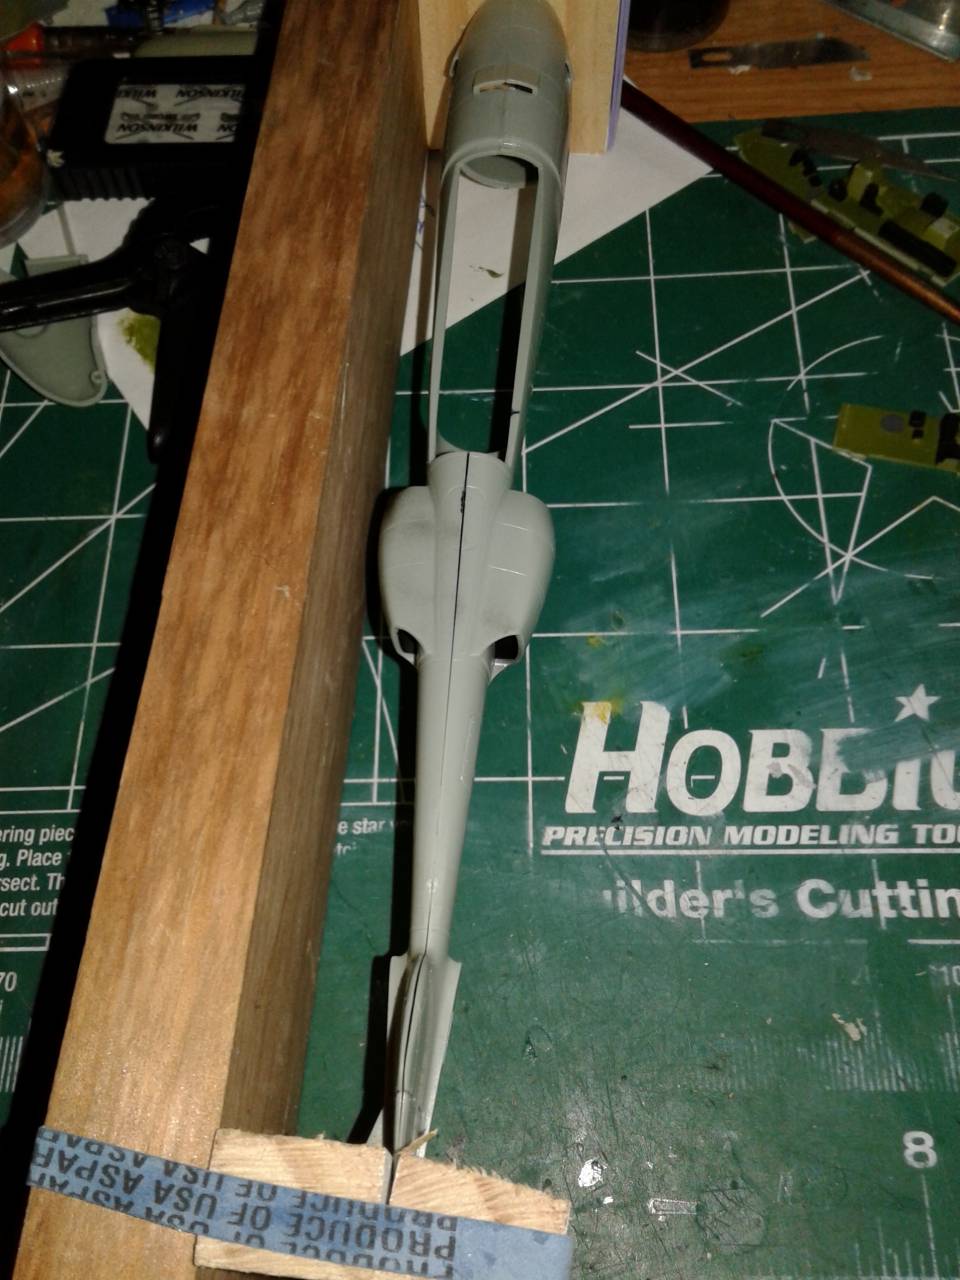
What it doesn't tell you is that getting the seams to close is a bit tricky. I wound up using some clothes pins and a twisty tie from a bread wrapper.
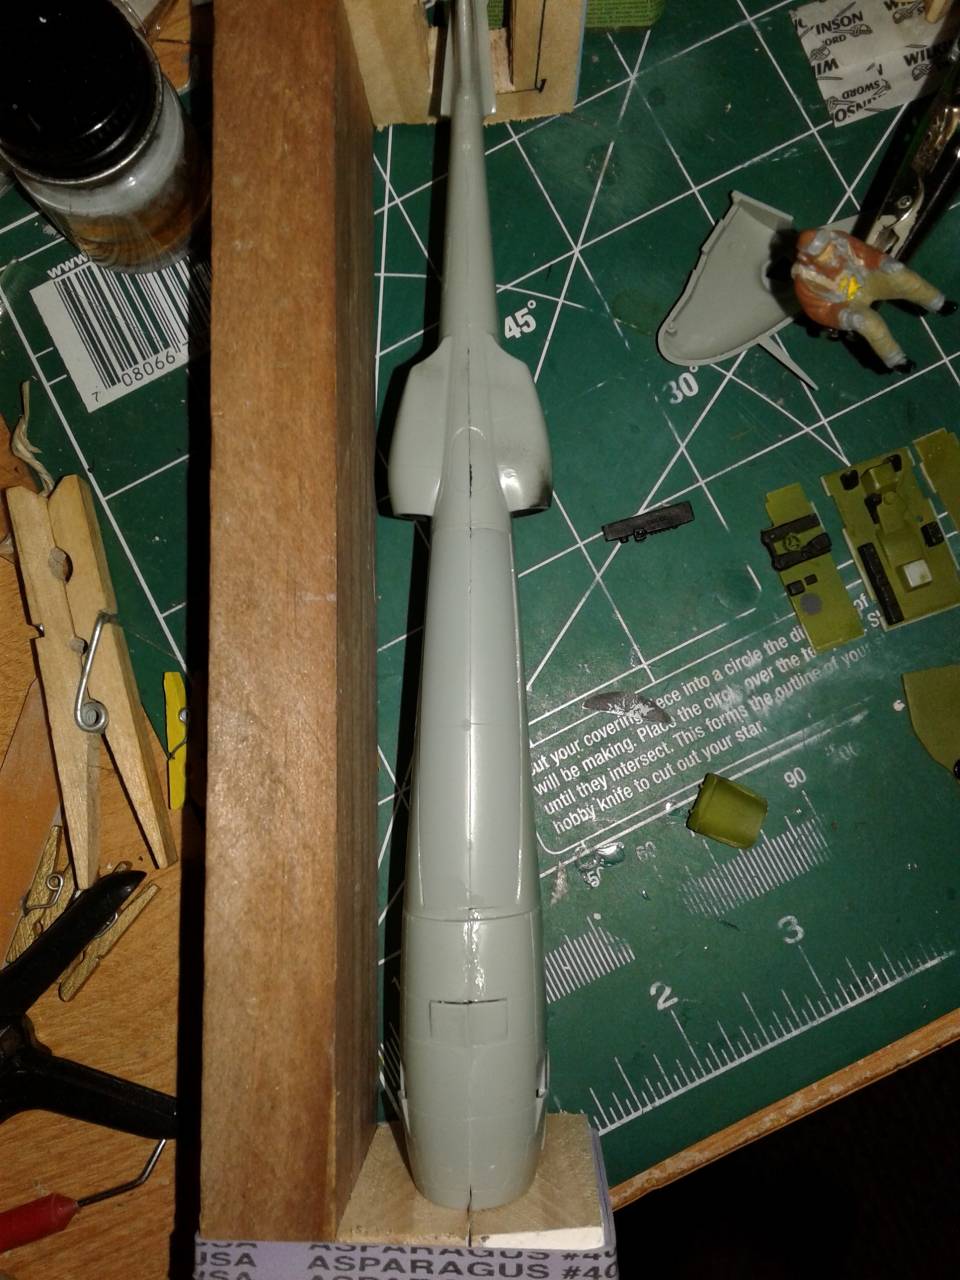
I put the wheel wells in to add support, and then closed them up. Fit here is poor, but it's all aligned.
So for the next couple of days it'll be Mr. Surfacer 500, sanding, repeat. And some washes of black and burnt umber. And of course test fitting out the ying yang!
Take it easy,
John
I found myself going back to page one of this campaign and checking out all the builds to date. There is some impressive things that have happened and happening! Paul, I really like the Hurricane. It's gotten me rethinking the Airfix brand. Their new moldings look fabulous, and what you did looks great! Of course I need a new kit like a hole in the head.
Bob, I think it's great you got some new glasses. Please use them a bit more! You gave me scare, and had to reread everything and do a little math! Hahaha, I do like the paint job so far, the colors look right to my eyes.
Joe, hang in there! I've found that the worst kits have taught me the most of how to deal with working around or though challenges. Keep it up!
Speaking of challenges, I'm currently having a slug fest with this P-38.

The fit is pretty good, but a few tabs would be nicer than butt joins. Oh well, clamps do wonders. Since the bath I've accomplished some progress. With this gem, I really didn't start at any one point, but three. painting up the cockpit, which is adequate for what I'm planning to do. Just need to give some color to the switches, and some washes and dry brushing to bring it all out. Included in the cockpit assembly is a pilot named Jim. Academy doesn't have a pilot, so I used lend lease on a P-47 Tamiya pilot. I'd forgotten all the different paints needed! He's looking believable and needs a wash. After that the office will be assembled. The kits canopy doesn't lend itself to being closed, so I got a vacuformed one, ah the joy. It's been cut loose and cleaned a bit, though test fitting requires a bit more work. I'll hold off until the cockpit is in the fuselage.
Finally, I made a "Boom Jig". I had seen this on Swanny's models (does anyone know what's happened to it? I keep getting "site suspended".). Fortunately, I found a link to the original article from the "Forked Tail Devils" campaign.
While the jury is still out on this, my comfort level isn't too high at the moment, it does seem to keep things lined up nicely.

What it doesn't tell you is that getting the seams to close is a bit tricky. I wound up using some clothes pins and a twisty tie from a bread wrapper.

I put the wheel wells in to add support, and then closed them up. Fit here is poor, but it's all aligned.
So for the next couple of days it'll be Mr. Surfacer 500, sanding, repeat. And some washes of black and burnt umber. And of course test fitting out the ying yang!
Take it easy,
John
Posted: Tuesday, June 27, 2017 - 12:12 AM UTC
Posted: Tuesday, June 27, 2017 - 12:45 AM UTC
@John, I'm impressed with your engineering! Mad skillz.
Almost done with the cockpit on the Jug, moving over to the engine now.
Almost done with the cockpit on the Jug, moving over to the engine now.

Posted: Tuesday, June 27, 2017 - 08:19 AM UTC
Welcome aboard Raj! Nice looking kit.
Mark, thanks. Though the idea for the jig came from someone else, I read about it and thought it was a good path to follow. It could belong to Paul Budzik. Gotta give credit where it belongs. I guess my research roots are showing, I'll try just about anything that looks and seems sound. I will say that the booms are certainly sturdier than my last P-38 (Monogram) about 20 years ago! Granted, they seem to need about the same or more filler.
John
KelticKnot

Joined: May 11, 2015
KitMaker: 768 posts
AeroScale: 656 posts

Posted: Tuesday, June 27, 2017 - 02:06 PM UTC
[quote]I found myself going back to page one of this campaign and checking out all the builds to date. There is some impressive things that have happened and happening! Paul, I really like the Hurricane. It's gotten me rethinking the Airfix brand. Their new moldings look fabulous, and what you did looks great! Of course I need a new kit like a hole in the head.
/quote]
I agree, there have been some great builds in this campaign! And thanks for noticing my Hurricane. I can't say enough good things about the new Airfix brand. As someone who had only built "legacy" kits since returning to the hobby this was a real eye opener on the improvements in moulding.
/quote]
I agree, there have been some great builds in this campaign! And thanks for noticing my Hurricane. I can't say enough good things about the new Airfix brand. As someone who had only built "legacy" kits since returning to the hobby this was a real eye opener on the improvements in moulding.

Bigrip74

Joined: February 22, 2008
KitMaker: 5,026 posts
AeroScale: 2,811 posts

Posted: Tuesday, June 27, 2017 - 09:10 PM UTC

Bigrip74

Joined: February 22, 2008
KitMaker: 5,026 posts
AeroScale: 2,811 posts

Posted: Wednesday, June 28, 2017 - 05:57 AM UTC
Removed by original poster on 06/29/17 - 03:15:25 (GMT).
Posted: Wednesday, June 28, 2017 - 07:36 PM UTC
Nice job, Bob! Hope the stripes on my C-47 look half as good!

bomber14

Joined: February 02, 2015
KitMaker: 330 posts
AeroScale: 286 posts

Posted: Wednesday, June 28, 2017 - 09:41 PM UTC
looks great bob. i am yet to try d-day stripes, hope mine will look as good.
joe
joe

Bigrip74

Joined: February 22, 2008
KitMaker: 5,026 posts
AeroScale: 2,811 posts

Posted: Wednesday, June 28, 2017 - 09:46 PM UTC
Clayton and Joe, thanks for the comments but photos don't show everything. There was some minor bleeding on the fuselage, but I can live with that. The weathering will take care of this.
Bob
Bob

goodn8

Joined: October 12, 2008
KitMaker: 709 posts
AeroScale: 651 posts

Posted: Wednesday, June 28, 2017 - 10:08 PM UTC
Very nice and neat work, Bob!
Do the white stripes not go over the outboard side of the wheel wells (next to the attachment point for the struts) up to the front of the wing`s underside?
Thomas

Do the white stripes not go over the outboard side of the wheel wells (next to the attachment point for the struts) up to the front of the wing`s underside?
Thomas

Posted: Thursday, June 29, 2017 - 12:57 AM UTC
Quoted Text
Clayton and Joe, thanks for the comments but photos don't show everything. There was some minor bleeding on the fuselage, but I can live with that. The weathering will take care of this.
Bob
Remember that the crews painted the stripes, and used whatever they had available- mops, etc., so they were a bit sloppy!

 |


