Lisboa, Portugal
Joined: August 27, 2010
KitMaker: 679 posts
AeroScale: 669 posts
Posted: Friday, April 10, 2020 - 01:25 AM UTC
Hi everyone,
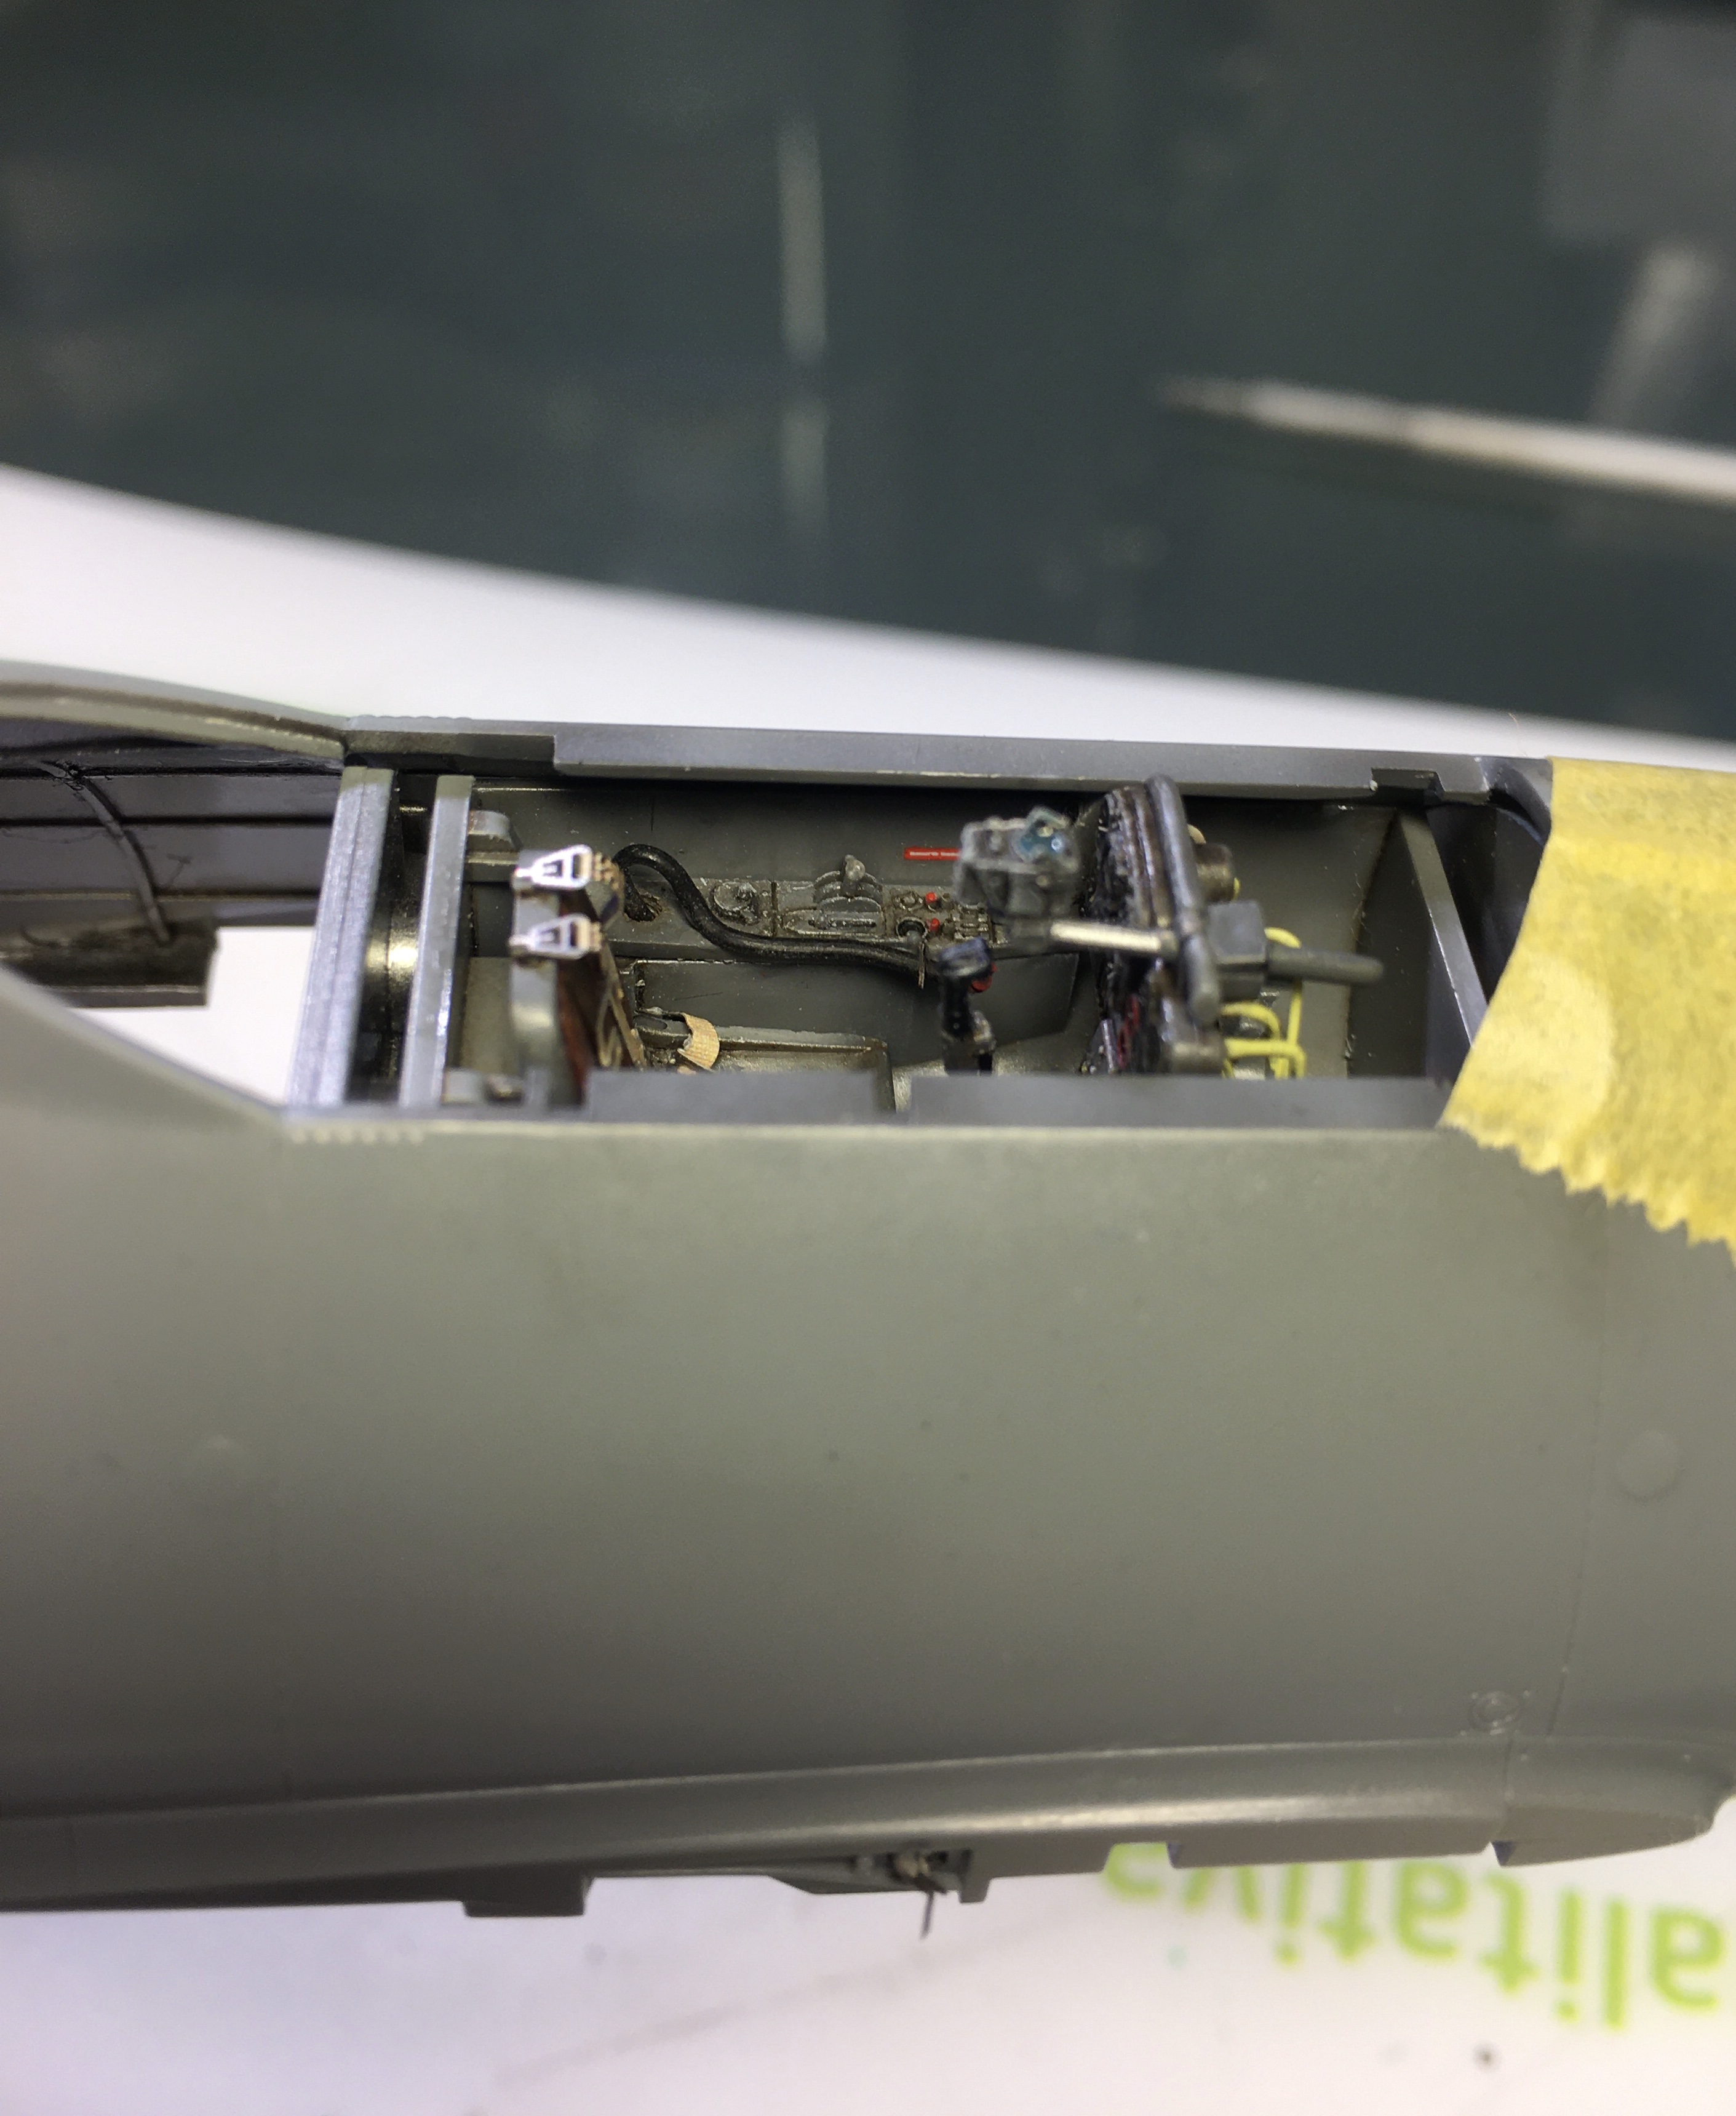
A bit more work done, the familiar shape of the 262 starts to take form
Frontal wheel

Fuselage and main wheel well


Cheers
Pedro

#424
Queensland, Australia
Joined: April 23, 2015
KitMaker: 4,648 posts
AeroScale: 1,938 posts
Posted: Friday, April 10, 2020 - 07:53 AM UTC
I'm certainly liking the look of your 262, Pedro. The details are very nicely molded.
"Artillery adds dignity, to what would otherwise be an ugly brawl."
Frederick The Great
AussieReg
 Associate Editor
#007
Victoria, Australia
Joined: June 09, 2009
KitMaker: 8,156 posts
AeroScale: 3,756 posts
Posted: Friday, April 10, 2020 - 08:46 AM UTC
Beautiful work Pedro, your build is coming together really nicely now!
Cheers, D
ON the bench
Revell 1/24 '53 Corvette (building as '54)
Revell 1/24 BMW 507 Coupe and Cabrio
Italeri 1/48 Me262 B-1a/U1 Nightfighter
Monogram 1/24 '57 Chevy Nomad
Dragon 1/350 USS Frank Knox DD-742
#501
Kerala, India / भारत
Joined: August 25, 2009
KitMaker: 292 posts
AeroScale: 194 posts
Posted: Tuesday, April 21, 2020 - 12:24 PM UTC
I finally started my entry for the GB.

Before start picture

The progress so far.

Kettenkraftrad mit Mk108 kanone
I planned to build this OOB but having seen Pedro's wonderful additions now I'm tempted to add a few of my own.
Thanks for watching. Cheers

Hawaii, United States
Joined: August 27, 2006
KitMaker: 1,646 posts
AeroScale: 12 posts
Posted: Tuesday, April 21, 2020 - 05:54 PM UTC
Aloha All,
Wow Pedro, I can't believe you are building the same kit as me! No way I could put that much detail in there. Super nice work.
Raj: Nice start. The Kettenkraftrad looks great with the Kanone on there. could be a fun what-if.
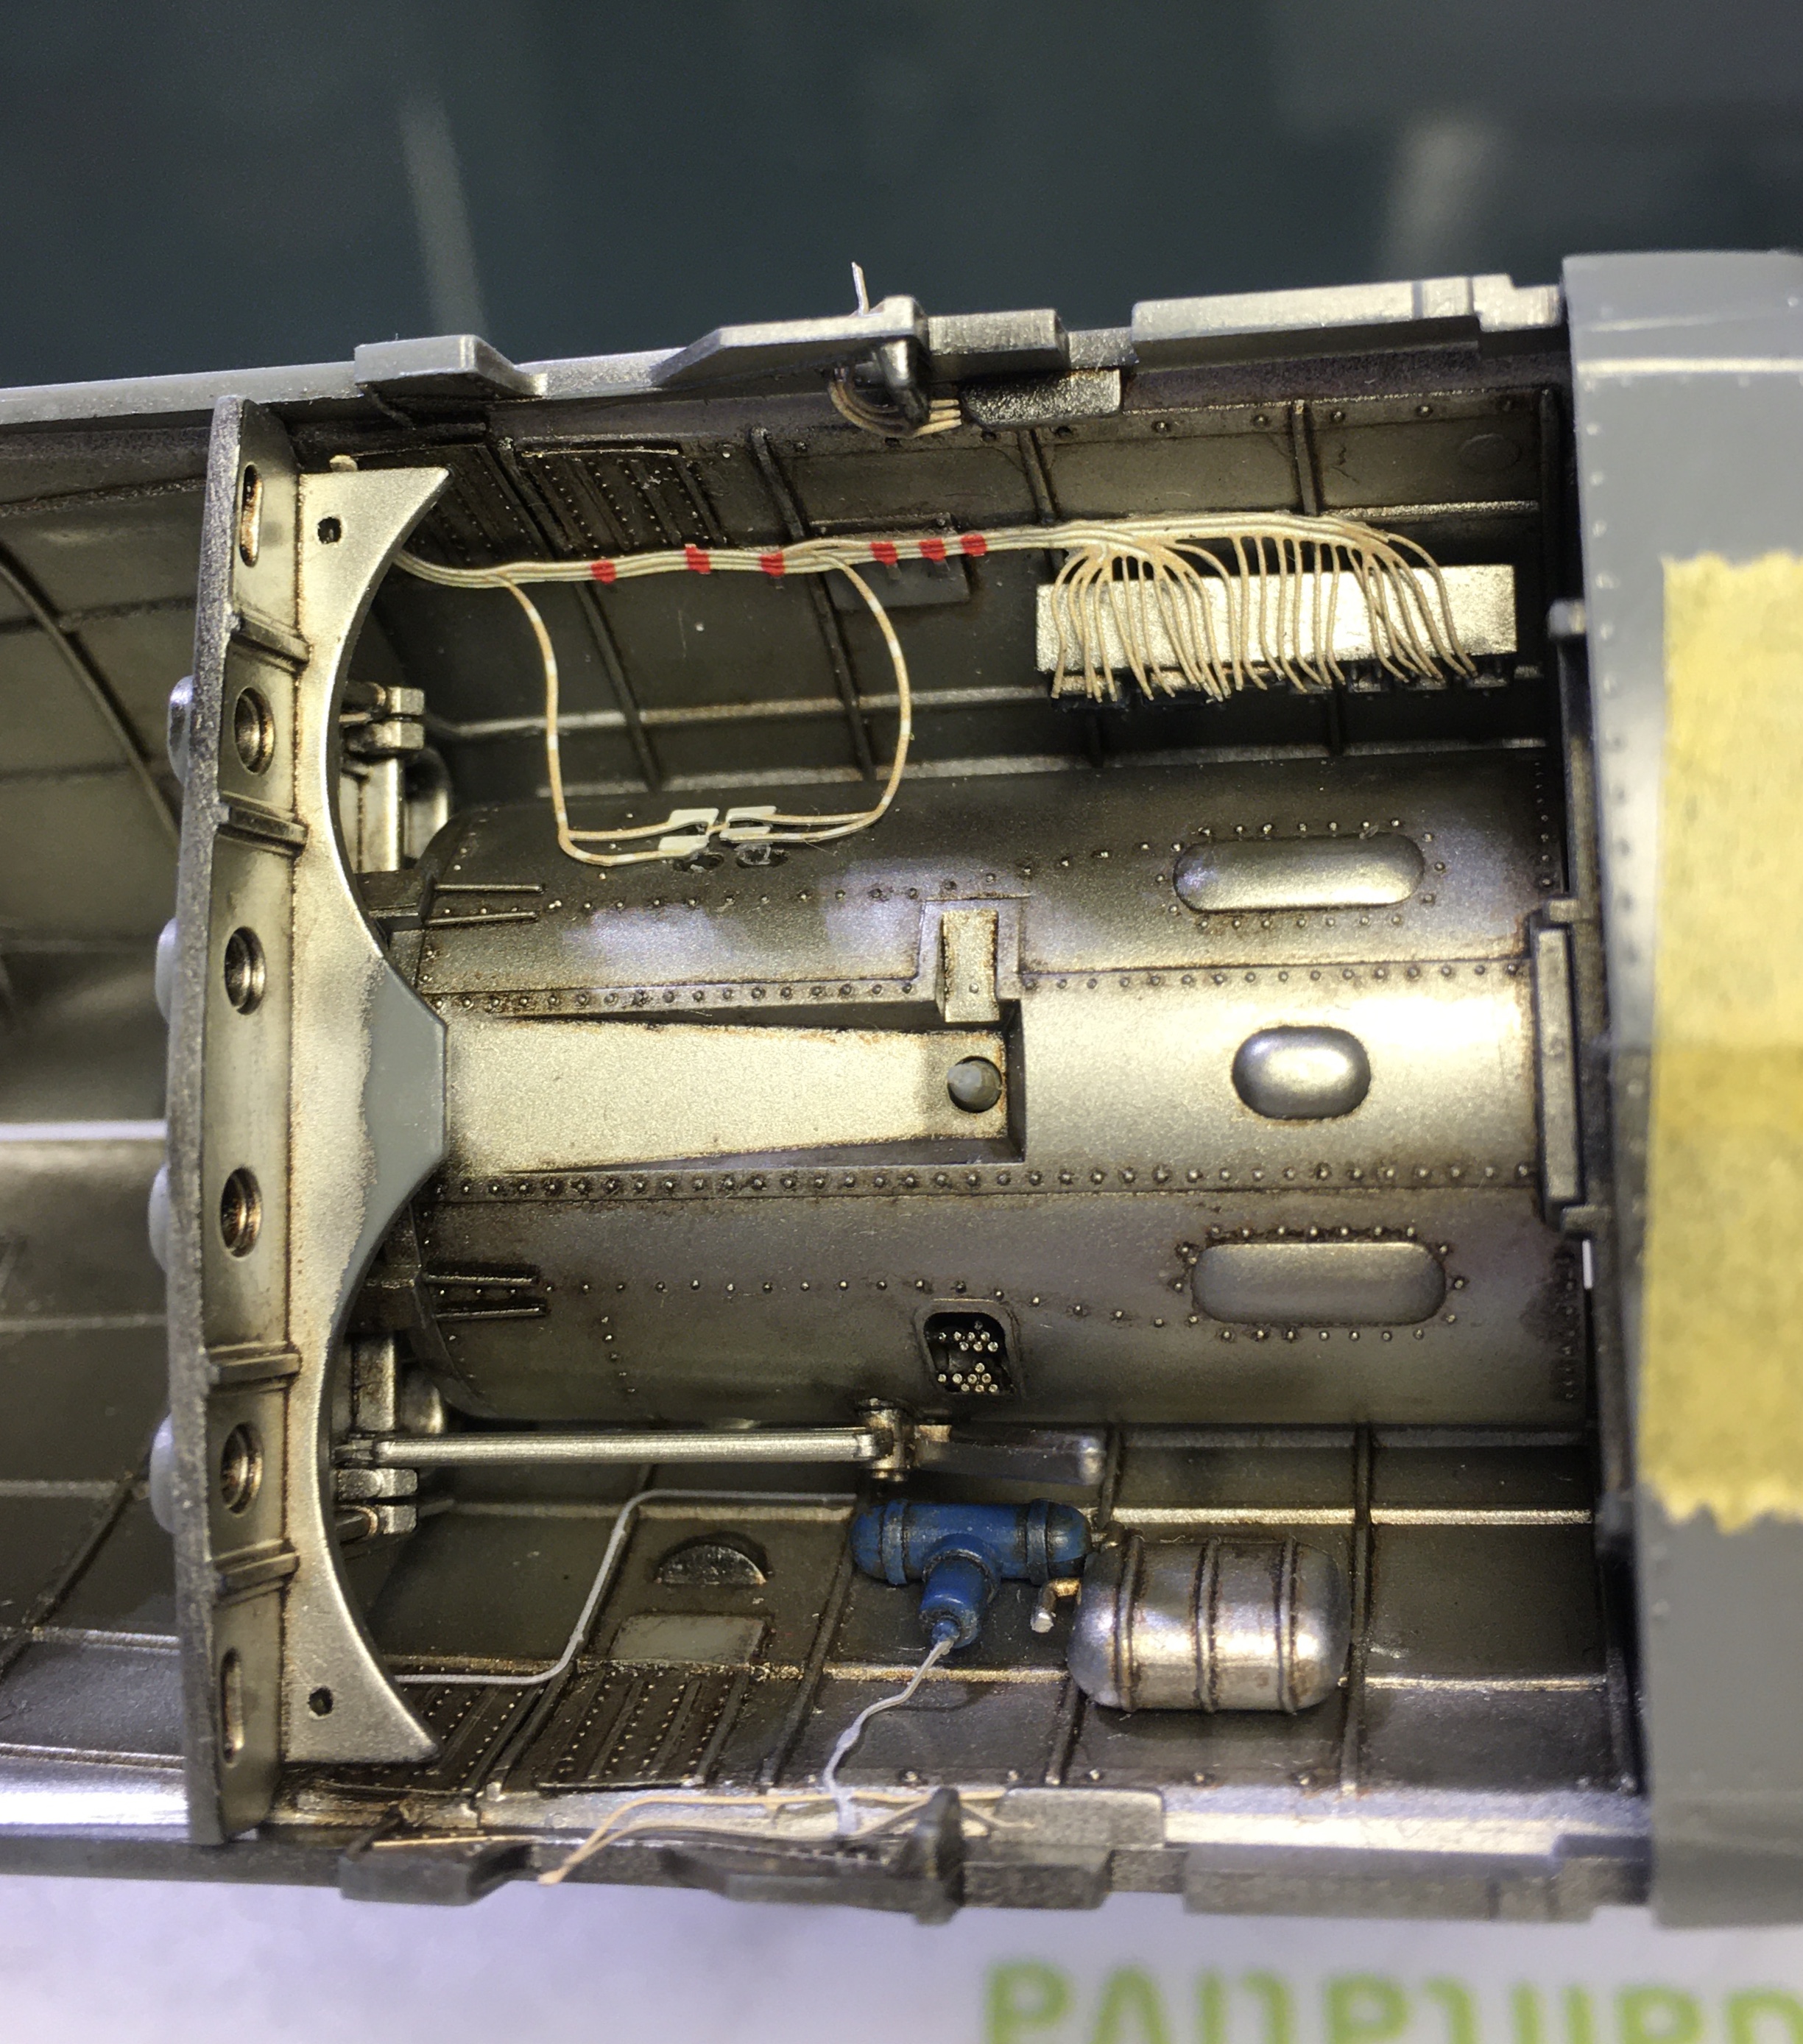
I've made some progress on my entry, getting the cockpit mostly done as well as the gun bay and main gear wheel well.


My instrument wiring is way out of scale, but it was the smallest wire I had, so went for more of a "suggestion" than accuracy, since you'll be able to see down in there from the front windscreen. I used the supplied decals for the instruments and had a really hard time lining them up, so they're a bit off, but laid down pretty well after 10 or so coats of Micro Sol.
Happy Modeling,
Zon
"Certainty of death.
Small chance of sucess.
What are we waiting for?"
-Gimli, Return of the King.
#424
Queensland, Australia
Joined: April 23, 2015
KitMaker: 4,648 posts
AeroScale: 1,938 posts
Posted: Tuesday, April 21, 2020 - 08:05 PM UTC
Raj,
Glad to see you've started! That Kettenkrad looks pretty awesome with the MK 103's mounted on it.
"Artillery adds dignity, to what would otherwise be an ugly brawl."
Frederick The Great
#424
Queensland, Australia
Joined: April 23, 2015
KitMaker: 4,648 posts
AeroScale: 1,938 posts
Posted: Tuesday, April 21, 2020 - 08:06 PM UTC
Zon,
Your interior details look great! Keep it rolling!
"Artillery adds dignity, to what would otherwise be an ugly brawl."
Frederick The Great
#424
Queensland, Australia
Joined: April 23, 2015
KitMaker: 4,648 posts
AeroScale: 1,938 posts
Posted: Tuesday, April 21, 2020 - 08:29 PM UTC
I've done some painting today. My take on 81/83:


Happy Modelling!
"Artillery adds dignity, to what would otherwise be an ugly brawl."
Frederick The Great
Lisboa, Portugal
Joined: August 27, 2010
KitMaker: 679 posts
AeroScale: 669 posts
Posted: Wednesday, April 22, 2020 - 01:32 AM UTC
Looking sharp! What paint brand did you use?
Cheers
Pedro
#424
Queensland, Australia
Joined: April 23, 2015
KitMaker: 4,648 posts
AeroScale: 1,938 posts
Posted: Wednesday, April 22, 2020 - 04:42 PM UTC
Quoted Text
Looking sharp! What paint brand did you use?
Cheers
Pedro
Thank you Pedro! I used MRP lacquers. But I didn't have any late war Luftwaffe colors, and no green whatsoever. So, should you one day buy MRP RLM 81 or RLM 83, they may not look like these colors.
"Artillery adds dignity, to what would otherwise be an ugly brawl."
Frederick The Great
AussieReg
Associate Editor #007
Victoria, Australia
Joined: June 09, 2009
KitMaker: 8,156 posts
AeroScale: 3,756 posts
Posted: Wednesday, April 22, 2020 - 04:55 PM UTC
Nice work on the mottling Gaz, looking good mate!
Cheers, D
ON the bench
Revell 1/24 '53 Corvette (building as '54)
Revell 1/24 BMW 507 Coupe and Cabrio
Italeri 1/48 Me262 B-1a/U1 Nightfighter
Monogram 1/24 '57 Chevy Nomad
Dragon 1/350 USS Frank Knox DD-742
Hawaii, United States
Joined: August 27, 2006
KitMaker: 1,646 posts
AeroScale: 12 posts
Posted: Wednesday, April 22, 2020 - 07:24 PM UTC
Gaz: thanks for the encouragement. Your paint scheme looks great and the mottling is superb. I have to say, that is what scares me the most, after putty work. You did great!
Happy Modeling,
zon
"Certainty of death.
Small chance of sucess.
What are we waiting for?"
-Gimli, Return of the King.
New Jersey, United States
Joined: February 02, 2015
KitMaker: 330 posts
AeroScale: 286 posts
Posted: Friday, April 24, 2020 - 07:40 AM UTC
pedro did you do all that wiring in the wheel bay yourself or is it a photo etch? and where did you get your wing slat kit? i have one somewhere here but am hesitant to use it if i can't find others.
thanks-joe
JPTRR
Managing Editor #051
Tennessee, United States
Joined: December 21, 2002
KitMaker: 7,772 posts
AeroScale: 3,175 posts
Posted: Friday, April 24, 2020 - 08:48 AM UTC
Hi Gruppe,
Room on the ramp for one more?

I've had this model for 42 years and it is time to get her out of the box and onto the shelf. I'm planning to build OOB.

If they demand your loyalty, give them integrity; if they demand integrity, give them your loyalty.--Col John Boyd, USAF
Any plan where you lose your hat is a bad plan.
#424
Queensland, Australia
Joined: April 23, 2015
KitMaker: 4,648 posts
AeroScale: 1,938 posts
Posted: Friday, April 24, 2020 - 09:00 AM UTC
Frederick,
Welcome to the campaign! You've got the same kit as me, except my boxing was 2005. I'll be interested in seeing the differences.
I filled the nose of mine with lead, so didn't use the cannon details.
"Artillery adds dignity, to what would otherwise be an ugly brawl."
Frederick The Great
JPTRR
Managing Editor #051
Tennessee, United States
Joined: December 21, 2002
KitMaker: 7,772 posts
AeroScale: 3,175 posts
Posted: Friday, April 24, 2020 - 09:08 AM UTC
Quoted Text
You've got the same kit as me, except my boxing was 2005. I'll be interested in seeing the differences.
Gaz, I'll be glad to show off the whole kit. If you are interested, I can make a review out of it, too. I enjoy showing the model world the older kits and they seem to get a lot of attention.
Anyone else what to see a review of the kit?

If they demand your loyalty, give them integrity; if they demand integrity, give them your loyalty.--Col John Boyd, USAF
Any plan where you lose your hat is a bad plan.
AussieReg
Associate Editor #007
Victoria, Australia
Joined: June 09, 2009
KitMaker: 8,156 posts
AeroScale: 3,756 posts
Posted: Friday, April 24, 2020 - 11:00 AM UTC
Quoted Text
Anyone else what to see a review of the kit?
Definitely Fred! Like you said, reviewing these older kits is fun, and can open peoples eyes up to some opportunities when these pop up on the swap meet tables. I'm reviewing quite a few older Auto kits and there are some real gems amongst them (as well a bit of dumpster fodder!).
Looking forward to your build progress.
Cheers, D
ON the bench
Revell 1/24 '53 Corvette (building as '54)
Revell 1/24 BMW 507 Coupe and Cabrio
Italeri 1/48 Me262 B-1a/U1 Nightfighter
Monogram 1/24 '57 Chevy Nomad
Dragon 1/350 USS Frank Knox DD-742
Lisboa, Portugal
Joined: August 27, 2010
KitMaker: 679 posts
AeroScale: 669 posts
Posted: Friday, April 24, 2020 - 12:25 PM UTC
pedro did you do all that wiring in the wheel bay yourself or is it a photo etch? and where did you get your wing slat kit? i have one somewhere here but am hesitant to use it if i can't find others.
thanks-joe[/quote]
Joe,
I used both, the lion share is from an Eduard PE and a few other Inadded using cooper or stretched plastic.
The slats resin set Im using is the long OOP Cutting Edge, very good but still a laborious work to fit, at least by lesser skilled hands like mine

#424
Queensland, Australia
Joined: April 23, 2015
KitMaker: 4,648 posts
AeroScale: 1,938 posts
Posted: Friday, April 24, 2020 - 12:54 PM UTC
Quoted Text
Quoted Text
You've got the same kit as me, except my boxing was 2005. I'll be interested in seeing the differences.
Gaz, I'll be glad to show off the whole kit. If you are interested, I can make a review out of it, too. I enjoy showing the model world the older kits and they seem to get a lot of attention.
Anyone else what to see a review of the kit?
Go for it Frederick! I'm sure most here will enjoy seeing your presentation!
"Artillery adds dignity, to what would otherwise be an ugly brawl."
Frederick The Great
#424
Queensland, Australia
Joined: April 23, 2015
KitMaker: 4,648 posts
AeroScale: 1,938 posts
Posted: Friday, April 24, 2020 - 12:58 PM UTC
A little more from me:
The later war Messerschmitts have a scalloped joint between the upper and lower colors along the leading edge of the wings. Until now, I;d been unsuccessful at reproducing it.

I think one thing people don;t understand about mottle is getting rid of the 1/1 scale overspray. You can see here that I've used 8000grit wet/dry paper and water to remove the overspray giving a much more refined appearance to the mottle:

Happy modeling!
"Artillery adds dignity, to what would otherwise be an ugly brawl."
Frederick The Great
New Jersey, United States
Joined: February 02, 2015
KitMaker: 330 posts
AeroScale: 286 posts
Posted: Saturday, April 25, 2020 - 03:54 AM UTC
Quoted Text
pedro did you do all that wiring in the wheel bay yourself or is it a photo etch? and where did you get your wing slat kit? i have one somewhere here but am hesitant to use it if i can't find others.
thanks-joe
Joe,
I used both, the lion share is from an Eduard PE and a few other Inadded using cooper or stretched plastic.
The slats resin set Im using is the long OOP Cutting Edge, very good but still a laborious work to fit, at least by lesser skilled hands like mine
[/quote]
pedro:
Lesser skilled hands!!! i've seen your work and you are too modest. i am not near your skill set, although i have been building only cars for many years and just started building military for a couple years only and am still learning techniques. i have an aeries slat set, they have it still on their catalog web site under "other" but i don't see prices or ordering info. i may hold the set i have for now and try to cast it later. i am going to try to attempt making the wire harness in the wheel bay myself. may not look as neat as your pe set though.
New Jersey, United States
Joined: February 02, 2015
KitMaker: 330 posts
AeroScale: 286 posts
Posted: Monday, April 27, 2020 - 04:20 AM UTC
Quoted Text
A little more from me:
The later war Messerschmitts have a scalloped joint between the upper and lower colors along the leading edge of the wings. Until now, I;d been unsuccessful at reproducing it.
I think one thing people don;t understand about mottle is getting rid of the 1/1 scale overspray. You can see here that I've used 8000grit wet/dry paper and water to remove the overspray giving a much more refined appearance to the mottle:
Happy modeling!
hi gaz, great looking build. you really made that old kit look top notch. nice job on the camo too, the scalloped edge looks great. up till now i have been avoiding any build with it. how did you reproduce it? interesting technique to remove the overspray. did you free hand the mottle or use a template?
joe
#424
Queensland, Australia
Joined: April 23, 2015
KitMaker: 4,648 posts
AeroScale: 1,938 posts
Posted: Monday, April 27, 2020 - 10:28 AM UTC
Quoted Text
Quoted Text
A little more from me:
The later war Messerschmitts have a scalloped joint between the upper and lower colors along the leading edge of the wings. Until now, I;d been unsuccessful at reproducing it.
I think one thing people don;t understand about mottle is getting rid of the 1/1 scale overspray. You can see here that I've used 8000grit wet/dry paper and water to remove the overspray giving a much more refined appearance to the mottle:
Happy modeling!
hi gaz, great looking build. you really made that old kit look top notch. nice job on the camo too, the scalloped edge looks great. up till now i have been avoiding any build with it. how did you reproduce it? interesting technique to remove the overspray. did you free hand the mottle or use a template?
joe
Thank you, Joe!
Once the upper camouflage was finished, I made a mask with the aim of the scallops being about 3mm wide and 1.5 to 2mm deep and as irregular as possible. Then I laid the mask on so that the scallops were loose over the forward edge of the wings to get a very slight overspray effect. I used a mask cutter because cutting scallops that small is very difficult with scissors or a knife blade... for my clumsy hands, anyway.
Gaz
"Artillery adds dignity, to what would otherwise be an ugly brawl."
Frederick The Great
AussieReg
Associate Editor #007
Victoria, Australia
Joined: June 09, 2009
KitMaker: 8,156 posts
AeroScale: 3,756 posts
Posted: Monday, April 27, 2020 - 01:15 PM UTC
Hi Gaz.
Quoted Text
The later war Messerschmitts have a scalloped joint between the upper and lower colors along the leading edge of the wings. Until now, I;d been unsuccessful at reproducing it.
You have overcome that little issue very nicely, those leading edges look great!
Quoted Text
I think one thing people don;t understand about mottle is getting rid of the 1/1 scale overspray. You can see here that I've used 8000grit wet/dry paper and water to remove the overspray giving a much more refined appearance to the mottle
Great tip, great result. I will be stealing that one and using it on my builds (once I get back to them

)
Cheers, D
ON the bench
Revell 1/24 '53 Corvette (building as '54)
Revell 1/24 BMW 507 Coupe and Cabrio
Italeri 1/48 Me262 B-1a/U1 Nightfighter
Monogram 1/24 '57 Chevy Nomad
Dragon 1/350 USS Frank Knox DD-742
New Jersey, United States
Joined: February 02, 2015
KitMaker: 330 posts
AeroScale: 286 posts
Posted: Tuesday, April 28, 2020 - 05:09 AM UTC
thanks gaz, what kind of mask cutter are you describing? it would come in handy. you applied the mask from the underside of the wing and wrapped it around and over the top of the wing i would think.
i managed to roughly reproduce the wiring harness in the wheel bay although don't take a close up look to it. had to use a lot of super glue to hold it down.i think next time i will paint the wires after i glue them to the model.

![20200427_002134[1]](../../live.staticflickr.com/65535/49830454826_5575c0c0a2_z.jpg)
" BORDER="0">
once the fuselage is closed up it should look ok. i wasn't worried about where i anchored the wires since the cockpit tub will cover a lot of it.
i was getting held up on this build because i couldn't decide if i wanted to use up the one slat set i had, i was planning on casting my own. but now since i was able to find the same aftermarket resin slat sets (although meant for the tamiya kit) i can go ahead and use the one i already had on this build. i will probably have to modify it to fit which leads me to think i may use it to make my own set for the hobbyboss kit. would there be a market for such a set you guys think? i see none available for it.
joe