World War II
Discuss WWII and the era directly before and after the war from 1935-1949.
Hosted by Rowan Baylis
Catalina......
Lucky13
_VISITCOMMUNITY
Scotland, United Kingdom
Joined: June 01, 2006
KitMaker: 1,707 posts
AeroScale: 1,119 posts
Posted: Tuesday, October 24, 2006 - 04:44 AM UTC

Quoted Text


If you might indulge me again Jan, I had some further input
First, the photos of the weapons bay....is that a quad fifty caliber setup? Heck, didn't even know they sported that kind of firepower. I would definitely consider the inclusion of that nifty addition.
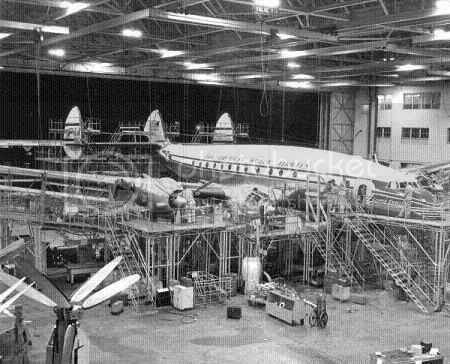
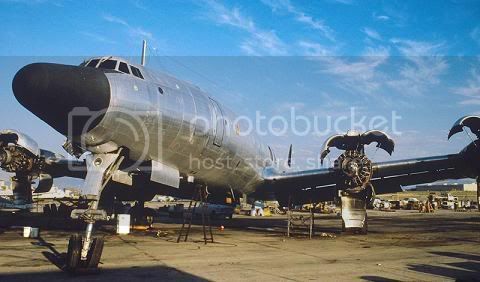
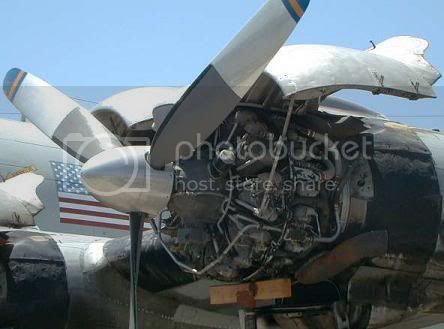
Also, you provided some dandy shots of the engine cowling maintenance flaps in the 'open' position...I especially like those!


Gordon, Rob....Can you find these engine cowling on the aftermarket?
Or would you have to cut those provided in the kit, open yourself?
SmileyCentral.com
Yup Gordon, That's Lieutenant W. J. Lahodney's own idea. As it says in the book "BLACK CAT RAIDERS OF WWII".....

"In his quest for increased firepower, Lahodney made several flights in the Army's B-25 bombers and was impressed with their gunfire capabilities. These planes had 75 mm in the nose but also several fixed-quad .50 caliber machine guns which were was of particular interest to the Cat pilot.
He decided to experiment with the same .50 caliber installation in the nose of his PBY. It was a somewhat radical concept and, as might be expected, there were many raised eyebrows. The PBY after all was a patrol plane, not a fighter, and it was the opinion of some that the fifties would tear the nose of the airplane. The old cat was simply not built to take that kind of abuse, they said. Others thought the installation would have an adverse effect on the aircraft weight and balance.
Few were optimistic that it would work.
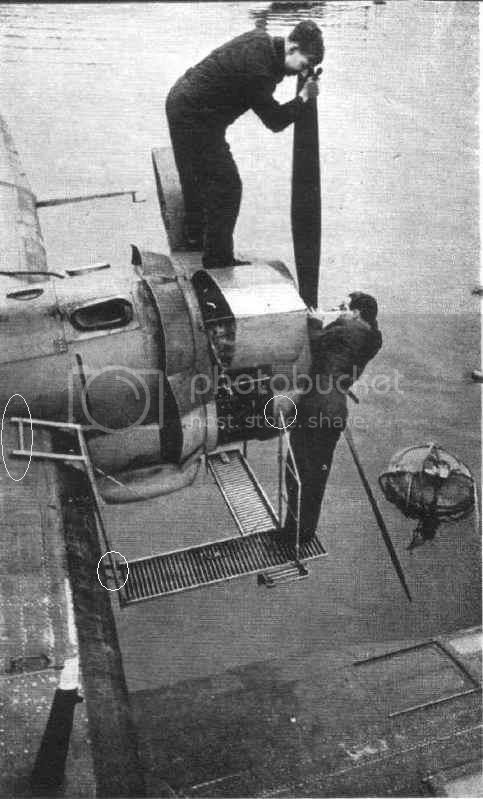
Lahodney was not to be deterred. Removing the bombsight (which had not proven very effective for the specialized work of the Black cats) and the small bow plate window, he bolted the guns, mounted two over two, to the keel of the big boat. The top set of the two was mounted forward of the lower set, so the muzzles of all four were aft of the angle of the angled bow plate.
An aluminum panel with four blast tubes extending forward for seven inches replaced the window, and was all that was visible of the lethal addition from an exterior view. An electric trigger on the pilot's yoke and a selector switch which permitted the pilot to fire the guns individually or together, completed the installation.
Bill lahodney was confident that the Cat would not only withstand the vibration of the fifties, but that twin thirties normally mounted just above that spot could be retained along with the gunner's position.
With a minimum volunteer crew, consisting of himselfm a flight engineer, and a bow gunner, Lahodney took off from Palm Island seadrome to try out his idea. Dropping a floating smoke light in the water for a target, he executed a wing-over and put the Cat into a steep dive.
Eyeballing the burning smoke light he pressed the trigger and the fifties responded with a burst that churned the water and extinguished the smoke.
That was the kind of firepower he was looking for, he thought with satisfaction. During the run he had also noted that the extra weight in the nose had noperceptible effect on theaircraft's performance.
The test was repeated witht the same result and upon returning to base, a careful inspection revealed that the old Cat had shouldered her new burden without complaint.
The experiment was a complete success, so much so that the quad fifties were installed in at least three planesinevery succeeding squadron.
Other tests also bore out Lahodney's wievs. They demonstrated that a gunner could straddle the quad mount and operate the thirties with almost as much mobility as before. A burlap pad was placed on top of the hot .50 caliber barrels to prevent the gunner from being burned.
One problem with the installation was that because of its positioning it was difficult to keep saltwater from getting into the muzzels. Rubber plugs were made to fit in the blast tubes but they leaked badly. Then someone got the idea that the standard rubber devices used for the prevention of venereal disease would be just the thing to make the blast tubes watertight. And they were.
In preparing for the coming deployment, Lahodney flew over to Townsville on the Australian mainland on a supply run. He picked up two additional quad mounts from the army supply depot and an unusally large quantity of condoms to protect the gun muzzles. The swells were heavy that day and during the take-off run one bounced the Cat into the air prematurely. The starboard wing dropped about forty degree and full power on the starboard engine would not bring it level.
It hit the water and broke off and the rest of the airplane came down hard. As it began to sink, Lahodney again applied full throttle and ran the broken Cat up on the rocks of the Townsville breakwater. Incredibly, no one was hurt.
With a heavy on-shore wind, the condoms were scattered about and it looked like there were many thousands as they floated ashore. Lahodney recalls that since there were no women on Palm Island there were much humourus speculation concerning the intended use of all those contraceptives."

End of story.....
TreadHead
_VISITCOMMUNITY
Colorado, United States
Joined: January 12, 2002
KitMaker: 5,000 posts
AeroScale: 370 posts
Posted: Tuesday, October 24, 2006 - 10:41 PM UTC
Howdy fellas,

Rob, yes it has been a wee while huh? But it's still bloody good to see your excellent Cat once again. And I'm sure your expanded, weathering step-by-step post will be most helpful.
And, I must confess to being both impressed, and genuinely happy to hear about the recognition your Cat's have gotten ....the Officer Training School at RAAF Base Williams huh?.......very cool pard! Plus, you said you have a Lanc' and a Beaufighter?....don't suppose you have any pics of those do ya? Also, thx for finding the photo of the Folliage Green camo'd Cat. She most definitely deserves it's new residence, she indeed looks of museum quality.
See if you can find those Lanc' and Beau' photos huh?

to Jan: I'll say it again, I really like your provided repair photos. There are several different versions of the platforms you speak of. Some wheeled and on the ground, some heavier and apparently designed for lifting capabilities, and then the really cool ones, the ones that are designed to hang off the wings and be self supporting.
In regards to scratching these things, I will unfortunately have to kindly disagree with my esteemed colleague 29Foxtrot at this junture. But then of course different build techniques is what it's all about.
If I were to build any of these platforms I would use brass rod for all the supports and Evergreen rectangular strip for the ground-based platforms, and metal fret material for the wing mounted platforms.

Reason being is; As is evident in your very first photo, these platforms were treated quite roughly by the mechanics and subsequently sustained much pounding and the occassional damage. To depict this, and show bent and/or dented handrails, support legs, etc. I would take the brass rod and simply bend up a small representation of the platform on my modeling desk. One of the beauties of using brass rod is you can just keep bending and repeating until it looks 'good'....then stop.

Reason I'd use Evergreen rectangular strip for the ground-based platforms is that real Balsa/Bass wood strips have an almost microscopic wooden 'hair' that not only affects working with the stuff, but also looks out-of-scale. If you take the Evergreen rectangular strips, place them on a falt surface, and repeatedly rake across them {length-wise} with a very stiff wire brush, you will create the wood 'grain' lines in the styrene strips.

Reason for the metal fret for the wing-mounted platforms is that you can get premade fretwork like that at your local RR supply store. And if you look closely at the treadways on the wing-mounted units I'm sure you can match it up with something they have on the shelf....plus, it will be in scale.

Now, on to some observations about the intriguing wing-mounted work platforms.
If you look at the picture below, and more specifically at the three circled areas, these platfroms were obviously designed to hook into some premade depressions, or 'hook' points on both the wing leading edge, and the front of the engine cowling. There was also some sort of additional support leg that wrapped underneath the wing to support the weight


Also, look at the treadway....closely spaced slats, and apparently made of metal.

Tread.

More later......
TreadHead
_VISITCOMMUNITY
Colorado, United States
Joined: January 12, 2002
KitMaker: 5,000 posts
AeroScale: 370 posts
Posted: Tuesday, October 24, 2006 - 11:07 PM UTC


some of the "More" I promised......

Regarding the engine cowlings in the 'open' position....I will confess to you Jan that when I model I almost always choose to 'open up' my models. So you will have to pardon my selfish indulgence here, but I can't resist

Not having the model itself to refer to, I will take some artistic license here and generally describe how I would depict this {remember, this is just a rambling suggestion}.
Remove the engine cowling parts from the box, place a small piece of regular copy paper over the engine cowling covering the access panels.
Then run the tip of a rounded dental scribe along the panel lines inscribed in the plastic part {you could also just lay the paper over the cowling and trace the lines out by rubbing the pencil back and forth}.
Then, take this piece of paper with the panel lines depicted on it and cut it out with a hobby knife. Once cut out, place these pieces of paper on a thin sheet of Evergreen stock {you can do this with inexpensive rubber cement} and trace the outside lines of the access panels on the thin styrene stock. Cut these out, then gently roll them around something of the proper diameter {say, a highlite marker} repeatedly until the piece of styrene sets and 'remembers' the curvature. To depict the cowlings that are folding in on themselves just mark the fold mark and simply crease along that line like you would a piece of paper. Just be careful not to crease too heavily, otherwise it will split on ya'.
hth.

Tread.

Oops!....almost forgot. To remove the existing access panels from the kit supplied engine cowlings, just drill a very small hole at one of the corners of the rectangular opening of the access panel and take {one of my favourite tools} a jewelers saw and slowly, and methodically cut out the existing access panels from whichever engine cowling you have chosen to 'adjust' ;-)
Lucky13
_VISITCOMMUNITY
Scotland, United Kingdom
Joined: June 01, 2006
KitMaker: 1,707 posts
AeroScale: 1,119 posts
Posted: Wednesday, October 25, 2006 - 12:57 AM UTC
As for the diorama lads.... How about having one engine exchange with the worn (or battle damaged) engine hanging in the crane. A wooden crate with a new engine on the ground being looked over by some mechanics, much like the picture at the bottom on page 1. One engine still having some "hours" of flying left, with its cowlings open being looked over and cared for by two men.....
How does that sound?

PS. Rob, your Cat and your other work too, impresses me just as much every time that I see it....
AWESOME work!!
Lucky13
_VISITCOMMUNITY
Scotland, United Kingdom
Joined: June 01, 2006
KitMaker: 1,707 posts
AeroScale: 1,119 posts
Posted: Wednesday, October 25, 2006 - 01:42 AM UTC
Another picture.....I hope. :-)
Lucky13
_VISITCOMMUNITY
Scotland, United Kingdom
Joined: June 01, 2006
KitMaker: 1,707 posts
AeroScale: 1,119 posts
Posted: Wednesday, October 25, 2006 - 02:13 AM UTC
And a few more......


TreadHead
_VISITCOMMUNITY
Colorado, United States
Joined: January 12, 2002
KitMaker: 5,000 posts
AeroScale: 370 posts
Posted: Wednesday, October 25, 2006 - 05:32 AM UTC

Quoted Text

As for the diorama lads.... How about having one engine exchange with the worn (or battle damaged) engine hanging in the crane. A wooden crate with a new engine on the ground being looked over by some mechanics, much like the picture at the bottom on page 1. One engine still having some "hours" of flying left, with its cowlings open being looked over and cared for by two men.....
How does that sound?


That's extremely close to what I had in mind there Jan. My original thoughts were based around the ground maintenance scene, and pretty much still are, except, those photos you provided where the Cat's were being worked on while in the water are doubly intriguing
You new pics are dandy as well, plus they give you some more insight on the maintenance platform construction. Not to mention the great closeups of the radial engine detail...nice.

Tread.
Lucky13
_VISITCOMMUNITY
Scotland, United Kingdom
Joined: June 01, 2006
KitMaker: 1,707 posts
AeroScale: 1,119 posts
Posted: Wednesday, October 25, 2006 - 11:48 AM UTC

Quoted Text


Quoted Text

As for the diorama lads.... How about having one engine exchange with the worn (or battle damaged) engine hanging in the crane. A wooden crate with a new engine on the ground being looked over by some mechanics, much like the picture at the bottom on page 1. One engine still having some "hours" of flying left, with its cowlings open being looked over and cared for by two men.....
How does that sound?


That's extremely close to what I had in mind there Jan. My original thoughts were based around the ground maintenance scene, and pretty much still are, except, those photos you provided where the Cat's were being worked on while in the water are doubly intriguing
You new pics are dandy as well, plus they give you some more insight on the maintenance platform construction. Not to mention the great closeups of the radial engine detail...nice.

Tread.


Same here O' Enlighted One.....you can always add to the scene. As for the "in the water maintenance", I've got for four catalinas, so you never know..... :-) Maybe a Island base somewhere, eh? I better get back to research again young Master Gordon......
29Foxtrot
_VISITCOMMUNITY
Victoria, Australia
Joined: September 19, 2003
KitMaker: 708 posts
AeroScale: 674 posts
Posted: Wednesday, October 25, 2006 - 02:35 PM UTC
Gordon,

The Lanc and the Beau which are on loan to the RAAF along with the 'Green Cat' I have a pic of the Beau somewhere, but sadly the Lanc I refer too is the 'Dam Buster'.

The RAAF's OTS contract I had started in November 2003, their are still some unfinished subjects in the list

I'll PM the content of the model subjects list too you.

Now I'll have to organize with the School for a photo shoot of the models for future refs, as I think you'd be interested in several of their subject choices.
Lucky13
_VISITCOMMUNITY
Scotland, United Kingdom
Joined: June 01, 2006
KitMaker: 1,707 posts
AeroScale: 1,119 posts
Posted: Thursday, October 26, 2006 - 12:56 AM UTC
Grabs an Extra Cold Guinness and waits for pictures......

Here's a few more fellas....

Does this one meet your approval lads? Imagine it on the outside instead.

Aaand a Beaufighter too!
29Foxtrot
_VISITCOMMUNITY
Victoria, Australia
Joined: September 19, 2003
KitMaker: 708 posts
AeroScale: 674 posts
Posted: Thursday, October 26, 2006 - 01:36 PM UTC
Jan,

Here are a few more Catalina pix to add to the collection, I better get back to completing my 2 'Cat' models, 1x 72 and 1x 48 to add to this groing thread.


Oh and a few Beaufighter pix 1x RAF and the others are RAAF Mk XXI's


Lucky13
_VISITCOMMUNITY
Scotland, United Kingdom
Joined: June 01, 2006
KitMaker: 1,707 posts
AeroScale: 1,119 posts
Posted: Friday, October 27, 2006 - 04:29 AM UTC
Excellent Rob....don't keep us all waiting too long for you superb work..... :-)
Some more Cats....

What do you think about this set up then lads? The 20mm cannons cought my interest....


And why you don't mess with a Beaufighter.....

You might just end up getting hurt.....

Look forward to see more pics of your work lads...
29Foxtrot
_VISITCOMMUNITY
Victoria, Australia
Joined: September 19, 2003
KitMaker: 708 posts
AeroScale: 674 posts
Posted: Saturday, October 28, 2006 - 02:47 PM UTC
Jan,

I have those Beaufighter pix myself, built a 48 scale Beaufighter as UB-E of 455 Sqn sometime ago and I'll find a pic of it.
But more importantly 2 PBY model subjects, the smaller 72 scale PBY 5 {I got as a partly made up kit from my Club Secretary} and the 48 kit wing {dryfit}, the 72 scale bird is a direct replica of the RAAF "Black Cat' scheme [Black fuselage and under surfaces Dark Sea Grey / Ocean Blue main wing], I posted the model subject of much earlier, the 48 scale build is also a PBY 5 but this build is of an RAAF ASR bird the RAAF flew 2 'Cat's' that were finished in Intermediate Blue over Black.


The 72 scale subject

The 48 scale wing


455 Sqn RAAF Beaufighter XIc model subject
Lucky13
_VISITCOMMUNITY
Scotland, United Kingdom
Joined: June 01, 2006
KitMaker: 1,707 posts
AeroScale: 1,119 posts
Posted: Saturday, October 28, 2006 - 04:45 PM UTC
Looking great Rob! I really like the Beaufighter..... One wee question, or maybe two actually. The thing in front of the cockpit, is that a air intake? But, what on earth is that thingy on the back behind the cockpit??? Also, just noticed, what are the wee things on the swastikas, is it ships?
29Foxtrot
_VISITCOMMUNITY
Victoria, Australia
Joined: September 19, 2003
KitMaker: 708 posts
AeroScale: 674 posts
Posted: Saturday, October 28, 2006 - 06:02 PM UTC
Jan,

In answer to your questions on the 455 Sqn RAAF Beaufighter XIc.

The inlet in front of the cockpit is the air ram intake for the nose mounted Surface Radar system carried on this bird. {it is a kit supplied part in the Tamiya TF X Beaufighter kit}
The gun camera which are normaly mounted in the nose cone is what is mounted in the flaring above the cockpit.
The Swastika's have little ship motifs over them and the other white markings are for torpedo attacks.

455 Sqn RAAF used a variety of Beaufighter Mk's with various Radar fittings to the nose and had flown a Beaufighter Xc with a vary interesting cammo scheme applied to it.

Going back to the PBY Catalina's, here are 2 pix of something most unusual.

pic #1:
The Cat with the Orion as it's wingman, is over RAAF Base Williams, {commonly called Point Cook} the pier was used by the Air Sea Rescue unit that was stationed at the Base untill 1995.
The Catalina {converted to a Super Cat}, was a private ownership beastie that was flown on Magnetic Mapping flights over this Country, untill replaced by a more modern aircraft. The RAAF bourght this Super 'Cat' in the mid '90's, with the intention to restore it back to a PBY 5a {about 1990 /1991 I built the Revell boxing of the PBY 5a Catalina as an RAAF 'Green Cat'}.

pic #2:
The Fuselage section of the RAAF's restoration Catalina project, at the RAAF Museum storage facility.
The wing section is at RAAF Base East Sale [also in Victoria] and is yet to be completed.


Incidently the Beaufighter model was one I built for a local magazine review some years back and was {sadly} sold about 6 months ago,
Lucky13
_VISITCOMMUNITY
Scotland, United Kingdom
Joined: June 01, 2006
KitMaker: 1,707 posts
AeroScale: 1,119 posts
Posted: Saturday, October 28, 2006 - 06:55 PM UTC
Thanks for the quick answers Rob, much appreciated! He who owns a Catalina is a lucky fella, eh? :-) Here's a couple of more pics of some stands for the Cats..... Loading bombs.


Lucky13
_VISITCOMMUNITY
Scotland, United Kingdom
Joined: June 01, 2006
KitMaker: 1,707 posts
AeroScale: 1,119 posts
Posted: Sunday, October 29, 2006 - 05:20 AM UTC
Another question about the Cats.....did they use the same rack for the bombs and the torpedoes? And two more pictures.....

Anyone care to tell what uniform this is that this waist gunner is "wearing"?

I think that we safely can asume that he's NOT flying around the Aleutians, eh? :-)
TreadHead
_VISITCOMMUNITY
Colorado, United States
Joined: January 12, 2002
KitMaker: 5,000 posts
AeroScale: 370 posts
Posted: Sunday, October 29, 2006 - 09:47 AM UTC
Holy Mackeral fellas!

Sheesh!.....I focus elsewhere for just a tick, and you blokes get busy with the pics!...... ..just kiddin' guys, and I am just loving these photos that are popping up in this thread.

To begin, just the sheer variations of these maintenance platforms I think ensure you of not really making any significant mistakes in reproducing them in scale. And to hopefully illustrate the plethora of possiblities in this regard, I will share this rather cool {IMHO} early photo of one of my faves under maintenance, and almost literally under neath maintenance platforms of every size, height, shape and configuration.........


Now, if you take a careful look at this photo, I think you get the idea of the possibilities......... ;-)

gotta run...............but more later

Tread.
Lucky13
_VISITCOMMUNITY
Scotland, United Kingdom
Joined: June 01, 2006
KitMaker: 1,707 posts
AeroScale: 1,119 posts
Posted: Sunday, October 29, 2006 - 04:29 PM UTC
WOW!! Is that a Lockheed Constellation that I can see in the middle of picture? :-) That's one of my two favorite civil passenger machines, the other is Boeing 377 Stratocruiser.

Somehow you wonder if the medical staff had the right equipment to do their job......

I know that this is a wee bit but it is a anyhoo a B-25.... :-)
29Foxtrot
_VISITCOMMUNITY
Victoria, Australia
Joined: September 19, 2003
KitMaker: 708 posts
AeroScale: 674 posts
Posted: Sunday, October 29, 2006 - 08:21 PM UTC
Jan,

I have a B 25 in the stash with a few AM decal sheets with the Bat Nose motif for a future project.

In the next couple of days I should have the base Silver paint layed on the fuselage section of the 72 scale Cat.

I know this is but here is a pic of something rather special.

Lucky13
_VISITCOMMUNITY
Scotland, United Kingdom
Joined: June 01, 2006
KitMaker: 1,707 posts
AeroScale: 1,119 posts
Posted: Sunday, October 29, 2006 - 08:37 PM UTC
Great looking model Rob, love the weathering! Looking forward to see more from you...
Thinking about having two models in the works when I finally start, the Cat and the Beaufighter OR a B-25......decisions, decisions..... :-) :-)
29Foxtrot
_VISITCOMMUNITY
Victoria, Australia
Joined: September 19, 2003
KitMaker: 708 posts
AeroScale: 674 posts
Posted: Sunday, October 29, 2006 - 08:52 PM UTC
Jan,

Thanks for the kind words on the Beau, when I do get to do my B 25 I would replicate this style of weathering again, but using a slight variation on the chipping / faded paintwork.

I'm intending to use the 72 scale Cat as the Guinea Pig for this variation idea and I'd be more than happy to use this thread for the progress pix.
Lucky13
_VISITCOMMUNITY
Scotland, United Kingdom
Joined: June 01, 2006
KitMaker: 1,707 posts
AeroScale: 1,119 posts
Posted: Sunday, October 29, 2006 - 08:58 PM UTC
Please do Rob, I might "steal" some ideas from you like I do from others here, weathering etc.... :-)
Just want make sure that I keep my hands of the models while I work to let things dry etc. Looks like alot of people do that, having more than one model in the shop, still learning and taking notes before I "take off" with a lot of research and buying new stuff, expensive..... :-)
TreadHead
_VISITCOMMUNITY
Colorado, United States
Joined: January 12, 2002
KitMaker: 5,000 posts
AeroScale: 370 posts
Posted: Sunday, October 29, 2006 - 10:13 PM UTC
Howdy fellas,

I'm SO glad you decided to share this pic of the Beau' with the thread Rob, because she really is a {pardon the play on words} Beaut! And I'm glad it's getting some 'air' time here for all to see.

To answer your earlier question Jan, that is indeed a Lockheed Constellation. I have always had a 'thing' for this aircraft ever since I was a youngster. Maybe because it was one of the very first aircraft I ever saw in the 'flesh'. Back then {wayyyyy back then }, you used to have to board the aircraft by walking on the tarmac right up to it and boarding it in the same way you're used to seeing the President of the United States boarding Air Force One. The sleek, almost art deco style-ish lines of the aircraft are quite unique. And don't EVEN get me started on that incredibly cool set of Tri-tailfeathers!!
And, before I get off of the subject and back to the original thread topic, allow me to share a real tease picture with ya.....

How would you like to have THIS hanging from your ceiling??


Of course you'd probably have to have a structural engineer perform a stress/load test on your ceiling joists! :-)

AND, if you ever have any complaints about not ever having enough space in your modeling room for your larger scale projects......well, have a look at this!..!..!


Now THAT'S a Conny!!!!!

O.K., ..O.K.....enough 'Conny' stuff.....NO, wait a minute, I've still got a couple left. But at least they're a tad more 'on subject'.

I made mention earlier of really liking the way in which the Catalina engine cowling access doors opened up, and their appearance when in the 'open' position....and compared them to the Constellation engine access doors. Well, here's a couple of photos showing how the Conny doors look...........

This first pic is from a little further away, and gives you an idea of the general 'look'. You'll notice that the propellers are missing so it looks a bit odd, but it also serves to show the doors more clearly.


This next one is a close-up, and shows both the doors and the engine in better detail......


Alright, enough about my 'Conny's'..........and back to Cat's.

Hey!, Jan!......Since you're doing the research on the Cat's and chosen to include the maintenance aspect as well, I have an assignment suggestion for you during your R&D travels....please figure out HOW these under-wing maintenance platforms are actually mounted, hung, attached, plugged-in, screwed-in, glued-to, etc, etc......because for the life of me I cannot {with accuracy} conclude how they are mounted from any of the pics so far. I guess I can make an assumption, but just in case you come across anything certain, I would just love to know.

I want to say again {and I don't mind doing it}, I'm just loving the photos showing up on this thread!!
And to refer back to few......

In the series of photos you both provided on the previous page, there are a couple of very good ones showing a Cat being towed out of the water. In the colour photo you posted Jan, you can see the multiple sets of twin-wheel 'bogies' that were used to move the Cats while they were land bourne......very cool, and also a nice little scratchbuild idea for your planned dio Jan, not to mention the little red tractor.......it would be a 'Cat'epiller towing a 'Cat'alina
The 20 mike-mikes are a very interesting variation, kinda makes you wonder what else could have been stuffed in these things.

And Rob, thx for including the invasion striped Beau' XIc photos. Another fine example of your work my man! But I do have one question about this aircraft {and you're probably gonna get mad at me}, but is that suppose to be rust on the engine cowlings leading edge?
Also, am I to understand the RAAFare restoring the 'Green' Cat you built in model form with their project " The Fuselage section of the RAAF's restoration Catalina project, at the RAAF Museum storage facility. "?

And finally, Jan, about your naked guy.......I bet it got REALLY hot under all that greenhouse glass!.....especially in the tropics.

Tread.
Lucky13
_VISITCOMMUNITY
Scotland, United Kingdom
Joined: June 01, 2006
KitMaker: 1,707 posts
AeroScale: 1,119 posts
Posted: Sunday, October 29, 2006 - 10:53 PM UTC
Well, well, well Gordon...... I can tell you this, young man, you will never see the likes of the Constellation OR the Stratocruiser, the most beau(still on topic here :-) )tiful passenger aircrafts ever designed, end of story.

And the Boeing 377 Stratocruiser.

Here's another way of doing it, even if it's a B-25 and in the factory....

I also thought that we could brighten things up a wee bit if you know what I mean..... :-)


I'll see what I can find out about those underwing platforms, I curious to find out as well, believe you me.....
Just found this.....look at colour photo earlier on page 2, could by ANY chance be the same Catalina?