World War II
Discuss WWII and the era directly before and after the war from 1935-1949.
Hosted by Rowan Baylis
Catalina......
29Foxtrot
_VISITCOMMUNITY
Victoria, Australia
Joined: September 19, 2003
KitMaker: 708 posts
AeroScale: 674 posts
Posted: Monday, October 30, 2006 - 04:54 PM UTC
Gordon,

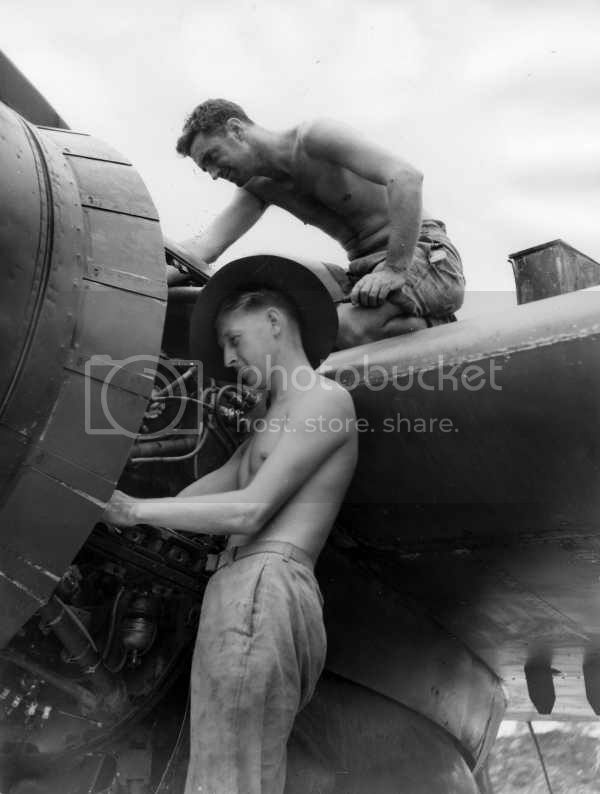
Thanks for the kind words on the Beau pix, to answer your question on the 455 Sqn Bird {and no I won't get mad at you - it's a question always argued about in the 'Land Down Under'}, the forward section of the cowling is not rust, but infact Burnt Iron, on all the Bristol Hercules engines the exhaust collector is the forward section of the engine cowlings, standard with the Swordfish, Beaufort, Beaufighter, Sunderland, Halifax, Wellington, Lysander and Lancaster II.

Regarding the RAAF 'Green Cat', I have a magazine on RAAF Camouflage for Catalina aircraft and it shows an Overall Green PBY 5a bird, so when I built my PBY 5a Cataliana, I chose to paint mine in the overall green scheme, because all the models I had seen previously showed either USN, RAF, RAAF cammo and the Green beastie was something different to look at, about 18 months after I had finished my model the RAAF turn up with their 1 to 1 scale Green Bird.

Staying with the Catalina subjects:-

Jan,

I can understand what your saying about copying idea's and I have no problem with that, afterall the forums are a place for exchanging idea's and techinques used, [I worked in a Hobby Shop for 15 years and modeller's regardless of being face to face, over the forums or over the phone, always have questions, relating to something on a model subject].

Going back to the 'Cat'
Step 1:-


The Red Oxide Primer is Humbrol #70 applied to the 'Canvas' area of the main wing and the control surfaces of the tail plane, this will sit for 2 days before I mask it off ready for the Humbrol #191 Gloss Silver.

The main wing is NOT glued to the fuselage, but notice in the fuselage pic the masking tape over the wing centre mounting and also this is a 72 scale bird.


Lucky13
_VISITCOMMUNITY
Scotland, United Kingdom
Joined: June 01, 2006
KitMaker: 1,707 posts
AeroScale: 1,119 posts
Posted: Monday, October 30, 2006 - 05:14 PM UTC
Thank you kind Sir for that. The Cat is looking great Rob! It's such a pain in the having to buy everything new again. Looking at everybody's exceptional work here at these forums, I want to throw everything aside and start building SmileyCentral.com my cats......
One word fellas......WHOOOPS!!

Any theories how this might have happened??
29Foxtrot
_VISITCOMMUNITY
Victoria, Australia
Joined: September 19, 2003
KitMaker: 708 posts
AeroScale: 674 posts
Posted: Monday, October 30, 2006 - 05:44 PM UTC
Jan,

Your welcome and thanks for the kind words.

I'd say a VERY STRONG wind, as it looks to be in the PTO region.

Going again:- Here are a few pix being from somewhere in the '40's - '60's and strangely enough '96. The Lancaster B I is a 466 Sqn RAAF bird that was Tamiyasan's 1975 kit decal option, the C47 Dakota is the wiered Dayglo scheme the RAAF had carried on most of their aircraft untill '73, lastly the C47 Dakota this is the AWM's restored bird of 36 Sqn RAAF and is still flying in these colours today, {this pic was taken at RAAF Base Laverton in 1996.


These following pix are behind glass {the cabinets the OTS had built for their model displays are Bullet Proof Glass}, the time these were taken was during a rest period at the school and having a room full of students the models stayed locked up.


Gordon,

The Lancaster {Modified from the currant Tamiya 'Grand Slam' kit to a B I/III standard}, model pic is the OTS built subject and when I go back to OTS for a Photo Shoot day, I'll use a mirror when I photograph this model to show the bomb bay detail.
The C47 is the 48 scale Monogram Classic kit and is based on the previous colour pic, that's how the RAAF wanted their model subject painted.
Lucky13
_VISITCOMMUNITY
Scotland, United Kingdom
Joined: June 01, 2006
KitMaker: 1,707 posts
AeroScale: 1,119 posts
Posted: Tuesday, October 31, 2006 - 12:59 PM UTC
A couple of jewels fellas...Pratt & Whitney R-1830

Great pictures and models Rob.....
29Foxtrot
_VISITCOMMUNITY
Victoria, Australia
Joined: September 19, 2003
KitMaker: 708 posts
AeroScale: 674 posts
Posted: Tuesday, October 31, 2006 - 07:53 PM UTC
Here is another pic of the Cat with an Orion as a wingman


Here is an pic from the gun camera of a Mosquito.

Lucky13
_VISITCOMMUNITY
Scotland, United Kingdom
Joined: June 01, 2006
KitMaker: 1,707 posts
AeroScale: 1,119 posts
Posted: Tuesday, October 31, 2006 - 08:33 PM UTC
I raise the bet Rob with a Beaufighter rocket attack.....:-) :-) :-)

Canadian flown Beaufighter aircraft firing rockets at German merchantmen Aquila and Helga Ferdinand near Fjord Migdulen, November 8th, 1944.
Aaaand some Beaufighter maintenance.....

Of course another Cat picture as well, a New Zeeland one I think.


Bigskip
_VISITCOMMUNITY
England - South East, United Kingdom
Joined: June 27, 2006
KitMaker: 2,487 posts
AeroScale: 575 posts
Posted: Wednesday, November 01, 2006 - 04:09 AM UTC
Fantastic photos here chaps.

I've made a start on my 1:72 Black Cat now - the Photo etch is way samll, but it's fun so far. I can already see that this will not be my last Cat.

Also bought some weighted wheels for it - i will post some photos when it's more completed.

Andy
Lucky13
_VISITCOMMUNITY
Scotland, United Kingdom
Joined: June 01, 2006
KitMaker: 1,707 posts
AeroScale: 1,119 posts
Posted: Wednesday, November 01, 2006 - 12:02 PM UTC
Great Andy.....hope to see some pictures mate.
29Foxtrot
_VISITCOMMUNITY
Victoria, Australia
Joined: September 19, 2003
KitMaker: 708 posts
AeroScale: 674 posts
Posted: Wednesday, November 01, 2006 - 02:22 PM UTC
Andy,

Your Catalina, sounds to be progressing steadily, PE {can be minuit at times}, makes a better deatail.

Jan,

Great pic from the gun camera and a Kiwi PBY5 'Cat', XX-C of 6 Sqn [RNZAF], I'll rustle up some pix of the Kiwi 'Cat's' I have here somewhere. {RNZAF markings for the 'Cat' are rare as}, but untill the 48 scale kit resurfaces, a Kiwi 'Cat' is on hold.

Going back to the model side of the 'Cat'
here is Step 2.


The Silver is Humbrol #191 that I have used on this model subject and now the masking has been removed from the canvas area's, the model can sit for a few days [or longer], before going on to step 3.
This is a Guinea Pig {test subject}, for a new variation of paint chipping and paint weathering, I intend too try out.

This is a 72 scale bird.


The main wing is NOT GLUED to the fuselage at this stage, the main wing is sitting in place for the purpose of the pix, as this model is in 2 sub assemblies, my reason for doing this as 2 different assemblies is for ease of painting both the lower main wing and the fuselage section.
Bigskip
_VISITCOMMUNITY
England - South East, United Kingdom
Joined: June 27, 2006
KitMaker: 2,487 posts
AeroScale: 575 posts
Posted: Wednesday, November 01, 2006 - 03:16 PM UTC
Rob

Looks like it's progessing well in the paint shop - I'm confused as to what the red oxide on the canvas surfaces for.

Did more work on my Cat last night. I'd had a bad day at work so built the wing assembly - didn't feel in the mood for PE at all.

Andy
29Foxtrot
_VISITCOMMUNITY
Victoria, Australia
Joined: September 19, 2003
KitMaker: 708 posts
AeroScale: 674 posts
Posted: Wednesday, November 01, 2006 - 03:38 PM UTC
Andy,

The Red Oxide was a primmer type dope applied to the canvas area's of these birds, as the doped area would so as very dull Aluminium colour.
Whatever the cammo scheme applied to these canvas areas the cammo scemes always faded more rapidly than being on metal.

I hope this helps a little.
Lucky13
_VISITCOMMUNITY
Scotland, United Kingdom
Joined: June 01, 2006
KitMaker: 1,707 posts
AeroScale: 1,119 posts
Posted: Wednesday, November 01, 2006 - 04:52 PM UTC
This waaaay interesting fellas!! Great looking work Rob! Just so you know, I'm taking notes here....
Can't wait to see more pictures!
SmileyCentral.com
Here's a few more Cat pictures......one production and two Kiwi.


Bigskip
_VISITCOMMUNITY
England - South East, United Kingdom
Joined: June 27, 2006
KitMaker: 2,487 posts
AeroScale: 575 posts
Posted: Wednesday, November 01, 2006 - 06:46 PM UTC
Rob

You're a star. Thanks for the info re fading on the canvas area's. As you may have guessed i have a passion for Cat's , but have not yet delved greatly into research.

Cheers

Andy
Lucky13
_VISITCOMMUNITY
Scotland, United Kingdom
Joined: June 01, 2006
KitMaker: 1,707 posts
AeroScale: 1,119 posts
Posted: Thursday, November 02, 2006 - 01:45 AM UTC
Fellas.....
How would you open the engine cowlings on the Revell/Monogram 1/48 Catalina like in the earlier shown pictures? To me it seems like there's a few planel lines missing on them, or am I wrong here? Can you find them from any aftermarket producers?
If not, how would go ahead when it comes to thin them down and open the correct panels???
TreadHead
_VISITCOMMUNITY
Colorado, United States
Joined: January 12, 2002
KitMaker: 5,000 posts
AeroScale: 370 posts
Posted: Thursday, November 02, 2006 - 05:32 AM UTC
Jan, you said; "...Fellas.....
How would you open the engine cowlings on the Revell/Monogram 1/48 Catalina like in the earlier shown pictures? To me it seems like there's a few planel lines missing on them, or am I wrong here? Can you find them from any aftermarket producers?
If not, how would go ahead when it comes to thin them down and open the correct panels???
...."

I will attempt to answer by re-quoting myself from a post I made back on the second page of this thread. Hopefully that helps a little. :-)

"....some of the "More" I promised......

Regarding the engine cowlings in the 'open' position....I will confess to you Jan that when I model I almost always choose to 'open up' my models. So you will have to pardon my selfish indulgence here, but I can't resist

Not having the model itself to refer to, I will take some artistic license here and generally describe how I would depict this {remember, this is just a rambling suggestion}.
Remove the engine cowling parts from the box, place a small piece of regular copy paper over the engine cowling covering the access panels.
Then run the tip of a rounded dental scribe along the panel lines inscribed in the plastic part {you could also just lay the paper over the cowling and trace the lines out by rubbing the pencil back and forth}.
Then, take this piece of paper with the panel lines depicted on it and cut it out with a hobby knife. Once cut out, place these pieces of paper on a thin sheet of Evergreen stock {you can do this with inexpensive rubber cement} and trace the outside lines of the access panels on the thin styrene stock. Cut these out, then gently roll them around something of the proper diameter {say, a highlite marker} repeatedly until the piece of styrene sets and 'remembers' the curvature. To depict the cowlings that are folding in on themselves just mark the fold mark and simply crease along that line like you would a piece of paper. Just be careful not to crease too heavily, otherwise it will split on ya'.
hth.

Tread.

Oops!....almost forgot. To remove the existing access panels from the kit supplied engine cowlings, just drill a very small hole at one of the corners of the rectangular opening of the access panel and take {one of my favourite tools} a jewelers saw and slowly, and methodically cut out the existing access panels from whichever engine cowling you have chosen to 'adjust' ;-)
....."

Tread.

PostScript: If the above seems to 'involved' to you, you can always try the tried and true method of repeatedly scribing/rescribing the kit panel lines with the back of your Xacto blade and gently breaking the access panels away from the kit engine cowl....this is a bit more dangerous and can quite possibly result in a broken piece, but is a bit simpler......especially if the jewelers saw seems intimidating.
Just for the record, the hardest thing to master when it comes to using the jewelers saw is; ensuring the proper cutting direction of the miniature saw blade itself. Especially when attempting to cut a straight line!
TreadHead
_VISITCOMMUNITY
Colorado, United States
Joined: January 12, 2002
KitMaker: 5,000 posts
AeroScale: 370 posts
Posted: Thursday, November 02, 2006 - 05:49 AM UTC

Quoted Text

Andy,

The Red Oxide was a primmer type dope applied to the canvas area's of these birds, as the doped area would so as very dull Aluminium colour.
Whatever the cammo scheme applied to these canvas areas the cammo scemes always faded more rapidly than being on metal.

I hope this helps a little.


Ummmmhmmmmmmmm! ..........methinks I see where you are heading with this one you little rascal.
But I am most interested in watching your 'experiment' unfold.........

Tread.

As just an 'aside'......am I to assume that the rest of the wing was base primered in a different colour?

EDIT: Just to toss something out on the table, and maybe touch on where I might think you are heading with this; I have used a chipping method in the past {I'm not a big fan of pencils} on armour subjects where {in a quick nutshell} I primered the base kit in an enamel grey primer, then applied an acrylic topcoat of my chosen colour and then proceeded to 'chip' away at the topcoat {fairly easy with the topcaot being acrylic} and exposing the grey/silver/aluminum undercoat.
What this accomplished was a more realistic 'chipped/worn paint' look by removing paint as opposed to adding paint with the normal pencil method.
The additional, and very cool thing about this method is you can employ any number of different methods to 'chip' away at your topcoat {worn masking tape ball, dental picks, finger nail files, sea salt, Vulture eggshells, etc}, and at differing times during the final construction to depict the varying ways in which real chipping/wearing paint actually happens......works good.
29Foxtrot
_VISITCOMMUNITY
Victoria, Australia
Joined: September 19, 2003
KitMaker: 708 posts
AeroScale: 674 posts
Posted: Thursday, November 02, 2006 - 10:09 AM UTC
I knew I had another pic of the OTS 'Cat' so sorry it's a copy of a photo, when I get to the School for my photo shoot I'll take some better pix of this and the other model subjects we had built.

Gordon,
Yes the Catalina had a metal and canvas wing area, one thing of interest in the metal section of the wing is the fuel cells it housed.
With paint chipping from the elements, my question is 'Where do I find a 48 or even a 72 scale Sea Gull ?'
In Oz we have those much bigger Vulture's that we call Emu's and they don't fly. I have a Birdstrike pic somewhere of an Eagle doing a close inspection of a Beaufighter wing.

Andy,
Thanks for the kind words on the Cat build so far.

Jan,
Apart from confiring with Gordon over the Cowling Flaps, the alternative I can add is doing some scratch building using styrene card of .010 thou thick.


Once again sorry for the poor quality of the pic.
Lucky13
_VISITCOMMUNITY
Scotland, United Kingdom
Joined: June 01, 2006
KitMaker: 1,707 posts
AeroScale: 1,119 posts
Posted: Thursday, November 02, 2006 - 12:30 PM UTC
That is one awesome looking Cat Rob!! Sorry lads, I forgot that I had asked that question before, my bad..... :-) :-) Will see what we'll do.

Here's two Catalina videos, enjoy the view and the SOUND!

Consolidated PBY Catalina, Wanaka - (NZWF / WKA) New Zealand
Consolidated PBY Catalina Yverdon - (ZLJ) Switzerland


Quoted Text

Jan,
Apart from confiring with Gordon over the Cowling Flaps, the alternative I can add is doing some scratch building using styrene card of .010 thou thick.


I guess that it's back to Evergreen then fellas, how do you make styrene card of .010 round in the shape of the engine cowlings??


Lucky13
_VISITCOMMUNITY
Scotland, United Kingdom
Joined: June 01, 2006
KitMaker: 1,707 posts
AeroScale: 1,119 posts
Posted: Saturday, November 04, 2006 - 01:24 AM UTC
I know that this is a wee bit "off topic", but here's a few more maintenance pictures of B-25, B-26 and A-26. At least it still on topic the three being twin engined machines..... :-) :-) :-


Quite a few good ideas for a diorama lads, eh? :-) :-)
Lucky13
_VISITCOMMUNITY
Scotland, United Kingdom
Joined: June 01, 2006
KitMaker: 1,707 posts
AeroScale: 1,119 posts
Posted: Saturday, November 04, 2006 - 03:38 AM UTC
Couldn't keep this P-38 away from you lads.... :-)

Or this C-47 Dakota...


Well fellas, time to get back on track, eh? :-)


Sorry about that....
29Foxtrot
_VISITCOMMUNITY
Victoria, Australia
Joined: September 19, 2003
KitMaker: 708 posts
AeroScale: 674 posts
Posted: Saturday, November 04, 2006 - 06:31 PM UTC
Jan,

If you are going to OPEN the cowling flaps on the 'Cat' using Evergreen styrene card, use a hair dryer on low heat to reform the styrene scratch builds.
It's the only sujestion I can offer as a posibility and I hope it helps a little.

Now going over to the 'Twins' in the section:

Built the A26, B 25d and C47 in 48 scale but here are some pix that maybe of interest, the RAAF A20 Boston III, B 25 Mitchell, F4-1a Lightning and {a Ringin or should I say the CAC CA 11 Woomera}.


This is the DB 7b which was the export version of the A20 b/c that was originally intended for service with the NEIAF {of 22 Sqn RAAF the only Sqn to fly the type}.

A B25j that was placed in storage shortly after delivery to the RAAF

A B25d of 2 Sqn RAAF {the only Sqn to fly the type}.

Another 2 Sqn RAAF Mitchel, which is featured on the Aussie Decals sheet, known as 'Stormbird'

A B 25d Mitchell, operated by 18 Sqn NEIAF when based at Batchalor in the N.T.

1 of 3 F4a and F4-1a's operated by the 86 Sqn {PR} RAAF, these are modified P 38e airframes {this particular aircraft A55-3 I have made, - more on that later}


This is the 'Ringin' of note are the remotely operated twin .303 barbetts in the rear of the main wing cowling extention and the 2 drop tanks, the bomb bay on this aircraft was in each narcelle on either side of the wheel wells
A most unusual Aircraft subject, only 2 of this aircraft type were ever built.

In the next day or so I'll go back to the Catalina model, so more on that later.
TreadHead
_VISITCOMMUNITY
Colorado, United States
Joined: January 12, 2002
KitMaker: 5,000 posts
AeroScale: 370 posts
Posted: Saturday, November 04, 2006 - 11:12 PM UTC
Howdy fellas,

Man, you guys are just flyin' with this thread aren't ya? I keep getting behind on all of it. Those great pics just KEEP on comin'!

Hey Jan, is that pic you posted of the aircraft nose sporting eight .50 caliber MG's a B-25? I seem to remember the 25's being equipped with the four underwing twin .50 cal pods {the picture above that}, but wasn't aware they also sported eight in the nose.

And Rob, bloody good pics as well mate. In particular, that F4a and F4-1a is a rather nifty bird. So am I to understand {by your discription} that the aircraft had two small bomb bays underneath each engine nacelle? And, a remote-controlled twin turret at the rear of each?
More on this please.

Tread.

BTW, I really like those two cranes...the one doing the engine change-out on the Mitchell, and the one doing the loading on the Dakota.
Lucky13
_VISITCOMMUNITY
Scotland, United Kingdom
Joined: June 01, 2006
KitMaker: 1,707 posts
AeroScale: 1,119 posts
Posted: Saturday, November 04, 2006 - 11:42 PM UTC
Sure thing Gordon.... My favorite is the H version with 4 .50's and a 75 mm cannon in the nose.....THAT is firepower. :-)


You see that the A/B-26 also had a 8 gun nose, something that I didn't know before....
Also, why don't you see ads like these nowadays???
Bigskip
_VISITCOMMUNITY
England - South East, United Kingdom
Joined: June 27, 2006
KitMaker: 2,487 posts
AeroScale: 575 posts
Posted: Sunday, November 05, 2006 - 04:47 AM UTC
I'm getting quite inspired to spend time doing aircraft models, rather than thing with tracks on them.

This thread is fantastic - Keep the twin engined photo's coming chaps

Andy
Lucky13
_VISITCOMMUNITY
Scotland, United Kingdom
Joined: June 01, 2006
KitMaker: 1,707 posts
AeroScale: 1,119 posts
Posted: Sunday, November 05, 2006 - 05:20 AM UTC
Here's one for you Andy, an A-20 Havoc.