Air Campaigns
Want to start or join a group build? This is where to start.
Official tread: Rumble in the East Asian Sky
Emeritus
_VISITCOMMUNITY
Uusimaa, Finland
Joined: March 30, 2004
KitMaker: 2,845 posts
AeroScale: 1,564 posts
Posted: Monday, January 07, 2008 - 03:26 AM UTC

Quoted Text


Quoted Text

Unfortunately I don't think I'll make it with my British buffalo. It's still at the very same stage as when I last posted pics (On the first or second page on this thread?) as I'm starting my studies at a university of applied sciences next Monday, my modeling time will be limited.


Sorry to hear that, Eetu. I was looking forward to your build as the standard is always high. Anyway, I will enjoy your MiG instead.

Good luck with you studies


Thanks.
And don't worry, I'll finish the Buffalo in the future, I just can't make for the campaign deadline.
bf443
_VISITCOMMUNITY
Idaho, United States
Joined: May 16, 2003
KitMaker: 895 posts
AeroScale: 457 posts
Posted: Monday, January 07, 2008 - 09:09 AM UTC
Hello everyone,

I was able to prime and apply the pre-shading to the P-39. I used a Testors paint pen (In the background of the first photo) to highlight the panel seams. It went fairly quick and I had no problems. I guess we will see how it turns out before long.


Sincerely,
Brian
Automaton
_VISITCOMMUNITY
United States
Joined: August 12, 2007
KitMaker: 153 posts
AeroScale: 139 posts
Posted: Monday, January 07, 2008 - 01:59 PM UTC

Quoted Text

Automation, you are most welcome to participate in the campaign. Better late than never I am looking forward to hear what you have ready to take to the East Asian skies.


Hi Jesper

I finally decided on a kit for the group build, and it's going to be this (in 1/48th):


I've never built this particular kit before, so I decided to do a "mockup" prebuild to familiarize myself with how everything goes together and to hopefully see any pitfalls. Here's a look at where things stand at the moment:


The fit appears to be excellent overall. The worst thing I see is that the landing gear legs seem very flimsy. The gear legs on this kit are supposed to be held by little poly caps in sockets molded into the wheelwells, but I'll probably end up doing something different--perhaps epoxy.

I have an Eduard "color zoom" set that I'll probably be using, also.

Japanese aircraft are a bit out of my normal area, so I'll have to be doing some . I've done some preliminary research, and have already hit a conundrum: it seems there is a lot of controversy over the correct cockpit color for this bird.

I hope I can do a decent job on this one, as there have been some really nice builds done in this gb already.

Cheers
Automaton
SGTJKJ
#041
_VISITCOMMUNITY
Kobenhavn, Denmark
Joined: July 20, 2006
KitMaker: 10,069 posts
AeroScale: 3,788 posts
Posted: Monday, January 07, 2008 - 07:17 PM UTC
Looks good, Automaton. A good start on your project.

Sorry I cannot help you with the colour of the cockpit of this bird. Rob (29foxtrot) might be able to help. He is like the inhouse Pacific expert

Looking forward to see more
GVoakes
_VISITCOMMUNITY
Manitoba, Canada
Joined: September 04, 2007
KitMaker: 193 posts
AeroScale: 32 posts
Posted: Tuesday, January 08, 2008 - 03:31 AM UTC

Quoted Text


Japanese aircraft are a bit out of my normal area, so I'll have to be doing some . I've done some preliminary research, and have already hit a conundrum: it seems there is a lot of controversy over the correct cockpit color for this bird.

Automaton


The instructions call out "Nakajima cockpit colour", which is a yellowish green. WEM has match for this in their Japanese aircraft colours, as did Aeromaster. It could also be mixed - what paint ranges do you have access to?

As the Hayate was a Nakajima aircraft, it should use the Nakajima colours, which were different from the colours Mitsubishi used (and from Kawanishi's, et al.) The only variation that I am aware of is that towards the end of the war, cockpits were often left unpainted as a time saving measure and because the plane`s expected life span was less than the time it would take for the cockpit parts to rust.

Grant
f1matt
_VISITCOMMUNITY
Manitoba, Canada
Joined: August 13, 2006
KitMaker: 1,021 posts
AeroScale: 184 posts
Posted: Tuesday, January 08, 2008 - 09:49 AM UTC
Hey Grant. Just saw your newest meatball. Looks fantastic. I'm amazed with how well the hand painted camo turned out. That would be so easy to screw up but you pulled it off. I'll be by Tiger this Saturday so we can actually talk in person as it's been far to long. See you soon.

-Matt
Automaton
_VISITCOMMUNITY
United States
Joined: August 12, 2007
KitMaker: 153 posts
AeroScale: 139 posts
Posted: Tuesday, January 08, 2008 - 10:57 AM UTC

Quoted Text


The instructions call out "Nakajima cockpit colour", which is a yellowish green. WEM has match for this in their Japanese aircraft colours, as did Aeromaster. It could also be mixed - what paint ranges do you have access to?


Thanks for the input, Grant

Actually, the instructions in this edition of the kit call for Gunze H63 Metallic Blue Green, which I am assuming is their rendition of Aotake. From what research I've done, though, I think you're likely right about the Nakajima Int. Green/natural metal.

I'd order some of the WEM stuff if I had more time, but my fastest mail order supplier doesn't carry them. I guess I'm stuck with trying a mix unless I end up doing a scheme from the very late war period, in which case I'd probably go the natural metal route.

I found the following Tamiya mix formula on the J-Aircraft site: White 92%, X1-Black 3%, X5-Green 3%, X8-Lemon Yellow 2%. While looking at some builds online, I also saw where one guy used a Floquil railroad color called "Weyerhaeuser Green", which he said was a very close match for the Aeromaster Nakajima interior green. I have semi-local access to both Tamiya and Floquil, so I may end up going one of these routes.

Any more thoughts on this matter (this goes for anyone else reading this, too) will be welcome, as it'll probably be at least a couple of days before I paint the interior.

Cheers
Automaton
GVoakes
_VISITCOMMUNITY
Manitoba, Canada
Joined: September 04, 2007
KitMaker: 193 posts
AeroScale: 32 posts
Posted: Tuesday, January 08, 2008 - 03:17 PM UTC
The Tamiya or Floquil mixes sound like they're right on the money. My preference is for acrylics, so I'll probably end up mixing Tamiya once my horde of Aeromaster acrylics is gone.

I would question the use of Aotake anywhere in an IJAAF aircraft. As far as I have come across, Aotake was used only as a sealant on Navy aircraft.

I will try and get some pics posted of the cockpit of my 1/32 Hayate, if you would like.

Grant
SGTJKJ
#041
_VISITCOMMUNITY
Kobenhavn, Denmark
Joined: July 20, 2006
KitMaker: 10,069 posts
AeroScale: 3,788 posts
Posted: Tuesday, January 08, 2008 - 07:35 PM UTC
Great to see that help is coming forward from follow modellers on the cockpit colour question. Especially since the campaign leader cannot add any real information

Although the campaign runs until the end of January, I have a few notes to remember for all participants:
- Make sure you are signed up for the campaign HERE if you are not already signed up. Otherwise I cannot adward any ribbon.
- Make sure to post at least one picture of your finished build HERE
- Make sure to let me know if you need an extra week or two to make the touches your build.

Thanks to everybody for participating - I am looking forward to a sprint for the finish line on some very interesting builds still to be finished
Automaton
_VISITCOMMUNITY
United States
Joined: August 12, 2007
KitMaker: 153 posts
AeroScale: 139 posts
Posted: Wednesday, January 09, 2008 - 12:35 PM UTC

Quoted Text

The Tamiya or Floquil mixes sound like they're right on the money. My preference is for acrylics, so I'll probably end up mixing Tamiya once my horde of Aeromaster acrylics is gone.

I would question the use of Aotake anywhere in an IJAAF aircraft. As far as I have come across, Aotake was used only as a sealant on Navy aircraft.

I will try and get some pics posted of the cockpit of my 1/32 Hayate, if you would like.

Grant


Yeah, I strongly prefer acrylics, too. In fact, my methods have evolved to being almost completely centered around acrylics. This caused me to have some problems on my last build, on which I used enamels for the first time in years. I think it's gonna be the Tamiya mix for me on this one.

And I'd be interested in seeing your Ki-84 build pics--post 'em up!

And to Jesper: Thanks for the reminder about enlisting--I'd actually forgotten you had to do that. Took care of it tonight.

Cheers
Automaton
GVoakes
_VISITCOMMUNITY
Manitoba, Canada
Joined: September 04, 2007
KitMaker: 193 posts
AeroScale: 32 posts
Posted: Friday, January 11, 2008 - 06:09 PM UTC
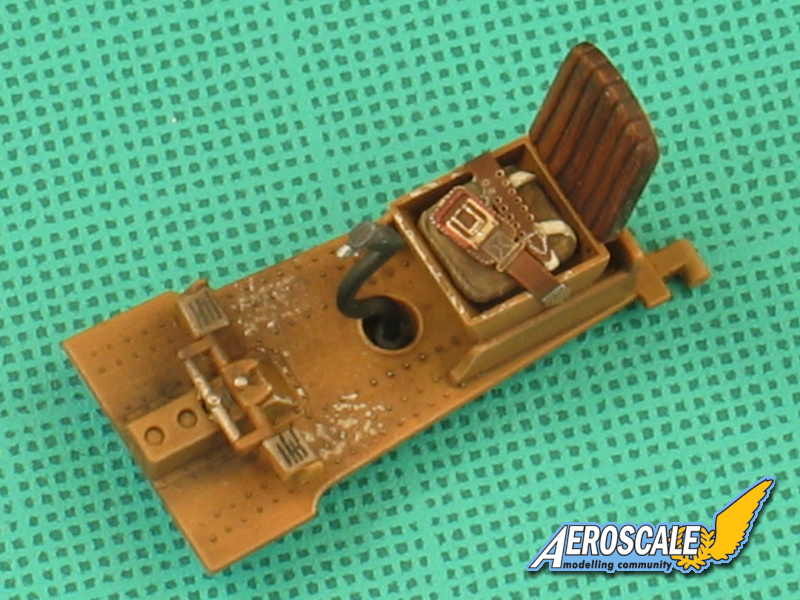
Went poking around on the computer tonight to find some of the pics that I took while building the 1/32 Hasegawa Hayate. Here's a couple I took of the cockpit before it was installed and the fuselage sealed up.


The cockpit was built OOB, but Cutting Edge IJN seatbelts made of the flexible rubber were added. I chose not to fiddle with the kit seat, although the seat padding was absent from the actual aircraft (and would have interfered with the pilot's parachute). I also kept the cockpit weathering down to next to nothing, as I wasnted to portray a fairly new and clean a/c.
bf443
_VISITCOMMUNITY
Idaho, United States
Joined: May 16, 2003
KitMaker: 895 posts
AeroScale: 457 posts
Posted: Friday, January 11, 2008 - 09:44 PM UTC
Hello everyone,

I managed to apply the Neutral Grey underside and Olive Drab topside on my P-39 tonight. The paint was really giving me fits it seem to be either to thin or to thick and not JUST RIGHT. Also I don’t know if it’s the lighting but the color appears to be to light at least to me.


Hope to do more tomorrow,

Brian
SGTJKJ
#041
_VISITCOMMUNITY
Kobenhavn, Denmark
Joined: July 20, 2006
KitMaker: 10,069 posts
AeroScale: 3,788 posts
Posted: Friday, January 11, 2008 - 10:20 PM UTC
Hi Brian

Looks good. I agree with yoy that the colour might be too light. Maybe you can darken it a bit with a wash.

Anyway, looking at peacetime vehicles the colour can vary quite a lot. I guess in war time they can vary even more when the high use of materiel, lack of cover against the elements in most cases, and with the pressure on production making the right shade and tone of camouflage to be second priority.

I would stick with it if I were you. Alternatively give it a wash to darken it.
Phantom2
_VISITCOMMUNITY
Östergötland, Sweden
Joined: April 18, 2006
KitMaker: 708 posts
AeroScale: 678 posts
Posted: Friday, January 11, 2008 - 10:34 PM UTC
Hi all!

I have made good progress on the Speedy-Dee, so here´s an update!

Fuselage sides done;


After I had all interior sub-assemblies done I started adding them to the left fuselage side.

From front end;


Note that the gunner´s seat goes in LAST, NOT before you add the floor assembly as Trumpeter will have you to do.


Later I had to remove the fragile guns, it would have been nigh on impossible to get that to survive the rest of the build!

Detail of cockpit;


When I realized how much stuff you had to add before the fuselage sides could be closed, I was somewhat concerned by the fit!

So, I checked out that every sub assembly would fit without problems, one at a time.
Then I added all the stuff (in the correct order), no need for any glue as everything is a press-fit!
I had to juggle around and poke on a few tabs with a small screwdriver, before the fuselage just snapped together.
Surprisingly, The fit was as perfect as It could be!

Tailplanes fitted almost as good;


As did the wing;


I had to clamp the front, as there were some smallish gaps, and a wide tape from wingtip to wingtip ensured the correct dihedral and gave a nice join between fuselage and wings.

After tidying up all seams I will add the engine and all the small stuff!

More on that later!

Cheers!

Stefan E
Automaton
_VISITCOMMUNITY
United States
Joined: August 12, 2007
KitMaker: 153 posts
AeroScale: 139 posts
Posted: Friday, January 11, 2008 - 11:45 PM UTC

Quoted Text

Went poking around on the computer tonight to find some of the pics that I took while building the 1/32 Hasegawa Hayate. Here's a couple I took of the cockpit before it was installed and the fuselage sealed up.


Thanks for posting those, Grant. I mixed up a batch of homebrew Nakajima Cockpit Green from Tamiya paint (as per the J.Aircraft mix) last night. It's probably not exact, as those 2% and 3% parts of the formula would be difficult to get perfect unless you were mixing it a gallon at a time. Also, I'm pretty sure (unless I made some mistake) that their mix is too heavy on the white, as it was VERY light before I added more of the black, green, and lemon yellow in proportion. I'm satisfied that it's close enough, though. While I realize you can't judge color precisely by a computer display (variations in displays, cameras, yada yada), I will have to say the mix I came up with looks very close to the Aeromaster you used. I'll be satisfied if my cockpit is even in the same league with yours--excellent job!

I've made quite a bit more progress on my build, but I'll wait a while before posting any pics, as I have a three-day weekend without (at the moment, anyway) a lot of commitments, and hope to do a lot more before Tuesday.

Cheers
Automaton
Merlin
Staff MemberSenior Editor
AEROSCALE
#017
_VISITCOMMUNITY
United Kingdom
Joined: June 11, 2003
KitMaker: 17,582 posts
AeroScale: 12,795 posts
Posted: Sunday, January 13, 2008 - 02:58 AM UTC
Hi Jesper

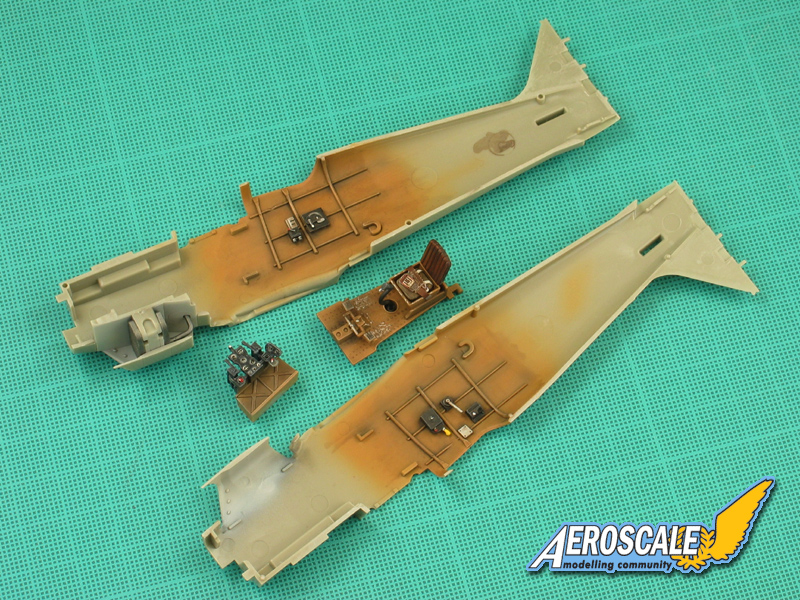
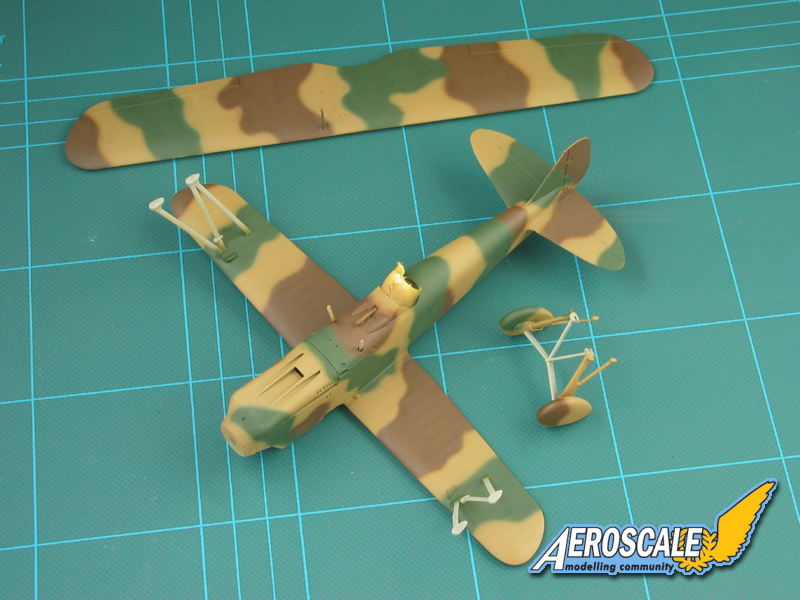
I've tempted fate and joined in. I've got a fair bit done on my FineMolds Ki-10 and - particularly if my internet connection keeps packing up - have a reasonable chance of finishing on time:


I've built it basically OOB, with just the addition of Eduard Japanese seat harness (I'm still undecided as to whether shoulder harnesses are appropriate...). The exterior colours are WEM Colourcoats. I've read conflicting opinions as to whether the camouflage was applied in the field and whether it was sprayed or brushed - anyway, I've sprayed it on freehand, as it was quicker and easier than masking.

I'll be trying Mal's Miracle Masks for the bulk of the markings, so more to follow this week (hopefully).

All the best

Rowan
SGTJKJ
#041
_VISITCOMMUNITY
Kobenhavn, Denmark
Joined: July 20, 2006
KitMaker: 10,069 posts
AeroScale: 3,788 posts
Posted: Sunday, January 13, 2008 - 08:13 AM UTC
Welcome onboard, Rowan.

Looks like you are more than halfway there. Very nice job on the camouflage especially considering it is freehand.

Looking forward to see more
TedMamere
_VISITCOMMUNITY
Moselle, France
Joined: May 15, 2005
KitMaker: 5,653 posts
AeroScale: 4,347 posts
Posted: Sunday, January 13, 2008 - 11:24 PM UTC
Hi Rowan!

Your Ki-10 looks great. The interior color is very interesting.

How is the fit of the kit? It looks like it can be build in sub-assemblies which is a good thing. Did you already test fitted the upper wing and the undercarriage?

Jean-Luc
Merlin
Staff MemberSenior Editor
AEROSCALE
#017
_VISITCOMMUNITY
United Kingdom
Joined: June 11, 2003
KitMaker: 17,582 posts
AeroScale: 12,795 posts
Posted: Sunday, January 13, 2008 - 11:54 PM UTC
Many thanks Jean-Luc

I've gone by FineMolds's call-out for a tan-coloured interior - that also seems to match some later Japanese aircraft. It's not among the WEM Japanese Colourcoats, but they have several different interior colours - the original colour seems to have depended on the aircraft manufacturer.

The kit fits together very well indeed. As you say, I've built it in sub-assemblies for speed and ease of painting. The undercarriage and top wing are simple drop-in fits, making this an ideal bi-plane kit for beginners. The rigging attachments are well done too - the positions are pre-marked, so all I've done is drill them out a bit deeper. I'll try black fishing line on this one - a first for me, as I usually use heated stretched sprue.

All the best

Rowan
bf443
_VISITCOMMUNITY
Idaho, United States
Joined: May 16, 2003
KitMaker: 895 posts
AeroScale: 457 posts
Posted: Friday, January 18, 2008 - 07:48 PM UTC
Hello everyone,

Here is my progress on the Monogram P-39 as of tonight. When I painted the O.D. it appeared to light in color so I took the same O.D. and added a few drops of black into it and airbrushed it over the original color. The pictures do not show it but there is some variation of color now.
A gloss coat is next but I am kind of concerned since earlier today I had a bad experience with the Model Master gloss clear coat on my Super Etendard (Paint started to peel). Anyway here is some pictures.


Sincerely,
Brian
TedMamere
_VISITCOMMUNITY
Moselle, France
Joined: May 15, 2005
KitMaker: 5,653 posts
AeroScale: 4,347 posts
Posted: Friday, January 18, 2008 - 09:22 PM UTC
Hi all!

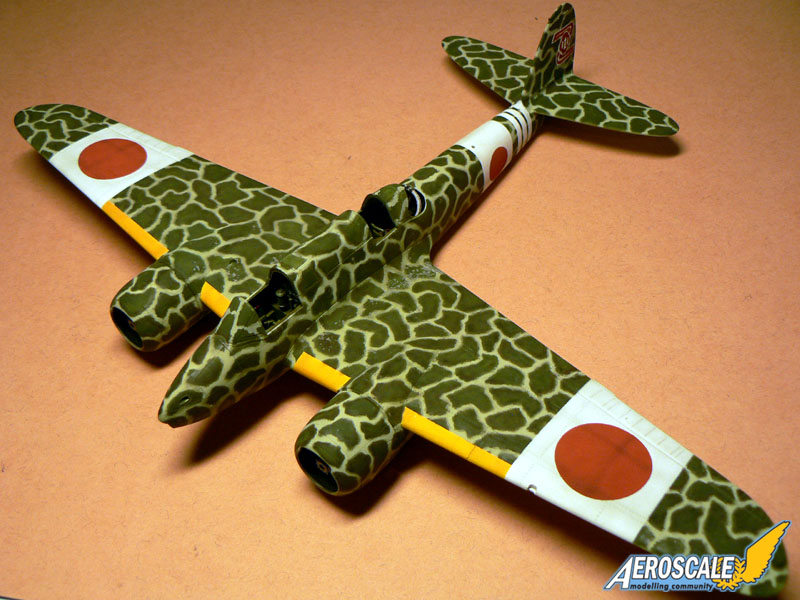
Here's a picture of my Ki-45 in it's current status. I think I will make it before the deadline...


Nice P-39 Brian! You've said you will do it in markings from the Aloutians. Are there any provided in the Monogram kit or will you use aftermarket decals?

Jean-Luc
alpha_tango
_VISITCOMMUNITY
Germany
Joined: September 07, 2005
KitMaker: 5,609 posts
AeroScale: 5,231 posts
Posted: Friday, January 18, 2008 - 09:50 PM UTC
Hi All

I am progressing pretty good with my model (posting some pix this afternoon) but I am lacking decals. I would like to do O'Hares plane (as T. Cleaver did it: http://modelingmadness.com/reviews/allies/us/cleaverf4f3.htm ) and I esp. need the numbers and emblem. Can somebody help me out on this?

Many thanks in advance

greets

Steffen
P.S. J-L: I love your Toryu!!!!
SGTJKJ
#041
_VISITCOMMUNITY
Kobenhavn, Denmark
Joined: July 20, 2006
KitMaker: 10,069 posts
AeroScale: 3,788 posts
Posted: Friday, January 18, 2008 - 10:15 PM UTC
Good to see everybody is progressing with their builds.

@Brian, looks good with your P-39 and the new colourcoat. Do not forget to give the pilot as thin wash of dark brown. This will bring up the details and his face. Hope everything works out with the clear coat.

@Jean-Luc, good to see the progress. Glad that you expect to finish before the end date.

@Steffen, looking forward to see some pictures. Sorry I cannot help with decals. Hope somebody else will be able the help.

Keep up the good work, guys
alpha_tango
_VISITCOMMUNITY
Germany
Joined: September 07, 2005
KitMaker: 5,609 posts
AeroScale: 5,231 posts
Posted: Saturday, January 19, 2008 - 03:01 AM UTC
Hi Jesper, and all others too

here are some pix of the HB model so far. Do not care about the yellow bottle in the pit ... you can't see nothing of it when the pit is installed so I did not care to paint it any better.


I will add some eduard seat belts and close the thing up today ... still lacking white numbers and the emblem for the c&m - see post above - .... anyone???

had to delete some pictures again .. so Jesper could you please point me to the campaign gallery for posting pix once the model is finished (how many?).

as always, comments welcome

best wishes

Steffen
bf443
_VISITCOMMUNITY
Idaho, United States
Joined: May 16, 2003
KitMaker: 895 posts
AeroScale: 457 posts
Posted: Saturday, January 19, 2008 - 05:38 AM UTC

Quoted Text

Nice P-39 Brian! You've said you will do it in markings from the Aloutians. Are there any provided in the Monogram kit or will you use aftermarket decals?

Jean-Luc


Hello Jean-Luc,

Thanks for the compliment ! One of the many reboxings of this kit actually does have markings for the Aleutians (one with Russian markings on the box). My kit only has markings for a training squadron in the U.S. To the best of my knowledge no aftermarket company includes Aleutian based aircraft. Not to worry though, I have the excellent Osprey P-39 Aces book and I have enough reference to combine after market letters, numbers, and national insignia to create what I'm after.

Jesper,

Thank you for the reminder on the pilot wash. I wonder should I use a brown wash for the entire plane as well or should I use a grey? I think black would not show up well against the dark Olive Drab I created. Watching some movie footage taken at Adak those aircraft were constantly subjected to standing,muddy, water while taking off and landing. Anyone have any ideas on this?

Sincerely,
Brian