Air Campaigns
Want to start or join a group build? This is where to start.
FW 190 Campaign. It will really be cool!
Emeritus
_VISITCOMMUNITY
Uusimaa, Finland
Joined: March 30, 2004
KitMaker: 2,845 posts
AeroScale: 1,564 posts
Posted: Monday, January 19, 2009 - 07:00 PM UTC

Quoted Text


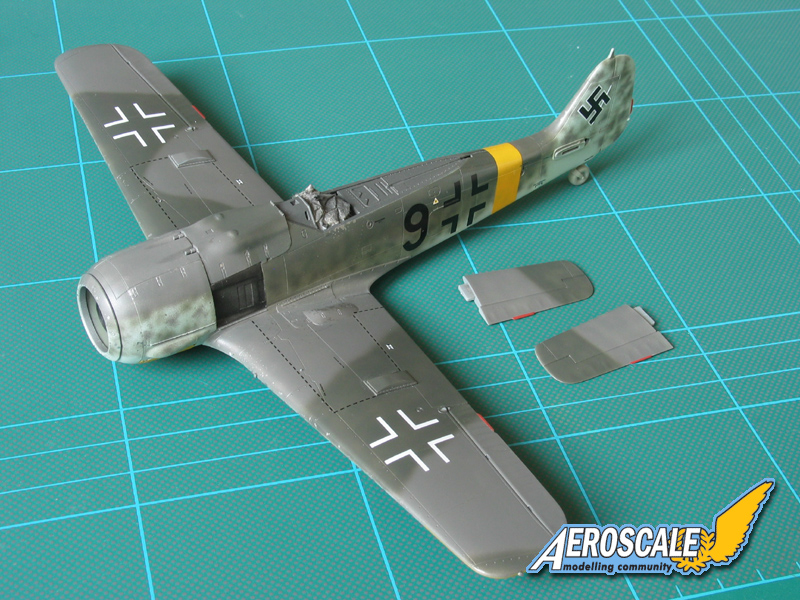
Eetu, I'm assuming that's the 1/72 Revell kit you ended up building? I have a couple of those in the stash, an A8 and a nachtjager. I built one back in the '90s when it was issued in the states as the Pro Modeler boxing. I was really pleased with how it came out, but it came to grief in a catastrophic accident (something fell off a shelf on top of it). IIRC, it's a really nice kit, except for the molded-on rear canopy frame (and those boiler rivets on the canopy frame).


Yep, it's the Revell boxing of the kit. I second that, looks like a really nice kit except for the really strange solution done with the canopy. That would have been almost passable with only the raised bump excuses for rivets removed, if you're fine with a closed canopy. But the moulds have clearly seen better times when my sample was made and as a result the clear parts are quite scuffed.
I'll replace it with a vac-form canopy, perhaps leaving it open if I dare to attempt cutting it in two.
KAYELL
_VISITCOMMUNITY
England - North East, United Kingdom
Joined: February 16, 2008
KitMaker: 107 posts
AeroScale: 16 posts
Posted: Monday, January 19, 2009 - 08:36 PM UTC
Hi Guys,

Please could you clarify to a 'non plane' maker what is the issue with the canopy on the excellent whiite 190!

I am drifting into this campaign from armour, so forgive me if it seems a dumb question.

Looking at some of the early entries this will bring in some stunning builds.
jaypee
_VISITCOMMUNITY
Scotland, United Kingdom
Joined: February 07, 2008
KitMaker: 1,699 posts
AeroScale: 1,384 posts
Posted: Monday, January 19, 2009 - 09:15 PM UTC
just when you mask up your canopy you paint the interior colour on first. so it shows from the inside. probably black or grey in this case. Then you paint the exterior cover over that. Andrew forgot to spray the interior colour on first so it looks like the inside of the canopy frame is white not grey. It is a neat trick. But you can't tell from the photos. Follow some of the build logs and you'll see it being done quite a lot. Welcome to the world of flying machines. I think that is what is unique about kitmaker is the way different strands of the hobby are all in one place.

Update: Beat you to it Steffen
alpha_tango
_VISITCOMMUNITY
Germany
Joined: September 07, 2005
KitMaker: 5,609 posts
AeroScale: 5,231 posts
Posted: Monday, January 19, 2009 - 09:15 PM UTC
Hi Keith

In real life the canopy has a painted inside and a painted outside.

We a/c modellers mostly like to take the short tour and paint it all from the outside (esp. on closed canopys). So we must first spray on a layer of inside colour (which is RLM 66 in this case - a dark blueish grey) to show through the clear part and then the outside camouflage .. .

Andrew just forgot to spray the interior colour and I agree that it would not be noticed in the photos ... but it is easy recognizeable if you look at the model directly (been there ...)

HTH

cheers

Steffen

P.S. .. I am just too slow in typing ...
KAYELL
_VISITCOMMUNITY
England - North East, United Kingdom
Joined: February 16, 2008
KitMaker: 107 posts
AeroScale: 16 posts
Posted: Monday, January 19, 2009 - 09:26 PM UTC
Thanks Guys

I am onto the priming stage at the moment. Canopy to do.......just in time then!

Thanks again another tip for the database.
AirLedge
_VISITCOMMUNITY
Cork, Ireland
Joined: July 26, 2007
KitMaker: 292 posts
AeroScale: 265 posts
Posted: Monday, January 19, 2009 - 09:43 PM UTC
Hi Keith,

Everything the lads have already said is spot on. A varation on this theme (after masking) is to paint the interior colour first (RLM 66 in the case of the 190), then black and finally the overall paint scheme. The layer of black between the interior colour and the final coat serves 2 functions. First it is an attempt to replicate the thin seal that exists on real aircraft and secondly, it helps the frames stand out slightly against the clear of the canopy.

All the best,

Mike.
CaptainA
_VISITCOMMUNITY
Indiana, United States
Joined: May 14, 2007
KitMaker: 3,117 posts
AeroScale: 2,270 posts
Posted: Tuesday, January 20, 2009 - 10:16 AM UTC
Andrew, That looks great.

Keith, We welcome you clank clank, ima tank guys with open cockpits. We would love to see some pictures. btw, I will be starting this campaign as soon as I finish my current tank.

Yeti123
_VISITCOMMUNITY
Michigan, United States
Joined: February 11, 2008
KitMaker: 311 posts
AeroScale: 278 posts
Posted: Friday, January 23, 2009 - 01:07 AM UTC
Time to get started now that the Mustang is done. I will be attempting a D9 using the Tamiya kit and using the MDC wheel well and exterior updates. Aircraft 3 on the decal sheet is the target.

Taylor

SEDimmick
_VISITCOMMUNITY
New Jersey, United States
Joined: March 15, 2002
KitMaker: 1,745 posts
AeroScale: 20 posts
Posted: Friday, January 23, 2009 - 02:22 AM UTC
Oops I just Enlisted

I have a Tamiya Fw190D9 in the closet I plan on building with the MDC update sets.
Emeritus
_VISITCOMMUNITY
Uusimaa, Finland
Joined: March 30, 2004
KitMaker: 2,845 posts
AeroScale: 1,564 posts
Posted: Saturday, January 24, 2009 - 04:40 AM UTC
I've working on my entry as well.

As the PE set was designed for a different kit, I was a little worried how some of the pieces would fit, but fortunately the engine-related pieces seem to fit right in.

The mouled-in engine cooling fins on the spinner base plate weren't bad, but the PE part is superior. No fit problems to either the plastic kit-par or resin replacement forward cowling ring I'm using. The engine face PE piece also fits in nicely, and I think I'll use that, even though it won't that visible on the finished item. Well, at least I know there something behind the fins.
The ignition harness piece (or that's what I think it is) on the other hand didn't fit in that well. With it's smaller central hole, it makes a noticable gap between itself and the engine face. I think I'll leave that off.


The wings and it's associated were put together next. Before joining the wing halves, I opened the shell ejection chutes for the wing root cannons. Strangely they were moulded only as recessions, while the fuselage MG chutes were already open. The outer wing cannon chutes looked much trickier to open so I left as they were.
The picture above also shows the peculiarly done detailing on the control surfaces. Nice and sharp, but they look like they're missing the fabric covering. A couple coats of mr. surfacer and some sanding should get them looking much better.

And to close this update, here's the right fuselage half, after some plastic surgery.

The rudder has received one coat of mr. surfacer and sanding, but it looks like it'll need one or two more. The moulded-in canopy frame has also been cut off, as is the front portion of the nose.

cinzano
_VISITCOMMUNITY
Indiana, United States
Joined: January 13, 2009
KitMaker: 419 posts
AeroScale: 378 posts
Posted: Saturday, January 24, 2009 - 05:24 AM UTC
OK,

Just browsed through the whole thread and I think I wanna play too. My brother has been bugging me to build an FW 190 to add to his 1/48 collection.

I've been a good boy this year, eating all my vegetables and finishing a bunch of old, dated kits. Its a good reason to treat myself and bust out one of the nicer projects from my closet shelf.

So go ahead and put me down for an Tamiya Fw190 A8 with Eduard PE goodies.

Cheers,
Merlin
Staff MemberSenior Editor
AEROSCALE
#017
_VISITCOMMUNITY
United Kingdom
Joined: June 11, 2003
KitMaker: 17,582 posts
AeroScale: 12,795 posts
Posted: Sunday, January 25, 2009 - 12:27 AM UTC
Hi again

A last look at my Fw 190F before the winter camouflage goes on... the next stage could be a disaster!


As you can see, I've gone for "Black 9" - not Red. I asked Judy Crandall at Eagle Editions if Jerry could offer any advice, and the answer backed up my own conclusion:

" I asked Jerry about your question of "Black 9" - here is his answer, The yellow band on the rear fuselage would be a very dark value if the film was orthochromatic, but since it is not dark, comparing all the values in proper scale, the 9 in red would not be as dark as the cross, he believes the number '9' to be Black."

- which was just as well, because I'd already applied the decals.

I'll maybe try some winter mirror-waves this afternoon. I say maybe, because the weather is very damp here, and my airbrush is prone to spitting water lately on extended spraying sessions (despite two moisture traps...) - so, if it's doing that today, I won't risk it!

All the best

Rowan
LongKnife
_VISITCOMMUNITY
Jönköping, Sweden
Joined: April 25, 2006
KitMaker: 831 posts
AeroScale: 688 posts
Posted: Sunday, January 25, 2009 - 03:21 AM UTC
Hi Rowan. Black or white doesn't really matter looking this good. I'm crossing my fingers for the winter camo to work.

Tony
thegirl
_VISITCOMMUNITY
Alberta, Canada
Joined: January 19, 2008
KitMaker: 6,743 posts
AeroScale: 6,151 posts
Posted: Sunday, January 25, 2009 - 04:51 AM UTC
Have some very nice builds happening here . I have never tried tried a winter camo before . So I'm looking forward to this . Hope the weather works in your favor .
Merlin
Staff MemberSenior Editor
AEROSCALE
#017
_VISITCOMMUNITY
United Kingdom
Joined: June 11, 2003
KitMaker: 17,582 posts
AeroScale: 12,795 posts
Posted: Sunday, January 25, 2009 - 05:04 AM UTC
Hi again

Well... I took the plunge!


It's certainly different! - I hope stripes are in fashion this year...

All the best

Rowan
Yeti123
_VISITCOMMUNITY
Michigan, United States
Joined: February 11, 2008
KitMaker: 311 posts
AeroScale: 278 posts
Posted: Sunday, January 25, 2009 - 02:26 PM UTC
Rowan:
That looks great. Looks like the risk payed off

Taylor
alpha_tango
_VISITCOMMUNITY
Germany
Joined: September 07, 2005
KitMaker: 5,609 posts
AeroScale: 5,231 posts
Posted: Sunday, January 25, 2009 - 09:50 PM UTC

Quoted Text

Hi again

Well... I took the plunge!


It's certainly different! - I hope stripes are in fashion this year...

All the best

Rowan


Hi Rowan

Turned out very nice!!

Ask Terri about stripes ...

cheers

Steffen
Merlin
Staff MemberSenior Editor
AEROSCALE
#017
_VISITCOMMUNITY
United Kingdom
Joined: June 11, 2003
KitMaker: 17,582 posts
AeroScale: 12,795 posts
Posted: Monday, January 26, 2009 - 02:03 AM UTC
Cheers guys

I'm not entirely happy, but I've never tried airbrushing anything like it before, so I guess I shouldn't complain. Anyway, the scary bit's over and done with, and it should (hopefully) look OK once it's weathered a bit...

All the best

Rowan
cinzano
_VISITCOMMUNITY
Indiana, United States
Joined: January 13, 2009
KitMaker: 419 posts
AeroScale: 378 posts
Posted: Monday, January 26, 2009 - 02:11 AM UTC
Rowan,

That is rather novel approach on leaving the empennage off and painting them separately. Something that I hadn't thought of before.

Well,

I jumped in last night. cracked the box on my A8 and began populating the tub of the cockpit with PE bits...
Merlin
Staff MemberSenior Editor
AEROSCALE
#017
_VISITCOMMUNITY
United Kingdom
Joined: June 11, 2003
KitMaker: 17,582 posts
AeroScale: 12,795 posts
Posted: Monday, January 26, 2009 - 02:36 AM UTC

Quoted Text

Rowan,

That is rather novel approach on leaving the empennage off and painting them separately. Something that I hadn't thought of before


Hi Frederick

I often leave them off - provided they fit well, of course - because it makes painting easier, particularly things like mottling. The best kit I ever found for the trick was Tamiya's Bf 109E which I was doing in an experimental all-mottle scheme tried by Adolf Galland - the fit was so perfect, I left off the tail and the wings to paint them separately!

I'm looking forward to seeing your 'A-8 take shape.

All the best

Rowan
thegirl
_VISITCOMMUNITY
Alberta, Canada
Joined: January 19, 2008
KitMaker: 6,743 posts
AeroScale: 6,151 posts
Posted: Monday, January 26, 2009 - 02:55 AM UTC
Very funny Steffen ........................ asking me about stripes !
jugjunkie
_VISITCOMMUNITY
South Africa
Joined: January 20, 2009
KitMaker: 140 posts
AeroScale: 84 posts
Posted: Tuesday, January 27, 2009 - 03:53 AM UTC
Just a quick question please guys. I'd like to enter this campaign with the same aircraft I have enterted into another campaign. Haven't started at all yet so will this be allowed??

Geoff
LongKnife
_VISITCOMMUNITY
Jönköping, Sweden
Joined: April 25, 2006
KitMaker: 831 posts
AeroScale: 688 posts
Posted: Tuesday, January 27, 2009 - 04:29 AM UTC
I guess I'm stepping into moderator-territory now, but I've seen that question before. Answer is no, Im afraid. You're not allowed to kill two stones with one bird!

Tony.

(However, Chuck Norris can kill two stones with one bird)
CaptainA
_VISITCOMMUNITY
Indiana, United States
Joined: May 14, 2007
KitMaker: 3,117 posts
AeroScale: 2,270 posts
Posted: Tuesday, January 27, 2009 - 08:57 AM UTC
Unfortunately, a build can only be used in one campaign.

Rowan. I think it looks great. To me, the effect is very realistic.

Frederick, Welcome to Aeroscale, and the campaign. Where in Indiana?
cinzano
_VISITCOMMUNITY
Indiana, United States
Joined: January 13, 2009
KitMaker: 419 posts
AeroScale: 378 posts
Posted: Tuesday, January 27, 2009 - 10:08 AM UTC
Thanks,

I call Bloomington home.

(Got to do some detailing on the oleo struts this morning). It looks like this project will take several weeks. (maybe even a month or two)

Any suggestions on aftermarket decals? I've had some mixed results with Tamiya decals lately (I use Micro Sol decal setting solution).