Hi Steffen
The fuselage number isn't in shadow, but I quite agree about the perils of relying on my crude method of comparison.
Most of my refs simply state that the a/c belonged to SG 2. Kagero go further, but contradict themselves by stating I./SG 2 in a photo caption and II./SG 2 for their accompanying profile! Going by Schiffer's "Luftwaffe Codes, Markings and Units 1939-1945", SG 2 had three Staffeln per Gruppe, and black or red would correlate with number 2 or number 5 Staffel (and 8, 11 and 14 - but they wouldn't fit the suggested Gruppen), with black being increasingly common as the war progressed.
Another interesting thing with this a/c is the obsolete tactical markings of yellow wingtips and lower cowl that Ken Merrick highlights. Kagero's profile and Tamiya both show the later underwing chevron (which you can see on other SG 2 machines), so there is also a chance that the aircraft was repainted at some point after the photo...
I'm tempted to ask Jerry Crandall if he has any more info on the a/c, but he may well say Ken has it right.
All the best and thanks for your help
Rowan
Air Campaigns
Want to start or join a group build? This is where to start.
Hosted by Frederick Boucher, Michael Satin
FW 190 Campaign. It will really be cool!
Posted: Sunday, January 11, 2009 - 07:16 AM UTC
Posted: Sunday, January 11, 2009 - 07:31 AM UTC
Hi Rowan
Well, look at the prop shadow, it clearly indicates that the sun is about 12 o'clock high. The photo was thus taken from 3 o'clock (roughly) so IMHO that Number is in the shadow (not as much as below the wings but also not as exposed as the spinner) .... just to explain my statement
greets
Steffen
Quoted Text
The fuselage number isn't in shadow, but I quite agree about the perils of relying on my crude method of comparison.
Well, look at the prop shadow, it clearly indicates that the sun is about 12 o'clock high. The photo was thus taken from 3 o'clock (roughly) so IMHO that Number is in the shadow (not as much as below the wings but also not as exposed as the spinner) .... just to explain my statement
greets
Steffen
Posted: Sunday, January 11, 2009 - 08:12 AM UTC
Hi Steffen
Remember, the photo was taken in winter, so the sun wouldn't rise very high in the sky. From the length and direction of the shadows, it seems to me to have been a about 33 to 35 degrees and slightly to the right as the aircraft faced.:
But the main thing for me is that I just can't make out a dark outline to the numeral in any of the versions I have of the photo, so I'm inclined to think it was a solid colour and to go with black - and, of course, I can always do the reverse of Patrick's suggestion and apply the Tamiya decal later if evidence to the contrary appears.
All the best
Rowan
CaptainA
Indiana, United States
Joined: May 14, 2007
KitMaker: 3,117 posts
AeroScale: 2,270 posts
Joined: May 14, 2007
KitMaker: 3,117 posts
AeroScale: 2,270 posts
Posted: Sunday, January 11, 2009 - 08:22 AM UTC
I found a profile of "Red 2", but not your "Red/Black 9". I am relaxing and reading my references. You were correct in assuming I have plenty of reference materials. I actually went into the workshop for about an hour. I am still taking it easy until after the next X-Ray.
I am very pleased with how this campaign is progressing.
Posted: Sunday, January 11, 2009 - 08:34 AM UTC
Hi Carl
I am glad you are feeling better!!
@Rowan:
the discussion of this single pic would take hours and is best done in a group and not via Inet (this was probably already done so contacting Mr. Crandell could be of help). I still think the angle of the sun light would obscure the border. Do you know what kind of film was used for that pic? On orthochromatic film red appears black ... thus my statement above that you best go with "the typical number colour" .. best not only based on standards and regulations but on personal accounts and capture reports ...
all the best
Steffen
Posted: Sunday, January 11, 2009 - 08:34 AM UTC
Hi Carl
Good to see you back and I'm glad to hear you're taking it easy.
I'll do my best to actually have a finished build for you on this one!
All the best
Rowan
Good to see you back and I'm glad to hear you're taking it easy.
I'll do my best to actually have a finished build for you on this one!
All the best
Rowan
Posted: Sunday, January 11, 2009 - 08:50 AM UTC
Quoted Text
Do you know what kind of film was used for that pic? On orthochromatic film red appears black ...
Hi Steffen
Without access to the negative, I've no idea - but, if it was orthochromatic film, the yellow fuselage band would be much darker too. The overall tonal balance looks pretty natural.
Your question has reminded me of a great photo I found at Christmas that should really stir up the VVS enthusiasts! You know the debate over Soviet stars appearing white due to the type of film used? Well, I stumbled across a shot of VVS wrecks showing both "normal" and "white" stars in the same picture! Now... if only I could remember where...
All the best
Rowan
Posted: Sunday, January 11, 2009 - 09:02 AM UTC
Hi Rowan
you are probably right, but as already stated this could be discussed much further and in more detail. Pictures are great and I prefer to have a pic to build my models but b&w pix are a bad base for colour decisions
I do not want to clog up this thread with my thoughts/our discussion --> so just decide for a variant and do it! Let others prove you wrong ... a test is much easier done than a validation.
cheers
Steffen
Automaton
United States
Joined: August 12, 2007
KitMaker: 153 posts
AeroScale: 139 posts
Joined: August 12, 2007
KitMaker: 153 posts
AeroScale: 139 posts
Posted: Sunday, January 11, 2009 - 02:29 PM UTC
Hi again
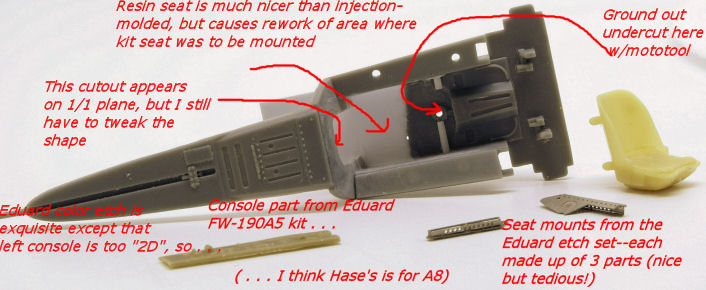
Well, I've achieved some meager progress on my build. As usual, I've complicated things by deciding to use some aftermarket and scratchbuilt improvements (no wonder it always takes me so long to finish these things). Here's where it stands at the moment (less some "watchmaker" parts from the Eduard set that I don't have a good enough lens to satisfactorily photograph . . .
When I built the cockpit of the Eduard kit, I used a piece of sheet styrene under the etch part for the left console instead of grinding off the molded part's detail. I knew that thing would come in handy some day! Oh, and the sheet styrene areas at the rear of this cockpit haven't been filled yet--I promise light won't show through 'em when it's finished.
By the way, I should say that I "borrowed" the idea of putting notes directly on the photos from Chukw1. I can't draw cartoons, and I know I'll never be in his league as a modeller, but I'm always ready to steal a good idea.
Wishing a quick recovery to Carl;
Automaton
Emeritus
Uusimaa, Finland
Joined: March 30, 2004
KitMaker: 2,845 posts
AeroScale: 1,564 posts
Joined: March 30, 2004
KitMaker: 2,845 posts
AeroScale: 1,564 posts
Posted: Monday, January 12, 2009 - 04:30 AM UTC
Cheers! I assume there will be room for one more?
But before I enlist and start cutting any styrene, I still got some other campaign entries to finish. Anyway, here's what I've been thinking about building, Revell's (reboxing of Monogram's kit, I presume?) Fw-190 A-8:
Now makes for a nice & quick straight-from-the-box build ... not!
When looking at the part, it was clear that something just had to be done about the awful kit-supplied canopy: Frame-portion of the sliding parts moulded as part of the fuselage halves, thick clear parts, and judging from the surface texture, obviously from moulds that have seen better days.
So, when placing my order on Hannants, I ordered an Aeroclub vac-canopy, as well as a resin forward cowling ring from Quickboost.
Even just the canopy and some new seatbelts would have made a nice model, but when I saw an Eduard PE set for sale at a discount price of 2€ at LHS, I simply couldn't resist.
Yes, it's originally meant for Hasegawa's A-7, but since the differences between the variants were largely internal, and I'm not going to use each and every one of the parts provided, it ought to work out ok.
Oh, and of course, the moulded-in gunsight is going to give room for a Quickboost replacement.
And top it off, new decals by Eagle Cal. I haven't quite decided which one I'm building of the three choices ("blue 13" is out because of the blown-type canopy), but I'm thinking Rudolf Artner's "white 10" would make a good connection to my collection of Finnish aircarft, as two out of his total of 20 kills were Finnish.
Now I'm off to try and finish those other entries I've procrastinated with much too long already.
thegirl
Alberta, Canada
Joined: January 19, 2008
KitMaker: 6,743 posts
AeroScale: 6,151 posts
Joined: January 19, 2008
KitMaker: 6,743 posts
AeroScale: 6,151 posts
Posted: Monday, January 12, 2009 - 07:21 AM UTC
I was just seeing on how many of use signed up for this one and notice that camogirl ( Samatha ) has joined as well ! Awesome !
Hi Sam !
Hi Sam !
CaptainA
Indiana, United States
Joined: May 14, 2007
KitMaker: 3,117 posts
AeroScale: 2,270 posts
Joined: May 14, 2007
KitMaker: 3,117 posts
AeroScale: 2,270 posts
Posted: Monday, January 12, 2009 - 08:06 AM UTC
Here is our first SitRep.
The Butcherbird Campaign now has 46 Participants:
AIRGUNNER
AirLedge Building a FW 190D-9
alpha_tango Building a FW 190A-4 and a FW 190A-5.
Atoplu
Automaton Building a Hasegawa FW 190A-6
betheyn Building Eduard's Fw190A8 R2D2 c3po
Blackwulf Building a FW 190A-4
Blueheeler
camogirl
CaptainA Building Eduards FW 190A-8/R2 with extras
CMOT70 Building a Hasegawa FW 190A-4
cybermedic
dcandal Building a FW 190V-15
Desmoquattro
dsailors
eMan
FalkeEins Building a 1/24th scale Airfix FW 190
gcn123
HeyLoad Building an Eduard FW 190A-6
Jaypee Building a 1/72 FW 190D-9
JollyRoger
KAYELL
Lakota Building a Tamiya’s 1/48 A-8/A-8/R2
lampie
LinkinPark Building a Tamiya 1/72 scale Fw190D-9
Littorio Building a FW 190 190V18 prototype and then time permitting a 190A-1
Maurice Building a Hasegawa 1/72 Focke Wulf Fw190D-9 'Rudel'
Merlin Building Tamiya's up-dated Fw 190F
oakboy Building a FW 190A-5
Phantom2 Building an Eduard FW 190A-5
Red4
SGTJKJ Building a Tamiya FW 190A-3
Spiff Building a 1/32 Hasegawa FW190A-8 or FW190D-9
TedMamere Building a 1/48 FW 190V-1 prototype with a Legato scale resin kit
thegirl Building Dragons Fw190A-5
thomokiwi
Tomcat31
TuomasH Building Eduards weekend FW 190A-3
vanize
VonCuda Building a Eduard FW 190A-8
warreni
williamsfw2427
willy74
Yeti123 Building a FW 190D-9 with an MDC update set
ZombieKraut Building a FW 190A-5 in 1/32nd scale
_H_Dori Building a Hasegawa 1/48 FW 190A-6 with the Owl R11 conversion
matrixone, gothicgeek, PolarBear, Rattler, LongKnife, Emeritus, and SEDimmick, you still haven’t enlisted.
LongKnife
Jönköping, Sweden
Joined: April 25, 2006
KitMaker: 831 posts
AeroScale: 688 posts
Joined: April 25, 2006
KitMaker: 831 posts
AeroScale: 688 posts
Posted: Monday, January 12, 2009 - 08:34 PM UTC
Ooops. Sorry about that.
Now I'm enlisted and will have a mini-group-build with a friend. Two Tamiya A-3's that will be Armin Fabers mount before and after capture. The work has started, but will take longer than normal since we are two that have to mate our calendars.
The silver fuselage to the left is a J 37 Viggen that my friends 9 year junior is building. Perfect timing for giving him the building bug too!
Tony.
TuomasH
Turku ja Pori, Finland
Joined: September 10, 2008
KitMaker: 470 posts
AeroScale: 279 posts
Joined: September 10, 2008
KitMaker: 470 posts
AeroScale: 279 posts
Posted: Tuesday, January 13, 2009 - 03:00 AM UTC
Hey Carl, nice to see you up again and nice list you made, however theres a small mistake at your list. My first thought for this campaign was indeed the A-3, but it was sold out at my LHS. Then I found Tamiya older F-8 which I bought.
I have been looking for photos of SG4 in Italy 1944, but I've been unable to find any. If any of you could check your sources for F-8s of that unit. Thanks in Advance!
Tuomas
I have been looking for photos of SG4 in Italy 1944, but I've been unable to find any. If any of you could check your sources for F-8s of that unit. Thanks in Advance!
Tuomas
Posted: Tuesday, January 13, 2009 - 09:39 AM UTC
Quoted Text
I have been looking for photos of SG4 in Italy 1944, but I've been unable to find any. If any of you could check your sources for F-8s of that unit. Thanks in Advance!
Tuomas
Great choice, Tuomas. I think I might have some pictures in my references. I am away from my books right now, but I will check later this week.
CMOT70
Victoria, Australia
Joined: August 23, 2007
KitMaker: 629 posts
AeroScale: 539 posts
Joined: August 23, 2007
KitMaker: 629 posts
AeroScale: 539 posts
Posted: Wednesday, January 14, 2009 - 05:36 PM UTC
I've got all the airframe bit together on the Trautloft A-4. An easy near perfect fitting kit so far. Just a very small amount of filler for the lower right cowl to wing join all that is need before getting on with painting.
Straight from the box except for some Reheat harnesses for the cockpit.
Andrew
Straight from the box except for some Reheat harnesses for the cockpit.
Andrew
thegirl
Alberta, Canada
Joined: January 19, 2008
KitMaker: 6,743 posts
AeroScale: 6,151 posts
Joined: January 19, 2008
KitMaker: 6,743 posts
AeroScale: 6,151 posts
Posted: Friday, January 16, 2009 - 03:07 AM UTC
Looking good so far Andrew .
I will have pic's up soon of my build , Alb D.Va is almost out of the way . I have done test fitting and started gluing parts in the cockpit together , but nothing worth of photo's yet .
And it's not dragons kit , but the accurate minitures kit and a resin replacement engine . Plan on have the cowl open .
CaptainA
Indiana, United States
Joined: May 14, 2007
KitMaker: 3,117 posts
AeroScale: 2,270 posts
Joined: May 14, 2007
KitMaker: 3,117 posts
AeroScale: 2,270 posts
Posted: Saturday, January 17, 2009 - 09:18 AM UTC
Andrew, your A-4 is looking good.
I am getting over this recent incapacitation. I have been spendin about an hour a day at the desk. I have one build ready for decals, and a tank that is getting the first steps of weathering. I should have both of them done by the end of next week. Next in line is Eduards FW 190A-8/R2. The open box is sitting in the embarkation zone next to my build desk. I am anxious. Maybe 2-3 hours tomorrow.
Posted: Saturday, January 17, 2009 - 09:08 PM UTC
Quoted Text
Next in line is Eduards FW 190A-8/R2. The open box is sitting in the embarkation zone next to my build desk. I am anxious. Maybe 2-3 hours tomorrow.
Hi Carl
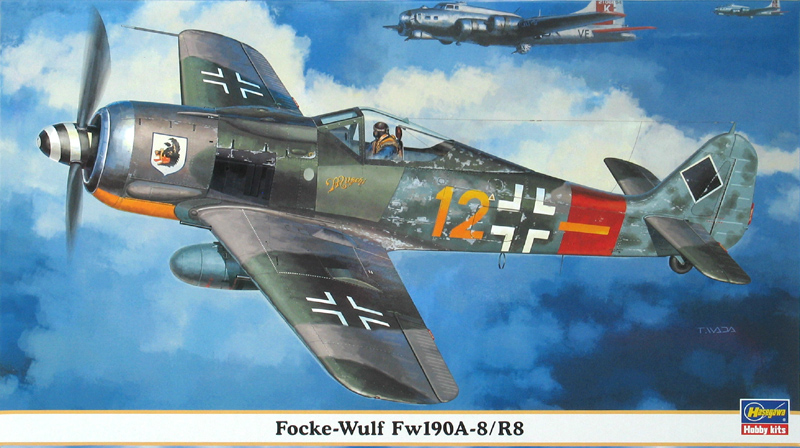
I'll be hot on your heels in starting my second entry - Hasegawa's new 'A-8/R8 Sturmbock:
I'll also try to get the decals onto my 'F-8 today...
All the best
Rowan
CMOT70
Victoria, Australia
Joined: August 23, 2007
KitMaker: 629 posts
AeroScale: 539 posts
Joined: August 23, 2007
KitMaker: 629 posts
AeroScale: 539 posts
Posted: Sunday, January 18, 2009 - 04:33 PM UTC
My FW 190A-4 is finished. It represents one of the aircraft flown by Hannes Trautloft, shortly before he was moved to a staff position i believe. I based it mostly upon the profile in Ospreys FW190 Aces of the Eastern Front. It seems that there was evidence of some fresh white wash touch ups on the fuselage in places, namely just in front of the crosses- probably to cover up previous markings that had begun to show through.
I made one silly unfixable mistake on this one. I forgot to spray the interior colour onto the canopy frames before doing the top colour. So if you look up close inside the cockpit you can notice the interior frames are white just like the outside! And no real way of fixing that one without risking major damage to the clear parts, so it will stay the way it is.
The Hasegawa kit was very easy to put together. I've also built one of the Tamiya kits before as well. I have a slight preference for the Hasegawa kit for doing the early short nosed A's.
Andrew
LongKnife
Jönköping, Sweden
Joined: April 25, 2006
KitMaker: 831 posts
AeroScale: 688 posts
Joined: April 25, 2006
KitMaker: 831 posts
AeroScale: 688 posts
Posted: Sunday, January 18, 2009 - 08:30 PM UTC
That's a nice looking bird. I guess the canopy framing is visible, but more to you than to others I think.
I like the scratches in the white camo. Especially the soft marks on the fuselage. Makes you wonder how the inside of the left leg looked after climbing in and out for a while.
Tony
I like the scratches in the white camo. Especially the soft marks on the fuselage. Makes you wonder how the inside of the left leg looked after climbing in and out for a while.
Tony
Posted: Monday, January 19, 2009 - 03:25 AM UTC
Nice butcher bird, Andrew. I must agree with Tony. It is not that visible unless you know it.
Emeritus
Uusimaa, Finland
Joined: March 30, 2004
KitMaker: 2,845 posts
AeroScale: 1,564 posts
Joined: March 30, 2004
KitMaker: 2,845 posts
AeroScale: 1,564 posts
Posted: Monday, January 19, 2009 - 08:36 AM UTC
Okay, I'm officially in now, just enlisted.
I've made a careful start with my A-8, clipping parts off the sprues and cleaning them up mostly. Today I started on the cockpit.
The sides of the seat were awfully thick so I sanded them down to a more scale appareance. Here it's still being dryfitted. I'll still need to do some sanding on it and modify the locators on the underside to make it sit closer to the back wall. (sanding made unwanted room there)
Next to the cockpit module are the rudder pedals and the map case (at least that's what I think it is).
Automaton
United States
Joined: August 12, 2007
KitMaker: 153 posts
AeroScale: 139 posts
Joined: August 12, 2007
KitMaker: 153 posts
AeroScale: 139 posts
Posted: Monday, January 19, 2009 - 10:48 AM UTC
Good looking A4, Andrew. Rest assured you're not the only one who makes "silly unfixable" mistakes. It seems I never build anything without that happening at least once. I doubt that anyone would have ever noticed the canopy frames if you hadn't pointed it out yourself.
Eetu, I'm assuming that's the 1/72 Revell kit you ended up building? I have a couple of those in the stash, an A8 and a nachtjager. I built one back in the '90s when it was issued in the states as the Pro Modeler boxing. I was really pleased with how it came out, but it came to grief in a catastrophic accident (something fell off a shelf on top of it). IIRC, it's a really nice kit, except for the molded-on rear canopy frame (and those boiler rivets on the canopy frame).
I have the cockpit of my Hase A6 assembled mostly assembled and painted, but don't have any detail painting or weathering done yet, so I'm not going to post any more pics yet. I had originally planned to do a fairly basic build adding only the Eduard etch set and a resin seat, but since we have a few months til the end of the campaign, I'm contemplating rivetting it.
Guess I've gotten enough inspiration from Aeroscale for the moment, so I should log off and do some non-virtual building now.
Happy building
Automaton
Yeti123
Michigan, United States
Joined: February 11, 2008
KitMaker: 311 posts
AeroScale: 278 posts
Joined: February 11, 2008
KitMaker: 311 posts
AeroScale: 278 posts
Posted: Monday, January 19, 2009 - 01:06 PM UTC
Andrew:
That was quick and with great results. I love winter schemes. Great addition to a flock of Wurgers
Taylor
That was quick and with great results. I love winter schemes. Great addition to a flock of Wurgers
Taylor