Air Campaigns
Want to start or join a group build? This is where to start.
The great checker board Campaign
litespeed
Staff MemberNews Reporter
AEROSCALE
_VISITCOMMUNITY
England - North West, United Kingdom
Joined: October 15, 2009
KitMaker: 1,976 posts
AeroScale: 1,789 posts
Posted: Saturday, November 14, 2009 - 11:59 AM UTC
Photobucket

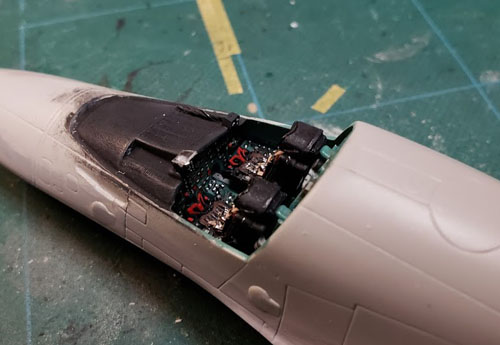
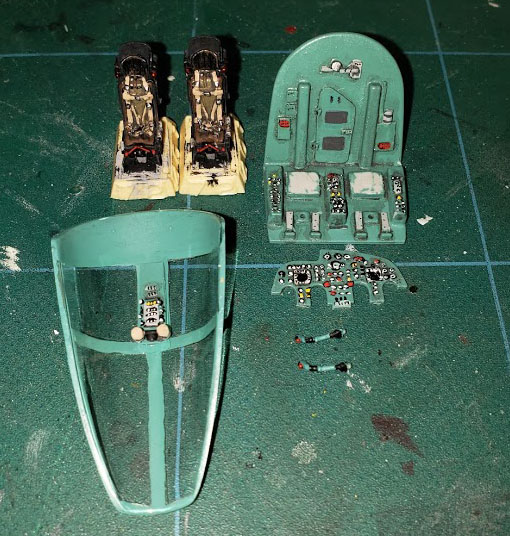
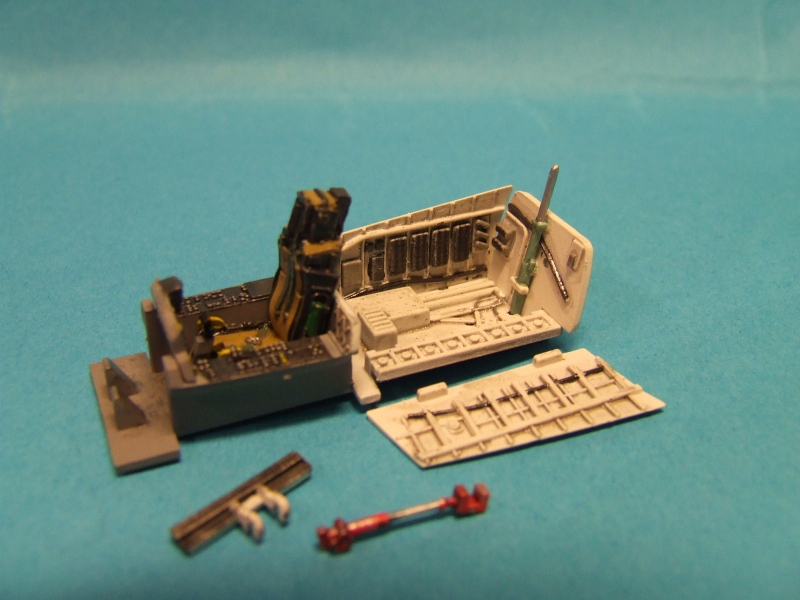
Well I am underway with my 1/48 Academy Hawker Hunter F6 for the chequreboard campaign. At first glance it is a beautiful piece of moulding of this gorgeous aircraft. The well publicsed tiny bang seat has to be seen to be believed. It does bare a resemblance to something more akin to 1/72 scale. A pity really as it's a fair representation of the Martin Baker 3H ejection seat. I might try and make a replacement, but there a few resin seats to correct this problem. The ducting for the engines seem a bit complex, but they are fitting together really well. You just need to be patient and use a bit of tape to hold the bits together before applying liquid poly. The plate fitted in the air inlet supplied in the kit does not fit when the halves of the intake are joined. It was simply replaced with plastic card. I later found that they are not supposed to join with the upper and lower parts of the intake! Cockpit is completed, minus the seat. I have gone a bit over the top with colour I think. No wonder there is no pilot with all the red lights showing,
tim


Photobucket

Photobucket

Photobucket
TuomasH
_VISITCOMMUNITY
Turku ja Pori, Finland
Joined: September 10, 2008
KitMaker: 470 posts
AeroScale: 279 posts
Posted: Monday, November 16, 2009 - 04:12 AM UTC
Tim I can't see your pictures! Just a photobucket error sign.
litespeed
Staff MemberNews Reporter
AEROSCALE
_VISITCOMMUNITY
England - North West, United Kingdom
Joined: October 15, 2009
KitMaker: 1,976 posts
AeroScale: 1,789 posts
Posted: Monday, November 16, 2009 - 04:49 AM UTC
OOPS sorry, I was trying to whittle down on images and binned the hunter ones by mistake!
tim
litespeed
Staff MemberNews Reporter
AEROSCALE
_VISITCOMMUNITY
England - North West, United Kingdom
Joined: October 15, 2009
KitMaker: 1,976 posts
AeroScale: 1,789 posts
Posted: Monday, November 16, 2009 - 05:21 AM UTC
Hi All
Steaming ahead with the Hunter after a slow but careful start. Despite seeming a complex kit for my standard it's going together really well. The only real gap to deal with [probably because of my doing] is a slight gap between the fuselage and upper forward wing root. The ducts supplied with the kit are great. There is a representation of the front of the engine, but it's almost impossible to see when its all closed up. Rudder and ailerons are separate and I joined these to the structure using steel pins to ensure a firm fit. The inside and outside of the jet tube was primed and sprayed with vallejo burnt steel. Not sure how accurate this is, but it looks good. The jet pipe is covered with the rear fairing. The tailplanes went on with no problems as did the shell link collecting pods and the air brake. The later two spoil the clean lines of the Hunter. I think I might have a go at producing the prototype! The shell link collecting pods look a tad to large once on the model. I have applied some liquid paper to all the seams just as a precaution and it's all ready to be sanded down for the painting stage.
tim


Photobucket

Photobucket

Photobucket

Photobucket

Photobucket
litespeed
Staff MemberNews Reporter
AEROSCALE
_VISITCOMMUNITY
England - North West, United Kingdom
Joined: October 15, 2009
KitMaker: 1,976 posts
AeroScale: 1,789 posts
Posted: Friday, November 20, 2009 - 12:41 PM UTC
Hi all
A few days off or was it putting off making the Martin Baker 2H bang seat. Well it took me a couple of goes, but it's done. It's OK. The white seat is my effort and the grey is the one supplied by Academy and is significantly under scale. I based mine on the Academy seat and images from Martin Baker. It is very simplistic.
tim

Photobucket
Photobucket
Removed by original poster on 11/21/09 - 01:08:07 (GMT).
Ruffus
_VISITCOMMUNITY
Guatemala
Joined: April 12, 2005
KitMaker: 343 posts
AeroScale: 111 posts
Posted: Friday, November 20, 2009 - 01:14 PM UTC
For this one, I will be going "low profile"

http://www.twobobs.net/contents/en-us/image_viewer.html?lmd=40069.341667

Some times "LESS IS MORE". and sometimes the link does not work. Well, is an F-15E "Shangry-La II"

Happy Modeling

Byron
RedwingNev
_VISITCOMMUNITY
England - East Midlands, United Kingdom
Joined: February 07, 2004
KitMaker: 911 posts
AeroScale: 415 posts
Posted: Wednesday, November 25, 2009 - 07:46 AM UTC
First of all, let me say "Hunters, mmmmmmmmmmmm!"

Second of all, been beavering away with my F-15, and the cockpit is now complete, although it may need a quick flat coat, and I've left one side off to help with the pics.

After building several Airfix kits recently I've been really impressed by the quality of this 25 year old kit. The cockpit is well detailed, and pretty accurate too. The only addition I've made is a Pavla resin seat (seen below with the kit seat as a comparison)


All advice, comments, constructive criticism etc welcomed.
Torchy
#047
_VISITCOMMUNITY
England - East Anglia, United Kingdom
Joined: September 13, 2005
KitMaker: 2,016 posts
AeroScale: 475 posts
Posted: Wednesday, November 25, 2009 - 09:45 AM UTC
Hi all
I'm in with this baby

I was going to do my fav stang BBD but Terri's building that ,this will be a OOB build with NO extras(for once!).
Right, lets scare some plastic
Andy
AussieReg
Staff MemberAssociate Editor
AUTOMODELER
#007
_VISITCOMMUNITY
Victoria, Australia
Joined: June 09, 2009
KitMaker: 8,156 posts
AeroScale: 3,756 posts
Posted: Wednesday, November 25, 2009 - 11:14 AM UTC
Hey Andy,

Take a look at post 7 on page 2 of this thread, I'm building your "little brother"

Cheers, D
Torchy
#047
_VISITCOMMUNITY
England - East Anglia, United Kingdom
Joined: September 13, 2005
KitMaker: 2,016 posts
AeroScale: 475 posts
Posted: Wednesday, November 25, 2009 - 11:40 AM UTC

Quoted Text

Hey Andy,

Take a look at post 7 on page 2 of this thread, I'm building your "little brother"

Cheers, D


Nice one Damian,these will make a great pair of jugs ,thanks for the comments on my P-51 "Torchy" btw.
I've started it tonight,OOB, a nice simple,easy build for once!!!
thegirl
_VISITCOMMUNITY
Alberta, Canada
Joined: January 19, 2008
KitMaker: 6,743 posts
AeroScale: 6,151 posts
Posted: Wednesday, November 25, 2009 - 01:08 PM UTC
Very nice Neil Never built an Airfix kit before , but I'm thinking about picking up the mossie in 72 scale .
Your seat turned out really great . The kit parts isn't bad either for detail . Looking forward to more progress !

Glad to have you on Torchy ! Can never have enough jug's in a campaign !
AussieReg
Staff MemberAssociate Editor
AUTOMODELER
#007
_VISITCOMMUNITY
Victoria, Australia
Joined: June 09, 2009
KitMaker: 8,156 posts
AeroScale: 3,756 posts
Posted: Wednesday, November 25, 2009 - 01:59 PM UTC
Sorry Terri, I just couldn't pass this one by . . .

Quoted Text


Glad to have you on Torchy ! Can never have enough jug's in a campaign !


You can never have enough jugs . . . . . . .period !!

Cheers, D
RedwingNev
_VISITCOMMUNITY
England - East Midlands, United Kingdom
Joined: February 07, 2004
KitMaker: 911 posts
AeroScale: 415 posts
Posted: Wednesday, November 25, 2009 - 06:33 PM UTC

Quoted Text

Very nice Neil Never built an Airfix kit before , but I'm thinking about picking up the mossie in 72 scale .


I should make it clear, this is the Hasegawa kit - I was making the comment that after building several Airfix kits recently, this is a pleasant change.

The 72nd Mossie isn't bad - for a 30 year old kit. Tamiya is the way to go if you can afford it
Phantom2
_VISITCOMMUNITY
Östergötland, Sweden
Joined: April 18, 2006
KitMaker: 708 posts
AeroScale: 678 posts
Posted: Thursday, November 26, 2009 - 04:35 AM UTC
Hi all!

I have finally decided what to build for this Campaign!

Ever since I first laid my eyes on her, It has been one of my "must-dos", a Thunderbolt named "Eileen", WZ * S!

I´ll go with 1/48 and here´s my kit;


Everythig is still in the bags!


...and those are the decals I´ll use;


I know Academy have done "Eileen", complete with decals, but this is a far better kit and the Cutting Edge decals are beyond compare!

Now, Please excuse me...

I´ll better let this cat out of the bag(s) now...

Cheers!

Stefan E


thegirl
_VISITCOMMUNITY
Alberta, Canada
Joined: January 19, 2008
KitMaker: 6,743 posts
AeroScale: 6,151 posts
Posted: Friday, November 27, 2009 - 01:23 AM UTC
Right on Stefan , another excellent jug being added to the campaign !

sorry for the miss understanding Neil , Hasegawa kits are a pleasure to build and a nice break from doing WW1 aircraft .


I will be starting my build this weekend and will show some progress of it soon . Now with some features cleared off the work bench will have a little more time .

Looking great so far guy's , getting some cool markings happening here !
jaypee
_VISITCOMMUNITY
Scotland, United Kingdom
Joined: February 07, 2008
KitMaker: 1,699 posts
AeroScale: 1,384 posts
Posted: Friday, November 27, 2009 - 02:20 AM UTC
Over at Cross and cockade I found a nicely drawn out profile for E7267.
It was Cobby's machine while a flight instructor.


Some snaps from the Oz War Memorial site


Neat huh. Note the A/c codes on the underside.

Since the camel is nice and small I'll get the white on tonight and paint Cobby's face.
With luck and refs perhaps the rigging holes will get some thought.

Those wheels look a bast&&& to mask. Thinking cap will be required.
VonCuda
_VISITCOMMUNITY
North Carolina, United States
Joined: November 28, 2005
KitMaker: 2,216 posts
AeroScale: 1,080 posts
Posted: Friday, November 27, 2009 - 02:55 AM UTC
Nice one John-Paul. I think that may be my favorite entry yet. Good luck with those wheels. I have NO ideas that would help.

Hermon
jaypee
_VISITCOMMUNITY
Scotland, United Kingdom
Joined: February 07, 2008
KitMaker: 1,699 posts
AeroScale: 1,384 posts
Posted: Friday, November 27, 2009 - 04:44 AM UTC
Thanks Hermon I think finding unusual schemes and the stories behind them is one of my favourite parts of the hobby.
The all black 109 night fighter, USAAC SE5a trainer, Bert Marshall's p51 Hunhunter or the all metal Sunderland G-AGES. And without places on the net like the aerodrome, p51 sig, and seawings where there is a wealth of research experience to go and plunder it would be so difficult. Hats off to those guys for keeping the fires alive.

I've got Mr Lawson to thank for sparking my interest in this way with his "When I flew with..." campaign. Nice one Stephen if you're listening.

The kit details are very overdone thanks to the age of the moulds, some 400 grit will remove it and a technical pencil will
suffice to reinstate it.
Torchy
#047
_VISITCOMMUNITY
England - East Anglia, United Kingdom
Joined: September 13, 2005
KitMaker: 2,016 posts
AeroScale: 475 posts
Posted: Friday, November 27, 2009 - 07:56 AM UTC
Hi all
glued some bits and chucked some paint at the jug


Tamiya,XF-54 ,lower and XF-62 upper,then a coat of Kleer,will put the decals on later tonight.
I love these OOB builds,should do more of them!!!
more pics tomorrow
Andy
mj
_VISITCOMMUNITY
Illinois, United States
Joined: March 16, 2002
KitMaker: 1,331 posts
AeroScale: 325 posts
Posted: Friday, November 27, 2009 - 08:26 AM UTC
Well, here we are with my 1/72 Academy "Eileen". I always sing the praises of the Academy kits, as I feel they are great value, and well engineered. This one went together very nicely, and I thought I did a nice job on the painting of the kit. However... ...the decals! Tried everything short of a nail-gun to get the suckers on, and they still would not conform! Thick, you wouldn't believe...I had to slice a few sections to try and get some Solvaset under the decal, practically broke the blade doing it! Never, I say never again, will I build an Academy kit without Aftermarket decals to put on it. The heartbreak (and heartburn) just isn't worth it.

Okay - rant over, and my bloodpressure is back to normal. Sorry, but I just had to get that out. Here are the pics:


I believe there is another "Eileen" coming in this Campaign, and I look forward to seeing it completed. As always Terri, you think up and run really fun Campaigns. Thanks for the opportunity to build this kit.

Cheers,
Mike

CMOT70
_VISITCOMMUNITY
Victoria, Australia
Joined: August 23, 2007
KitMaker: 629 posts
AeroScale: 539 posts
Posted: Friday, November 27, 2009 - 11:56 AM UTC
I feel the need for something quick to build whilst doing the Repulse. A 1/72 Tamiya Corsair shouldn't pose many problems and it turns out that the VMF-312 option has checkers on the nose and tail, so i signed up to do it for this campaign.


Andrew
Siderius
_VISITCOMMUNITY
Tennessee, United States
Joined: September 20, 2005
KitMaker: 1,747 posts
AeroScale: 1,673 posts
Posted: Friday, November 27, 2009 - 12:23 PM UTC
Mike good job on working with those Academy decals. I agree, very nice kits but the decals, sometimes you get away with using them, sometimes you don't! When you don't watch out for it! My P-51 pictured here, is the Academy kit, in 1/72 of course, and is a mix of decals which were out of the box and some aftermarket ones. No matter how much gloss I put on the fuselage sides, the out of the box codes would silver terribly! So to the aftermarket codes I went. On the other hand the national insignia went on without any problem, go figure! I feel your pain, to quote a former President of our United States! Ha ha. Again, good effort. Russell

thegirl
_VISITCOMMUNITY
Alberta, Canada
Joined: January 19, 2008
KitMaker: 6,743 posts
AeroScale: 6,151 posts
Posted: Saturday, November 28, 2009 - 01:51 AM UTC
Fantastic choice JayPee ! You always come up with great profile subjects

Gee Torchy , do you have Santa's elves working in your work shop ? Looking good !

MJ , super build ! You did a fantastic job on her . I have Two P51 B by Acadmey in 72 scale , but I won't be using the kit decals . I felt your frustration all the way here in Canada !

Andrew , it wouldn't be the same with out you in this one . Glad to have you on and look forward to your progress


Russell , nice job on the Mustang
Siderius
_VISITCOMMUNITY
Tennessee, United States
Joined: September 20, 2005
KitMaker: 1,747 posts
AeroScale: 1,673 posts
Posted: Saturday, November 28, 2009 - 12:49 PM UTC
Thank you Terri for the kind words. My Mustang is a couple years old, put it up for illustration purposes about Academy decals. You're WW1 work is outstanding I must say. Thanks again. Russell