Air Campaigns
Want to start or join a group build? This is where to start.
The great checker board Campaign
VonCuda
_VISITCOMMUNITY
North Carolina, United States
Joined: November 28, 2005
KitMaker: 2,216 posts
AeroScale: 1,080 posts
Posted: Saturday, November 28, 2009 - 01:29 PM UTC
Mike, Academy decals......been there, done that my friend. I'm not rich, but I generally throw those suckers away and pop the extra $9.00 for some aftermarket decals.

Anyhoo......my seaplane is nearing completion so I'm gonna jump back on the P-40 sometime this week hopefully. Can't wait to dive into that slick black paint job.

Hermon
thegirl
_VISITCOMMUNITY
Alberta, Canada
Joined: January 19, 2008
KitMaker: 6,743 posts
AeroScale: 6,151 posts
Posted: Saturday, November 28, 2009 - 03:54 PM UTC
I've been waiting for this one Hermon ! All black and the with the checkers reall stands out .

I have started painting the cockpit parts today on my build . pic's to follow soon ...............
CMOT70
_VISITCOMMUNITY
Victoria, Australia
Joined: August 23, 2007
KitMaker: 629 posts
AeroScale: 539 posts
Posted: Saturday, November 28, 2009 - 05:59 PM UTC
These 1/72 scale things are tiny! Anyway, being a Tamiya kit this one is just flying together. Everything is done in less than a day so far. Just have to get the rest of the airframe together and then the single colour scheme shouldn't take too long, assuming i don't mess anything up.


Andrew
Siderius
_VISITCOMMUNITY
Tennessee, United States
Joined: September 20, 2005
KitMaker: 1,747 posts
AeroScale: 1,673 posts
Posted: Sunday, November 29, 2009 - 08:53 AM UTC
Those Tamiya kits are really great Andrew. Looking forward to seeing your Corsair built up! Russell

P.S. 1/72 scale isn't that small is it? Ha ha
jaypee
_VISITCOMMUNITY
Scotland, United Kingdom
Joined: February 07, 2008
KitMaker: 1,699 posts
AeroScale: 1,384 posts
Posted: Monday, November 30, 2009 - 12:10 AM UTC
A splash of white to really show up the blemishes Urgh!. Back to the 600 grit.
Click on the pics to see the gory details
I hate the Revell trench for the struts, more work really if you want it looking decent.

Cobby's CamelCobby's Camel
Cobby's Camel
jaypee
_VISITCOMMUNITY
Scotland, United Kingdom
Joined: February 07, 2008
KitMaker: 1,699 posts
AeroScale: 1,384 posts
Posted: Monday, November 30, 2009 - 11:04 PM UTC
Since no-one has any smart ideas on how to paint eight sectored check wheels that are
smaller than your pinkie nail, I'll press ahead
Checks and the bars are done with a sharpie pen. The touched up with white paint.
The wings got some more filler. Underwing codes todo. Also those darn wheels.
It's not pretty but gives a rendering of the scheme. It'll look better with the roundels
applied.

IMG_0702IMG_0705

Pics clickable for higher res
thegirl
_VISITCOMMUNITY
Alberta, Canada
Joined: January 19, 2008
KitMaker: 6,743 posts
AeroScale: 6,151 posts
Posted: Tuesday, December 01, 2009 - 01:04 AM UTC
Very nice Jaypee ! Your schemes always add a splash of life to the campaign

For masking the checkes on the wheels Cut some long triangles and trim to shape starting with the center section and working out .
AussieReg
Staff MemberAssociate Editor
AUTOMODELER
#007
_VISITCOMMUNITY
Victoria, Australia
Joined: June 09, 2009
KitMaker: 8,156 posts
AeroScale: 3,756 posts
Posted: Tuesday, December 01, 2009 - 01:33 AM UTC
[quote]Since no-one has any smart ideas on how to paint eight sectored check wheels that are
smaller than your pinkie nail, I'll press ahead

Just a thought JP, how about cutting a small circle of masking tape and painting that then just sticking it in place. That would allow for a couple of practice runs with no damage done !!

Cheers, D
jaypee
_VISITCOMMUNITY
Scotland, United Kingdom
Joined: February 07, 2008
KitMaker: 1,699 posts
AeroScale: 1,384 posts
Posted: Tuesday, December 01, 2009 - 05:15 AM UTC
Yep that seems a goer Damian. Even making a decal might work although the complex curve would probably make it wrinkle.
Ideally a circle of correct radius with a slice taken out to deal with the angle of the spoke would work but it's a long time since I did that kind of trig. Actually Mrs Taggart can't've been all bad as I can think how to do it and its been 20 years since O-levels. Next up is struts made from contrail stock.
Torchy
#047
_VISITCOMMUNITY
England - East Anglia, United Kingdom
Joined: September 13, 2005
KitMaker: 2,016 posts
AeroScale: 475 posts
Posted: Tuesday, December 01, 2009 - 09:14 AM UTC
JP,you are a legend for taking that paint job on,Fantastic
MJ,Great job on the Jug,I've had the same probs with my Academy P-47 decals,they are pooh
Terri,Thanks, no need for santa's elves when I'm owed soooooo many days off work!!!!
I finished my Jug tonight but the light is poor to take some pics ,I will post some tomorrow(dont laugh) ,
I must get back to my WNW LVG.......
Andy
CMOT70
_VISITCOMMUNITY
Victoria, Australia
Joined: August 23, 2007
KitMaker: 629 posts
AeroScale: 539 posts
Posted: Tuesday, December 01, 2009 - 04:08 PM UTC
Not much left on the F4U. The Tamiya decals are BAD! I've used Academy decals that are better than these before. The pic shows the third round of slicing and setting solution to get the decals into the recessed detail.

Otherwise a pretty straight forward kit. After seeing what Jaypee is doing it almost feels like cheating just building a Tamiya kit and using kit decals for this campaign!


Andrew
Torchy
#047
_VISITCOMMUNITY
England - East Anglia, United Kingdom
Joined: September 13, 2005
KitMaker: 2,016 posts
AeroScale: 475 posts
Posted: Tuesday, December 01, 2009 - 09:10 PM UTC
Hi all
Finished,the decals were a nightmare,could not get them to conform.
I used promodeller sand wash for the upper and black for the lower surfaces,I'm experimenting with these at the moment 
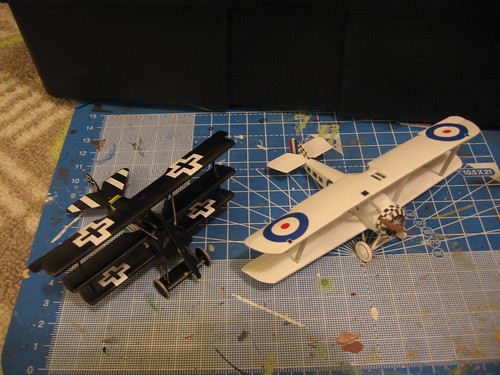
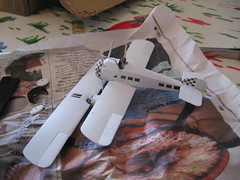
I though black would be to dark for the upper,buy now looking at it.......
Paint chipping around the cowl,gun panels,prop,wing roots etc were done with an HB pencil.
the whole lot was sealed with Humbrol matt cote then a few mig pigs added.


Thanks for looking
Andy
CMOT70
_VISITCOMMUNITY
Victoria, Australia
Joined: August 23, 2007
KitMaker: 629 posts
AeroScale: 539 posts
Posted: Tuesday, December 01, 2009 - 10:10 PM UTC
The Corsair is done, decided to keep this one very clean and new looking for something different.

According to Tamiya it is an aircraft of VMF-312, Okinawa Feb 1945.

No problems with the kit apart from bad decals, but i think i'll generally stick with 1/48 scale. These little ones only really have one advantage to me...they take less space. Otherwise they take the same (or even more) effort to build as 1/48 and are not really much cheaper to buy.


Andrew
Torchy
#047
_VISITCOMMUNITY
England - East Anglia, United Kingdom
Joined: September 13, 2005
KitMaker: 2,016 posts
AeroScale: 475 posts
Posted: Wednesday, December 02, 2009 - 12:11 AM UTC
Hey Andrew,
love the Corsair, I agree these 1/72nd kits fly together(pun intended),and a dam site cheaper
Its funny I've never had a problem with Tamiya decals,but the Academy were super thick!!!strange
Andy
thegirl
_VISITCOMMUNITY
Alberta, Canada
Joined: January 19, 2008
KitMaker: 6,743 posts
AeroScale: 6,151 posts
Posted: Wednesday, December 02, 2009 - 01:51 AM UTC
Andrew , Torchy you both done a super job on your builds !

Love that corsair Andrew , I pick that kit up last weekend and there was really no price difference . Kit was 30 bucks ! Nice to know about the decals in the kit .

Torchy , the weathering turned out really well . Wich mig pigments did you use ?
Torchy
#047
_VISITCOMMUNITY
England - East Anglia, United Kingdom
Joined: September 13, 2005
KitMaker: 2,016 posts
AeroScale: 475 posts
Posted: Wednesday, December 02, 2009 - 02:13 AM UTC

Quoted Text


Torchy , the weathering turned out really well . Wich mig pigments did you use ?


Thanks Terri,I used Allied green fading P036 it breaks up the OD quite nicely,and CMK Star dust black smut SD10 for the zorst and other streaking
Andy
thegirl
_VISITCOMMUNITY
Alberta, Canada
Joined: January 19, 2008
KitMaker: 6,743 posts
AeroScale: 6,151 posts
Posted: Wednesday, December 02, 2009 - 02:28 AM UTC
Here are some pic's of my progress so far on the mustang . Sorry about the pic's but my lighting has gone down hill . I go to work , it's dark , come home and it's dark !


Built out of box with weathering done with dry brushing a few washes and pastels .

1/72 scale !
MikeMx
_VISITCOMMUNITY
England - North East, United Kingdom
Joined: May 22, 2008
KitMaker: 649 posts
AeroScale: 434 posts
Posted: Wednesday, December 02, 2009 - 11:39 PM UTC
Hi

Where do we post our pics for this campaign?

thanks
Mike
thegirl
_VISITCOMMUNITY
Alberta, Canada
Joined: January 19, 2008
KitMaker: 6,743 posts
AeroScale: 6,151 posts
Posted: Thursday, December 03, 2009 - 01:33 AM UTC
You can post your pic's right here Micheal !
RedwingNev
_VISITCOMMUNITY
England - East Midlands, United Kingdom
Joined: February 07, 2004
KitMaker: 911 posts
AeroScale: 415 posts
Posted: Thursday, December 03, 2009 - 01:52 AM UTC
Nice Jug & Corsair Andy & Andy

Muchos progress has been made on my Eagle. I remember the intakes from the last time I made this year 10 years ago with the nice gap to fill inside and out, and the fragile nature of the join....these has since been filled and sanded, but I won't know how well till it stops raining at weekends and I can get outside and spray primer In fact the whole fuselage is quite tricky to put together, not helped by its awkward shape no doubt.


So does anyone know why Hasegawa chose to put the lower wing join line in the middle of nowhere?


MikeMx
_VISITCOMMUNITY
England - North East, United Kingdom
Joined: May 22, 2008
KitMaker: 649 posts
AeroScale: 434 posts
Posted: Thursday, December 03, 2009 - 02:55 AM UTC
How do you post pics in here? I know how to add them to my own gallery.

thanks
Mike
mj
_VISITCOMMUNITY
Illinois, United States
Joined: March 16, 2002
KitMaker: 1,331 posts
AeroScale: 325 posts
Posted: Thursday, December 03, 2009 - 05:28 AM UTC
What I love most about Campaigns is, you're always assured of seeing some really great models! Great work all!

JP - A love the subjects you choose. They would be way too much of a challenge for me, but you really handle them brilliantly. A Sharpie...never would have thought of that. Excellent job.

Russ - appreciate the commiseration on the decals. I always know what I am in for, but I seem to be this eternal optimist and think this time, it will be different. Never again!

Hermon - I vow to follow your astute advice, and from now on, after opening an Academy kit, the first thing I will do after admiring the kit, is pitch the decals! This is a hobby, and it's supposed to be fun - not frustrating as all get-out. Aftermarket decals are a small price to pay for enjoyment...and steady blood pressue.

Andy - Really nice jug. I like the lighter wash. I think it might have been too light in color on its own, but your further weathering really blended the whole thing together nicely. Seeing what can be done, you really make me want to give this weathering thing a try. I've always been too timid to try, before.

Andrew - Really nice Corsair. I never had any trouble with Tamiya decals before, and from your pics, you did get them to set down nicely. Strange. But, I have this kit in my stash - I'm putting a note in the box now to be careful about the decals. I have to agree that 1/72 prices seem to have jumped too much lately, but - that can be said for every scale these days, unfortunately. Great job, though, and a nicely finished Corsair (that won't take up too much space! )

Terri - Your office is looking really nice so far. This scheme is a pretty complicated one, I think, so I am anxiously waiting to see how you will tackle it. I know what you mean about the lighting situation. The only saving grace for me, is I work 2nd shift. It's always dark when I get home, but at least I get a little late morning sun to enjoy before heading back to the salt mine...except for today ... it's snowing.

Whew! sorry for the long winded post - you get caught up at work for a few days, and you get a bit behind. Great work, all. This is really one fine Campaign so far.

Cheers,
MIke

mj
_VISITCOMMUNITY
Illinois, United States
Joined: March 16, 2002
KitMaker: 1,331 posts
AeroScale: 325 posts
Posted: Thursday, December 03, 2009 - 05:43 AM UTC
Hi Mike - I'm not an expert at it, but - go to your gallary, and click on the pic you want to post in the forum. Right click on it after it opens, and select "properties". In the box that opens, highlight and copy the address (URL) of the pic. Than go back to the forum.

In the forum, hit the reply button to open a posting box. Click on the [img] tag provided. Now paste the address you copied in between the [img] tags that appear in the posting box.

The pic should appear when you post.

Hope this helps.

Cheers,
Mike

jaypee
_VISITCOMMUNITY
Scotland, United Kingdom
Joined: February 07, 2008
KitMaker: 1,699 posts
AeroScale: 1,384 posts
Posted: Thursday, December 03, 2009 - 12:17 PM UTC
Too kind MJ. It's actually a bit of a mess if you look close. I just dont look close
I dont recommend the use of a sharpie. It is very water soluble not what you
want with sweaty palms when fitting struts. Not too much harm done this time though, phew
those struts were a BOLLIX. I need a rest before rigging. I thought this was supposed to be relaxing!

Told oyu i would look better with the roundel. These are the revell kit's own and they go on nice and easy.

Flyboys Fokker and Cobbys Camel
We seem to have an interloper!!
Flyboys Fokker and Cobbys Camel
Thats better.

Yes I've still not tackled them wheels
thegirl
_VISITCOMMUNITY
Alberta, Canada
Joined: January 19, 2008
KitMaker: 6,743 posts
AeroScale: 6,151 posts
Posted: Sunday, December 06, 2009 - 01:56 AM UTC
Lovely little Camel JP !

I have closed the fuselage and wings glued in place clean up done waiting for primer now .
Pic's up when the sun gets up today !