

Nice progress Neil !
I agree with D ...Mr surface is the best way to go on filling the gap .
Air Campaigns
Want to start or join a group build? This is where to start.
Want to start or join a group build? This is where to start.
Hosted by Frederick Boucher, Michael Satin
The great checker board Campaign

thegirl

Joined: January 19, 2008
KitMaker: 6,743 posts
AeroScale: 6,151 posts
Posted: Friday, January 01, 2010 - 01:15 AM UTC

VonCuda

Joined: November 28, 2005
KitMaker: 2,216 posts
AeroScale: 1,080 posts
Posted: Monday, January 11, 2010 - 12:38 PM UTC
I'm back in the P-40 saddle again. The body work is done and the primer is on. Next comes the shiny black paint...top, bottom, all around. 

Hermon
Hermon

VonCuda
Joined: November 28, 2005
KitMaker: 2,216 posts
AeroScale: 1,080 posts
Posted: Wednesday, January 13, 2010 - 10:56 AM UTC
And the colors are on! Hope she looks better with the decals. Right now it's looking like a gaudy circus flyer. 

More to come.
Hermon
More to come.
Hermon

Siderius
Joined: September 20, 2005
KitMaker: 1,747 posts
AeroScale: 1,673 posts
Posted: Wednesday, January 13, 2010 - 10:58 AM UTC
Wow Hermon, what a great looking P-40, glad to see you are building up your collection again. Russell 

thegirl
Joined: January 19, 2008
KitMaker: 6,743 posts
AeroScale: 6,151 posts
Posted: Thursday, January 14, 2010 - 02:03 AM UTC
Hermon , now that is looking mighty fine Any fit issues with the kit so far ?
Your cockpit pit looks super any more pic's of this area ?
Any fit issues with the kit so far ? Your cockpit pit looks super any more pic's of this area ?
VonCuda
Joined: November 28, 2005
KitMaker: 2,216 posts
AeroScale: 1,080 posts
Posted: Thursday, January 14, 2010 - 08:41 AM UTC
Thanks Russell. This one has some odd color combo's but it's a nice change from greens and greys.
Terri, the kit is Hobbycraft and so far it has been flawless. Not alot of great detail as with Tamiya or Hasegawa but worth the $16.00 I spent on her. I think the pic I posted of the cockpit are the only ones I have. I can try and get an up close one after the decals are on, which BTW they are almost done.
Hermon
VonCuda
Joined: November 28, 2005
KitMaker: 2,216 posts
AeroScale: 1,080 posts
Posted: Thursday, January 14, 2010 - 12:45 PM UTC
Decals are on, and to be what I consider an inexpensive kit they were very nice decals. Still have A LOT of touch-ups to do but I'm getting closer.

Sorry about the flash. I'm seriously thinking of going with an overall coat of clear flat for the finished plane. This aircraft was based in North Africa so I'm sure it wouldn't have been shiny very long, even if it was the commanders bird.
Hermon
Sorry about the flash. I'm seriously thinking of going with an overall coat of clear flat for the finished plane. This aircraft was based in North Africa so I'm sure it wouldn't have been shiny very long, even if it was the commanders bird.
Hermon
thegirl
Joined: January 19, 2008
KitMaker: 6,743 posts
AeroScale: 6,151 posts
Posted: Friday, January 15, 2010 - 01:38 PM UTC
I really like it Hermon ! Excellent job so far Always nice when you have a kit which builds up nicely .
Always nice when you have a kit which builds up nicely . 
Torchy

#047

Joined: September 13, 2005
KitMaker: 2,016 posts
AeroScale: 475 posts

Posted: Sunday, January 17, 2010 - 08:13 AM UTC
Hermon,
that is one cool looking paint job
Andy
that is one cool looking paint job
Andy


jaypee

Joined: February 07, 2008
KitMaker: 1,699 posts
AeroScale: 1,384 posts

Posted: Sunday, January 17, 2010 - 12:12 PM UTC
That looks like a Reno racer more than an operational plane Hermon.
What a great scheme.
I got a little progress on Cobby's Camel.
Struts replaced with thinner strut stock. Unfortunately once
I rigged it the struts compressed a Cobby is well and truly stuck
in there. I'm not doing it a third, no make that a fourth time.
I'm getting brass strutz the next time I tackle these old revell
kits of which I have the SPAD, and the Fokker D7. But I'll
spare myself until I can make a better fist of them.
Oh and I got the wheels done. I just scored the sections with a
sharp knife and painted it freehand.
Was more effective than anything else I tried. In larger scales a mask would
be OK I just couldn't cut it up neatly enough.
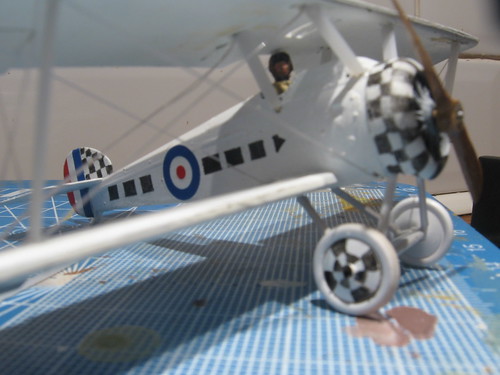
Touch ups to do under the top wing and some more markings to add. But the worst is past me.
What a great scheme.
I got a little progress on Cobby's Camel.
Struts replaced with thinner strut stock. Unfortunately once
I rigged it the struts compressed a Cobby is well and truly stuck
in there. I'm not doing it a third, no make that a fourth time.
I'm getting brass strutz the next time I tackle these old revell
kits of which I have the SPAD, and the Fokker D7. But I'll
spare myself until I can make a better fist of them.
Oh and I got the wheels done. I just scored the sections with a
sharp knife and painted it freehand.
Was more effective than anything else I tried. In larger scales a mask would
be OK I just couldn't cut it up neatly enough.
Touch ups to do under the top wing and some more markings to add. But the worst is past me.


atoplu
Joined: August 17, 2003
KitMaker: 753 posts
AeroScale: 174 posts
Posted: Tuesday, January 19, 2010 - 01:14 AM UTC
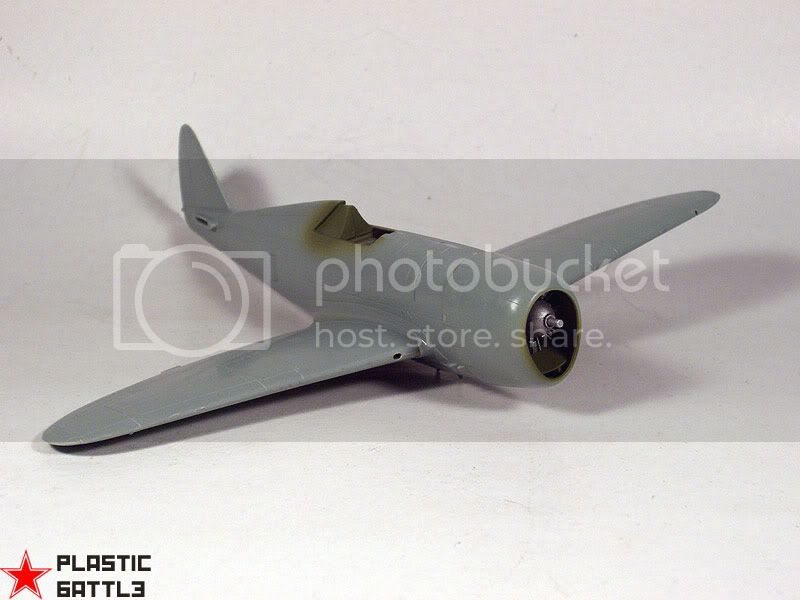
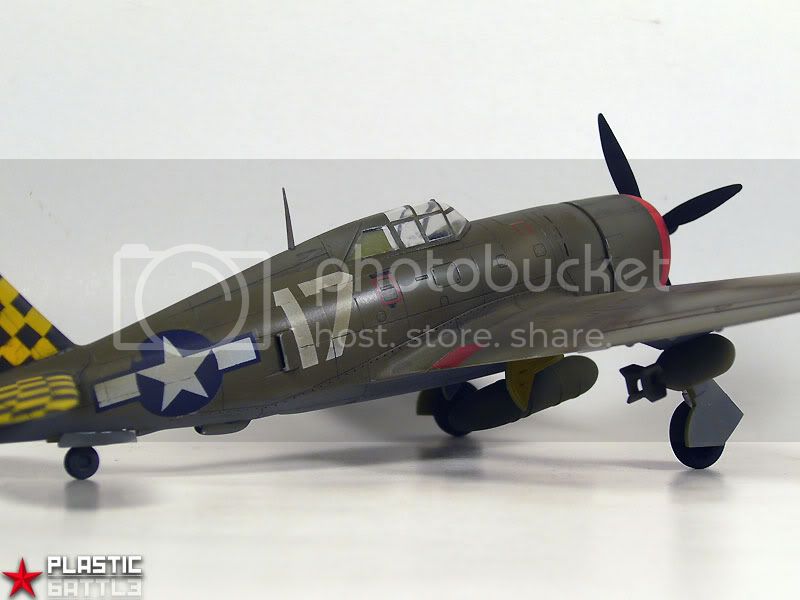
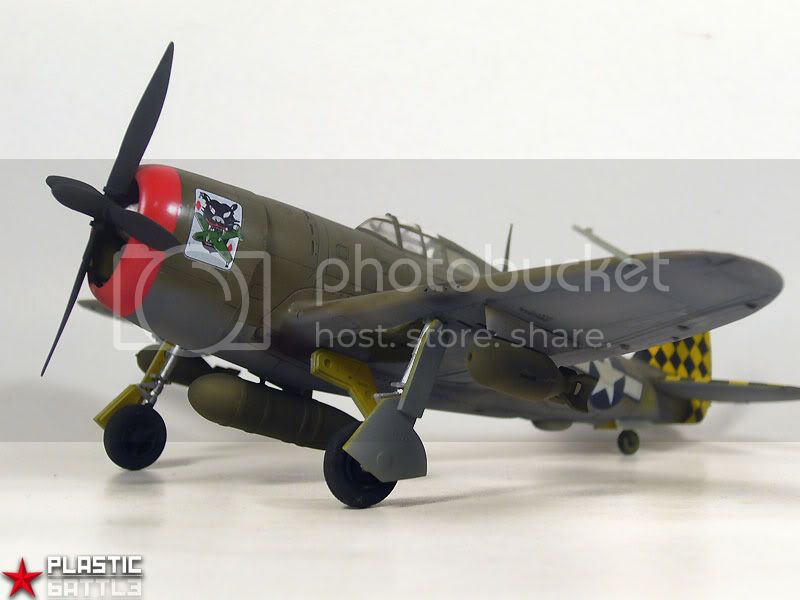
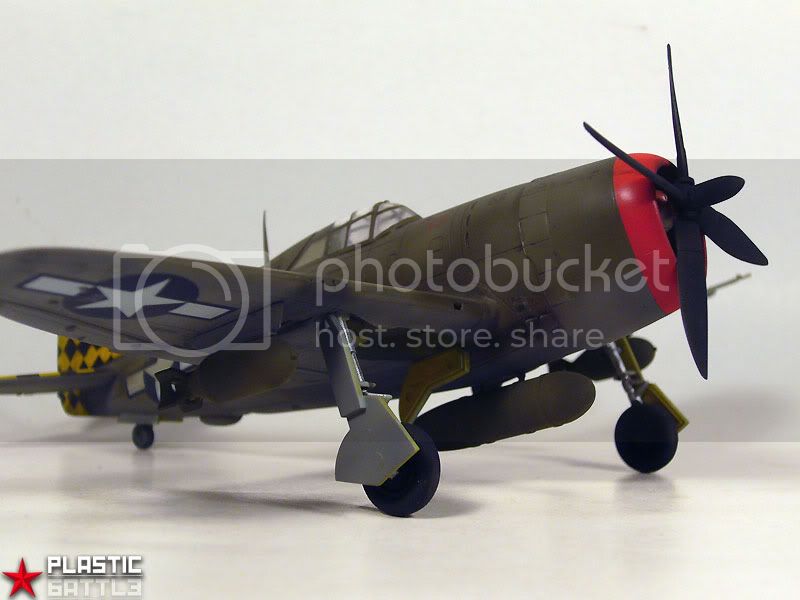
This is Academy P-47 in 1/72 scale.


atoplu
Joined: August 17, 2003
KitMaker: 753 posts
AeroScale: 174 posts
Posted: Tuesday, January 19, 2010 - 01:14 AM UTC
Some progress pictures.

atoplu
Joined: August 17, 2003
KitMaker: 753 posts
AeroScale: 174 posts
Posted: Tuesday, January 19, 2010 - 01:15 AM UTC
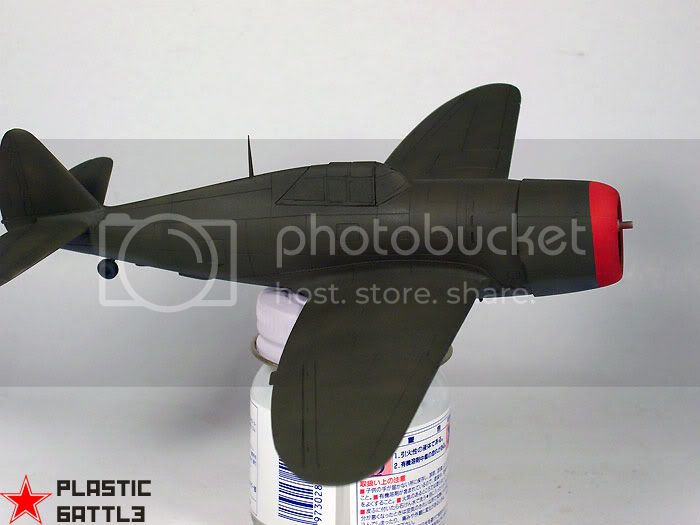
And finished.
thegirl
Joined: January 19, 2008
KitMaker: 6,743 posts
AeroScale: 6,151 posts
Posted: Tuesday, January 19, 2010 - 01:34 AM UTC
Looking really good Jaypee ! Also like your solution for painting the checkers on the wheels .
Ayhan , excellent build and a qiuck one ! Nice effect with the per-shading and weathering .
Man you guy's are turning out some fantastic builds here , lot's of jugs - always great to have !
As for me I'm falling behide on my build .........
Ayhan , excellent build and a qiuck one ! Nice effect with the per-shading and weathering .
Man you guy's are turning out some fantastic builds here , lot's of jugs - always great to have !
As for me I'm falling behide on my build .........

RedwingNev

Joined: February 07, 2004
KitMaker: 911 posts
AeroScale: 415 posts

Posted: Thursday, January 21, 2010 - 08:03 AM UTC
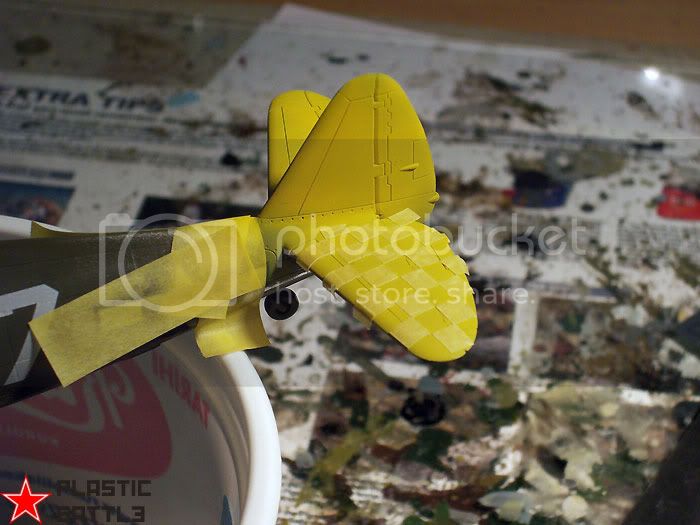
Ayhan, you didn't really hand mask those checks on the tail?
In 1/72??
 (Thats me, just thinking about that!)
In 1/72??
(Thats me, just thinking about that!)jaypee
Joined: February 07, 2008
KitMaker: 1,699 posts
AeroScale: 1,384 posts
Posted: Thursday, January 21, 2010 - 10:35 PM UTC
Wow! Is that even possible? I guess it is! Beautiful Ayhan.
When I grow up I want skills like that
Well I've been doing a little digging on the web for E7267. And it turns
out it had number codes on the underside. E7267 on each wing. Port wing
the tops of the codes face forward and stbd wing the codes face aft.
(unless the film is reversed!)
Neat huh? I may have to make some decals for this and do it in 1/48 some day
but for now it is a ruler and the trusty sharpie. Pics to follow. Or maybe
Removed by original poster on 01/24/10 - 22:24:38 (GMT).
kiwisoldier

Joined: January 29, 2007
KitMaker: 50 posts
AeroScale: 15 posts

Posted: Sunday, January 24, 2010 - 11:07 AM UTC
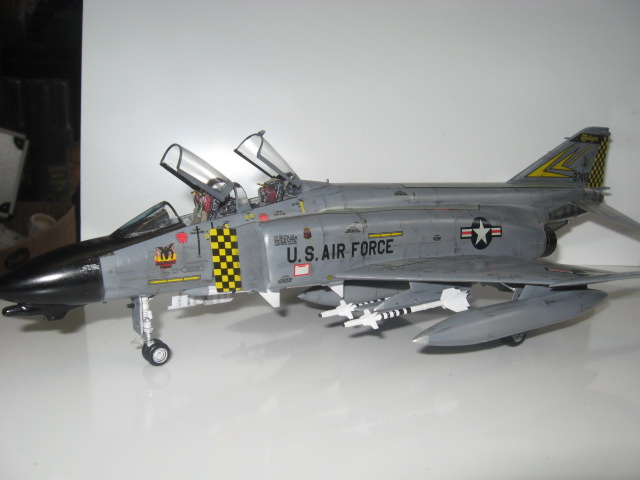
Just finished yesterday Hasegawa 1/48 F4/C Phantom 191st FIG Michigan ANG 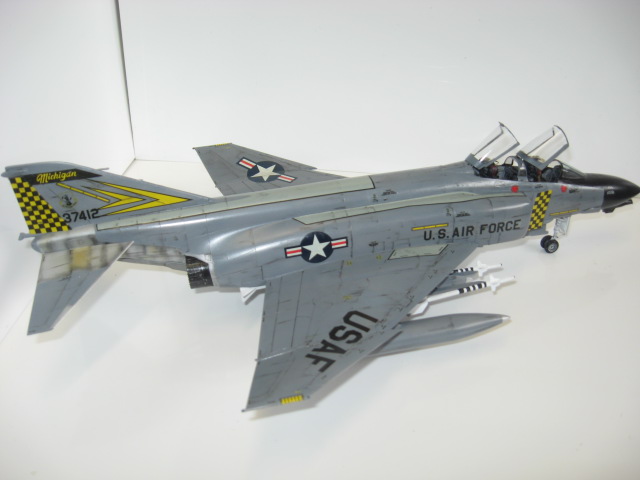
RedwingNev
Joined: February 07, 2004
KitMaker: 911 posts
AeroScale: 415 posts
Posted: Sunday, January 24, 2010 - 06:30 PM UTC
One of the best schemes ever worn by the Phantom!
thegirl
Joined: January 19, 2008
KitMaker: 6,743 posts
AeroScale: 6,151 posts
Posted: Wednesday, January 27, 2010 - 01:31 PM UTC
Awesome build Sean ! I really like the over all finish on this .
kiwisoldier
Joined: January 29, 2007
KitMaker: 50 posts
AeroScale: 15 posts
Posted: Wednesday, January 27, 2010 - 05:44 PM UTC
Thank you this was my first plane build for a while and this was what happened. This was an old Hasegawa kit with raised panel lines  so came up with using a Draftmans pen to hi-lite these then with a Q-tip dragged it across while he ink was wet.I'll try and find another kit to do as I'm hooked again.
so came up with using a Draftmans pen to hi-lite these then with a Q-tip dragged it across while he ink was wet.I'll try and find another kit to do as I'm hooked again. thegirl
Joined: January 19, 2008
KitMaker: 6,743 posts
AeroScale: 6,151 posts
Posted: Sunday, January 31, 2010 - 05:18 PM UTC
Glad to hear that you are hook again with aircraft Sean . What will your next project be ?
I have started the decaling on my build pic's to follow soon .....
How are the rest of you folks doing ?
I have started the decaling on my build pic's to follow soon .....
How are the rest of you folks doing ?
jaypee
Joined: February 07, 2008
KitMaker: 1,699 posts
AeroScale: 1,384 posts
Posted: Sunday, January 31, 2010 - 09:20 PM UTC
Dinnae ask! I will surely need to redo the struts and rigging, after an accident. Was putting the toolbox away in the dark and put it on top of the Camel! Grrr. Well at least this way I'll need to respray the wings, so I'll do the underside code letters right this time.
This is the fourth attempt at the struts.
1. The kit struts, horrible revell trench method, abandoned
2. Contrail struts. Good but picked an overscale size.
3. Contrail again. Right size but always felt a bit flimsy (esp when tool box set on top)
4. Hmmmm. I think I'll try cocktail sticks. I've sanded them into a rough aerofoil shape.
Look OK but I'll see how they take paint first as they are supposed to be white for this profile.
Fourth time lucky I hope. Looking forward to doing it right
Better to learn this on a £3 revell kit than something expensive takes the pressure off a bit.
Luckily I also have roundel left over from the se5a kit and some Almark ones too. I'll see which fits best.
I took the opportunity to break off the wings and set the dihedral correctly too.
So kinda glad it broke, perhaps some kind of Freudian slip.
"A Freudian slip is when you mean one thing but say your mother" lol
thegirl
Joined: January 19, 2008
KitMaker: 6,743 posts
AeroScale: 6,151 posts
Posted: Monday, February 01, 2010 - 02:05 PM UTC
Wow Jaypee that is a bummer . 4 times ....been there myself . Have you tried using chop-sticks , bamboo ones ? The spilt very easy and sand nicely and the grain is excellent for 72 - 48 scale and very strong .
thegirl
Joined: January 19, 2008
KitMaker: 6,743 posts
AeroScale: 6,151 posts
Posted: Monday, February 01, 2010 - 04:23 PM UTC
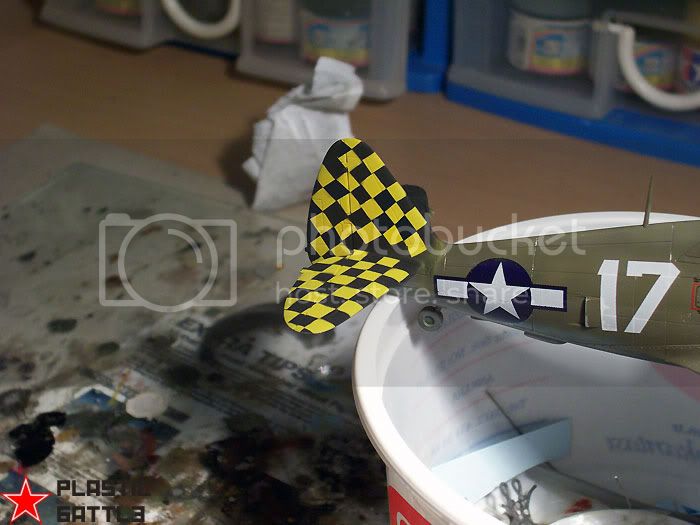
I guess I should show some up date pics hey !
Here is where I'm at at the moment . I didn't notice until today that on the nose checkes part of the white for the decals is missing , I did check the instruntions and no note saying that a band has to be painted . Same with the wing tip checkers so I mask off and sprayed some white . Tomorrow I can finish off with the decals and continue with the detail painting .


Here is where I'm at at the moment . I didn't notice until today that on the nose checkes part of the white for the decals is missing , I did check the instruntions and no note saying that a band has to be painted . Same with the wing tip checkers so I mask off and sprayed some white . Tomorrow I can finish off with the decals and continue with the detail painting .
 |

WEB HOSTING BY


Copyright ©2021 AeroScale and Kitmaker Network, a subsidiary of Silver Star Enterprises
All Rights Reserved. Please read our Conditions of Use and Privacy Policy.
All Rights Reserved. Please read our Conditions of Use and Privacy Policy.