

Air Campaigns
Want to start or join a group build? This is where to start.
Want to start or join a group build? This is where to start.
Hosted by Frederick Boucher, Michael Satin
Official BF 109 Campaign

EDC

Joined: January 16, 2006
KitMaker: 101 posts
AeroScale: 74 posts
Posted: Saturday, June 26, 2010 - 08:50 PM UTC
I actually made a start on my 109 this weekend, though not much progress to show for my efforts.

thegirl

Joined: January 19, 2008
KitMaker: 6,743 posts
AeroScale: 6,151 posts
Posted: Sunday, June 27, 2010 - 04:13 AM UTC
Hi Guy's !
Just had look at the numbers and we have 70 of us building away on our builds .
Damian , very nice ! Looking forward to the finishing touches
Matty , looking forward to your build .
Jason , very nice weathering job ! I'm I reading this right that you hand painted this build ? If so this is the best I have seen at this . Well done !
Grant , Your off to a good start . Which kit are you working on ? Looks like Hasegawa mouldings .....

werx07

Joined: February 21, 2010
KitMaker: 26 posts
AeroScale: 24 posts
Posted: Sunday, June 27, 2010 - 06:15 AM UTC
Quoted Text
Jason , very nice weathering job ! I'm I reading this right that you hand painted this build ? If so this is the best I have seen at this . Well done !
I just applied the filters with a brush. I wouldn't mess around with an airbrush if I could hand paint like that.

SGTJKJ

#041

Joined: July 20, 2006
KitMaker: 10,069 posts
AeroScale: 3,788 posts

Posted: Sunday, June 27, 2010 - 08:36 AM UTC
Great work, Damian. Very nice finish on your Me 109.
Nice weathering, Jason. What are the light spots on the wings and the cowling?
I have now made a little more progress on my Me 109F-4b. There are some obvious problems with the decals from Airfix. The white parts are very opaque, while the Kagero decals are solid white. The figure "1" is solid white while the cross is opaque. It looks a little bit strange, but hopefully some weathering can adjust that.
More to follow....


Siderius
Joined: September 20, 2005
KitMaker: 1,747 posts
AeroScale: 1,673 posts
Posted: Sunday, June 27, 2010 - 08:55 AM UTC
Jesper and Jason, great work both of you! I await to see your builds finished! Really enjoyed looking at your models. Russell 


AussieReg
#007

Joined: June 09, 2009
KitMaker: 8,156 posts
AeroScale: 3,756 posts
Posted: Sunday, June 27, 2010 - 02:48 PM UTC
Quoted Text
Good work D. Since I'm not a 109 guy either, what's that curb feeler on the port wing?
Cheers Mark.
I'm no expert(en), but I think there are 2 options for the purpose of the underwing doodad:
1: It's the hook used when Max is piloting the plane to pick up Professor Fate (best movie ever, The Great Race)
2: It's an antenna.
I'm sure somebody will set me straight and educate us both
Cheers, D


doubtingthomas
Joined: March 17, 2009
KitMaker: 156 posts
AeroScale: 153 posts
Posted: Monday, June 28, 2010 - 05:52 AM UTC
Damian & Jason - That's some great painting you guys are doing. Can't wait to see the finished products.
I should be able to get back to my 109 in a few days. I'm currently "all in" to finish a Ju88 for Aces High 2 by this week's deadline.
I should be able to get back to my 109 in a few days. I'm currently "all in" to finish a Ju88 for Aces High 2 by this week's deadline.

akhilleus
Joined: January 28, 2003
KitMaker: 28 posts
AeroScale: 27 posts
KitMaker: 28 posts
AeroScale: 27 posts
Posted: Tuesday, June 29, 2010 - 06:49 AM UTC
Nice works guys ! And here is mine;


She will be Franz Von Werra's Bf 109. Next step ; decalling.
See you soon
She will be Franz Von Werra's Bf 109. Next step ; decalling.
See you soon
AussieReg
#007
Joined: June 09, 2009
KitMaker: 8,156 posts
AeroScale: 3,756 posts
Posted: Wednesday, June 30, 2010 - 01:07 AM UTC
That is a superb paint job Rahmi, very well done indeed !!
Cheers, D
Cheers, D
thegirl
Joined: January 19, 2008
KitMaker: 6,743 posts
AeroScale: 6,151 posts
Posted: Wednesday, June 30, 2010 - 02:45 AM UTC
Quoted Text
That is a superb paint job Rahmi, very well done indeed !!
Cheers, D
I will second that ! Very nice paint work
akhilleus
Joined: January 28, 2003
KitMaker: 28 posts
AeroScale: 27 posts
KitMaker: 28 posts
AeroScale: 27 posts
Posted: Wednesday, June 30, 2010 - 06:24 AM UTC
Thanks a lot Damian & Terri
werx07
Joined: February 21, 2010
KitMaker: 26 posts
AeroScale: 24 posts
Posted: Wednesday, June 30, 2010 - 05:43 PM UTC
Looks great Rahmi, the paint is very well done.
Here's the finished product. There's things that I would have done differently but overall I'm pretty happy with how it turned out.
URL=http://img63.imageshack.us/i/75860819.jpg/] [/URL]


Here's the finished product. There's things that I would have done differently but overall I'm pretty happy with how it turned out.
URL=http://img63.imageshack.us/i/75860819.jpg/]
[/URL]


Matty_K

Joined: January 31, 2010
KitMaker: 103 posts
AeroScale: 71 posts
Posted: Thursday, July 01, 2010 - 10:52 AM UTC
I just started my build on the Bf 109 D by shooting some RLM 02 and RLM 70 for the prop - nothing spectacular.
To have a kind of a motivating first success, I already finished the parts of the prop including the spinner for later assembly.

Cheers
Matty
To have a kind of a motivating first success, I already finished the parts of the prop including the spinner for later assembly.
Cheers
Matty
thegirl
Joined: January 19, 2008
KitMaker: 6,743 posts
AeroScale: 6,151 posts
Posted: Friday, July 02, 2010 - 02:44 AM UTC
Jason , your project turn turned out great ! Nice attention to the details
Matty , your off to a good start . Looking forward to more
Matty , your off to a good start . Looking forward to more

eagledoc2000
Joined: August 03, 2003
KitMaker: 34 posts
AeroScale: 22 posts
Posted: Friday, July 02, 2010 - 09:57 AM UTC
Siderius - Russell
I see only one of the photos in any of the posts you have entered. i would love to see your work.
Everyone else - great work!
I see only one of the photos in any of the posts you have entered. i would love to see your work.
Everyone else - great work!
Siderius
Joined: September 20, 2005
KitMaker: 1,747 posts
AeroScale: 1,673 posts
Posted: Sunday, July 04, 2010 - 06:11 AM UTC
Thank you for the kind words David. If you go to my posting and click on photos it will take you to a gallery of images of my work. Hope you enjoy it. I will post a couple more shots of the 109 here for you to look at. Again, thank you. Russell

AussieReg
#007
Joined: June 09, 2009
KitMaker: 8,156 posts
AeroScale: 3,756 posts
Posted: Sunday, July 04, 2010 - 02:44 PM UTC
Well I'm calling this one DONE !! I was hoping to have it finished a week ago, but you all know how work and family can interupt things
Anyway, This is by far the most detailed build I have undertaken in my short career, and I'm happy with the results. The kit went together really well, and the extra detailing time I spent on the build was all great fun. I have tried a few new techniques that will certainly be carried over to future builds.
Here are couple of pics, I will post some better shots a bit later.


Thanks for an excellent campaign Terri, and well done to all those contributing here, your work has inspired me on this build !!
Cheers, D
Anyway, This is by far the most detailed build I have undertaken in my short career, and I'm happy with the results. The kit went together really well, and the extra detailing time I spent on the build was all great fun. I have tried a few new techniques that will certainly be carried over to future builds.
Here are couple of pics, I will post some better shots a bit later.
Thanks for an excellent campaign Terri, and well done to all those contributing here, your work has inspired me on this build !!
Cheers, D
Siderius
Joined: September 20, 2005
KitMaker: 1,747 posts
AeroScale: 1,673 posts
Posted: Sunday, July 04, 2010 - 03:05 PM UTC
Damian, great, great job. A fine looking addition to your collection. Russell
thegirl
Joined: January 19, 2008
KitMaker: 6,743 posts
AeroScale: 6,151 posts
Posted: Sunday, July 04, 2010 - 05:25 PM UTC
Damian , you did one hell of an excellent job on your 109 !
Well done my friend
I did get the uderside of my 109 painted with it's light blue and is drying right now . Other then that not much has been done . Will have pic's up very soon ......
Well done my friend
I did get the uderside of my 109 painted with it's light blue and is drying right now . Other then that not much has been done . Will have pic's up very soon ......
AussieReg
#007
Joined: June 09, 2009
KitMaker: 8,156 posts
AeroScale: 3,756 posts
Posted: Sunday, July 04, 2010 - 08:27 PM UTC
Thanks guys. I'm having one of those moments where you sit and just stare at your finished build. Pick it up, turn it over, wonder what if I did this or that ? Put it back down and just stare at it. I've got a club meet tomorrow night, and one of the guys there is a guru with the camera, so hopefully over the next few days I'll have some better pics.
I'm off now to stare a bit more, and maybe fit the glass to my P-61 for "Pin Ups"
Cheers, D
I'm off now to stare a bit more, and maybe fit the glass to my P-61 for "Pin Ups"
Cheers, D
Matty_K
Joined: January 31, 2010
KitMaker: 103 posts
AeroScale: 71 posts
Posted: Tuesday, July 06, 2010 - 11:09 AM UTC
Hi Damian,
Congrats to your excellent build, I know what you feel - chapeau!
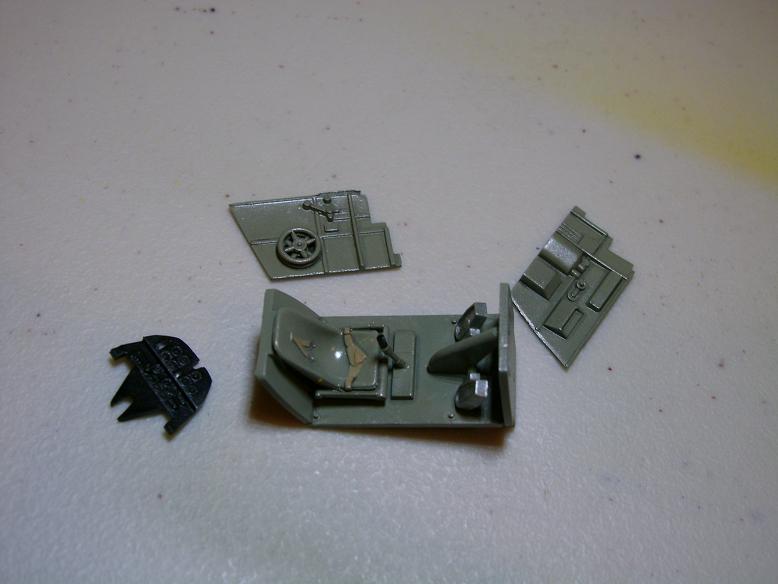
Just a small update on my Bf 109 D build. The cockpit is close to assembly now.
In parallel I have glued and sanded the wing halves. Dry-fitting showed that the wings profile should be a little wider to get a quite good fit to the fuselage. Some sprue (as a spreader) worked well.

Cheers
Matty
Congrats to your excellent build, I know what you feel - chapeau!
Just a small update on my Bf 109 D build. The cockpit is close to assembly now.
In parallel I have glued and sanded the wing halves. Dry-fitting showed that the wings profile should be a little wider to get a quite good fit to the fuselage. Some sprue (as a spreader) worked well.
Cheers
Matty

Ruffus

Joined: April 12, 2005
KitMaker: 343 posts
AeroScale: 111 posts

Posted: Tuesday, July 06, 2010 - 01:43 PM UTC
Hey!! Jaypee, looking good!!
Byron
Byron

SGTJKJ
#041
Joined: July 20, 2006
KitMaker: 10,069 posts
AeroScale: 3,788 posts
Posted: Wednesday, July 07, 2010 - 03:42 AM UTC
Great build, Jason. A real nice 109. The camouflage looks great.
Damian, excellent result. I also spend a few minutes looking at your pictures. Really nice work - one of your best builds and that says a lot.
I have run into some problems with my own 109. The Airfix decals or the solvent on the decals have in some way reacted with my weathering and/or matt varnish coat. This leaves a flurry white residue on the decal edges especially on the wing. I am at a loss how to correct this. Any suggestions?
Other than that I just need to fit a few details like antennas etc. and correct a few mistakes around the cockpit glazing.
AussieReg
#007
Joined: June 09, 2009
KitMaker: 8,156 posts
AeroScale: 3,756 posts
Posted: Wednesday, July 07, 2010 - 02:52 PM UTC
Matty K and Jesper, thanks for your comments. Praise from you guys is high praise indeed !!
Cheers, D
Cheers, D
Siderius
Joined: September 20, 2005
KitMaker: 1,747 posts
AeroScale: 1,673 posts
Posted: Wednesday, July 07, 2010 - 03:27 PM UTC
Jesper, I wonder if you had a reaction with the softening or setting solution and the clear coat? Try using a little bit of ammonia on the effected areas and see if that helps. Russell
Take a paper towel and dip it into the ammonia, then gently rub over the areas. See if that helps you any.
Take a paper towel and dip it into the ammonia, then gently rub over the areas. See if that helps you any.
 |

WEB HOSTING BY


Copyright ©2021 AeroScale and Kitmaker Network, a subsidiary of Silver Star Enterprises
All Rights Reserved. Please read our Conditions of Use and Privacy Policy.
All Rights Reserved. Please read our Conditions of Use and Privacy Policy.