AussieReg
 Associate Editor
#007
Victoria, Australia
Joined: June 09, 2009
KitMaker: 8,156 posts
AeroScale: 3,756 posts
Posted: Friday, August 06, 2010 - 11:11 AM UTC
Quoted Text
@ Damian - that's superb . your best yet on Aeroscale I reckon !
Many thanks Neil, I appreciate the feedback, and I'm sure it's my best build yet. It was a great kit to put together and that makes it much easier to put in the extra effort in the details.
Cheers, D
ON the bench
Revell 1/24 '53 Corvette (building as '54)
Revell 1/24 BMW 507 Coupe and Cabrio
Italeri 1/48 Me262 B-1a/U1 Nightfighter
Monogram 1/24 '57 Chevy Nomad
Dragon 1/350 USS Frank Knox DD-742
Alberta, Canada
Joined: January 19, 2008
KitMaker: 6,743 posts
AeroScale: 6,151 posts
Posted: Saturday, August 07, 2010 - 03:16 AM UTC
LOL , Eetu . Been there myself ! Nice detailing to the radio wire leads . Looking forward to some colour added .........

Merlin
Senior Editor #017
United Kingdom
Joined: June 11, 2003
KitMaker: 17,582 posts
AeroScale: 12,795 posts
Posted: Sunday, August 08, 2010 - 01:22 AM UTC
Hi there
I've had to drop out of the campaign; with so little time free for modelling at the moment and being committed to a big review build, there's just no realistic chance that I can meet the deadline. I'll carry on with my build as and when I get the opportunity and post pics as a feature when it's finished.
All the best
Rowan

BEWARE OF THE FEW...
As I grow older, I regret to say that a detestable habit of thinking seems to be getting a hold of me. - H. Rider Haggard
Uusimaa, Finland
Joined: March 30, 2004
KitMaker: 2,845 posts
AeroScale: 1,564 posts
Posted: Sunday, August 08, 2010 - 03:18 AM UTC
Quoted Text
LOL , Eetu . Been there myself ! Nice detailing to the radio wire leads . Looking forward to some colour added .........
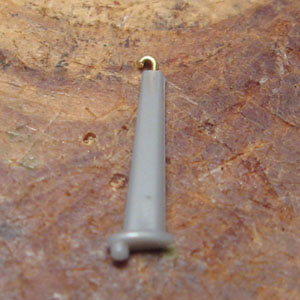
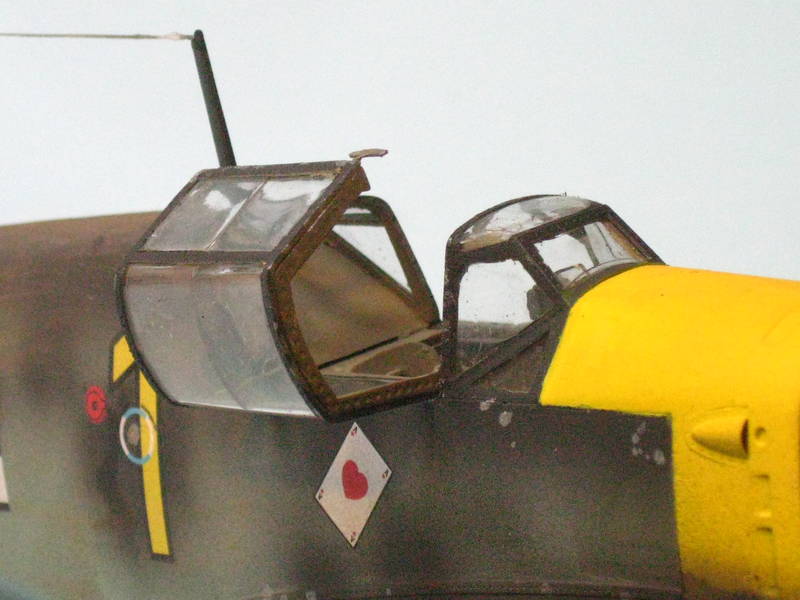
Thanks. Actually that's for the canopy wire, but I'll be definately making same kind of tensioning springs for the antenna wire too.

Here it is, glued in place to a hole drilled in the canopy rear section:
Oh btw, don't use that photo of the antenna mast in my previous for reference, as it turned out I glued the wire hook facing the wrong way. Found that out when I was about to glue the mast to the canopy. Fortunately I got the hook removed and re-attached neatly without breaking the styrene mast.
JPTRR
Managing Editor #051
Tennessee, United States
Joined: December 21, 2002
KitMaker: 7,772 posts
AeroScale: 3,175 posts
Posted: Sunday, August 08, 2010 - 05:28 PM UTC
Hi Everyone,
I have started the gallery for your 109s. It is not in the traditional gallery format as the gallery is being taxed to the max with all pix. Instead I will do it as a feature.
I will need the pix from you of your completed entries sent my way when they are ready.
Looking forward to it!

If they demand your loyalty, give them integrity; if they demand integrity, give them your loyalty.--Col John Boyd, USAF
Any plan where you lose your hat is a bad plan.
Alberta, Canada
Joined: January 19, 2008
KitMaker: 6,743 posts
AeroScale: 6,151 posts
Posted: Monday, August 09, 2010 - 03:44 AM UTC
Quoted Text
Hi there
I've had to drop out of the campaign; with so little time free for modelling at the moment and being committed to a big review build, there's just no realistic chance that I can meet the deadline. I'll carry on with my build as and when I get the opportunity and post pics as a feature when it's finished.
All the best
Rowan
So we have a desserter on our hands , send out the hounds !!!
No worries Rowan . I know you are very busy with reviews and submissions . I just wonder how and when you find time to sleep !
Alberta, Canada
Joined: January 19, 2008
KitMaker: 6,743 posts
AeroScale: 6,151 posts
Posted: Monday, August 09, 2010 - 03:49 AM UTC
Quoted Text
Hi Everyone,
I have started the gallery for your 109s. It is not in the traditional gallery format as the gallery is being taxed to the max with all pix. Instead I will do it as a feature.
I will need the pix from you of your completed entries sent my way when they are ready.
Looking forward to it!
Wow , turned into a feature ! how cool is that . Thanks Fred !
#041
Kobenhavn, Denmark
Joined: July 20, 2006
KitMaker: 10,069 posts
AeroScale: 3,788 posts
Posted: Monday, August 09, 2010 - 04:42 AM UTC
Quoted Text
@ Jesper - great looking Airfix Friedrich - your 'problems' don't detract from the quality of the build and the paint job !
Thanks a lot. Appreciate it, Neil.
Eetu, the level of detail is fantastic!! That is going to be one great build!
Frederick, can you take the pictures from the campaign tread or should we send you pictures by email?
Campaign'oholic - 252+ campaigns completed
Ontario, Canada
Joined: March 25, 2010
KitMaker: 514 posts
AeroScale: 244 posts
Posted: Monday, August 09, 2010 - 06:08 AM UTC
I have been unable to upload new photos of my build, though I do have them ready to transfer from camera. Thus a text update. Kit which is an Otaki is completed with tall tail installed. Obtained from spares, had to judiciously work to get tail to mate with fuselage,dropped flaps as well. Painted with a combo of mm and gunse, applied German markings and going to over paint them and add Italian.Using kit decals along with aeromaster. Will get photos uploaded soon
#041
Kobenhavn, Denmark
Joined: July 20, 2006
KitMaker: 10,069 posts
AeroScale: 3,788 posts
Posted: Monday, August 09, 2010 - 09:18 AM UTC
Sounds interesting, Trevor. Will be good to see how you managed the tail.
Looking forward to see the pictures.
Campaign'oholic - 252+ campaigns completed
Uusimaa, Finland
Joined: March 30, 2004
KitMaker: 2,845 posts
AeroScale: 1,564 posts
Posted: Tuesday, August 10, 2010 - 04:49 AM UTC
Quoted Text
Eetu, the level of detail is fantastic!! That is going to be one great build!
Thanks!
With these new exhaust shields done, I think there's just the diagonal canopy handles and cockpit UV lights to add.

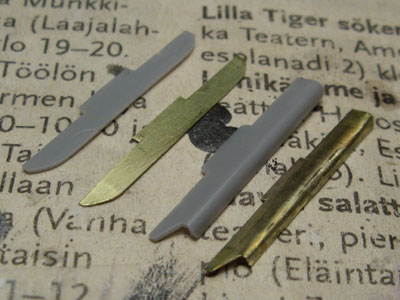
Left-over PE frets provided the metal, while the kit parts were used as templates for the shapes.
Now I finally got everything (minus the canopy) primed!
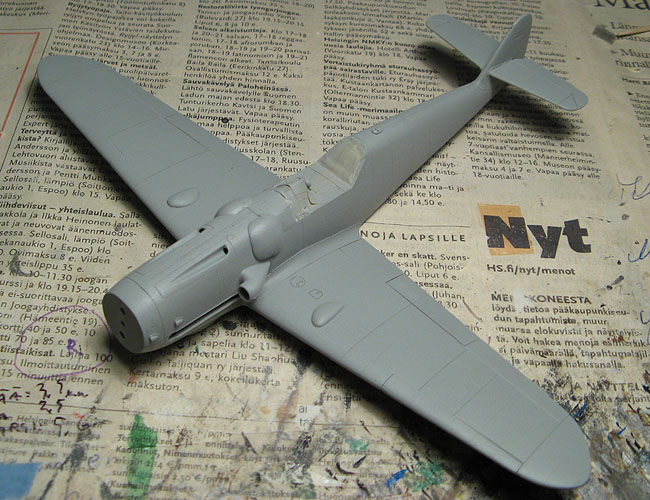
With the affordable supply of Mr. Surfacer cut (tightened international shipping regulations...

), I resorted to another brand of regular grey spray paint I've found to perform somewhat similarly compared to Surfacer (not utterly flat finish, fast drying time, good leveling qualities). Though this time the finish turned out a bit grainy and flatter than usual because I had to keep the coats light & neat in order to avoid filling the delicate rivet details.

But certainly nothing careful buffing and sanding with fine grade sanding sticks couldn't fix.
Next stop: preshading!
England - North East, United Kingdom
Joined: May 22, 2008
KitMaker: 649 posts
AeroScale: 434 posts
Posted: Thursday, August 12, 2010 - 12:49 AM UTC
My entry will be Revell's 1/72 G10. It will be a quick no frills build, no etch, no extras, just purely oob.
[url=http://gallery.kitmaker.net/showphoto.php/photo/343143]

[/url
hope the link thing works!
thanks
Mike
England - North East, United Kingdom
Joined: May 22, 2008
KitMaker: 649 posts
AeroScale: 434 posts
Posted: Thursday, August 12, 2010 - 12:50 AM UTC
try the link again!
Alberta, Canada
Joined: January 19, 2008
KitMaker: 6,743 posts
AeroScale: 6,151 posts
Posted: Thursday, August 12, 2010 - 04:05 AM UTC
Saving the trees from the PE parts do come in handy at times !
Looking forward to the camo .
Looks like you are having trouble with the link Mike . Wish I was able to aid you with it but I don't even know hao to do it myself .......you know being blonde and all .........Some will here will be able to give you hand with it .
England - North East, United Kingdom
Joined: May 22, 2008
KitMaker: 649 posts
AeroScale: 434 posts
Posted: Thursday, August 12, 2010 - 08:35 AM UTC
Nothing wrong with being blonde lol! Anyway the second link worked, as in it takes you to the pic rather than the pic appearing here, I suppose that something! More pics to follow soon.
I'm currently trying to decipher Revell's painting instructions and work out what RLM no's the top colours are. The paint mixes are Greenish Grey 60% + Matt Earth 40% and Lake Green 90% + Tank Grey 10%. I'm wondering if that means RLM 81 and RLM 82 but I'm not sure!
thanks
Mike
bill_c
Campaigns Administrator New Jersey, United States
Joined: January 09, 2008
KitMaker: 10,553 posts
AeroScale: 1,198 posts
Posted: Thursday, August 12, 2010 - 09:29 AM UTC
Alberta, Canada
Joined: January 19, 2008
KitMaker: 6,743 posts
AeroScale: 6,151 posts
Posted: Thursday, August 12, 2010 - 11:29 AM UTC
No Bill , you do not get a ribbon
(LOL)
Very nice build Bill , the weathering looks great !
Speaking of ribbons it has been up loaded on to the campaign page .
And just a reminder to send the pic's of your final build to Frederick Boucher who be turning this into a feature .
We have 72 folks who have signed up for this so far , Wow that is alot of us building the 109 .
PS , Yes Bill you get a ribbon !
bill_c
Campaigns Administrator New Jersey, United States
Joined: January 09, 2008
KitMaker: 10,553 posts
AeroScale: 1,198 posts
Posted: Friday, August 13, 2010 - 04:48 AM UTC
Thanks, Terri, I'm really happy to have my first Aeroscale campaign ribbon!
England - North East, United Kingdom
Joined: May 22, 2008
KitMaker: 649 posts
AeroScale: 434 posts
Posted: Friday, August 13, 2010 - 05:21 AM UTC
I got the camou sorted - it is RLM81/82. Its currently drying off after having its top coat of RLM82, I have already done the underside RLM76. This link is it built, primed and ready for painting. I will do another pic once all the main colours are done.

Florida, United States
Joined: March 01, 2008
KitMaker: 529 posts
AeroScale: 340 posts
Posted: Friday, August 13, 2010 - 11:36 AM UTC
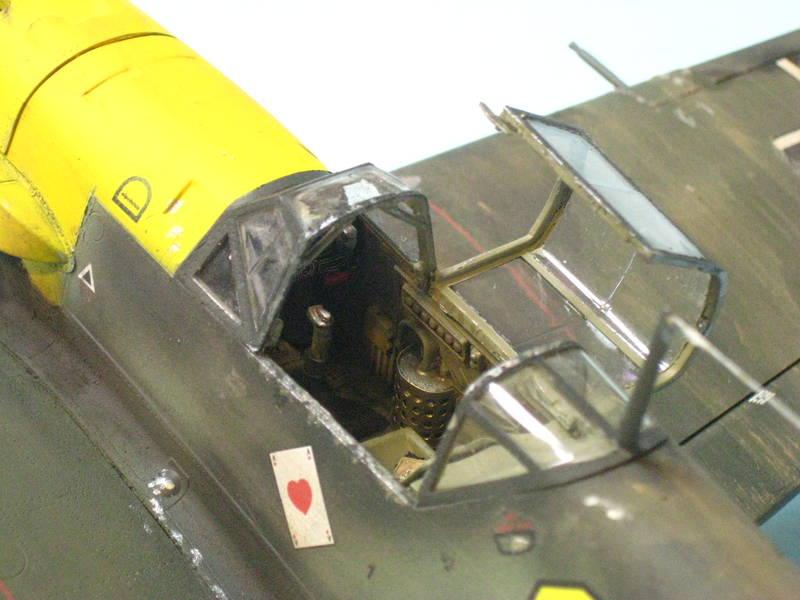
@Eetu: great progress, your eye for detail and skills in scratch building never seizes to amaze me. I can not wait to see this gem in the painting phase!
@Bill: Fine looking Emil!! Stunning paint work and weathering.
@Terri: I'll try to compile my photos as I wasn't too happy with those that I posted. It's just that life has gotten really complicated due to medical issues with a close family member.
Cheers,
Hermann.
Current projects:
Revell F-15E (1:48)
bill_c
Campaigns Administrator New Jersey, United States
Joined: January 09, 2008
KitMaker: 10,553 posts
AeroScale: 1,198 posts
Posted: Friday, August 13, 2010 - 11:50 AM UTC
Thanks, Hermann!
New South Wales, Australia
Joined: March 09, 2006
KitMaker: 248 posts
AeroScale: 160 posts
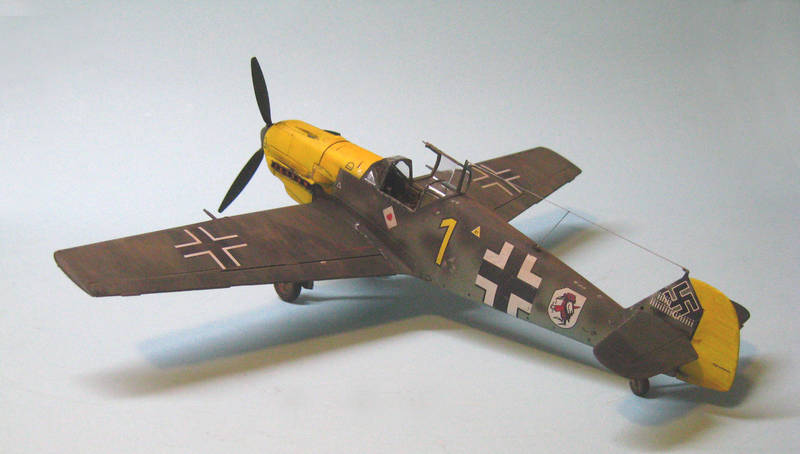
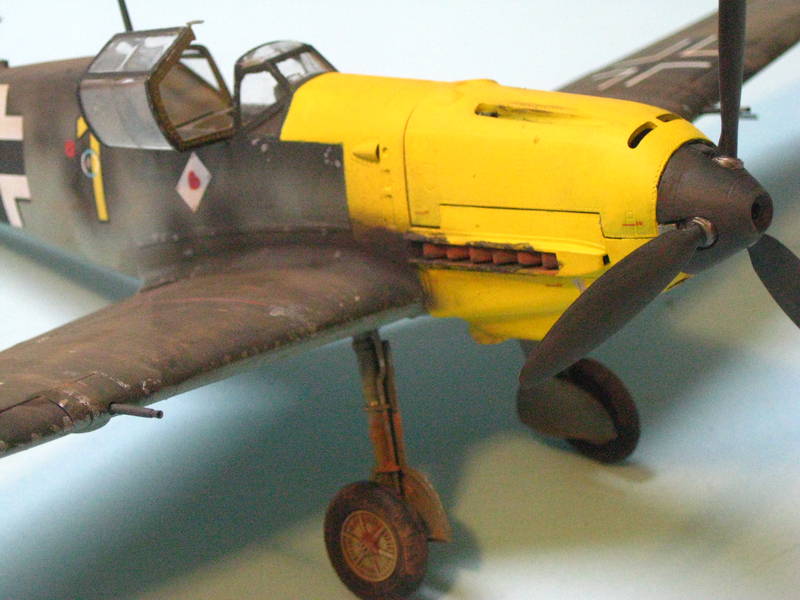
Posted: Friday, August 13, 2010 - 10:53 PM UTC
Hi all,
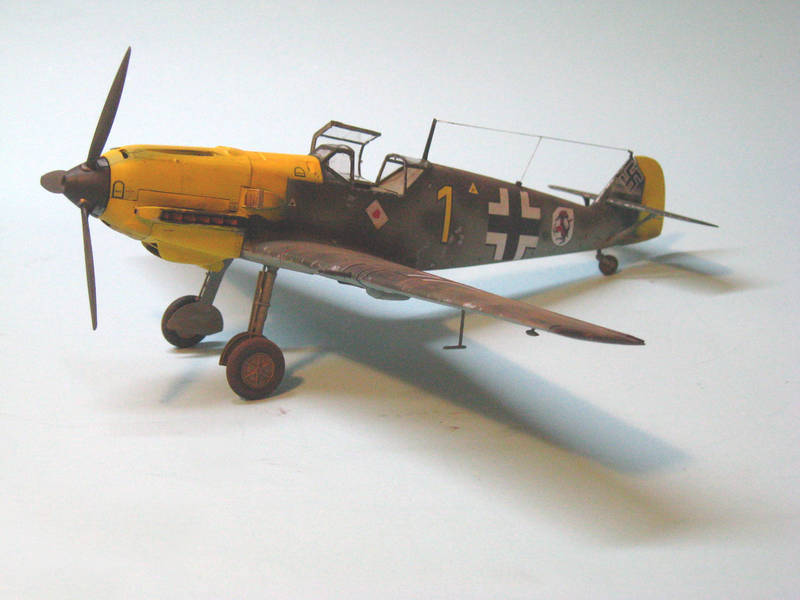
I'm Back with my finished 109:
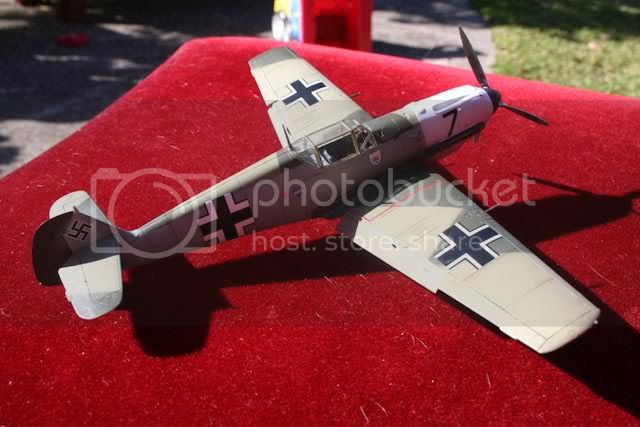
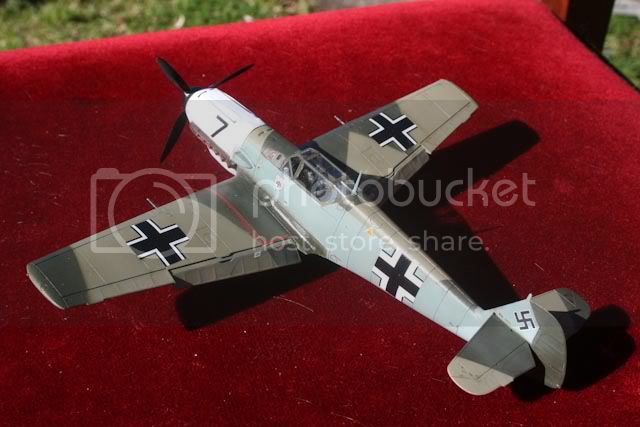
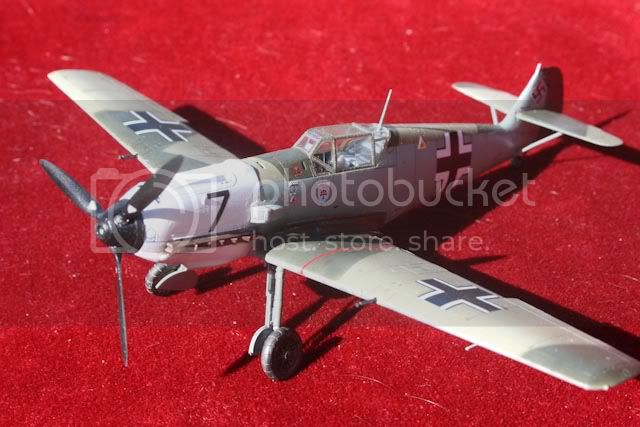
Cheers,
Mark
On the Workbench:
1/48 Academy P-38L (Pin ups II Campaign)
1/35 Dragon King Tiger
Uusimaa, Finland
Joined: March 30, 2004
KitMaker: 2,845 posts
AeroScale: 1,564 posts
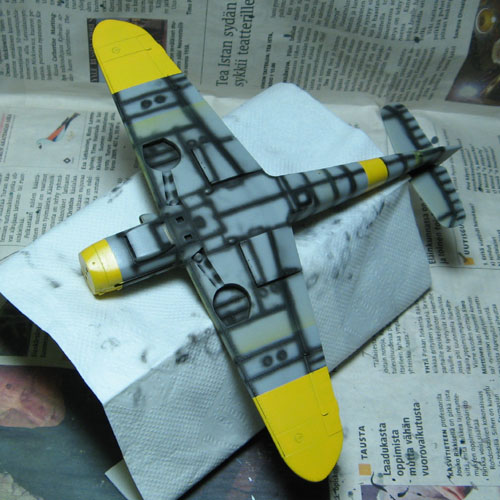
Posted: Sunday, August 15, 2010 - 01:40 AM UTC
Painting underway. Preshading and the yellow areas done.
Alberta, Canada
Joined: January 19, 2008
KitMaker: 6,743 posts
AeroScale: 6,151 posts
Posted: Sunday, August 15, 2010 - 02:20 AM UTC
Very nice job done on your build Mark .
Your project is coming along very well Eetu , wish I could say the same for my build . Still at that painting stage
England - North East, United Kingdom
Joined: May 22, 2008
KitMaker: 649 posts
AeroScale: 434 posts
Posted: Sunday, August 15, 2010 - 05:27 AM UTC
I've finished my build. I'm reasonably happy with it, as I stated its totally oob and just meant as a quick practice build.
So its Revell's 1/72 ME109G-10, I have used Vallejo model air paints from their Luftwaffe set and added swastikas by Aeroscale.
The first link is the kit with its camou done ready for gloss varnish and decals. The second link is the finished model.
I have another one of these to do and will be buying the quickboost prop/spinner and tail wheel/supercharger intake. Even so i hope my build proves you can make a nice neat model from this good starting point of a kit.
thanks
Mike