

Hi All
Great builds so far; very inspiring.
I was hoping to have my AV/8B+ started by now but I have been unable to get some of the paint shades I need in my preferred brand. There's a little way to go yet so will see how I go in the next month, if nothing then I'll change my build.
Cheers
Wiz
Air Campaigns
Want to start or join a group build? This is where to start.
Want to start or join a group build? This is where to start.
Hosted by Frederick Boucher, Michael Satin
OFFICIAL: CAS (Close Air Support)

wizard179

Joined: January 27, 2006
KitMaker: 251 posts
AeroScale: 179 posts
Posted: Sunday, October 31, 2010 - 08:54 PM UTC

KrisMax
Joined: January 23, 2010
KitMaker: 156 posts
AeroScale: 139 posts
Posted: Sunday, October 31, 2010 - 10:23 PM UTC
Leo & Damian - I like the camo which you've applied very well. How did you mask?
I had a couple of delays on the Il-2 - first I finished building a display cabinet I've been working on for a few weeks - no more room in the old dingy cupboard. Second, finance dept approved purchase of an Iwata airbrush and I had to wait a few days for that. Here's progress to date.
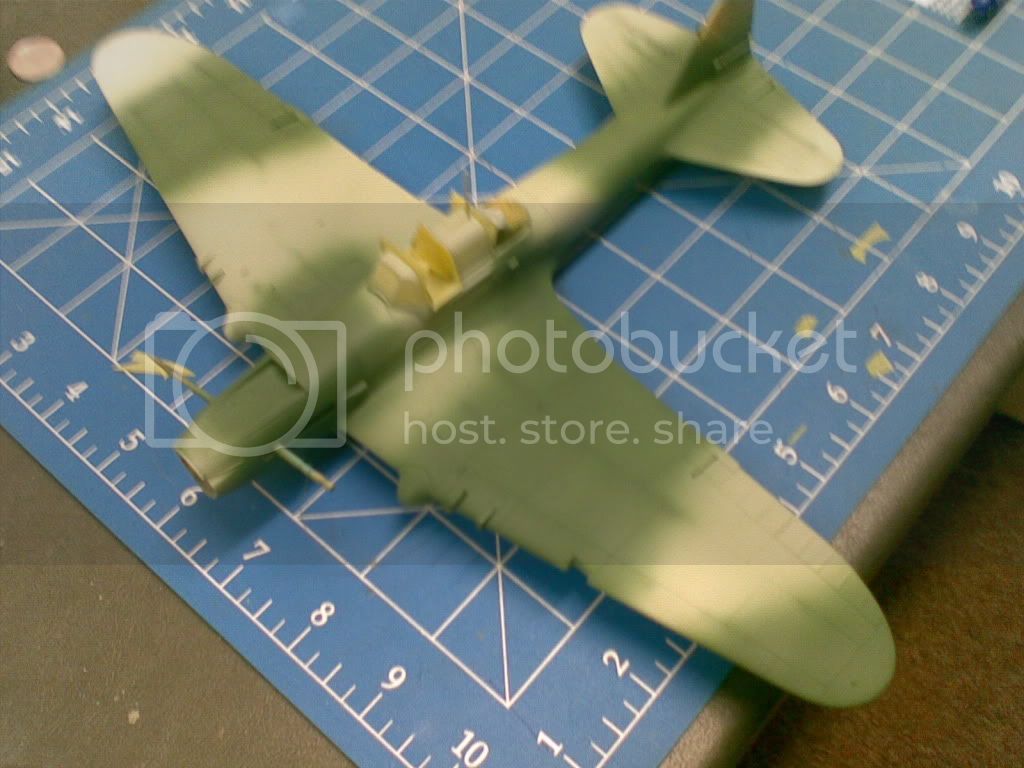
I've applied the first of three camo colours, but due to ignorance on cleaning this type of airbrush, finish is not great, so I'm about to do some sanding to smooth off the lumps and bumps befoe respraying. Patience.......
Simon
PS - still on the phone camera so photo cr*p, sorry.
I had a couple of delays on the Il-2 - first I finished building a display cabinet I've been working on for a few weeks - no more room in the old dingy cupboard. Second, finance dept approved purchase of an Iwata airbrush and I had to wait a few days for that. Here's progress to date.
I've applied the first of three camo colours, but due to ignorance on cleaning this type of airbrush, finish is not great, so I'm about to do some sanding to smooth off the lumps and bumps befoe respraying. Patience.......
Simon
PS - still on the phone camera so photo cr*p, sorry.
Rebilda

#057

Joined: May 11, 2010
KitMaker: 248 posts
AeroScale: 123 posts

Posted: Monday, November 01, 2010 - 05:29 AM UTC
Hi Simon. No masking, I just applied the sceme freehand. And i also use Iwatas. This job i did with the biggest, a CRI, which has a conical 0.3 needle-nose-combo. So nothing fancy - exept than being the best airbrush ever made for scale modellers!! I got a 0.25 and an 0.15, too, but those I use for special tecniques, seldomly for base coats/camo.
Which brings me to your problem: your gun is fine and you probably did clean it well enough (just use a soft brush on the cup and blast through a few cuploads of cleaning fluid at maximum pressure).
It looks as if you didn't thin down your pain well enough and/or sprayed at the wrong pressure.
This is what I do: Tamiya acrylics (thinned with laquer thinner and only laquer thinner!!!!!) or Gunze (thinned with green label Gunze thinner) thinned down to almost watery consitence sprayed at 0.8 to 1.1 bar (which is 20 to 30 PSI, I think).
Before i commit paint to model I try out my paint-thinner ratio on my test bed(an old Messerschmidt). If you get ''gritty appearance'' thin more, if you get runners or ''splotches'' add more paint. If ''almost there but not quite'' rather play a little with air pressure than with paint-thinner ratio.


AussieReg
#007
Joined: June 09, 2009
KitMaker: 8,156 posts
AeroScale: 3,756 posts
Posted: Monday, November 01, 2010 - 07:49 AM UTC
Hi SImon. Like Leo, I did my camo freehand. I have a Paasche H single action airbrush so I can't get down to the really fine lines of a double action. I used Gunze acrylics for the tan and medium green, and Tamiya Black Green XF-27 for the dark green. I thinned the paint using Mr Hobby Aqueous Thinner 110 for the Gunze and Tamiya Acrylic Thinner for the Tamiay, about 60:40 Thinner:Paint ratio, perhaps even a little more thinner, and turned the compressor right down to about 10-15psi. I start by SLOWLY doing the outer lines of the areas I want to colour, then broaden the pattern a bit and fill the area.
Hope this helps. Cheers, D
Hope this helps. Cheers, D

AussieReg
#007
Joined: June 09, 2009
KitMaker: 8,156 posts
AeroScale: 3,756 posts
Posted: Monday, November 01, 2010 - 11:19 AM UTC
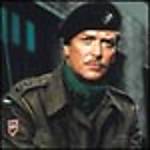
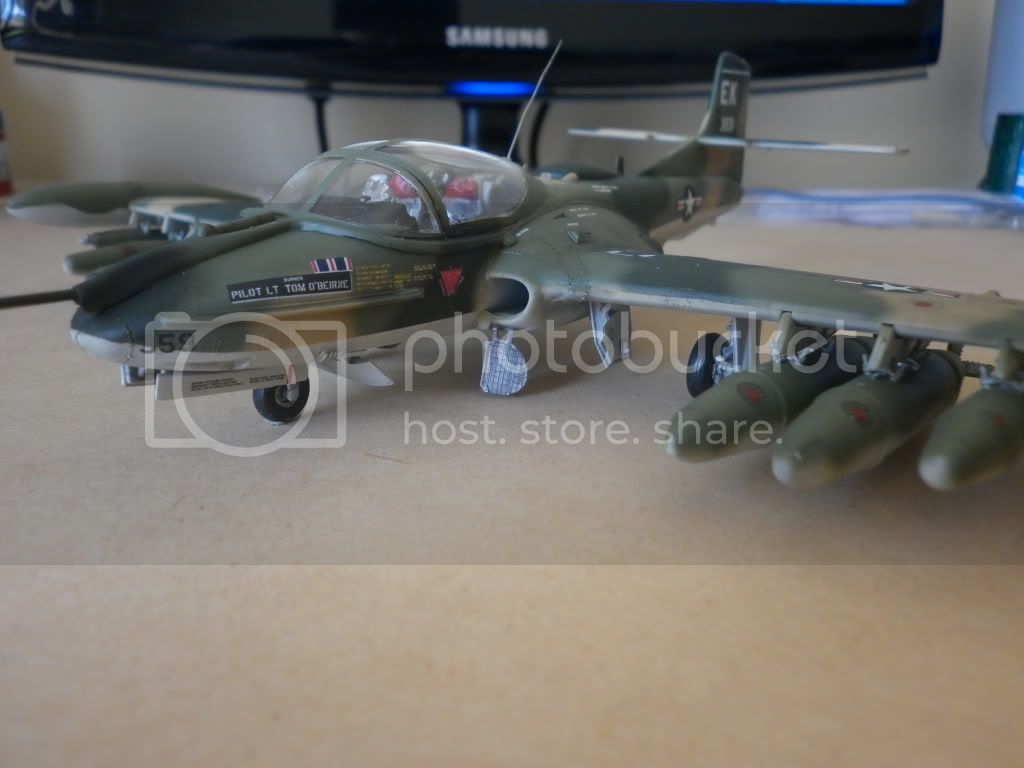
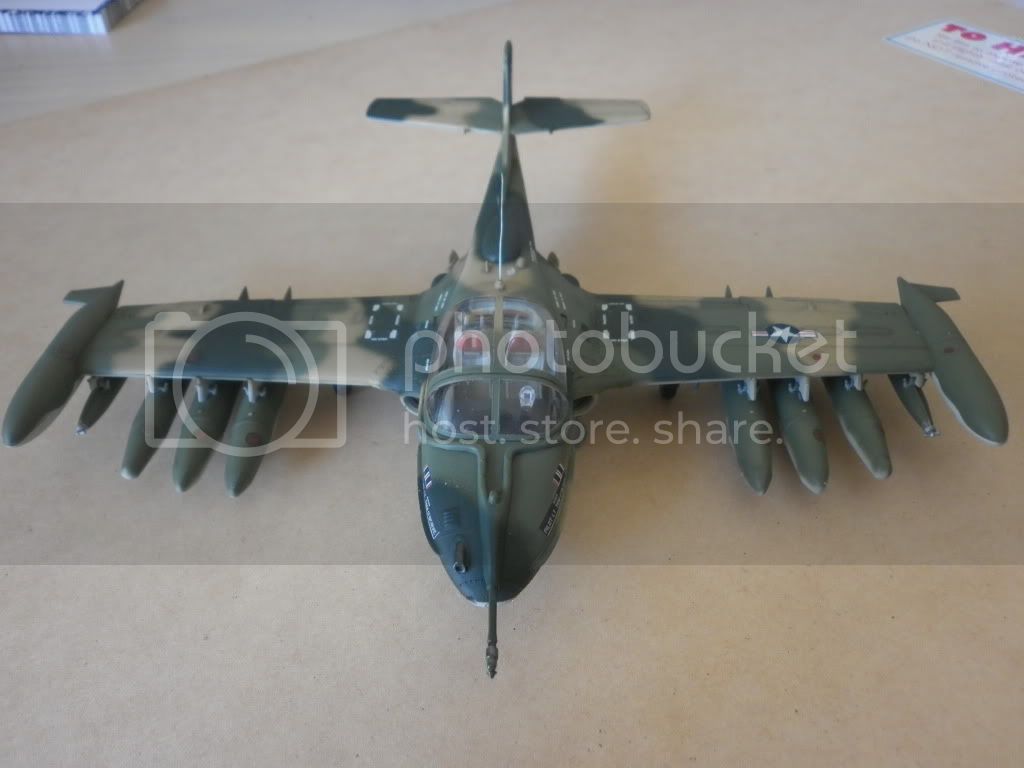
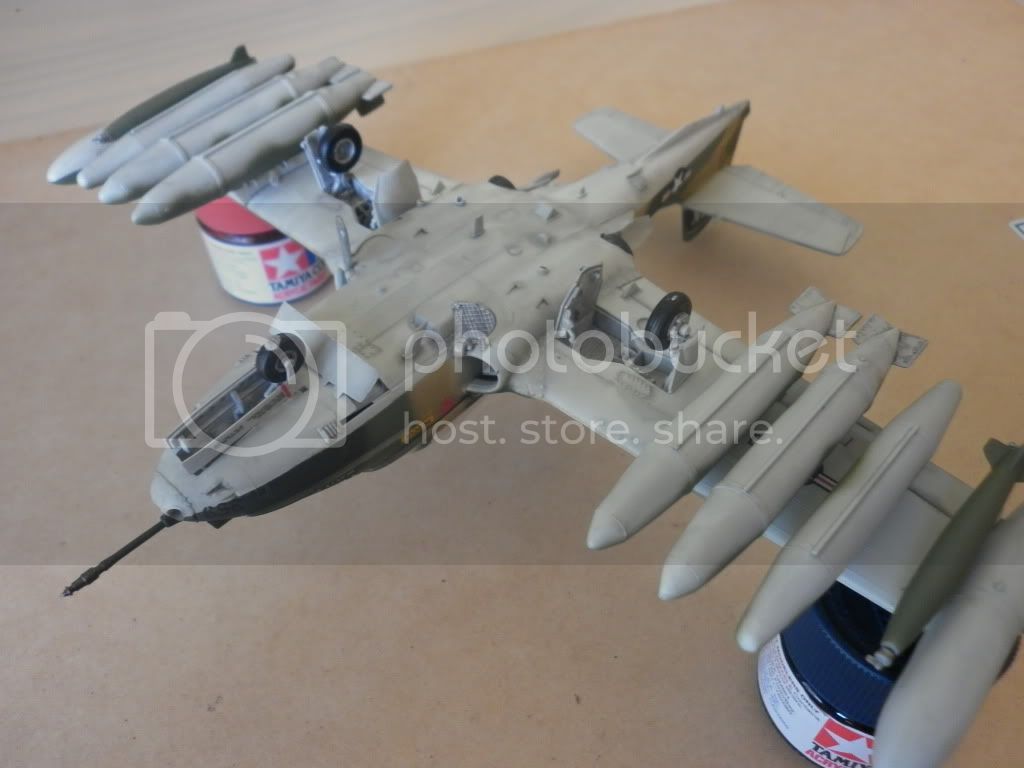
Progress report time, decals on, future on, arsenal painted and detailed . .
Once that's all dry the flat coat is going on, then the few bits and pieces put in place and a bit of light weathering.

Once that's all dry the flat coat is going on, then the few bits and pieces put in place and a bit of light weathering.

Keeperofsouls2099

Joined: January 14, 2009
KitMaker: 2,798 posts
AeroScale: 2,443 posts
Posted: Monday, November 01, 2010 - 12:33 PM UTC
Wow great builds guys sweet

AussieReg
#007
Joined: June 09, 2009
KitMaker: 8,156 posts
AeroScale: 3,756 posts
Posted: Monday, November 01, 2010 - 08:47 PM UTC
Getting really close now . . .


KrisMax
Joined: January 23, 2010
KitMaker: 156 posts
AeroScale: 139 posts
Posted: Monday, November 01, 2010 - 10:38 PM UTC
Leo & Damian,
Thanks for the advice guys, it's much appreciated. A light sanding smoothed things off so no great drama. I'm gonna change the thinner (I use enamels, so will try laquer thinner or tamiya enamel thinner) and take more care. I'll keep you posted.
Simon
Thanks for the advice guys, it's much appreciated. A light sanding smoothed things off so no great drama. I'm gonna change the thinner (I use enamels, so will try laquer thinner or tamiya enamel thinner) and take more care. I'll keep you posted.
Simon

JimMrr

Joined: January 03, 2007
KitMaker: 1,505 posts
AeroScale: 595 posts
Posted: Friday, November 05, 2010 - 12:42 PM UTC
Im making an apology to you guys here for not being as active in the thread as I feel i should have been. I was working a new construction job at my church here, after being unemployed for quite a while. After 2 months work, things have dried up here and Im basically kicking my can down the road once again. So,now I can look for a job, look after the thread, and not have to nurse my aching muscles at the end of the day... 


VonCuda
Joined: November 28, 2005
KitMaker: 2,216 posts
AeroScale: 1,080 posts
Posted: Friday, November 05, 2010 - 02:19 PM UTC
Working at your church is something I can totally respect Jim.
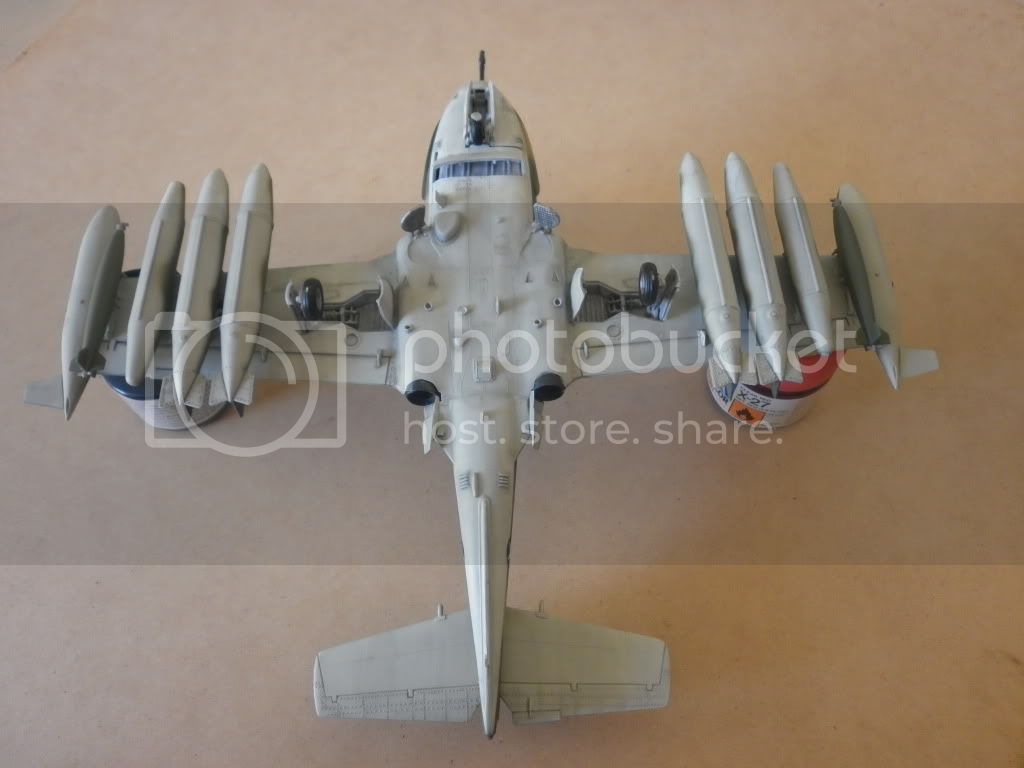
Anyhoo........I'm back at the workbench after a few months of football. I started my Tamiya A-10 and I'll post some pic's sometime this weekend. I was warned by some other members here (Joe & Justin) about this kit being a real dog.......and man, at first glance they were right. Raised panel lines, missing rivets and details, and the plastic is really funky. It's like dried out soap and cracks really easy.
Well, anyway it's good to be back in the saddle again and I'm looking forward to being a part of this campaign.
Hermon

Keeperofsouls2099
Joined: January 14, 2009
KitMaker: 2,798 posts
AeroScale: 2,443 posts
Posted: Friday, November 05, 2010 - 02:29 PM UTC
Cuda don't worry if you break anything I have the whole kit in the parts bin let me know I will send anything you need your way
eoinryan

Joined: April 30, 2010
KitMaker: 232 posts
AeroScale: 66 posts

Posted: Saturday, November 06, 2010 - 02:28 AM UTC
Simon,
Good to see your Sturmovik coming along! Good to see the camo scheme coming together.
I'm relatively new to the whole Airbrush world but a friend recommended using Blu-Tac to mask for camo schemes as you can get great unboken curved lines from it.
Eoin
VonCuda
Joined: November 28, 2005
KitMaker: 2,216 posts
AeroScale: 1,080 posts
Posted: Saturday, November 06, 2010 - 03:23 AM UTC
Justin, here's an idea. You build your Tamiya kit, sand/fill, sand/fill, sand/fill all of it and send it to me for painting. This way you'll get rid of a crappy kit and I'll have my CAS entry done all at the same time. 
Eoin, Blue-Tac is the way to go. Since I picked up that tip here on Aeroscale it's the only technique I ever use.....and the best part is that even when it gets paint on it it's still completely re-usable.
Hermon
Eoin, Blue-Tac is the way to go. Since I picked up that tip here on Aeroscale it's the only technique I ever use.....and the best part is that even when it gets paint on it it's still completely re-usable.
Hermon
Keeperofsouls2099
Joined: January 14, 2009
KitMaker: 2,798 posts
AeroScale: 2,443 posts
Posted: Saturday, November 06, 2010 - 07:40 AM UTC


VonCuda
Joined: November 28, 2005
KitMaker: 2,216 posts
AeroScale: 1,080 posts
Posted: Saturday, November 06, 2010 - 10:21 AM UTC
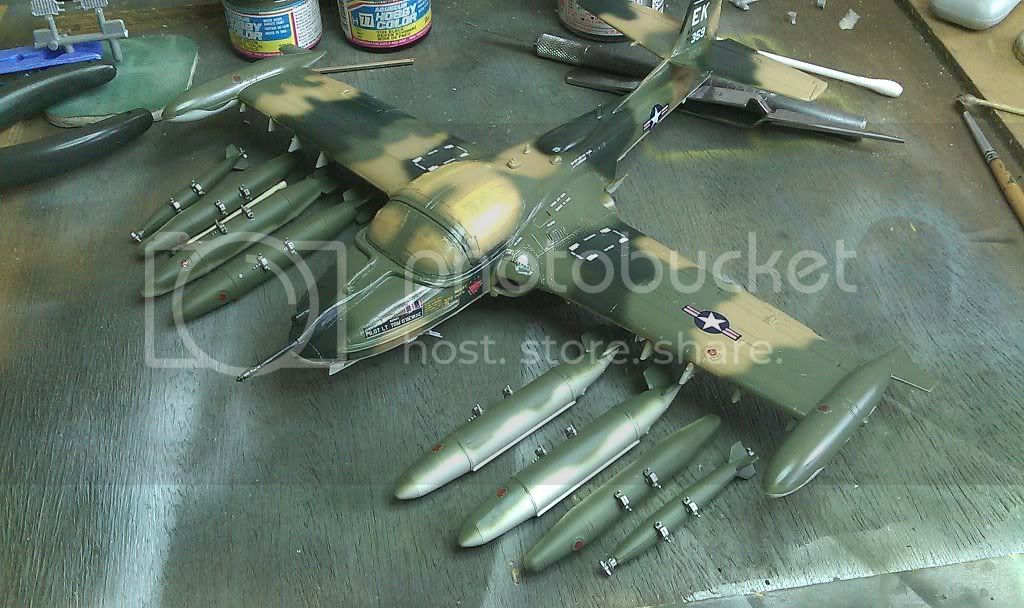
Five hours after I started, I have the fuselage together, cockpit done, and wings waiting to be sanded. I didn't bother with a cockpit photo since it's OOB and details are just decals.

After some dry test fitting I decided to include a total of six 9MM bullets and some CA glue to keep the hogs nose to the ground and her tail outta the mud.

There's gonna be many hours of sanding and filling on this turd so my next update pic may be a few days away.
Hermon
After some dry test fitting I decided to include a total of six 9MM bullets and some CA glue to keep the hogs nose to the ground and her tail outta the mud.
There's gonna be many hours of sanding and filling on this turd so my next update pic may be a few days away.
Hermon
eoinryan
Joined: April 30, 2010
KitMaker: 232 posts
AeroScale: 66 posts
Posted: Sunday, November 07, 2010 - 02:29 AM UTC
Hey VonCuda,
Pity about the ole gun-control legislation over here. The only folks who have 9mm's are cops and drug dealers... Could be an interesting defence in Court though!
Eoin
Rebilda
#057
Joined: May 11, 2010
KitMaker: 248 posts
AeroScale: 123 posts
Posted: Tuesday, November 09, 2010 - 03:12 AM UTC
Thanks all for the kind words, was real fun.
Hope you find a new job, soon, Jim. Freetime's nice but a man has to buy model supplies, right? So, crossing my fingers for you.
Hope you find a new job, soon, Jim. Freetime's nice but a man has to buy model supplies, right? So, crossing my fingers for you.
KrisMax
Joined: January 23, 2010
KitMaker: 156 posts
AeroScale: 139 posts
Posted: Tuesday, November 09, 2010 - 11:10 PM UTC
Quoted Text
Simon,
Good to see your Sturmovik coming along! Good to see the camo scheme coming together.
I'm relatively new to the whole Airbrush world but a friend recommended using Blu-Tac to mask for camo schemes as you can get great unboken curved lines from it.
Eoin
Thanks Eoin - I've now applied all three camo colours to the topside. Will post pics when I have done the underside. I followed Damian and Leo's advice
 and tried freehand camo spraying. Some touch ups to do but so far so good. Will you use blu-tac? Let us know how it goes.
Simon
eoinryan
Joined: April 30, 2010
KitMaker: 232 posts
AeroScale: 66 posts
Posted: Wednesday, November 10, 2010 - 08:15 AM UTC
Hi Simon,
I'm still spraying the underside of the Sturmovik- will take a few coats though (I'm using acryllics and think I'm thinning out the paint a bit too much). Will give the auld blu-tak a go and will let you know how I get on.
Eoin
I'm still spraying the underside of the Sturmovik- will take a few coats though (I'm using acryllics and think I'm thinning out the paint a bit too much). Will give the auld blu-tak a go and will let you know how I get on.
Eoin

Bigrip74
Joined: February 22, 2008
KitMaker: 5,026 posts
AeroScale: 2,811 posts

Posted: Wednesday, November 10, 2010 - 12:05 PM UTC
Hermon, what a waste of good stopping power. I thought that I would look in on this campaign and see if I might join in. I have a Hasegawa P-47 razorback in the stash.
Bob
Bob
AussieReg
#007
Joined: June 09, 2009
KitMaker: 8,156 posts
AeroScale: 3,756 posts
Posted: Wednesday, November 10, 2010 - 06:11 PM UTC
Well good folks I'm calling this one done. I've given it a pin wash and a dark filter and it looks ok to me.

And here's Dragonfly with its cousin Damselfly in matching outfits
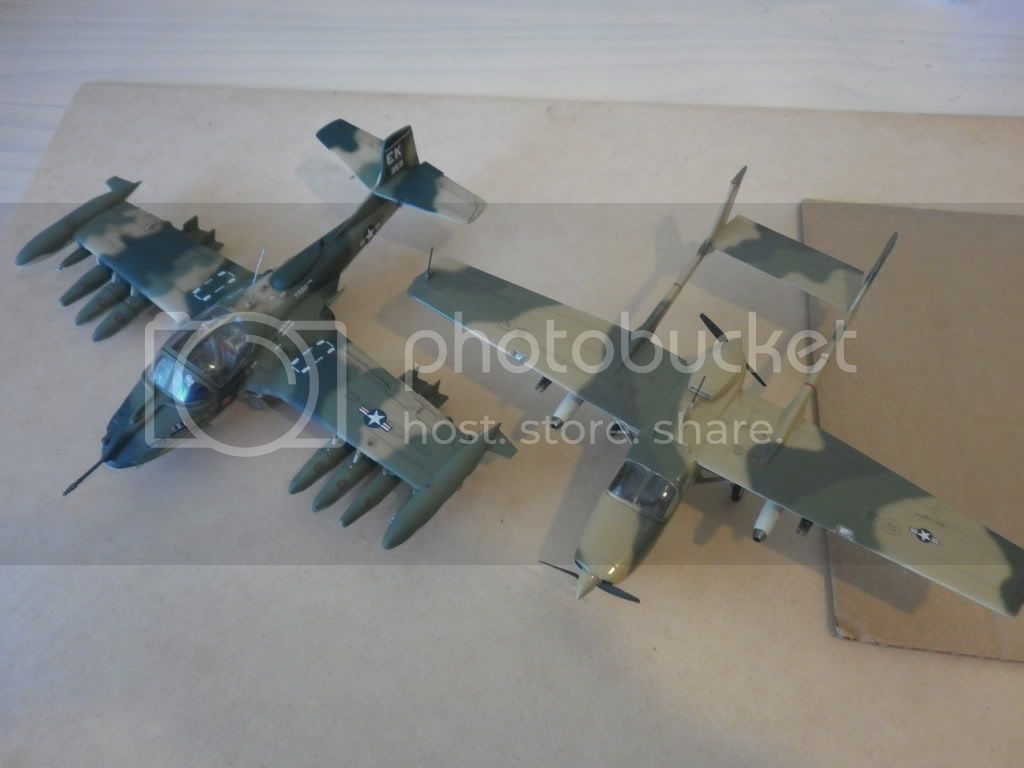
And Dragonfly with its evil cousin Darth Cessna
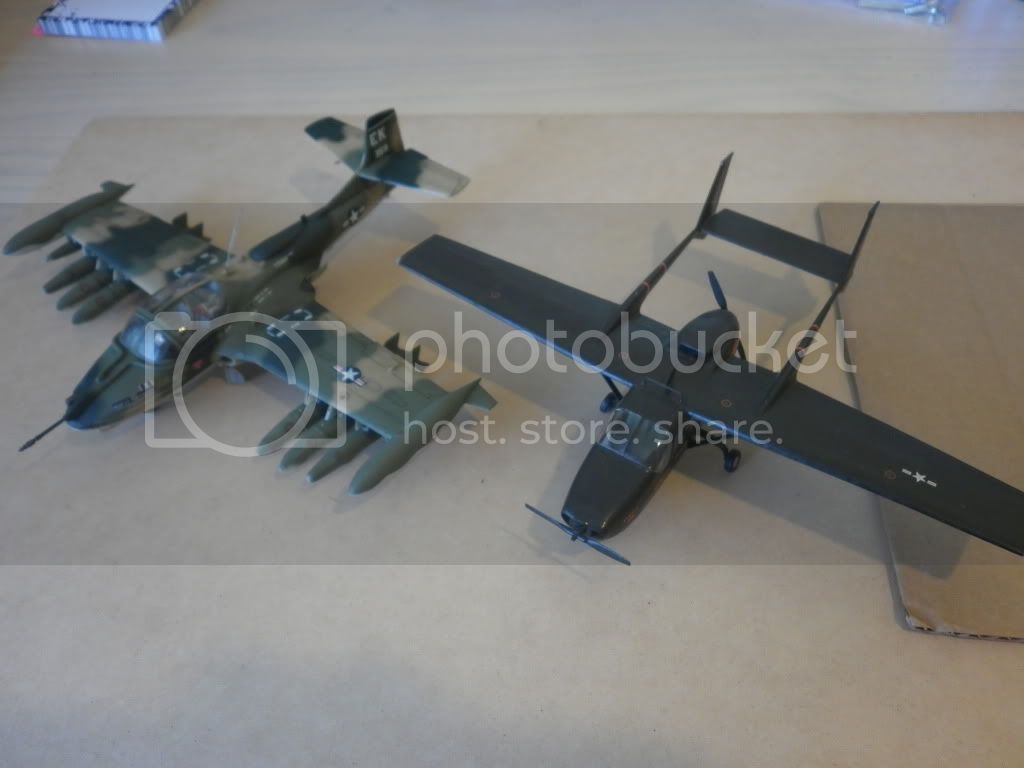
Cheers, D
And here's Dragonfly with its cousin Damselfly in matching outfits
And Dragonfly with its evil cousin Darth Cessna
Cheers, D
Bigrip74
Joined: February 22, 2008
KitMaker: 5,026 posts
AeroScale: 2,811 posts
Posted: Wednesday, November 10, 2010 - 07:11 PM UTC
Hey D. that is a nice set of Cessna's you have there. The At 37 has been a favorite of mine.
Bob
Bob
Bigrip74
Joined: February 22, 2008
KitMaker: 5,026 posts
AeroScale: 2,811 posts
Posted: Wednesday, November 10, 2010 - 09:09 PM UTC
Up late and board so I played with my first Hasegawa P-47. I am not sure I like the way the wing attaches to the fuselage. Any tips?


Bob


Bob
AussieReg
#007
Joined: June 09, 2009
KitMaker: 8,156 posts
AeroScale: 3,756 posts
Posted: Wednesday, November 10, 2010 - 09:53 PM UTC
Hey Rip, sorry to be the bearer of bad tidings, but fighter-bombers are not allowed in this campaign. If you check a bit earlier in the thread there was much discussion, but purpose designed CAS aircraft only allowed.
Sorrymate
Sorrymate
KrisMax
Joined: January 23, 2010
KitMaker: 156 posts
AeroScale: 139 posts
Posted: Wednesday, November 10, 2010 - 10:12 PM UTC
looks bl**dy good to me, Damian.
 |

WEB HOSTING BY


Copyright ©2021 AeroScale and Kitmaker Network, a subsidiary of Silver Star Enterprises
All Rights Reserved. Please read our Conditions of Use and Privacy Policy.
All Rights Reserved. Please read our Conditions of Use and Privacy Policy.