

Great job on the camo Simon, it came out really well.
When I brush apply 'Future" ( I use Pledge One-Go from Coles) I make sure I wipe most of it off the brush on the side of the cup first. It goes a REALLY long way and it may be that you have your brush overloaded if you're getting streaking. Airbrushing it neat on low pressure works really well, clean up with Windex straight away though. I have also recently tried adding a drop or two of artists water colour to the future and it is like combining a clear coat and panel wash at one time.
Cheers, D
Air Campaigns
Want to start or join a group build? This is where to start.
Want to start or join a group build? This is where to start.
Hosted by Frederick Boucher, Michael Satin
OFFICIAL: CAS (Close Air Support)

AussieReg

#007

Joined: June 09, 2009
KitMaker: 8,156 posts
AeroScale: 3,756 posts
Posted: Thursday, November 25, 2010 - 10:19 PM UTC


KrisMax
Joined: January 23, 2010
KitMaker: 156 posts
AeroScale: 139 posts
Posted: Friday, November 26, 2010 - 12:12 AM UTC
Thanks again Damian.
Yes, I put too much on to start with and tried to smooth things out by putting more coats on! I've even filled the panel lines so the wash isn't staying in.DOH.
I think it'll be ok with the dull coat applied so I'm happy to continue.
Simon
Yes, I put too much on to start with and tried to smooth things out by putting more coats on!
I've even filled the panel lines so the wash isn't staying in.DOH.I think it'll be ok with the dull coat applied so I'm happy to continue.
Simon

lawlzw

Joined: April 05, 2009
KitMaker: 120 posts
AeroScale: 26 posts

Posted: Monday, November 29, 2010 - 03:26 PM UTC
Those are some really great builds gentlemen...
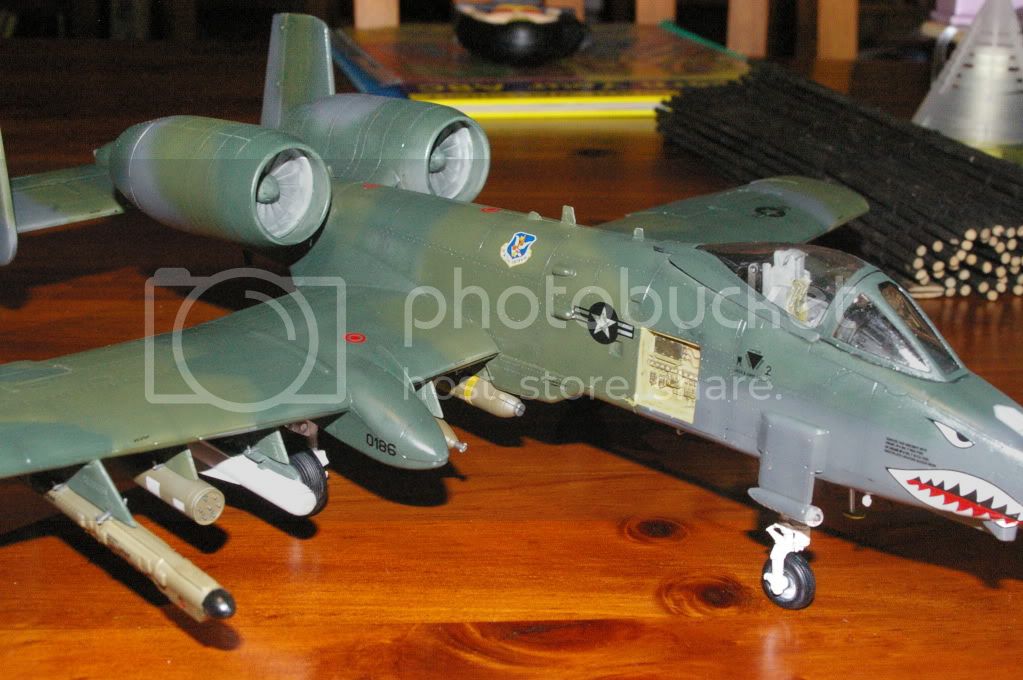
Here's my progress... yeah its another A-10A

The kit is from Academy, and I used gunze's dark and light ghost grey for the camo colours.
Cheers!
Here's my progress... yeah its another A-10A
The kit is from Academy, and I used gunze's dark and light ghost grey for the camo colours.
Cheers!

JackFlash

Joined: January 25, 2004
KitMaker: 11,669 posts
AeroScale: 11,011 posts
Posted: Monday, November 29, 2010 - 04:02 PM UTC
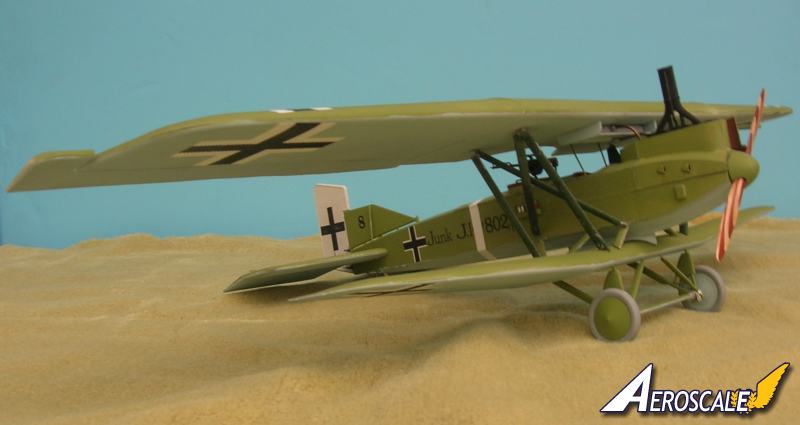
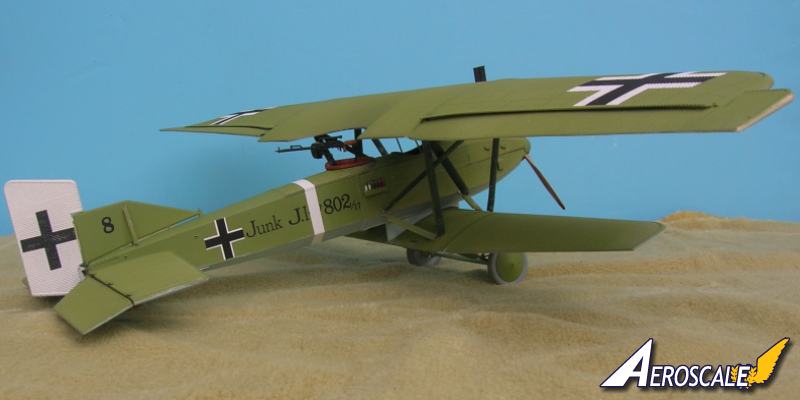
Now if you want something a bit different in CAS here's a history lesson for you.
Nicknamed the flying tank or the moving van, the Junkers J.I was the A-10 Thunderbolt of its day, designed to attack enemy ground targets while remaining impervious to ground fire. Despite being heavy, relatively slow and requiring a long take off and landing area, the J.I was popular with its crews due to the protection provided by its armoured front section and all metal airframe. . ."
Junkers J.I kit review
J.I Build thread
Here is my build from the WNW GB 2009 - 10. I am not signed up for the CAS campaign (yet) and this is just for your collective inspiration.
JackFlash
Joined: January 25, 2004
KitMaker: 11,669 posts
AeroScale: 11,011 posts
Posted: Monday, November 29, 2010 - 04:07 PM UTC
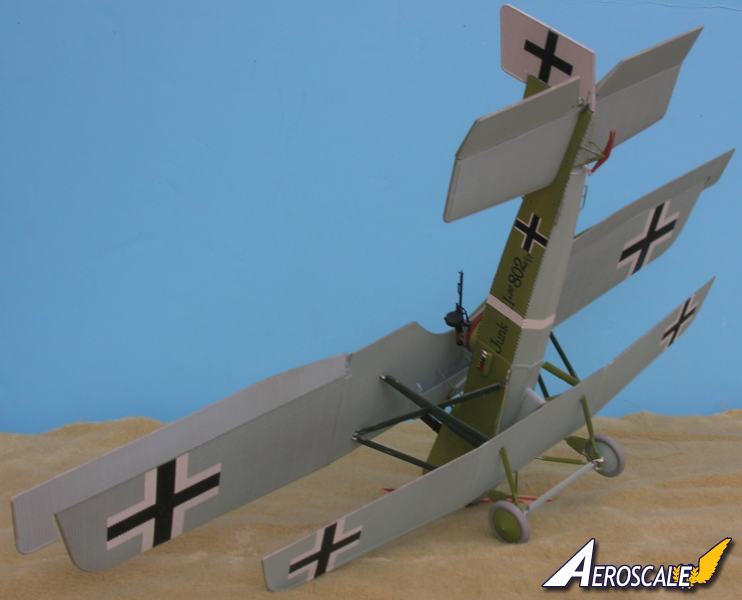
Now for real close air support. . .I just hope that WNW brings out the twin parabellum set up in their super kits. The gun mounts are in the rear cockpit near the floor with the barrels of the Parabellums sticking out through holes cut the rear cockpit flooring area. There is also a framework for stacking the ammo drums.
Essentially this is one of the first trench strafing gunships. Images here are from the WNW site and were taken by Giorgio Dorat. They show the rear cockpit of the Junkers J.I in Milan.
.jpg)
.jpg)
The divider wall between the front and rear cockpit has been removed to accomidate the twin parabellum installation. At this angle they would have cut holes in the lower wing to clear action for the MG barrels and fretted gun jackets.
". . .This application of the term for military aircraft is more specific, describing an aircraft that circles its target instead of performing strafing runs. Such aircraft have their armament on one side harmonized to fire at the apex of an imaginary cone formed by the aircraft and the ground when performing a banking turn. . . Such gunships with an operational profile that relies on flying in circles can only operate with the guarantee of air superiority. . . "
Essentially this is one of the first trench strafing gunships. Images here are from the WNW site and were taken by Giorgio Dorat. They show the rear cockpit of the Junkers J.I in Milan.
The divider wall between the front and rear cockpit has been removed to accomidate the twin parabellum installation. At this angle they would have cut holes in the lower wing to clear action for the MG barrels and fretted gun jackets.
". . .This application of the term for military aircraft is more specific, describing an aircraft that circles its target instead of performing strafing runs. Such aircraft have their armament on one side harmonized to fire at the apex of an imaginary cone formed by the aircraft and the ground when performing a banking turn. . . Such gunships with an operational profile that relies on flying in circles can only operate with the guarantee of air superiority. . . "
SGTJKJ
#041

Joined: July 20, 2006
KitMaker: 10,069 posts
AeroScale: 3,788 posts

Posted: Friday, December 03, 2010 - 02:21 AM UTC
Thanks for the inspiration, Stephen. A beautiful build and an interesting little history lesson. 
Thanks for sharing.
Thanks for sharing.


JimMrr

Joined: January 03, 2007
KitMaker: 1,505 posts
AeroScale: 595 posts
Posted: Friday, December 03, 2010 - 01:14 PM UTC
Thanks Stephen, I think the Junkers J1 is such a cool looking aircraft..


vonHengest
Joined: June 29, 2010
KitMaker: 5,854 posts
AeroScale: 372 posts

Posted: Sunday, December 05, 2010 - 04:14 PM UTC
I may end of foregoing the Stuka in favor of a IL-2 a buddy wants my to build with skis and winter camo, I'll let you guys know when I make the final decision.
Stephen: Thanks for dropping by with pics of your Junkers, that's a very cool project you have going on there.
Stephen: Thanks for dropping by with pics of your Junkers, that's a very cool project you have going on there.

warreni
Joined: August 14, 2007
KitMaker: 5,926 posts
AeroScale: 2,201 posts

Posted: Saturday, December 11, 2010 - 09:29 AM UTC
Now I am REEEEEALLY sorry to do this but I am going to ask a curly one again...
The Polikarpov Po-2 was used throughout the campaign on the Eastern Front as a close support aircraft even though it was designed as a trainer/agricultural aircraft. Does having carried out many many thousands of CAS missions during the war, and during the Korean war I believe, qualify this little plane for the campaign?

The Polikarpov Po-2 was used throughout the campaign on the Eastern Front as a close support aircraft even though it was designed as a trainer/agricultural aircraft. Does having carried out many many thousands of CAS missions during the war, and during the Korean war I believe, qualify this little plane for the campaign?
emroglan

Joined: December 16, 2004
KitMaker: 1,163 posts
AeroScale: 255 posts

Posted: Sunday, December 12, 2010 - 01:55 AM UTC
Hello all!
I have just started building two A-1H Skyraiders here:
http://aeroscale.kitmaker.net/forums/168412&page=1
If Skyraiders are eligible, I'll like to enter this campaign with one or both of them.
I have just started building two A-1H Skyraiders here:
http://aeroscale.kitmaker.net/forums/168412&page=1
If Skyraiders are eligible, I'll like to enter this campaign with one or both of them.
KrisMax
Joined: January 23, 2010
KitMaker: 156 posts
AeroScale: 139 posts
Posted: Monday, December 20, 2010 - 11:16 PM UTC
Well, I've finished the Il-2 and the new camera arrived today. Just got to get a US plug adaptor to charge the battery and a memory card. Then I'll post some pics.
Cheers
Simon
Cheers
Simon
JimMrr
Joined: January 03, 2007
KitMaker: 1,505 posts
AeroScale: 595 posts
Posted: Tuesday, December 21, 2010 - 11:58 AM UTC
Im trying to figure out how to create a gallery for the pics of all the great work everyone is doing!..sorry to be taking long on this, but im no computer whiz! 

werx07
Joined: February 21, 2010
KitMaker: 26 posts
AeroScale: 24 posts
Posted: Thursday, December 23, 2010 - 01:36 PM UTC
I'll be doing these two. They're pretty simple little kits, I'll probably just sand the raised panel lines and re-scribe them.


eoinryan

Joined: April 30, 2010
KitMaker: 232 posts
AeroScale: 66 posts

Posted: Saturday, December 25, 2010 - 12:49 PM UTC
Hi folks,
Loving the work on the aul A10s!
My pc was in the computer hospital for a while so here are a few updates:
Eoin
Loving the work on the aul A10s!
My pc was in the computer hospital for a while so here are a few updates:
Eoin
eoinryan
Joined: April 30, 2010
KitMaker: 232 posts
AeroScale: 66 posts
Posted: Saturday, December 25, 2010 - 12:53 PM UTC
Masked and pre-shading all done1
Looking good so far, what could possibly go wrong???
Looking good so far, what could possibly go wrong???
warreni
Joined: August 14, 2007
KitMaker: 5,926 posts
AeroScale: 2,201 posts
Posted: Saturday, December 25, 2010 - 01:40 PM UTC
I wouldn't say that if I was you..
I thought that with my Academy AH-1W and the decals ended up being too difficult to apply. I ended up paintint the snakes down each side. Should have the finished product up here by this evening.. What could go wrong!
I thought that with my Academy AH-1W and the decals ended up being too difficult to apply. I ended up paintint the snakes down each side. Should have the finished product up here by this evening.. What could go wrong!
eoinryan
Joined: April 30, 2010
KitMaker: 232 posts
AeroScale: 66 posts
Posted: Sunday, December 26, 2010 - 04:27 AM UTC
What could possibly go wrong?
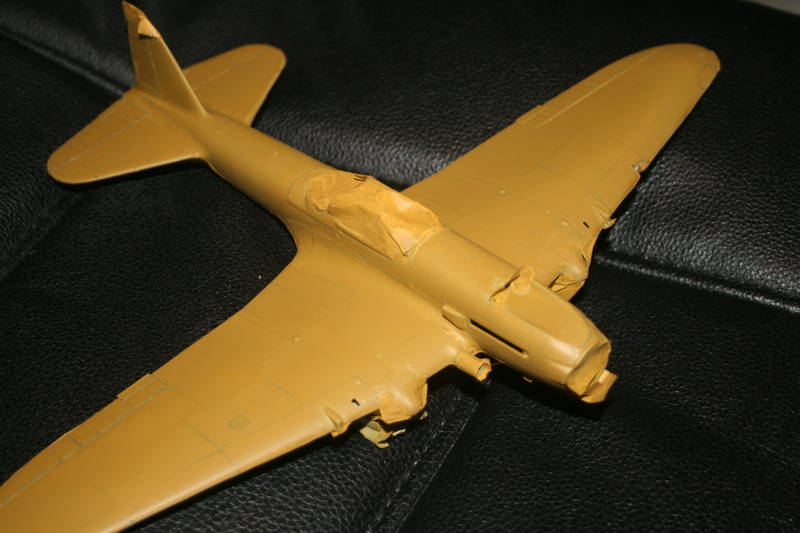
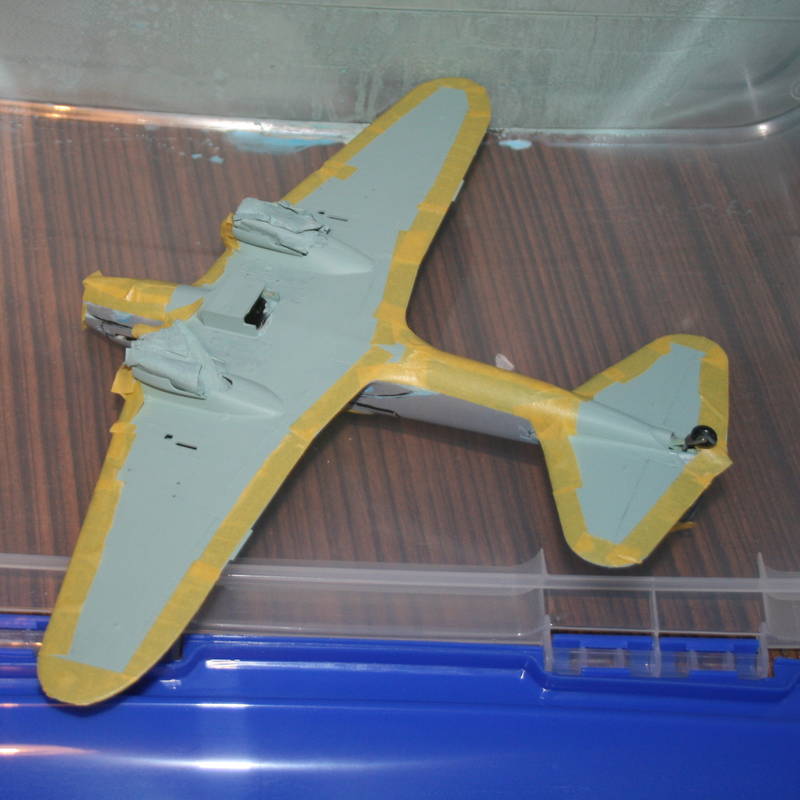
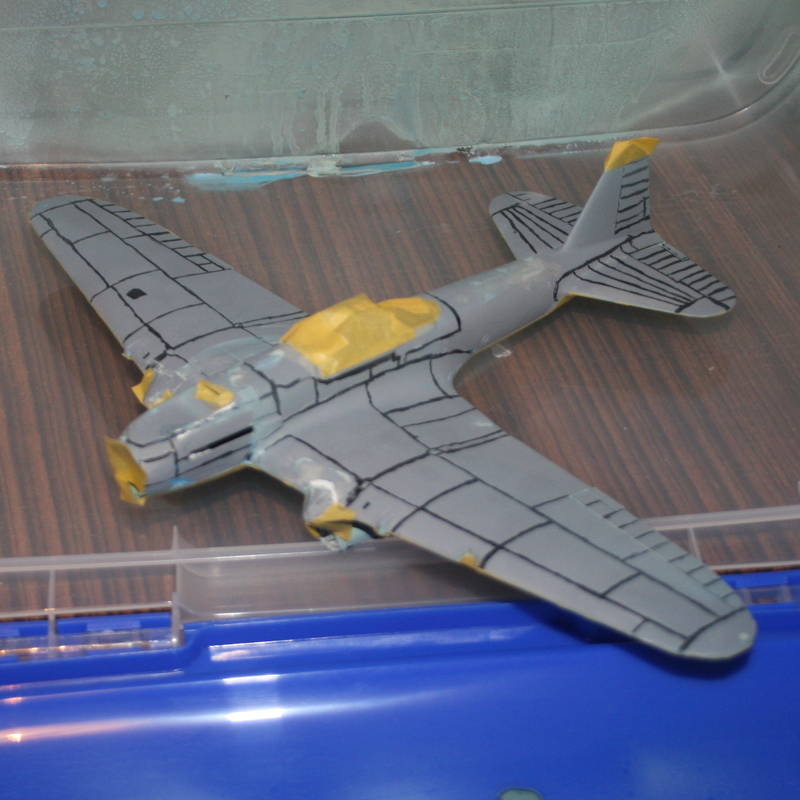
Okay... I got a coat or two of tan on poifect, next job is to mask it for the camo job.
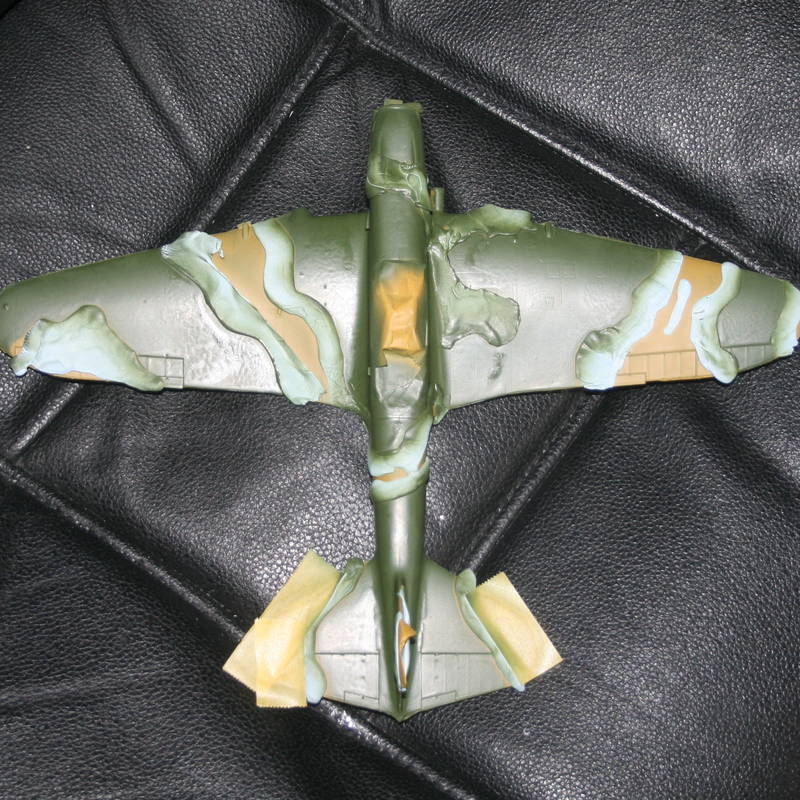
Used the Blu-Tac trick. When it worked, the lines came out great, but I'm a stingy b*****d and I try to strech out as much blu-tac as I have left instead of going to the shop and buying more for 2euro...
D'oh!
I made a litany on mistakes that you can sum up by calling 'Lazy Painter Syndrome'
Okay, okay, I'm just getting used to the airbrush but thats a lame excuse.
Mistake 1: I tried to make the Blu-Tac stretch. All that did was, especially on the wings, was lift and excess paint dribbled in there.
Mistake 2: I didn't mask ALL the areas on the model. As you can see, the paint vapours landed on unmasked parts and you can clearly see the difference in the masked places and exposed places.
Mistake 3: The worst offence for a lazy painter: I didn't take the masks off after every coat. I was lazy again and kept them on for a few days. If I did remove the masks, I would have spotted the problems earlier and they would have been easier to sort out.
Because I left the masks on for several days, the adhesive in the Blu-Tac soaked into the masked paint and stained it. Also on the wings (especially on the left one), there was a build-up of paint by the Blu-Tac and every time I put on another coat, this built up and formed ridges. They look really bad so a friend is getting me some wet and dry to try and sand them down.
Anywho folks hope you avoid these mistakes in the future!
Eoin
PS Simon,
Do you have any pics of your finished IL2??
Eoin
warreni
Joined: August 14, 2007
KitMaker: 5,926 posts
AeroScale: 2,201 posts
Posted: Sunday, December 26, 2010 - 07:35 AM UTC
What type of paint did you use Sir? No need to go to the wet and dry and lose detail. There are many other paint removal methods that will save all that detail for you. I am an even stingier bastard than you and never use blu-tack for masking, just paper.. Works goodly everytime..
KrisMax
Joined: January 23, 2010
KitMaker: 156 posts
AeroScale: 139 posts
Posted: Sunday, December 26, 2010 - 01:00 PM UTC
Eoin,
Sympathy my friend, I know how it feels. My first session with the airbrush included tipping half the contents of the paint cup straight onto the model!!!
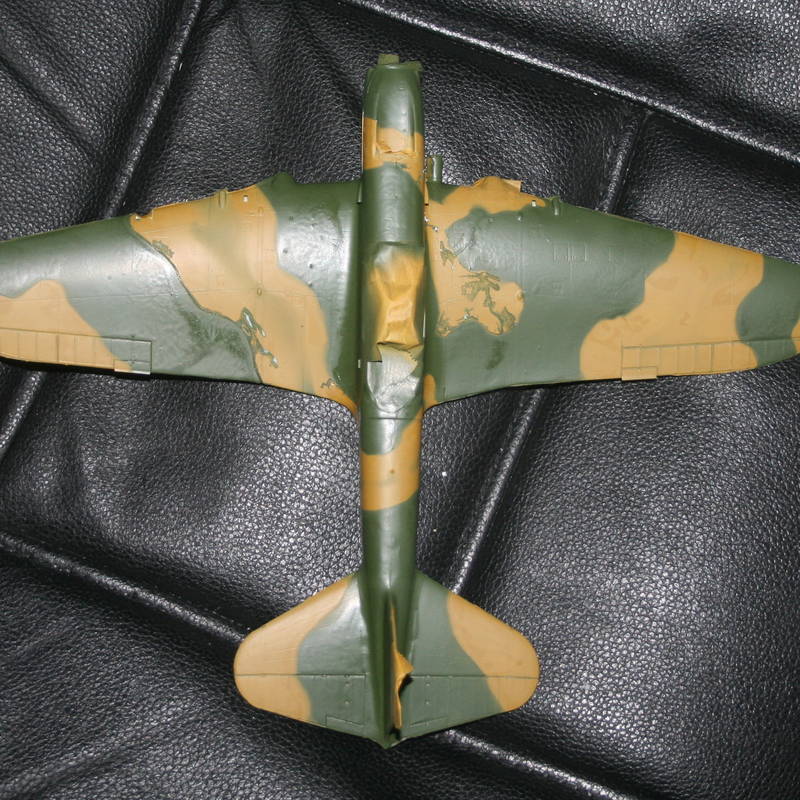
25 models late and I'm still learning. On the Il-2 I've had trouble with the clear coats. I put too much Future on (first time I used it) and the matt coat fogged - probably due to the warm/humid Queensland summer. The end result is ok and I've learned a couple of good lessons.
Here's the finished article.


Cheers
Simon
Sympathy my friend, I know how it feels. My first session with the airbrush included tipping half the contents of the paint cup straight onto the model!!!
25 models late and I'm still learning. On the Il-2 I've had trouble with the clear coats. I put too much Future on (first time I used it) and the matt coat fogged - probably due to the warm/humid Queensland summer. The end result is ok and I've learned a couple of good lessons.
Here's the finished article.
Cheers
Simon
warreni
Joined: August 14, 2007
KitMaker: 5,926 posts
AeroScale: 2,201 posts
Posted: Sunday, December 26, 2010 - 02:09 PM UTC
It has indeed been very humid here in sunny, sorry, rainy Queensland. But I am still on course to finish a few models soon. Just starting out with an airbrush is always a fraught time.
eoinryan
Joined: April 30, 2010
KitMaker: 232 posts
AeroScale: 66 posts
Posted: Monday, December 27, 2010 - 02:45 AM UTC
Hey Simon,
Your Sturmovik looks fantastic. Excellent finishing. I like your decals, did they go on okay? I've obviously got a different colour scheme so it will be interesting to compare when I'm done.
@ Warren- I used Vallejo Model Air. I don't think it was the paint's fault. Me putting the airbrush up to full pressure and spraying it an inch from the model didn't help!
Any tips on cleaning it up would be gratefully received!
Eoin
Matty_K

Joined: January 31, 2010
KitMaker: 103 posts
AeroScale: 71 posts
Posted: Monday, December 27, 2010 - 04:45 AM UTC
Hi Eoin,
For removing paint of almost any kind I use Mr. Thinner - works like a charm and does no harm to the plastic. It even removes very old colour coats.
The airbrush setting used seems to be not very helpful indeed:
As a starting point I would try painting at lower pressure with increased distance and rectangular to the surface. Otherwise the airbrush shoots paint into every gap (or even creates gaps) like a high-pressure cleaner.
All the best.
Cheers
Matty
warreni
Joined: August 14, 2007
KitMaker: 5,926 posts
AeroScale: 2,201 posts
Posted: Monday, December 27, 2010 - 11:31 AM UTC
Greetings one and all from wet and rainy Queensland.. drizzling one moment, pouring the next..
Well, I am calling this AH-1W finished. Due to a decal problem it took quite a bit longer than it would have. I had to hand paint the snake on the side of the chopper. Photocopy the decal sheet, print it out, make sure it is the right size, then cut out the bits you don't want masked. Then I had to go back and do the eyes.
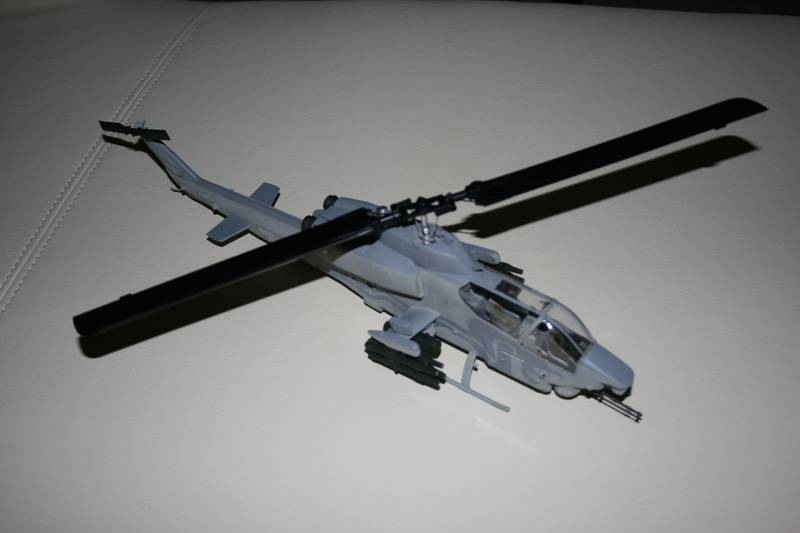

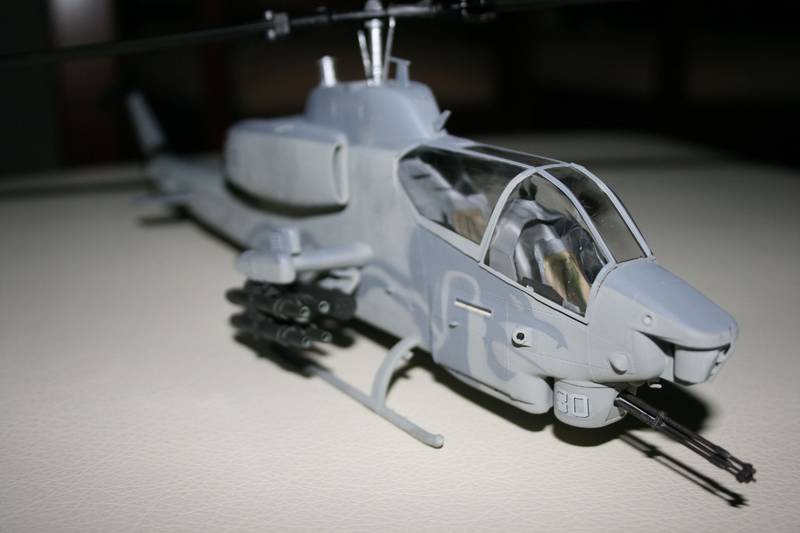
I have a funny feeling that this aircraft did little more than sit around looking pretty while it had this colour scheme as I couldn't actually find any photos of it on the www. Plus you wouldn't really operate a helicopter in any serious areas with most of the stencils covered by a paint scheme and no national markings.
Nice short, sharp campaign!
Keep up the good work guys and gals/
Warren
Well, I am calling this AH-1W finished. Due to a decal problem it took quite a bit longer than it would have. I had to hand paint the snake on the side of the chopper. Photocopy the decal sheet, print it out, make sure it is the right size, then cut out the bits you don't want masked. Then I had to go back and do the eyes.
I have a funny feeling that this aircraft did little more than sit around looking pretty while it had this colour scheme as I couldn't actually find any photos of it on the www. Plus you wouldn't really operate a helicopter in any serious areas with most of the stencils covered by a paint scheme and no national markings.
Nice short, sharp campaign!
Keep up the good work guys and gals/
Warren
KrisMax
Joined: January 23, 2010
KitMaker: 156 posts
AeroScale: 139 posts
Posted: Monday, December 27, 2010 - 10:15 PM UTC
Quoted Text
Hey Simon,
Your Sturmovik looks fantastic. Excellent finishing. I like your decals, did they go on okay? I've obviously got a different colour scheme so it will be interesting to compare when I'm done.
@ Warren- I used Vallejo Model Air. I don't think it was the paint's fault. Me putting the airbrush up to full pressure and spraying it an inch from the model didn't help!
Any tips on cleaning it up would be gratefully received!
Eoin
Eoin,
Thanks for the kind words. I really enjoyed building and painting this excellent kit. The decals went on very well, they're the best of any model I've completed so far. As I said before, this was the first time I used a Future type gloss coat, so I'm sure that played a part. There is not the slightest hint of silvering anywhere.
I recently changed to a double action airbrush (previously only used single action). To familiarise myself to it I spent a couple of hours spraying at different air pressures and with different paint:thinner ratios onto used plastic drink bottles. I soon got a feel for the best set up for my a/b, paint, etc.
Yes, I will keep an eye on this campaign as I want to see what markings you have for you Sturm. Mine is from the Leningrad Front, Summer 1944 and the city skyline on the sides is Leningrad. The inscription means Avenge for Khristenko, a recently fallen comrade.
Cheers
Simon

vonHengest
Joined: June 29, 2010
KitMaker: 5,854 posts
AeroScale: 372 posts
Posted: Tuesday, December 28, 2010 - 01:55 PM UTC
Quoted Text
Looking good Hermon, very nice!
You actually inspired me a little to do some more to my A-10. Just needs a little weathering and I'm done.


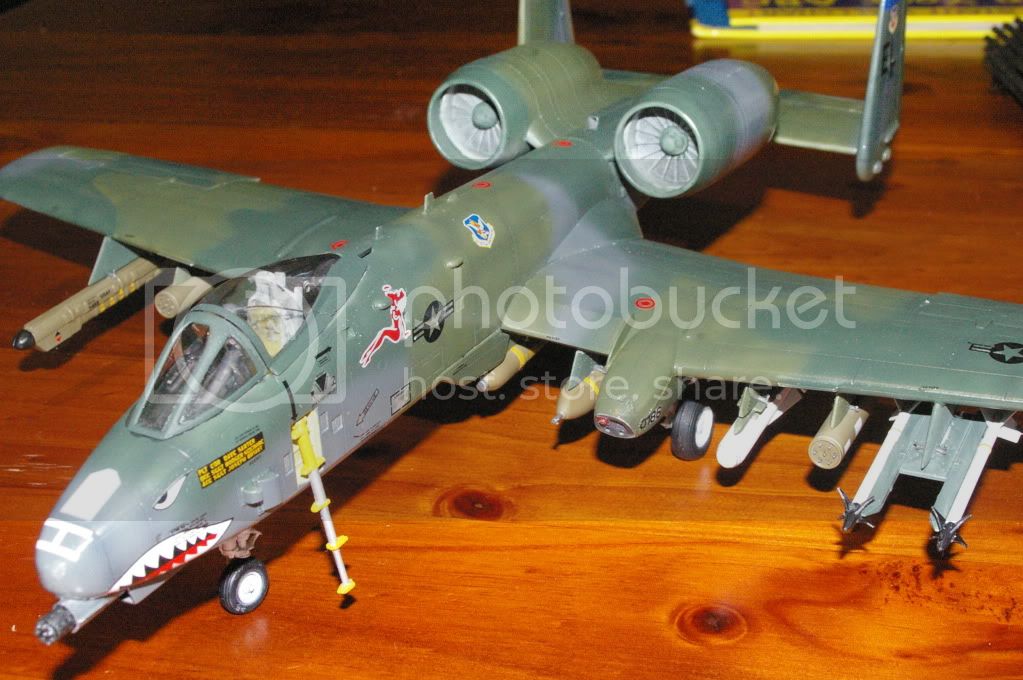
Any and all comments welcomed
That's a great looking build you have there, what decal set did you use?
 |

WEB HOSTING BY


Copyright ©2021 AeroScale and Kitmaker Network, a subsidiary of Silver Star Enterprises
All Rights Reserved. Please read our Conditions of Use and Privacy Policy.
All Rights Reserved. Please read our Conditions of Use and Privacy Policy.